2016 MERCEDES-BENZ G-CLASS SUV reset
[x] Cancel search: resetPage 20 of 261
Towin
geye
Front .............................................. 230
Rear .............................................. .230
Traffic reports
Overview lis t.................................. 188
Showing on the map ...................... 188
Switching on/of f........................... 196
Trailer
7-pi nconnecto r............................. 130
Power supply ................................. 129
Trailer coupling
see Towing atrailer
Trailer loads
Technica ldata. .............................. 256
Trailer towing
Cleaning the traile rtow hitch ......... 220
Coupling up atraile r...................... 129
Decoupling atraile r....................... 129
Driving tip s.................................... 128
ESP ®
................................................ 55
Important safety notes .................. 127
Lights display message .................. 145
Shift rang e..................................... 104
Trailer load s................................... 256
Transfer case
Genera lnotes ................................ 124
Shift rang e..................................... 124
Shifting .......................................... 124
Shifting (general notes ).................. 124
Shifting (important safety notes )... 124
Shifting to neutral .......................... 125
Switching off the off-road gear
rati o............................................... 124
Switching on the off-road gear
rati o............................................... 124
Transmission
see Automati ctransmission
Transmissio npositions .................... 103
Transport (vehicle) ............................ 231
Travellin guphill
Brow of hill ..................................... 122
Trim piece s(clea ning instruc-
tions) .................................................. 220
Trip computer (on-board com-
puter) .................................................. 134
Trip meter
Calling up ....................................... 133 Reset
ting(on-boar dcom puter) ...... 134
Turn signal lamp
Replacin gbulbs (rear) ...................... 80
Turn signals
Replacin gbulbs (front) .................... .80
Switching on/of f.............................. 76
Two-wa yradio
Frequencie s................................... 248
Installation ..................................... 248
Transmission outpu t(maximum) .... 248
Type identificatio nplate
see Vehicl eide ntification plate
Tyre pressure
Calling up (on-board computer) ..... 239
Displa ymessage ............................ 150
Recommended ............................... 238
Tyre pressure monitor
Checking the tyre pressure elec-
tronically ........................................ 240
Function/note s............................. 239
Genera lnotes ................................ 239
Important safety notes .................. 240
Radi otypea pproval for the tyre
pressure monitor ........................... 241
Restarting ...................................... 241
Warning lamp ................................. 164
Warning message .......................... 240
Tyres
Changing awheel .......................... 243
Checking ........................................ 235
Directio nofrotation ...................... 243
Displa ymessage ............................ 150
Important safety notes .................. 235
Information on driving .................... 235
Replacing ....................................... 243
Service life ..................................... 236
Snow chains .................................. 237
Storing ........................................... 243
Summer tyre sinwinter ................. 237
Tyre size (data ).............................. 246
Tyre trea d...................................... 236
Wheel and tyre combinations ........ 246
see Fla ttyre U
Unlade nweight .................................2 54 Index
17
Page 26 of 261
Heilbronne
rStraße 30 —74363 Güglingen Diagnos
tics connection
The diagnostic sconnectio nisused fo rconnect-
in gd iagnostic equipmen tataqualified special-
ist workshop. G
WARNING
If yo uconnect equipment to adiagnostics
connection in the vehicle, it may affect the
operation of vehicl esystems .Asaresult, the
operating safety of the vehicl ecouldbea ffec-
ted. There is arisk of an accident.
Only connect equipment to adiagnostics con-
nection in the vehicle, which is approved for
yourv ehiclebyM ercedes-Benz. G
WARNING
Objects in the driver's footwel lcan impede
peda ltravel or block apeda lwhich is
depressed. This jeopardise ssafe operation of
the vehicle. There is arisk of an accident.
Stow all objects in the vehicl esafely, so that
they cannot reach the driver's footwell. Make sure the floormats and carpets are properly
secure dsothat they cannot slip and obstruct
the pedals. Do not lay severa lfloormats or
carpets on top of one another.
! If the engine is switched off and equipment
on the diagnostics connection is used ,the
starter battery may discharge.
Connecting equipment to the diagnostics con-
nection can leadtoe missions monitoring infor-
mation being reset, for example. This may lead
to the vehicl efailing to meet the requirements of
the next emissions test during the main inspec-
tion. Qualifieds
pecialist workshop
Aq ualified specialist workshop has the neces-
sary special skills, tools and qualifications to
correctly carry out any necessary work on your
vehicle. This particularly applies to work rele-
vant to safety. Alwaysh
avet he following work carrie doutat a
qualified specialist workshop:
R work relevant to safety
R service and maintenance work
R repai rwork
R modifications, installations and conversions
R work on electronic components
Mercedes-Benz recommends tha tyou usea
Mercedes-Benz Service Centre. Vehicl
eregistration
Mercedes-Benz ma yask its Service Centres to
carry ou ttechnical inspections on certain vehi-
cles. The quality or safety of the vehicl eis
improve dasaresultoft he inspection.
Mercedes-Benz can inform yo uabout vehicle
inspections onl yifithasyour registration data.
It is possibl ethaty ou rv ehicl ehasnot ye tbeen
registere dinyourn am eint he following cases:
R if your vehicl ewasnot purchased at an
authorised specialist dealer.
R if your vehicl ehasnot ye tbeeninspected at a
Mercedes-Benz Service Centre.
It is advisable to register your vehicl ewitha
Mercedes-Benz Service Centre.
Infor mMercedes-Benz as soo naspossible
abou tany change in address or vehicl eowner-
ship. Yo ucan do thi sataMercedes-Benz Ser-
vice Centre, for example. Correc
tuse
If you remove any warning stickers ,you or oth-
ers coul dfail to recognise certain dangers.
Leav ewarning stickers in position.
Observ ethe followin ginformatio nwhen driving
your vehicle:
R thes afety note sinthism anual
R technical dat afor th evehicle
R traffic rules and regulations
R laws and safety standards pertaining to motor
vehicles Implied warranty
! Follow th
einstruction sinthism anual about
th ep roper operation of your vehicl easwell as Introduction
23 Z
Page 78 of 261
Automati
cheadlamp mode G
WARNING
When th elight switch is set to Ã,the
dipped-beam headlamps may not be switched on automatically if there is fog, snow or othercauses of poor visibility due to the weather
conditions such as spray. There is arisk of an
accident.
In such situations, turn the light switch to
L.
The automatic headlamp feature is only an aid.
The drive risresponsibl efor the vehicl elighting
at all times.
à is the preferre dlight switch position.
The light setting is automatically selected
according to the brightness of the ambient light,
but not in the event of poor visibility due to
weather conditions such as fog, snow or spray.
X To switch on the automatic headlamps:
turn the light switch to the Ãposition.
With the key in position 1in the ignitio nlock,
the side lamp sare switched on or off auto-
matically depending on the brightness of the
ambient light.
If you have switched on the Daytime driv‐ Daytime driv‐
ing lights
ing lights functionvia the on-board com-
puter, the daytime driving lights or the side
lamps and dipped-beam headlamps will
switch on or off automaticallyw hile the
engine is running.
When the dipped-beam headlamps are
switched on, the green Lindicator lamp in
the instrument cluster lights up. Rear foglamp
The rear fog lamp improves the visibility of your vehicle for the traffic behind in the event of
heavy fog. You must observe the legal require-
ment sfor the country in which yo uare currently
driving when operating the rea rfog lamp.
X To switc honthe rear fog lamp: turn the key
in the ignition lock to position 2or star tthe
engine.
X Turn the light switch to the Lposition.
X Press the Rbutton.
The yellow Rindicator lamp on the instru-
ment cluster lights up. Sid
elamps
! When the battery is discharged heavily,t
he
side lamps or parking lamps are automatically
switched off to facilitate an engine start.
Always park your vehicle safely and in awell lit
area, in accordance with the relevant legal
stipulations. Avoid using the Tside lamps
for periods lasting several hours. Where pos-
sible, switch on the right Xor left W
parking lamp.
X To switch on: turn the light switch to the
T position.
The green Tindicator lamp on the instru-
ment cluster lights up. Parking lamps
Switching on the parking lamps ensures that the
correspondin gside of the vehicle is illuminated.
X To switch on the parking lamp: turn the key
to position uin the ignition lock or remove
the key.
X Turn the light switch to the W(left-hand
side of the vehicle) or X(right-hand side of
the vehicle) position. Headlamp cleaning system
The headlamps are cleaned automatically if the
"Wipe with washer fluid" function is operated
ten times (Y page 81) while the lights are on
and the engin eisrunning. When you switch off
the ignition, the automatic headlamp cleaning
system is reset and counting is resumed from 0. Exterior lighting
75Lightsand windscreen wipers Z
Page 135 of 261
the engine compartment, leav
ethe bonnet
close dand notify the fir ebrigade.
The coolant temperatur egauge is in the instru-
ment cluste ronthe right-hand side (Y page 26).
Under normal operating conditions and with the specifie dcoolant level ,the coolant temperature
ma yriseto1 20 †.
At high outside temperatures and when driving
in mountainou sterrain, the coolant temperature
ma yrisetot he end of the scale. Operatin
gthe on-board computer
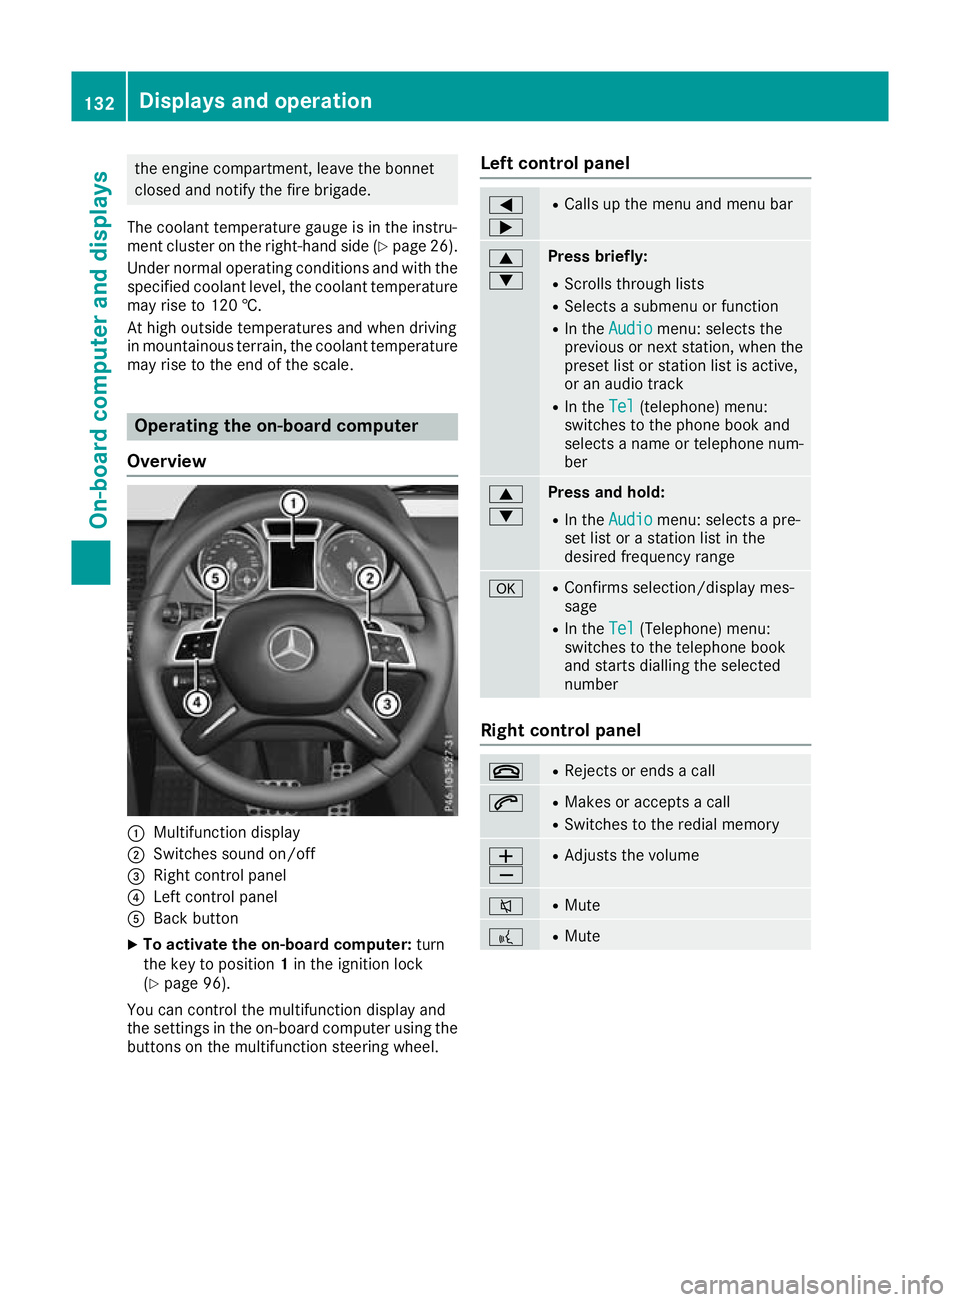
Overview :
Multifunction display
; Switches sound on/off
= Right control panel
? Left control panel
A Back button
X To activate the on-board computer: turn
the key to position 1in the ignition lock
(Y page 96).
You can control the multifunction display and
the settings in the on-board computer using the buttons on the multifunction steering wheel. Left control panel =
; R
Calls up the menu and menu bar 9
: Press briefly:
R Scrolls through lists
R Selects asubmenu or function
R In the Audio Audio menu: selects the
previous or next station, when the preset list or station list is active,
or an audio track
R In the Tel Tel(telephone) menu:
switches to the phone book and
selects aname or telephone num-
ber 9
: Press and hold:
R
In the Audio Audio menu: selects apre-
set list or astation list in the
desired frequency range a R
Confirms selection/displaym es-
sage
R In the Tel
Tel(Telephone) menu:
switches to th etelephone book
and start sdiallin gthe selected
number Right contro
lpanel ~ R
Rejects or end sacall 6 R
Makes or accept sacall
R Switches to the redial memory W
X R
Adjusts the volume 8 R
Mute ? R
Mute 132
Displays and operationOn-board computer and displays
Page 137 of 261
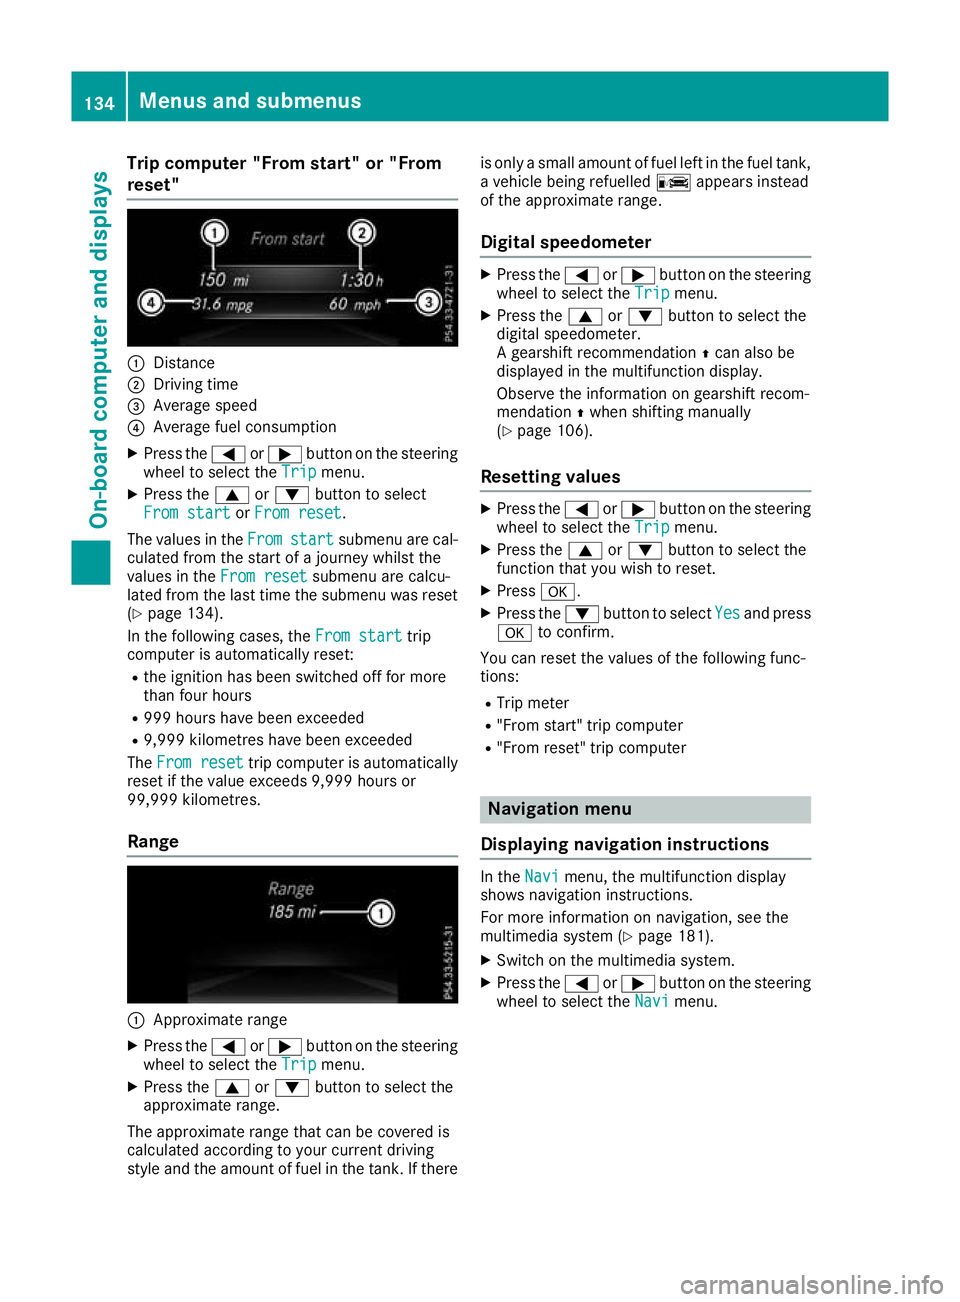
Trip compute
r"From start" or "From
reset" :
Distance
; Driving time
= Averag espeed
? Averag efuelconsumption
X Press the =or; button on the steering
whee ltoselect the Trip
Tripmenu.
X Press the 9or: button to select
Fro mstart
From start orFrom reset
From reset.
The valuesint heFrom
From start
start submenu are cal-
culated from the start of ajourney whilst the
valuesint heFrom reset
From reset submenu are calcu-
lated from the last time the submenu was reset
(Y page 134).
In the following cases, the From start
From start trip
computer is automaticallyr eset:
R the ignition has been switched off for more
than four hours
R 999 hours have been exceeded
R 9,999 kilometres have been exceeded
The From reset From reset trip computer is automatically
reset if the value exceeds 9,999 hours or
99,999 kilometres.
Range :
Approx imaterange
X Press the =or; button on the steering
whee ltoselect the Trip
Tripmenu.
X Press the 9or: button to select the
approximate range.
The approximate range tha tcan be covered is
calculate daccording to your current driving
style and the amount of fuel in the tank. If there is only
asmall amount of fuel left in the fuel tank,
av ehicle being refuelled Cappears instead
of the approximate range.
Digita lspeedometer X
Press the =or; button on the steering
wheel to select the Trip
Tripmenu.
X Press the 9or: button to select the
digital speedometer.
Ag earshift recommendation Zcan also be
displayed in the multifunction display.
Observe the information on gearshift recom-
mendation Zwhen shiftin gmanually
(Y page 106).
Resetting values X
Press the =or; button on the steering
wheel to select the Trip Tripmenu.
X Press the 9or: button to select the
function that you wish to reset.
X Press a.
X Press the :button to select Yes Yesand press
a to confirm.
You can reset the values of the following func-
tions:
R Trip meter
R "From start "trip computer
R "From reset" trip computer Navigat
ionm enu
Displaying navigatio ninstructions In the
Navi Navimenu, the multif unction display
shows navigation instructions.
For more information on navigation, see the
multimedia system (Y page 181).
X Switch on the multimedia system.
X Press the =or; button on the steering
wheel to select the Navi Navimenu. 134
Menu
sand submenusOn-boar dcomputer and displays
Page 138 of 261
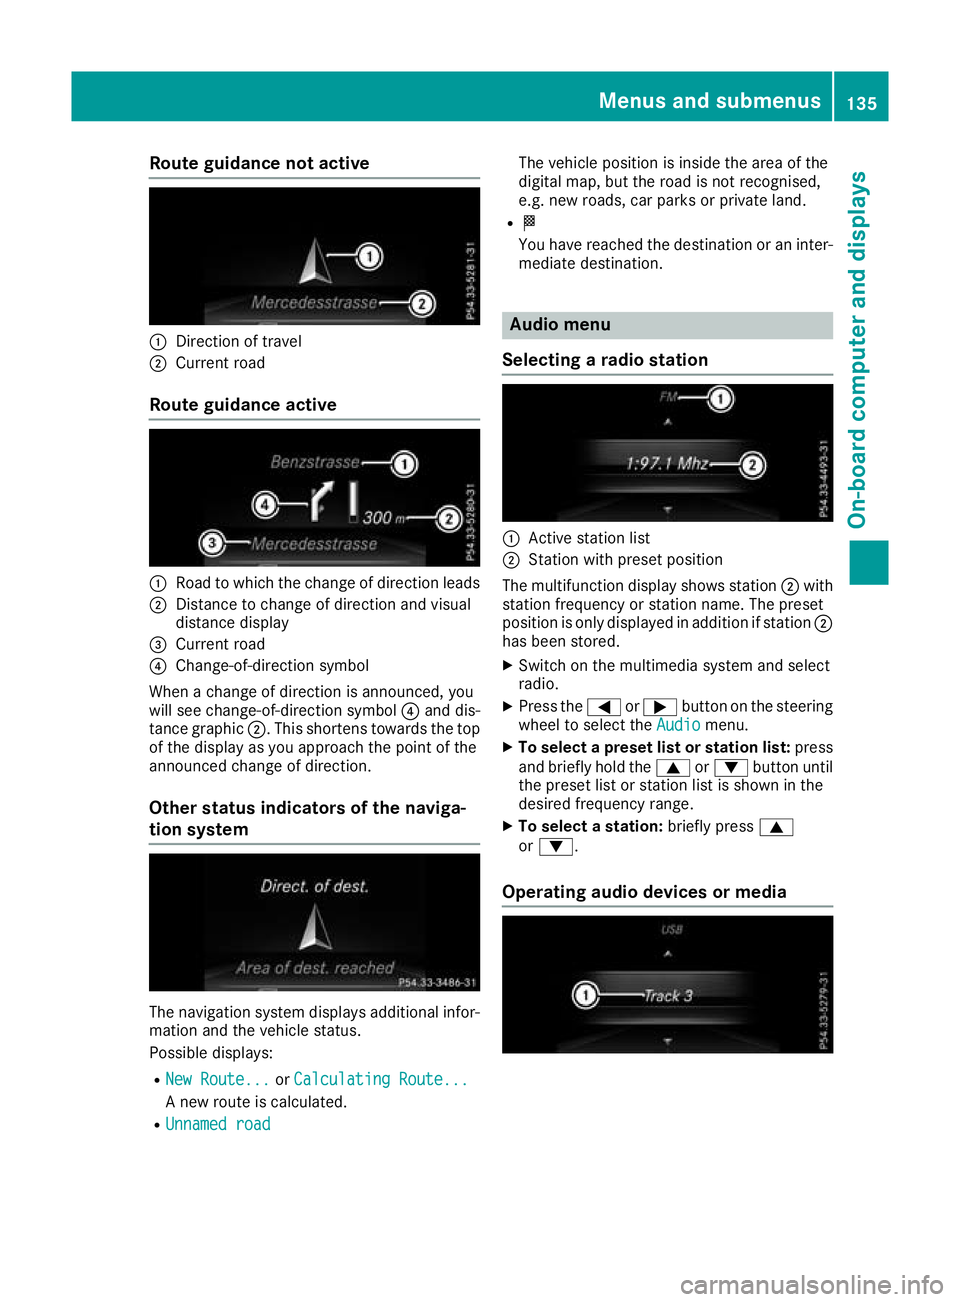
Route guidanc
enotactive :
Direction of travel
; Current road
Route guidanc eactive :
Road to which the change of direction leads
; Distance to change of direction an dvisual
distanc edisplay
= Curren troad
? Change-of-direction symbol
When achang eofd irection is announced, you
will see change-of-direction symbol ?and dis-
tance graphic ;.This shorten stow ards th etop
of th edisplay as you approac hthe poin toft he
announce dchang eofd irection.
Other status indicators of th enaviga-
tion system The navigation system displays additional infor-
mation and the vehicle status.
Possible displays:
R New Route... New Route... orCalculating Route...
Calculating Route...
An ew route is calculated.
R Unnamed road
Unnamed road The vehicle position is inside the area of the
digital map, but the road is not recognised,
e.g. new roads, car parks or private land.
R O
You have reached the destination or an inter-
mediate destination. Audio menu
Selecting aradio station :
Active station list
; Station wit hpreset position
The multifunctio ndisplay shows station ;with
statio nfrequency or statio nname. The preset
positio niso nlyd isplayed in additio nifstation ;
ha sb eens tored.
X Switch on the multimedia system and select
radio.
X Press the =or; button on the steering
whee ltoselect the Audio
Audio menu.
X To select apreset list or station list: press
and briefl yholdt he 9 or: button until
the preset list or statio nlistiss hown in the
desired frequency range.
X To select astation: brieflypress 9
or :.
Operatin gaudi odevices or media Menus and subme
nus
135On-boa rdcomputer and displays Z
Page 144 of 261
X
Press the :or9 button to select the
Easy Entry/Exit
Easy Entry/Exit function.
If the Easy
Easy Entry/Exit
Entry/Exit function is activated,
the vehicle steering wheel appears in red in
the multifunction display.
X Press ato save the setting.
Further informatio nonthe EASY-ENTRY/EXIT
feature (Y page 72). Resetting to factory settings
X Press the =or; button on the steering
wheel to select the Settings
Settingsmenu.
X Press the :or9 button to select the
Factory setting Factory setting submenu.
X Press ato confirm.
The Reset
Reset all allsettings?
settings? displaymessage
appears.
X Press the :or9 button to select No
Noor
Yes
Yes.
X Press ato confirm the selection.
If you have selected Yes
Yesand confirmed, the
multifunction displays howsaconfirmation
message. Display messages
Intro
duction
General notes Display messages appear in th
emultifunction
display.
Display message swithg raphic symbols ar esim-
plified in the Owner' sManualand ma ydiffer
fro mt he symbols in the multifunctio ndisplay.
Please respond in accordance with the display
message sand follo wthe additional note sinthis
Owner' sManual.
Certain displa ymessage sareaccompanied by
an audibl ewarning tone or acontinuous warning
tone. When yo
ustop and park the vehicle, please
observe the notes on:
R HOLD function (Y page 122)
R Parking (Y page 113)
Hiding displa ymessages X
Press the aor% button on the steering
wheel.
The multifunction display hides the display
message.
High-priority display messages are shown in red in the multifunction display. Some high-priority
display messages cannot be hidden.
The multifunction display shows these mes-
sages continuously until the causes for the mes- sages have been remedied.
Message memor ymenu The on-board computer saves certain display
messages in the
message memory.Y ou can
call up the display messages:
X Press the =or; button on the steering
wheel to select the Serv. Serv.menu.
If there are display messages, the multifunc-
tion display shows 2messages
2m essages ,for example.
X Press the 9or: button to select the
entry, e.g. 2messages
2m essages.
X Press ato confirm.
X Press the 9or: button to scroll
through the display messages.
When the ignition is switched off, all display
messages are deleted apart from some high-
priority display messages. Once the causes of
the high-priorit ydisplay messages have been
rectified, these display messages are deleted as well. Display me
ssages
141On-board compute rand displays Z
Page 176 of 261
X
Select ¯.
X Select Controller setting
Controller setting.
X Select the desire dsetting.
The #dot indicates the current setting.
i If the
Change station/title
Change station/title function is
active and the navigation system is running in
the front, zooming into or ou tofthe map is
only possible via the touchscreen.
i In the 3D display
,you can only zoom ou tof
the map up to acertain scale .Ifyouzoom out
beyond this scale ,the map switches to a2D
display. Settin
gthe system language
X Select ¯.
X Select the Language
Language.
Al ist of available languages appears.
X Select the desired language.
The #dot indicates the active language. Raisin
gorlowering the volume of
audio sources
Yo uc an raise or lowe rthe volume of individual
audi osources relative to the volume set on the
multimedi asystem. For example, yo ucan set
traffic reports to play back louder than the cur-
rentl yset volume.
X Select ¯.
X Select Volume
Volume.
X Select the desire daudio source.
Am enu appears.
X Set the desire dvalue using the arrows.
X Select Save ý.
The menu is closed. Starting
aself diagnosis
The self-diagnosis checksw hether radio and
GPS signals are being received and whether all
loudspeakers are emittings ound.
X Select ¯.
X Select Self-diagnosis Self-diagnosis.
The diagnostics display appears.
X Select TEST
TEST.
The self diagnosis starts. Calling up version info
rmation
X Select ¯.
X Select Versio ninfo
Versio ninfo.
Information on th esoftwar estatus of th emul-
timedia system is displayed. Resettin
gthe multimedi asystem
Resetting to factory settings Thi
sfunction return sthe settings of the multi-
media system to the factor ysettings. This will
delete all personal settings.
X Select ¯.
X Select Factory reset Factory reset.
Ap rompt appears asking whether you wish to
reset the multimedia system.
X To reset: selectYES
YES.
The multimedia system is reset to its factory
settings.
Restarting the multimedia system In the following cases, restarting the multimedia
system may be useful:
R if the multimedia system is not operating cor-
rectly
R if malfunctions occur
R if the vehicl eisdisplayedatani ncorrect loca-
tion on the map
There are two methods of restarting the multi-
media system.
Method 1: restart using the on/off knob
X Remove any devices that may be connected
to the multimedia system.
X Press and hold the on/off knob for five sec-
onds.
The multimedia system restarts.
Method 2: restart using the RESET button on the
front of the device
X Remove any devices that may be connected
to the multimedia system.
X Switch off the ignition.
X Using apointed object, press the RESET but-
ton on the front of the multimedia system.
The multimedia system restarts. System settings
173Multimedia system Z