2016 MERCEDES-BENZ G-Class heating
[x] Cancel search: heatingPage 138 of 302
wave could cause water to enter and damage
the engine and other assemblies.
!Do not open any of the vehicle's doors while
fording. Otherwise, water could get into the
vehicle interior and damage the vehicle's
electronics and interior equipment.
iYou may only drive through fresh water.
RObserve the safety notes (Ypage 137) and
the general notes (Ypage 137) on off-road
driving.
REstablish how deep the water is and the char-
acteristics of the body of water before ford-
ing.
RSwitch off the air-conditioning system.
RShift the transfer case to LOW RANGE
(Ypage 162).
REngage the differential locks, if necessary
(Ypage 165).
RRestrict the shift range to 1or 2
(Ypage 123).
RAvoid high engine speeds.
REnter and exit the water at a flat place and at
a steady walking pace.
RDrive slowly and at an even speed through the
water.
RDo not stop and do not switch off the engine.
RWater offers a high degree of resistance, and
the ground is slippery and in some cases
unstable. Therefore, it is difficult and danger-
ous to pull away in the water.
REnsure that a bow wave does not form as you
drive.
RClean any mud from the tire tread after ford-
ing.
RApply the brakes to dry them after fording.
Always observe the fording depth values
(
Ypage 296).
Winter driving
General notes
GDANGER
If the exhaust pipe is blocked or adequate
ventilation is not possible, poisonous gases
such as carbon monoxide (CO) may enter the vehicle. This is the case, e.g. if the vehicle
becomes trapped in snow. There is a risk of
fatal injury.
If you leave the engine or the auxiliary heatingrunning, make sure the exhaust pipe and area
around the vehicle are clear of snow. To
ensure an adequate supply of fresh air, open a
window on the side of the vehicle that is not
facing into the wind.
GWARNING
If you have installed unsuitable snow chains to the front wheels, they may drag against the
vehicle body or chassis components. This
could cause damage to the vehicle or the
tires. There is a risk of an accident.
Only equip the front wheels with suitable
snow chains that guarantee sufficient dis-
tance to the vehicle body and to the suspen-
sion components in every driving situation.
Always follow the manufacturer's installation
instructions when installing the snow chains.
Have your vehicle winter-proofed at a qualified
specialist workshop at the onset of winter.
Observe the notes in the "Winter operation" sec- tion (
Ypage 264).
Driving with summer tires
Observe the notes in the "Winter operation" sec-tion (Ypage 264).
Slippery road surfaces
GWARNING
If you shift down on a slippery road surface in an attempt to increase the engine's braking
effect, the drive wheels could lose their grip.
There is an increased danger of skidding and
accidents.
Do not shift down for additional engine brak-
ing on a slippery road surface.
136Driving tips
Driving and parking
Page 143 of 302

the vehicle is facing in the direction of the line
of fall.
RObserve the notes on driving in mountainous
terrain (Ypage 140).
RDrive slowly.
RDo not drive at an angle down steep inclines.
Steer into the line of fall and drive with the
front wheels aligned straight. Otherwise, the
vehicle could slip sideways, tip and roll over.
RCheck that the brakes are working normally
after a long downhill stretch.
iThe special off-road ABS setting (Ypage 56)
enables repeated, brief, precise locking of the
front wheels, which leads to the wheels dig-
ging into the loose ground. Note that when
the front wheels are fully braked, they slide
easily over the surface of the ground, making
it difficult to steer.
Driving systems
Cruise control
Important safety notes
GWARNING
The brake pedal moves when cruise control
brakes the vehicle. A foot in the area under
the brake pedal could become trapped. The
movement of the pedal, and therefore the
vehicle's ability to brake, may be restricted by objects in the area under the brake. There is a
risk of an accident and injury.
Do not place your foot under the brake pedal. Keep the area under the brake pedal free from
obstructions.
If you fail to adapt your driving style, cruise con-
trol can neither reduce the risk of accident nor
override the laws of physics. Cruise control can-
not take account of road, weather and traffic
conditions. Cruise control is only an aid. You are
responsible for the distance to the vehicle in
front, for vehicle speed and for braking in good
time. Adjust your driving style to the traffic con-
ditions. Only engage cruise control when the
current road, weather and traffic conditions per-
mit it to be done safely. Drive carefully and
maintain a suitable distance to the vehicle in
front. Do not use cruise control:
Rin traffic conditions that do not allow you to
drive at a constant speed, e.g. heavy traffic,
on winding roads or off-road
Ron slippery road surfaces. Braking or accel-
erating could cause the drive wheels to lose
traction and the vehicle could then skid
Rwhen there is poor visibility, e.g. due to fog,
heavy rain or snow
General notes
Cruise control maintains a constant road speed
for you. On long and steep downhill gradients,
especially if the vehicle is laden, you must select
shift range
1,2 or 3in good time. By doing so,
you will make use of the braking effect of the
engine. This relieves the load on the brake sys-
tem and prevents the brakes from overheating
and wearing too quickly.
Use cruise control only if road and traffic con-
ditions make it appropriate to maintain a steady
speed for a prolonged period. You can store any
road speed above 20 mph (30 km/h).
iCruise control should not be activated when
driving off-road.
Cruise control lever
:To activate or increase speed
;LIM indicator lamp
=To activate at the current speed/last stored speed
?To activate or reduce speed
ATo switch between cruise control and varia-
ble SPEEDTRONIC
BTo deactivate cruise control
You can operate cruise control and variable
SPEEDTRONIC with the cruise control lever.
Driving system s141
Driving an d parking
Z
Page 147 of 302
SPEEDTRONIC
Important safety notes
GWARNING
If you rest your foot on the brake pedal while
driving, the braking system can overheat. This increases the stopping distance and can even
cause the braking system to fail. There is a
risk of an accident.
Never use the brake pedal as a footrest. Never
depress the brake pedal and the accelerator
pedal at the same time.
!Depressing the brake pedal constantly
results in excessive and premature wear to
the brake pads.
If you fail to adapt your driving style, SPEED-
TRONIC can neither reduce the risk of accident
nor override the laws of physics. SPEEDTRONIC
cannot take account of road, weather and traffic
conditions. SPEEDTRONIC is only an aid. You
are responsible for the distance to the vehicle in
front, for vehicle speed, for braking in good time
and for staying in lane. Only engage SPEED-
TRONIC when the current road, weather and
traffic conditions permit it to be done safely.
Drive carefully and maintain a suitable distance
to the vehicle in front.
General notes
SPEEDTRONIC brakes automatically so that you
do not exceed the set speed. On long and steep
downhill gradients, especially if the vehicle is
laden or towing a trailer, you must select shift
range 1,2or 3in good time. By doing so, you will
make use of the braking effect of the engine,
which relieves the load on the brake system and
prevents the brakes from overheating and wear-
ing too quickly. If you need additional braking,
depress the brake pedal repeatedly rather than
continuously.
iThe speed indicated in the speedometer
may differ slightly from the limit speed stored.
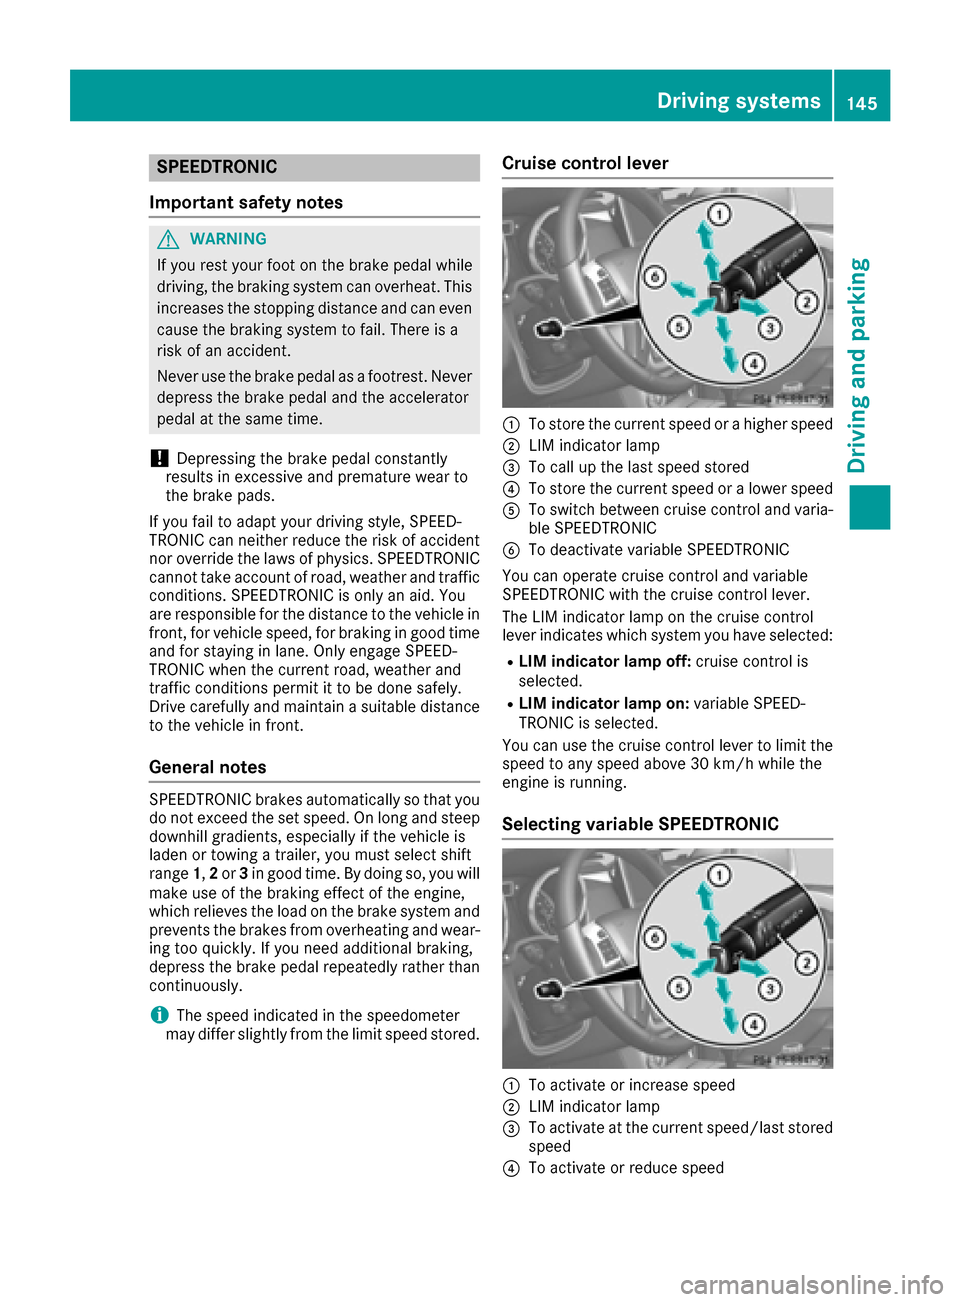
Cruise control lever
:To store the current speed or a higher speed
;LIM indicator lamp
=To call up the last speed stored
?To store the current speed or a lower speed
ATo switch between cruise control and varia- ble SPEEDTRONIC
BTo deactivate variable SPEEDTRONIC
You can operate cruise control and variable
SPEEDTRONIC with the cruise control lever.
The LIM indicator lamp on the cruise control
lever indicates which system you have selected:
RLIM indicator lamp off: cruise control is
selected.
RLIM indicator lamp on: variable SPEED-
TRONIC is selected.
You can use the cruise control lever to limit the
speed to any speed above 30 km/h while the
engine is running.
Selecting variable SPEEDTRONIC
:To activate or increase speed
;LIM indicator lamp
=To activate at the current speed/last stored speed
?To activate or reduce speed
Driving systems145
Driving and parking
Z
Page 170 of 302

The maximum noseweight of the trailer drawbar
on the ball coupling for up to 3 people is 562 lbs
(255 kg). The maximum permissible trailer draw-bar noseweight for more than 3 persons and the
maximum load in the trunk can be found in the
trailer drawbar noseweight table (
Ypage 298).
However, the actual noseweight must not
exceed the value given on the trailer tow hitch or trailer identification plates. The lowest weight
applies.
Please note that when towing a trailer,
PARKTRONIC (
Ypage 158) and Blind Spot
Assist (Ypage 154) are only available with lim-
itations, or not at all.
iOn vehicles without level control, the height
of the ball coupling will alter according to the
load placed on the vehicle. If necessary, use a
trailer with a height-adjustable drawbar.
Driving tips
XOn long and steep downhill gradients, select
shift range 1,2or 3(Ypage 123) in good
time.
iThis also applies if you have activated cruise
control or SPEEDTRONIC.
XIf necessary, shift the transfer case to LOW
RANGE (Ypage 162).
This will use the braking effect of the engine,
so that less braking will be required to main-
tain the speed. This relieves the load on the
brake system and prevents the brakes from
overheating and wearing too quickly. If you
need additional braking, depress the brake
pedal repeatedly rather than continuously.
The maximum permissible speed for vehicle/
trailer combinations depends on the type of
trailer. Before beginning the journey, check the
trailer's documents to see what the maximum
permissible speed is. Observe the legally pre-
scribed maximum speed in the relevant country.
For certain Mercedes-Benz vehicles, the maxi-
mum permissible rear axle load is increased
when towing a trailer. Refer to the "Technical
data" section to find out whether this applies to
your vehicle. If you utilize any of the added max- imum rear axle load when towing a trailer, the
vehicle/trailer combination may not exceed a
maximum speed of 60 mph (100 km/h) for rea-
sons concerning the operating permit. This also applies in countries in which the permissible
maximum speed for vehicle/trailer combina-
tions is above 60 mph (100 km/h). When towing a trailer, your vehicle's handling
characteristics will be different in comparison to
when driving without a trailer and it will con-
sume more fuel.
On long and steep downhill gradients, you must
select shift range
1,2or 3in good time.
iThis also applies if you have activated cruise
control or DISTRONIC PLUS.
This will use the braking effect of the engine, so
that less braking will be required to maintain the
speed. This relieves the load on the brake sys-
tem and prevents the brakes from overheating
and wearing too quickly. If you need additional
braking, depre ss the bra
ke pedal repeatedly
rather than continuously.
Driving tips
If the trailer swings from side to side:
XDo not accelerate.
XDo not counter-steer.
XBrake if necessary.
RMaintain a greater distance from the vehicle
in front than when driving without a trailer.
RAvoid braking abruptly. If possible, brake gen- tly at first to allow the trailer to run on. Then,
increase the braking force rapidly.
RThe values given for gradient-climbing capa-
bilities from a standstill refer to sea level.
When driving in mountainous areas, note that
the power output of the engine and, conse-
quently, the vehicle's gradient-climbing capa-
bility, decreases with increasing altitude.
Trailer power supply
!
You can connect accessories with a maxi-
mum power consumption of 180 W to the
permanent power supply.
You must not charge a trailer battery using the
power supply.
The trailer socket of your vehicle is equipped at
the factory with a permanent power supply.
The permanent power supply is supplied via
trailer socket pin 9.
A qualified specialist workshop can provide
more information about installing the trailer
electrics.
168Towing a trailer
Driving and parking
Page 224 of 302
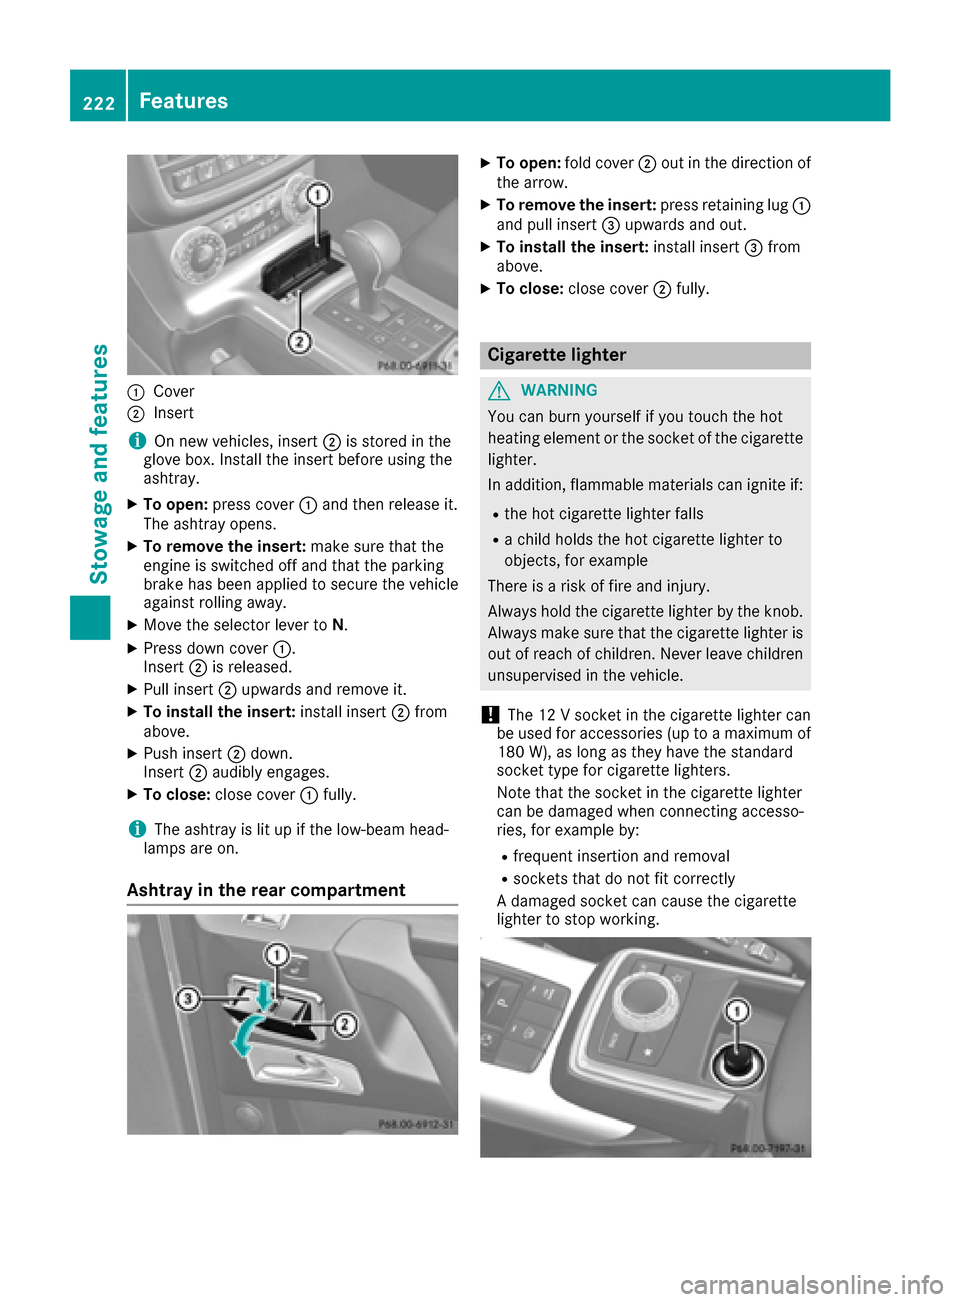
:Cover
;Insert
iOn new veh icles, insert ;isstored inthe
glove box. Install the insert before using the
ashtray.
XTo open: press cover :and then release it.
The ashtray opens.
XTo remove the insert: make sure that the
engine is switched off and that the parking
brake has been appliedto secure the veh icle
against rolling away.
XMove the selector lever to N.
XPress downcover :.
In sert ;isreleased.
XPull insert ;upwards and remove it.
XTo install the insert: install insert;from
above.
XPush insert ;down .
In sert ;audibly engages.
XTo close: close cover :fully.
iThe ashtray is litupifthe low- beam head-
lamps are on.
Ashtray in the rear compartment
XTo open: fold cover ;out in the direction of
the arrow.
XTo remove the insert: press retaining lug :
and pull insert =upwards and out.
XTo install the insert: install insert =from
above.
XTo close: close cover ;fully.
Cigarette lighter
GWARNING
You can burn yourself ifyou touch the hot
heating element or the socket of the cigarette lighter.
In addition, flammable materials can ignite if:
Rthe hot cigarette lighter falls
Ra child holds the hot cigarette lighter to
objects, for example
There isa risk of fire and injury.
Alwa ys hold the cigarette lighter bythe knob.
Alwa ys make sure that the cigarette lighter is
out of reach of children. Never leave ch ildren
unsupervised in the vehicle.
!The 12 V socket inthe cigarette lighter can
be used for accessories (up to a maximum of
180 W), as long as they have the standard
socket type for cigarette lighters.
Note that the socket in the cigarette lighter
can bedamaged when connecting accesso-
ries, for example by:
Rfrequent insertion and removal
Rsockets that do not fit correctly
A damaged socket can cause the cigarette
lighter to stop working.
222Features
Stowage and features
Page 225 of 302
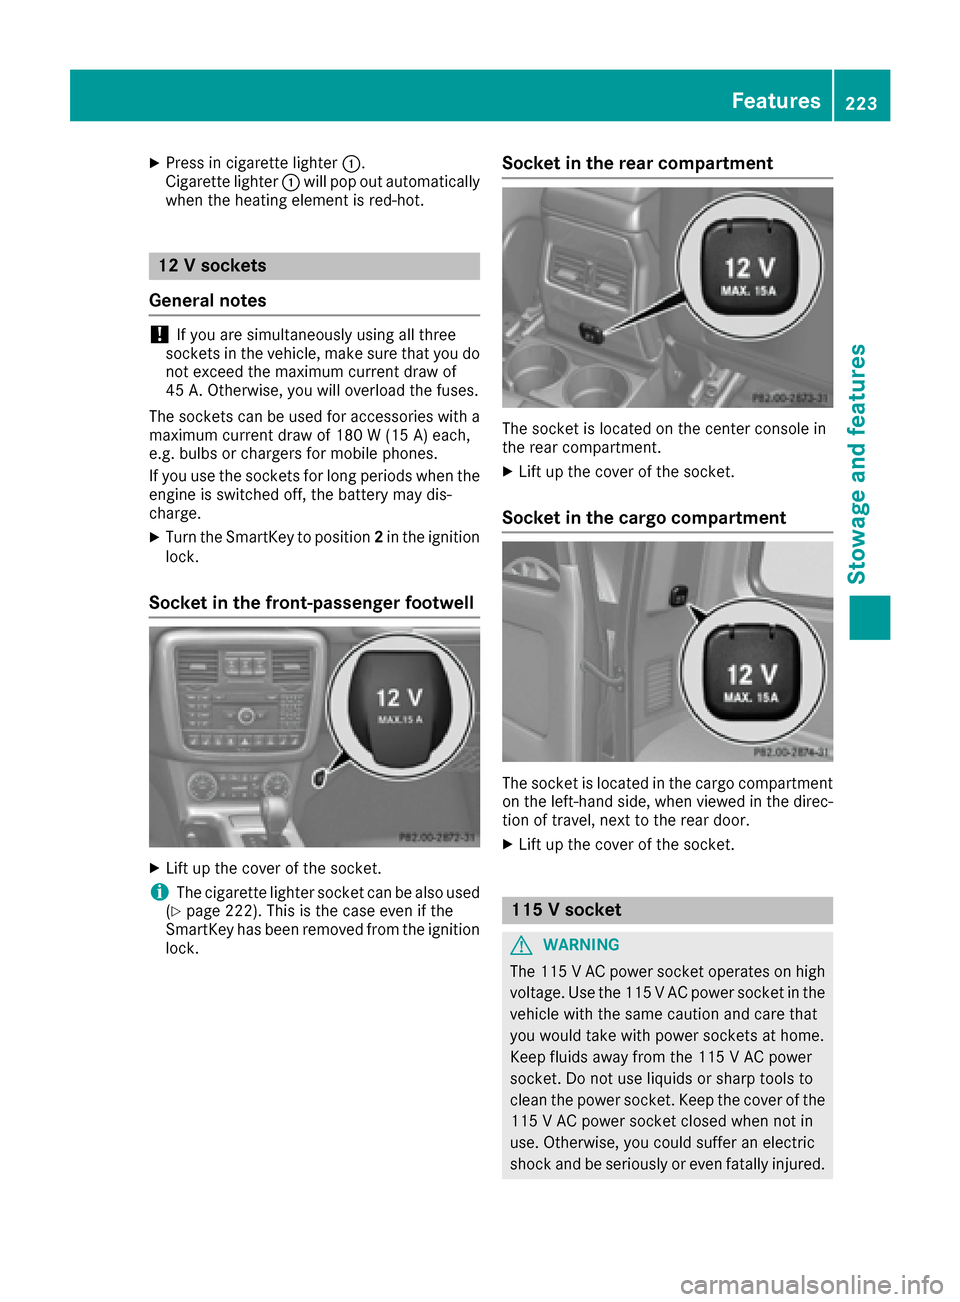
XPress in cigarette lighter:.
Cigarette lighter :will pop out automatically
when the heating element is red-hot.
12 V sockets
General notes
!If you are simultaneously using all three
sockets in the vehicle, make sure that you do
not exceed the maximum current draw of
45 A. Otherwise, you will overload the fuses.
The sockets can be used for accessories with a
maximum current draw of 180 W (15 A) each,
e.g. bulbs or chargers for mobile phones.
If you use the sockets for long periods when the
engine is switched off, the battery may dis-
charge.
XTurn the SmartKey to position 2in the ignition
lock.
Socket in the front-passenger footwell
XLift up the cover of the socket.
iThe cigarette lighter socket can be also used
(Ypage 222). This is the case even if the
SmartKey has been removed from the ignition
lock.
Socket in the rear compartment
The socket is located on the center console in
the rear compartment.
XLift up the cover of the socket.
Socket in the cargo compartment
The socket is located in the cargo compartment
on the left-hand side, when viewed in the direc-
tion of travel, next to the rear door.
XLift up the cover of the socket.
115 V socket
GWARNING
The 115 VAC power socket operates on high
voltage. Use the 115 V AC power socket in the
vehicle with the same caution and care that
you would take with power sockets at home.
Keep fluids away from the 115 V AC power
socket. Do not use liquids or sharp tools to
clean the power socket. Keep the cover of the
115 V AC power socket closed when not in
use. Otherwise, you could suffer an electric
shock and beseriously or even fat allyinjured.
Features223
Stowage and features
Z
Page 244 of 302
cleaning agents. These cleaning agents can
damage the paintwork or plastic parts.
!Make sure that the automatic car wash is
suitable for the size of the vehicle. Fold in the
exterior mirrors before the vehicle is washed.
The exterior mirrors could otherwise be dam-
aged.
!Make sure that the automatic transmission
is in position Nwhen washing your vehicle in
a tow-through car wash. The vehicle could be
damaged if the transmission is in another
position.
!Make sure that:
Rthe side windows and sliding sunroof are
closed completely.
Rthe blower for the ventilation/heating is
switched off (airflow control is turned to
position 0/the à andÁ buttons are
switched off).
Rthe windshield wiper switch is at position 0.
The vehicle could otherwise be damaged.
You can wash the vehicle in an automatic car
wash from the very start.
If the vehicle is very dirty, pre-wash it before
cleaning it in an automatic car wash.
After using an automatic car wash, wipe off wax
from the windshield and the wiper blades. This
will prevent smears and reduce wiping noises
caused by residue on the windshield.
Washing by hand
In some countries, washing by hand is only
allowed at specially equipped washing bays.
Observe the legal requirements in all countries
concerned.
When using the vehicle in winter, remove all
traces of road salt deposits carefully and as
soon as possible.
When washing the vehicle underbody, also clean the inside of the wheels.
XDo not use hot water and do not wash the
vehicle in direct sunlight.
XUse a soft sponge to clean.
XUse a mild cleaning agent, such as a car
shampoo approved by Mercedes-Benz.
XThoroughly hose down the vehicle with a gen-
tle jet of water.
XDo not point the water jet directly towards the
air inlets.
XUse plenty of water and rinse out the sponge
frequently.
XRinse the vehicle with clean water and dry
thoroughly with a chamois.
XDo not let the cleaning agent dry on the paint-
work.
Power washers
GWARNING
The water jet from a circular jet nozzle (dirt
blasters) can cause invisible exterior damage
to the tires or chassis components. Compo-
nents damaged in this way may fail unexpect-
edly. There is a risk of an accident.
Do not use power washers with circular jet
nozzles to clean the vehicle. Have damaged
tires or chassis components replaced imme-
diately.
!Always maintain a distance of at least
11.8 in (30 cm) between the vehicle and the
power washer nozzle. Information about the
correct distance is available from the equip-
ment manufacturer.
Move the power washer nozzle around when
cleaning your vehicle.
Do not aim directly at any of the following:
Rtires
Rdoor gaps, roof gaps, joints, etc.
Relectrical components
Rbattery
Rconnectors
Rlights
Rseals
Rtrim
Rventilation slots
Damaged seals or electrical components can
lead to leaks or failures.
Cleaning the wheels
!Do not use acidic wheel cleaning products
to remove brake dust. This could damage
wheel bolts and brake components.
!Do not park the vehicle for an extended
period straight after cleaning it, particularly
after having cleaned the wheels with wheel
cleaner. Wheel cleaners could cause
242Care
Maintenance and care
Page 249 of 302
!Do not clean the seat belts using chemical
cleaning agents. Do not dry the seat belts by
heating at temperatures above 176 ‡(80 †)
or in direct sunlight.
XUse clean, lukewarm water and soap solution.
Cleaning the headliner and carpets
XHeadliner: if it is very dirty, use a soft brush or
dry shampoo.
XCarpets: use the carpet and textile cleaning
agents recommended and approved by
Mercedes-Benz.
Care247
Maintenance and care
Z