2016 MERCEDES-BENZ G-Class change wheel
[x] Cancel search: change wheelPage 243 of 302

Ruseinmountainous terrain or on poor road
surfaces
Rif the engine isoften left idling for long periods
Under these or similar conditions, have, for
example, the air filter, engine oil and oil filter
replaced or changed more frequently. Under
arduous operating conditions, the tires must be
checked more often. Further information can be
obtained at a qualified specialist workshop,e.g.
an authorized Mercedes-Benz Center.
Fuel/water separator
HEnvironmental note
Dispose of service products inan environ-
mentally responsible manner.
!Ifyou continue drivingwithout having the
fuel/water separator serviced, th iscould
cause damage to the engine. Any resulting
damage isnot covered bythe warranty.
If the fuel/water separator needs servicing, the
fol lowin g message appears inthe multifunction
displ ay:
Youwillalso hear a brief warning tone.
XVisit a qualified specialist workshop as soon
as possible.
Care
General notes
GWAR NING
Many cleaning products can behazardous.
So me are poisonous, others are flammable.
Alwa ys follow the instructions on the particu-
lar container. Always open your veh icle's
doors or windows when cleaning the ins ide.
Never use fluids or solvents that are not
designed for cleaning your veh icle.
Always lock away cleaning products and keep
them out of reach of children.
!For cleaning your vehicle, donot use any of
the following:
Rdry, rough or hard cloths
Rabrasive cleaning agents
Rsolvents
Rcleaning agents containing solvents
Do not scrub.
Do not touch the surfaces or protective films
wit h hard objects, e.g. a ring or ice scraper.
You could otherwise scratch or damage the
surfaces and protective film.
!Do not park the vehicle for an extended
period straight after cleaning it, particularly
after having cleaned the wheels with wheel
cleaner. Wheel cleaners could cause
increased corrosion of the brake discs and
brake pads/linings. For this reason, you
should drive for a few minutes after cleaning.
Braking heats the brake discs and the brake
pads/linings, thus drying them. The vehicle
can then beparked.
HEnvironmental note
Dispose of empty packaging and cleaning
cloths in an environmentally responsible man-
ner.
Regular care of your vehicle isa condition for
retaining the quality in the long term.
Use care products and cleaning agents recom-
mended and approved by Mercedes-Benz.
Exterior care
Automatic car wash
GWARNING
Braking efficiency is reduced after washing
the vehicle. There is a risk of an accident.
After the vehicle has been washed, brake
carefully while paying attention to the traffic
conditions until full braking power is restored.
!Never clean your vehicle ina Touchless
Automat icCar Wash as these use special
Care241
Maintenance and care
Z
Page 250 of 302
Useful information
i
This Operator's Manual describes all models
and all standard and optional equipment of
your vehicle available at the time of publica-
tion of the Operator's Manual. Country-spe-
cific differences are possible. Please note
that your vehicle may not be equipped with all
features described. This also applies to
safety-related systems and functions.
iRead the information on qualified specialist
workshops: (Ypage 23).
Where will I find...?
Warning triangle
Setting up the warning triangle
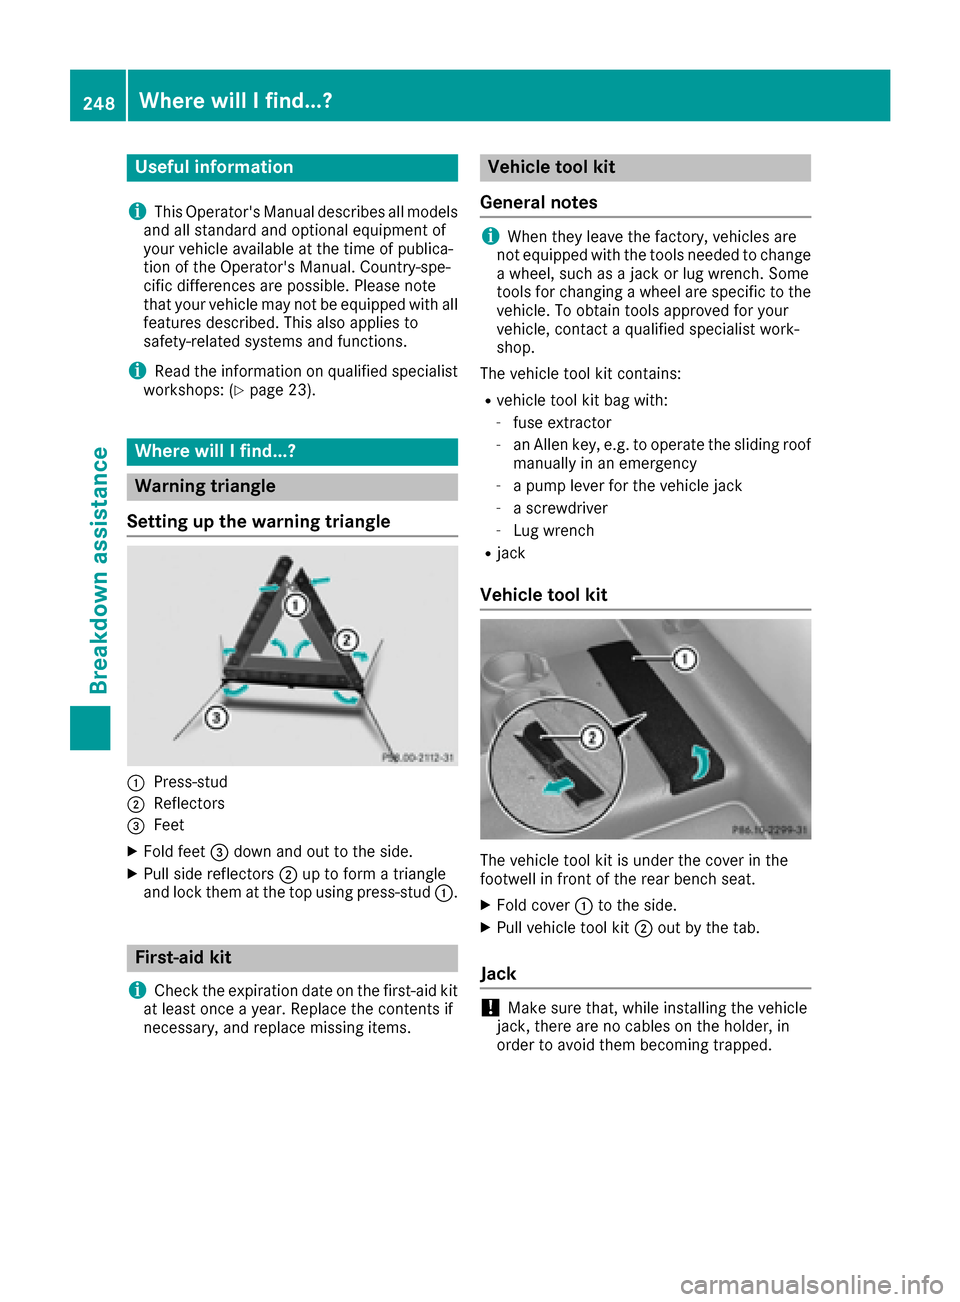
:Press-stud
;Reflectors
=Feet
XFold feet =down and out to the side.
XPull side reflectors ;up to form a triangle
and lock them at the top using press-stud :.
First-aid kit
i
Check the expiration date on the first-aid kit
at least once a year. Replace the contents if
necessary, and replace missing items.
Vehicle tool kit
General notes
iWhen they leave the factory, vehicles are
not equipped with the tools needed to change
a wheel, such as a jack or lug wrench. Some
tools for changing a wheel are specific to the
vehicle. To obtain tools approved for your
vehicle, contact a qualified specialist work-
shop.
The vehicle tool kit contains:
Rvehicle tool kit bag with:
-fuse extractor
-an Allen key, e.g. to operate the sliding roof
manually in an emergency
-a pump lever for the vehicle jack
-a screwdriver
-Lug wrench
Rjack
Vehicle tool kit
The vehicle tool kit is under the cover in the
footwell in front of the rear bench seat.
XFold cover :to the side.
XPull vehicle tool kit ;out by the tab.
Jack
!Make sure that, while installing the vehicle
jack, there are no cables on the holder, in
order to avoid them becoming trapped.
248Where will I find...?
Breakdown assistance
Page 252 of 302

iWhen re-installing trim panel?, make sure
that retainer Aengages in recess B.
Removing the spare wheel
The spare wheel is heavy. Take particular note of
this when removing the spare wheel.
XRemove wheel nuts :.
XRemove the spare wheel.
Mounting the wheel
After changing a wheel:
XRepair or replace the damaged wheel as soon
as possible and secure the spare wheel in
place again.
XSecure the damaged wheel on the spare
wheel bracket with wheel nuts :. When
doing so, make sure that the wheel cannot
come loose.
XWhen re-installing trim panel ?, make sure
that retainer Bengages in recess A
(
Ypage 249).
XMake sure that tab ;is below when re-
installing cover ring :(Ypage 249).
XFor safety reasons, regularly check to ensure
that the wheel is securely fastened.
Flat tire
Preparing the vehicle
XStop the vehicle on solid, non-slippery and
level ground, as far away as possible from
traffic.
XSwitch on the hazard warning lamps
(Ypage 89).
XApply the parking brake.
XBring the front wheels into the straight-ahead
position.
XMove the selector lever to position P.
XSwitch off the engine.
XRemove the SmartKey from the ignition lock.
The steering wheel lock stays active for as
long as the SmartKey is removed.
XAll occupants must get out of the vehicle.
Make sure that they are not endangered as
they do so.
XMake sure that no one is near the danger area
while a wheel is being changed. Anyone who
is not directly assisting in the wheel change
should, for example, stand behind the barrier.
XGet out of the vehicle. Pay attention to traffic
conditions when doing so.
XClose the driver's door.
Battery (vehicle)
Important safety notes
Special tools and expert knowledge are required
when working on the battery, e.g. removal and
installation. You should therefore have all work
involving the battery carried out at a qualified
specialist workshop.
GWARNING
Work carried out incorrectly on the battery
can lead, for example, to a short circuit and
thus damage the vehicle electronics. This can
lead to function restrictions applying to
safety-relevant systems, e.g the lighting sys-
tem, the ABS (anti-lock braking system) or the
ESP
®(Electronic Stability Program). The oper-
ating safety of your vehicle may be restricted.
You could lose control of the vehicle, for
example:
Rwhen braking
Rin the event of abrupt steering maneuvers
and/or when the vehicle's speed is not
adapted to the road conditions
There is a risk of an accident.
In the event of a short circuit or a similar inci-
dent, contact a qualified specialist workshop
immediately. Do not drive any further. You
250Battery (vehicle)
Breakdown assistance
Page 266 of 302
Winter operation
General notes
Have your vehicle winterproofed at a qualified
specialist workshop at the onset of winter.
Observe the notes in the "Changing a wheel"
section (
Ypage 281).
Driving with summer tires
At temperatures below 45 ‡ (+7 †), summer
tires lose elasticity and therefore traction and
braking power. Change the tires on your vehicle
to M+S tires. Using summer tires at very cold
temperatures could cause cracks to form,
thereby damaging the tires permanently.
Mercedes-Benz cannot accept responsibility for
this type of damage.
M+S tires
GWARNING
M+S tires with a tire tread depth of less than
ã in (4 mm) are not suitable for use in winter
and do not provide sufficient traction. There is
a risk of an accident.
M+S tires with a tread depth of less than ãin
(4 mm) must be replaced immediately.
GWARNING
Wheel and tire dimensions as well as the type of tire can vary between the spare wheel and
the wheel to be replaced. When the spare
wheel is mounted, driving characteristics may be severely affected. There is a risk of an acci-
dent.
In order to reduce risks:
Ryou should therefore adapt your driving
style and drive carefully.
Rnever mount more than one spare wheel
that differs from the wheel to be replaced.
Ronly use a spare wheel that differs from the
wheel to be replaced for a short time.
Rdo not deactivate ESP®.
Rhave a spare wheel that differs from the
wheel that has been changed replaced at
the nearest qualified specialist workshop.
You must observe the correct wheel and
tire dimensions as well as the wheel type.
Do not exceed a maximum speed of 50 mph
(80 km/h) if a spare wheel of a different size is
installed.
At temperatures below 45 ‡ (+7 †), use all-
season tires or winter tires. Both types of tire are
identified by the M+S marking.
Not all tires with the M+S marking provide the
driving characteristics of winter tires. In addition
to the M+S marking, winter tires also have the
i snowflake symbol on the tire wall. Tires
with this marking fulfill the requirements of the
Rubber Manufacturers Association (RMA) and
the Rubber Association of Canada (RAC) regard-
ing snow traction, and were specially developed
for driving on snow. Only these tires will allow
driving safety systems such as ABS and ESP
®to
function optimally in winter, since these tires
have been designed specifically for driving on
snow.
Use M+S tires of the same make and tread on all
wheels to maintain safe handling characteris-
tics.
Always observe the maximum permissible
speed specified for the M+S tires you have
mounted.
When you have mounted the M+S tires:
XCheck the tire pressures (Ypage 265).
XRestart the tire pressure monitor
(Ypage 270).
iYou can obtain information about winter
tires that have been approved by Mercedes-
Benz especially for your vehicle at any
Mercedes-Benz Service center.
iFor further information about tires, see
(Ypage 286).
Snow chains
GWARNING
If you drive too fast with snow chains moun-
ted, they may snap. As a result, you could
injure others and damage the vehicle. There is
a risk of an accident.
264Winter operation
Wheels and tires
Page 267 of 302
Observe the maximum permissible speed for
operation with snow chains.
!Information about the use of snow chain
compatible AMG winter tires is applicable for
AMG tires. Use of snow chains is only per-
missible with these tires.
!On some tire sizes there is not enough space
for snow chains. To avoid damage to the vehi- cle or tires, observe the "Wheel and tire com-
binations" section under "Tires and wheels".
!Check the snow chains for damage before
mounting them. Damaged or worn snow
chains may snap and damage the following
components:
Rwheel
Rwheel housing
Rwheel suspension
For this reason, you must use only snow
chains that are free of defects. Observe the
manufacturer's mounting instructions.
For safety reasons, Mercedes-Benz recom-
mends that you only use snow chains that have
been specially approved for your vehicle by
Mercedes-Benz, or are of a corresponding
standard of quality.
ROnly use snow chains when driving on roads
completely covered by snow. Remove the
snow chains as soon as possible when you
come to a road that is not snow-covered.
RLocal regulations may restrict the use of snow
chains. Observe the appropriate regulations if
you wish to mount snow chains.
RDo not exceed the maximum permissible
speed of 30 mph (50 km/h).
If you intend to mount snow chains, please bear
the following points in mind:
RSnow chains cannot be mounted on all
wheel/tire combinations (Ypage 284).
RMount snow chains only in pairs and only on
the rear wheels. Observe the manufacturer's
mounting instructions.
iYou may wish to deactivate ESP®when pull-
ing away with snow chains installed
(
Ypage 57). You can thereby allow the wheels
to spin in a controlled manner, achieving an
increased driving force (cutting action).
For more information, contact a qualified spe-
cialist workshop.
Tire pressure
Tire pressure specifications
Important safety notes
GWARNING
Underinflated or overinflated tires pose the
following risks:
Rthe tires may burst, especially as the load
and vehicle speed increase.
Rthe tires may wear excessively and/or
unevenly, which may greatly impair tire
traction.
Rthe driving characteristics, as well as steer-
ing and braking, may be greatly impaired.
There is a risk of an accident.
Follow recommended tire inflation pressures
and check the pressure of all the tires includ-
ing the spare wheel:
Rmonthly, at least
Rif the load changes
Rbefore beginning a long journey
Runder different operating conditions, e.g.
off-road driving
If necessary, correct the tire pressure.
iThe specifications on the sample Tire and
Loading Information placard and tire pressure
tables are examples. Tire pressure specifica-
tions are vehicle-specific and may deviate
from the data shown here. The tire pressure
specifications that are valid for your vehicle
can be found on the Tire and Loading Infor-
mation placard and tire pressure table on the
vehicle.
General notes
The recommended tire pressures for the tires
mounted at the factory can be found on the
labels described here.
Operation with a trailer: the applicable value
for the rear tires is the maximum tire pressure
value stated in the table inside the fuel filler flap.
Further information on tire pressures can be
obtained at a qualified specialist workshop.
Tire pressure265
Wheels and tires
Z
Page 269 of 302
Use a suitable pressure gauge to check the tire
pressure. The outer appearance of a tire does
not permit any reliable conclusion about the tire
pressure. On vehicles equipped with the elec-
tronic tire pressure monitoring system, the tire
pressure can be checked using the on-board
computer.
The tire temperature and pressure increase
when the vehicle is in motion. This is dependenton the driving speed and the load.
Therefore, you should only correct tire pres-
sures when the tires are cold.
The tires are cold:
Rif the vehicle has been parked without direct
sunlight on the tires for at least three hours
and
Rif the vehicle has been driven for less than
1 mile (1.6 km).
The tire temperature changes depending on the outside temperature, the vehicle speed and the
tire load. If the tire temperature changes by
18 ‡ (10 †), the tire pressure changes by
approximately 10 kPa (0.1 bar/1.5 psi). Take
this into account when checking the pressure of
warm tires. Only correct the tire pressure if it is
too low for the current operating conditions. If
you check the tire pressure when the tires are
warm, the resulting value will be higher than if
the tires were cold. This is normal. Do not
reduce the tire pressure to the value specified
for cold tires. The tire pressure would otherwise
be too low.
Observe the recommended tire pressures for
cold tires:
Ron the Tire and Loading Information placard
on the B-pillar on the driver's side
Rin the tire pressure table on the inside of the
fuel filler flap
Observe the following for the tire pressure on
the spare wheel:
Rthe tire and loading information table on the
B-pillar on the driver's side.
Rthe tire pressure sticker on the inside of the
fuel filler flap.
Underinflated or overinflated tires
Underinflation
GWARNING
Tires with pressure that is too low can over-
heat and burst as a consequence. In addition, they also suffer from excessive and/or irreg-
ular wear, which can severely impair the brak-
ing properties and the driving characteristics.
There is a risk of an accident.
Avoid tire pressures that are too low in all the
tires, including the spare wheel.
Underinflated tires may:
Roverheat, leading to tire defects
Rhave an adverse effect on handling charac-
teristics
Rwear quickly and unevenly
Rhave an adverse effect on fuel consumption
Overinflation
GWARNING
Tires with excessively high pressure can burst
because they are damaged more easily by
road debris, potholes etc. In addition, they
also suffer from irregular wear, which can
severely impair the braking properties and the driving characteristics. There is a risk of an
accident.
Avoid tire pressures that are too high in all the
tires, including the spare wheel.
Overinflated tires may:
Rincrease the braking distance
Rhave an adverse effect on handling charac-
teristics
Rwear quickly and unevenly
Rhave an adverse effect on ride comfort
Rbe more susceptible to damage
Tire pressure267
Wheels and tires
Z
Page 272 of 302

2. This device must accept any interference
received, including interference that may
cause undesired operation of the device.
Any unauthorized modification to this device
could void the user's authority to operate the
equipment.
iCanada only:
This device complies with RSS-210 of Indus-
try Canada. Operation is subject to the fol-
lowing two conditions:
1. This device may not cause harmful inter-
ference, and
2. this device must accept any interference
received, including interference that may
cause undesired operation of the device.
Any unauthorized modification to this device
could void the user's authority to operate the
equipment.
Checking the tire pressure electroni-
cally
XMake sure that the SmartKey is in position 2
in the ignition lock (Ypage 112).
XPress the =or; button on the steering
wheel to select the Serv.menu.
XPress the9or: button to select
Tire Pressure.
XPress the abutton.
The current tire pressure of each tire is shown
in the multifunction display.
If the vehicle has been parked for over
20 minutes, the Tire pressure will be
displayed after driving a few minutesmessage appears.
After a teach-in process, the tire pressure mon-
itor automatically detects new wheels or new
sensors. As long as a clear allocation of the tire
pressure value to the individual wheels is not
possible, theTire
PressureMonitorActivedisplay message is shown instead of the tire
pressure display. The tire pressures are already
being monitored.
iIf a spare wheel is mounted, the system may
continue to show the tire pressure of the
wheel that has been removed for a few
minutes. Observe that the displayed value is
not the same as the current tire pressure of
the emergency spare wheel.
Tire pressure monitor warning mes-
sages
If the tire pressure monitor detects a significant
pressure loss on one or more tires, a warning
message is shown in the multifunction display. A
warning tone also sounds and the tire pressure
warning lamp lights up in the instrument cluster.
Each tire that is affected by a significant loss of
pressure is highlighted in the pressure display.
XIf the Correct Tire Pressuremessage
appears in the multifunction display, check
the tire pressure on all four wheels and cor-
rect it if necessary.
XIf the Check Tiresmessage appears in the
multifunction display, the tire pressure in one
or more tires has dropped significantly and
the tires must be checked.
XIf the Tire Press. Warning CautionTire Malfunctionmessage appears in the
multifunction display, the tire pressure in one
or more tires has dropped suddenly and the
tires must be checked.
iIf the wheel positions on the vehicle are
rotated, the tire pressures may be displayed
for the wrong positions for a short time. This is
rectified after a few minutes of driving, and
the tire pressures are displayed for the cor-
rect positions.
Restarting the tire pressure monitor
When you restart the tire pressure monitor, all
existing warning messages are deleted and the
warning lamps go out. The monitor uses the cur-
rently set tire pressures as the reference values for monitoring. In most cases, the tire pressure
monitor will automatically detect the new refer-
ence values after you have changed the tire
pressure. However, you can also define refer-
ence values manually as described here.
XSet the tire pressure to the value recommen- ded for the corresponding driving situation on
the Tire and Loading Information placard on
the driver's side B-pillar (
Ypage 265).
Additional tire pressure values for different
loads can also be found on the tire pressure
table on the inside of the fuel filler flap
(
Ypage 265).
XMake sure that the tire pressure is correct on
all four wheels.
270Tire pressure
Wheels and tires
Page 283 of 302
Weight of optional extras
The combined weight of those optional extras
that weigh more than the replaced standard
parts and more than 2.3 kg (5 lbs). These
optional extras, such as high-performance
brakes, level control, a roof rack or a high-per-
formance battery, are not included in the curb
weight and the weight of the accessories.
TIN (Tire Identification Number)
This is a unique identifier which can be used by
a tire manufacturer to identify tires, for example
for a product recall, and thus identify the pur-
chasers. The TIN is made up of the manufactur- er's identity code, tire size, tire type code and
the manufacturing date.
Load bearing index
The load bearing index (also load index) is a code
that contains the maximum load bearing capa-
city of a tire.
Traction
Traction is the result of friction between the tires
and the road surface.
TWR (Tongue Weight Rating)
The TWR specifies the maximum permissible
weight that the ball coupling of the trailer tow
hitch can support.
Treadwear indicators
Narrow bars (tread wear bars) that are distrib-
uted over the tire tread. If the tire tread is level
with the bars, the wear limit of áin (1.6 mm)
has been reached.
Occupant distribution
The distribution of occupants in a vehicle at their
designated seating positions.
Total load limit
Nominal load and luggage load plus 150 lb
(68 kilograms) multiplied by the number of seats
in the vehicle.
Changing a wheel
Flat tire
The "Breakdown assistance" section
(Ypage 250) contains information and notes on
how to deal with a flat tire.
Rotating the wheels
GWARNING
Interchanging the front and rear wheels may
severely impair the driving characteristics if
the wheels or tires have different dimensions. The wheel brakes or suspension components
may also be damaged. There is a risk of acci-
dent.
Rotate front and rear wheels only if the wheels and tires are of the same dimensions.
!On vehicles equipped with a tire pressure
monitor, electronic components are located
in the wheel.
Tire-mounting tools should not be used near
the valve. This could damage the electronic
components.
Only have tires changed at a qualified spe-
cialist workshop.
Rotating front and rear wheels of differing
dimensions can render the general operating
permit invalid.
Always pay attention to the instructions and
safety notices in the section on "Changing a
wheel and mounting a spare wheel"
(
Ypage 282).
The wear patterns on the front and rear tires
differ, depending on the operating conditions.
Rotate the wheels before a clear wear pattern
has formed on the tires. Front tires typically
wear more on the shoulders and the rear tires in
the center.
If your vehicle's tire configuration allows, you
can rotate the wheels according to the intervals
in the tire manufacturer's warranty book in your
vehicle documents. If no warranty book is avail-
able, the tires should be rotated every 3,000 to
6,000 miles (5,000 to 10,000 km), or earlier if
tire wear requires. Do not change the direction
of wheel rotation.
Clean the contact surfaces of the wheel and the brake disc thoroughly every time a wheel is rota-
Changing a wheel281
Wheels and tires
Z