2016 MERCEDES-BENZ G-Class spare tire
[x] Cancel search: spare tirePage 270 of 302
Maximum tire pressures
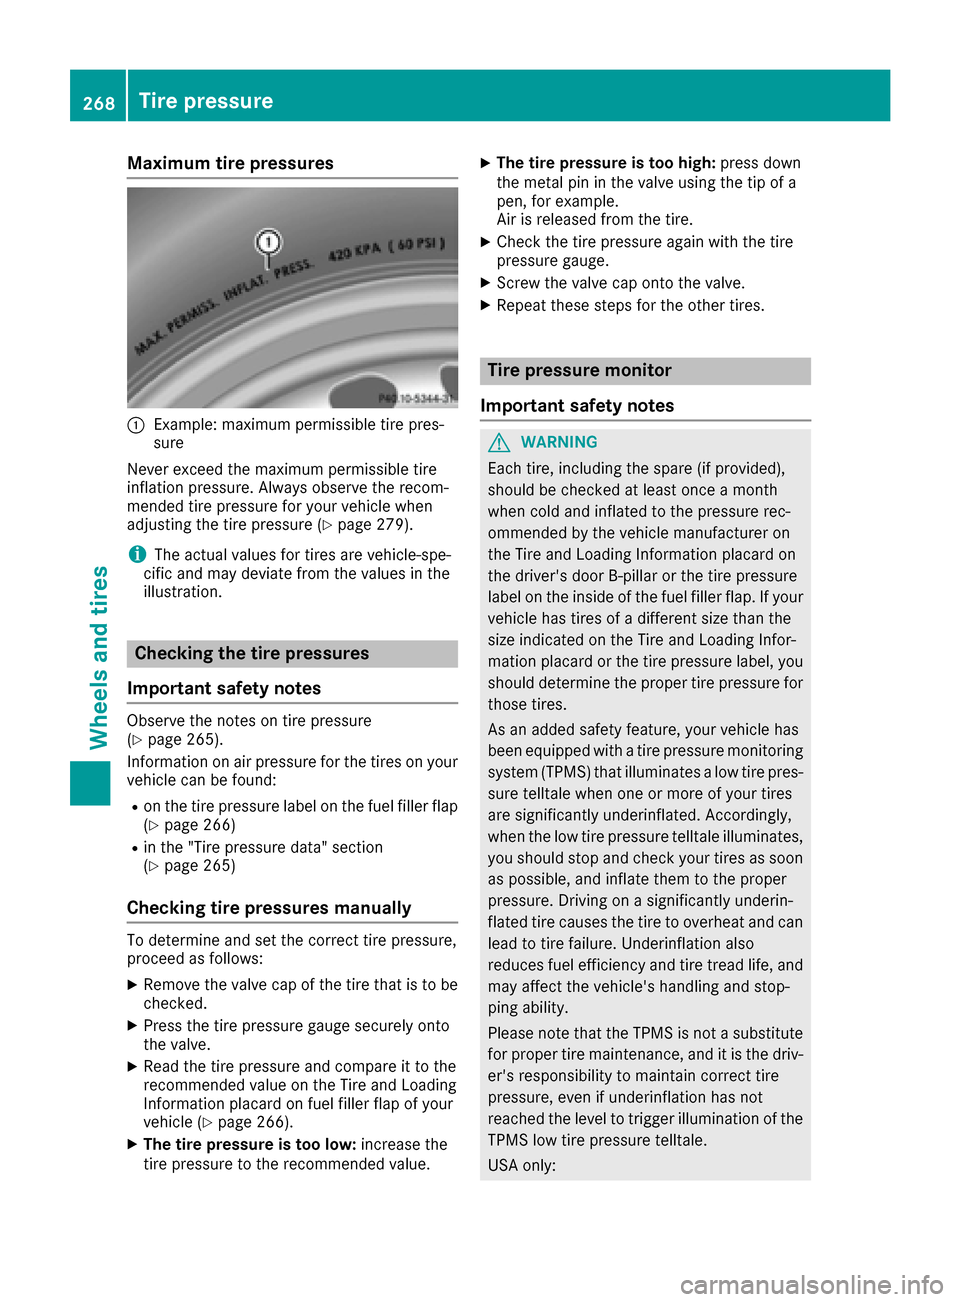
:Example: maximum permissible tire pres-
sure
Never exceed the maximum permissible tire
inflation pressure. Always observe the recom-
mended tire pressure for your vehicle when
adjusting the tire pressure (
Ypage 279).
iThe actual values for tires are vehicle-spe-
cific and may deviate from the values in the
illustration.
Checking the tire pressures
Important safety notes
Observe the notes on tire pressure
(Ypage 265).
Information on air pressure for the tires on your
vehicle can be found:
Ron the tire pressure label on the fuel filler flap
(Ypage 266)
Rin the "Tire pressure data" section
(Ypage 265)
Checking tire pressures manually
To determine and set the correct tire pressure,
proceed as follows:
XRemove the valve cap of the tire that is to be
checked.
XPress the tire pressure gauge securely onto
the valve.
XRead the tire pressure and compare it to the
recommended value on the Tire and Loading
Information placard on fuel filler flap of your
vehicle (
Ypage 266).
XThe tire pressure is too low: increase the
tire pressure to the recommended value.
XThe tire pressure is too high: press down
the metal pin in the valve using the tip of a
pen, for example.
Air is released from the tire.
XCheck the tire pressure again with the tire
pressure gauge.
XScrew the valve cap onto the valve.
XRepeat these steps for the other tires.
Tire pressure monitor
Important safety notes
GWARNING
Each tire, including the spare (if provided),
should be checked at least once a month
when cold and inflated to the pressure rec-
ommended by the vehicle manufacturer on
the Tire and Loading Information placard on
the driver's door B-pillar or the tire pressure
label on the inside of the fuel filler flap. If your
vehicle has tires of a different size than the
size indicated on the Tire and Loading Infor-
mation placard or the tire pressure label, you
should determine the proper tire pressure for
those tires.
As an added safety feature, your vehicle has
been equipped with a tire pressure monitoring
system (TPMS) that illuminates a low tire pres-
sure telltale when one or more of your tires
are significantly underinflated. Accordingly,
when the low tire pressure telltale illuminates,
you should stop and check your tires as soon
as possible, and inflate them to the proper
pressure. Driving on a significantly underin-
flated tire causes the tire to overheat and can lead to tire failure. Underinflation also
reduces fuel efficiency and tire tread life, and
may affect the vehicle's handling and stop-
ping ability.
Please note that the TPMS is not a substitute
for proper tire maintenance, and it is the driv-
er's responsibility to maintain correct tire
pressure, even if underinflation has not
reached the level to trigger illumination of the
TPMS low tire pressure telltale.
USA only:
268Tire pressure
Wheels and tires
Page 272 of 302

2. This device must accept any interference
received, including interference that may
cause undesired operation of the device.
Any unauthorized modification to this device
could void the user's authority to operate the
equipment.
iCanada only:
This device complies with RSS-210 of Indus-
try Canada. Operation is subject to the fol-
lowing two conditions:
1. This device may not cause harmful inter-
ference, and
2. this device must accept any interference
received, including interference that may
cause undesired operation of the device.
Any unauthorized modification to this device
could void the user's authority to operate the
equipment.
Checking the tire pressure electroni-
cally
XMake sure that the SmartKey is in position 2
in the ignition lock (Ypage 112).
XPress the =or; button on the steering
wheel to select the Serv.menu.
XPress the9or: button to select
Tire Pressure.
XPress the abutton.
The current tire pressure of each tire is shown
in the multifunction display.
If the vehicle has been parked for over
20 minutes, the Tire pressure will be
displayed after driving a few minutesmessage appears.
After a teach-in process, the tire pressure mon-
itor automatically detects new wheels or new
sensors. As long as a clear allocation of the tire
pressure value to the individual wheels is not
possible, theTire
PressureMonitorActivedisplay message is shown instead of the tire
pressure display. The tire pressures are already
being monitored.
iIf a spare wheel is mounted, the system may
continue to show the tire pressure of the
wheel that has been removed for a few
minutes. Observe that the displayed value is
not the same as the current tire pressure of
the emergency spare wheel.
Tire pressure monitor warning mes-
sages
If the tire pressure monitor detects a significant
pressure loss on one or more tires, a warning
message is shown in the multifunction display. A
warning tone also sounds and the tire pressure
warning lamp lights up in the instrument cluster.
Each tire that is affected by a significant loss of
pressure is highlighted in the pressure display.
XIf the Correct Tire Pressuremessage
appears in the multifunction display, check
the tire pressure on all four wheels and cor-
rect it if necessary.
XIf the Check Tiresmessage appears in the
multifunction display, the tire pressure in one
or more tires has dropped significantly and
the tires must be checked.
XIf the Tire Press. Warning CautionTire Malfunctionmessage appears in the
multifunction display, the tire pressure in one
or more tires has dropped suddenly and the
tires must be checked.
iIf the wheel positions on the vehicle are
rotated, the tire pressures may be displayed
for the wrong positions for a short time. This is
rectified after a few minutes of driving, and
the tire pressures are displayed for the cor-
rect positions.
Restarting the tire pressure monitor
When you restart the tire pressure monitor, all
existing warning messages are deleted and the
warning lamps go out. The monitor uses the cur-
rently set tire pressures as the reference values for monitoring. In most cases, the tire pressure
monitor will automatically detect the new refer-
ence values after you have changed the tire
pressure. However, you can also define refer-
ence values manually as described here.
XSet the tire pressure to the value recommen- ded for the corresponding driving situation on
the Tire and Loading Information placard on
the driver's side B-pillar (
Ypage 265).
Additional tire pressure values for different
loads can also be found on the tire pressure
table on the inside of the fuel filler flap
(
Ypage 265).
XMake sure that the tire pressure is correct on
all four wheels.
270Tire pressure
Wheels and tires
Page 278 of 302
DLoad identification (Ypage 277)
ETire name
The markings described above are on the tire in
addition to the tire name (sales designation) and
the manufacturer's name.
iTire data is vehicle-specific and may deviate
from the data in the example.
Tire size designation, load-bearing
capacity and speed rating
GWARNING
Exceeding the stated tire load-bearing capa-
city and the approved maximum speed could
lead to tire damage or the tire bursting. There is a risk of accident.
Therefore, only use tire types and sizes
approved for your vehicle model. Observe the
tire load rating and speed rating required for
your vehicle.
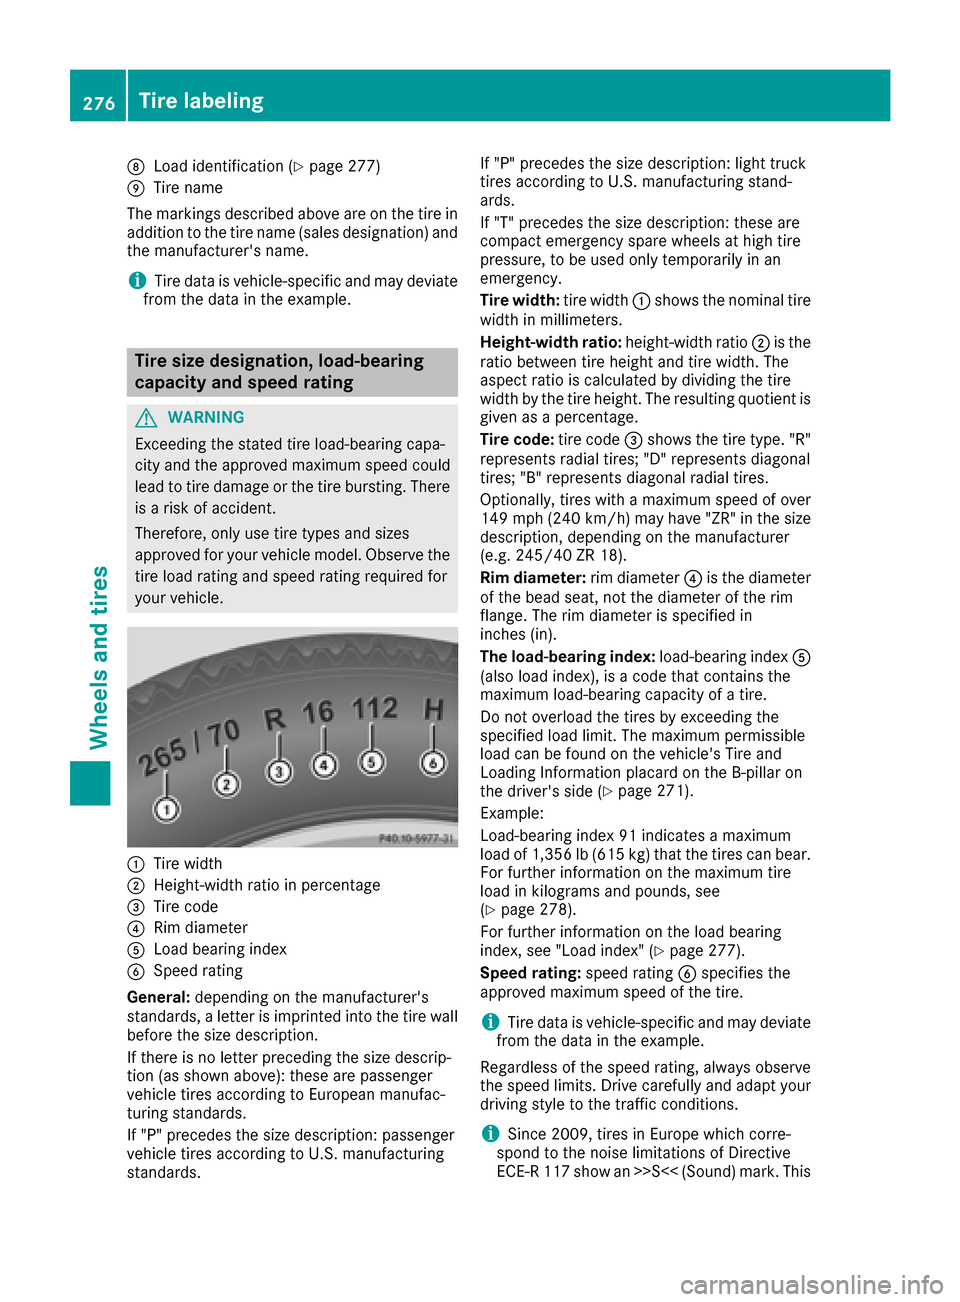
:Tire width
;Height-width ratio in percentage
=Tire code
?Rim diameter
ALoad bearing index
BSpeed rating
General: depending on the manufacturer's
standards, a letter is imprinted into the tire wall before the size description.
If there is no letter preceding the size descrip-
tion (as shown above): these are passenger
vehicle tires according to European manufac-
turing standards.
If "P" precedes the size description: passenger
vehicle tires according to U.S. manufacturing
standards. If "P" precedes the size description: light truck
tires according to U.S. manufacturing stand-
ards.
If "T" precedes the size description: these are
compact emergency spare wheels at high tire
pressure, to be used only temporarily in an
emergency.
Tire width:
tire width:shows the nominal tire
width in millimeters.
Height-width ratio: height-width ratio;is the
ratio between tire height and tire width. The
aspect ratio is calculated by dividing the tire
width by the tire height. The resulting quotient is
given as a percentage.
Tire code: tire code=shows the tire type. "R"
represents radial tires; "D" represents diagonal
tires; "B" represents diagonal radial tires.
Optionally, tires with a maximum speed of over
149 mph (240 km/h) may have "ZR" in the size
description, depending on the manufacturer
(e.g. 245/40 ZR 18).
Rim diameter: rim diameter?is the diameter
of the bead seat, not the diameter of the rim
flange. The rim diameter is specified in
inches (in).
The load-bearing index: load-bearing indexA
(also load index), is a code that contains the
maximum load-bearing capacity of a tire.
Do not overload the tires by exceeding the
specified load limit. The maximum permissible
load can be found on the vehicle's Tire and
Loading Information placard on the B-pillar on
the driver's side (
Ypage 271).
Example:
Load-bearing index 91 indicates a maximum
load of 1,356 lb (615 kg) that the tires can bear.
For further information on the maximum tire
load in kilograms and pounds, see
(
Ypage 278).
For further information on the load bearing
index, see "Load index" (
Ypage 277).
Speed rating: speed ratingBspecifies the
approved maximum speed of the tire.
iTire data is vehicle-specific and may deviate
from the data in the example.
Regardless of the speed rating, always observe
the speed limits. Drive carefully and adapt your
driving style to the traffic conditions.
iSince 2009, tires in Europe which corre-
spond to the noise limitations of Directive
ECE-R 117 show an >>S<< (Sound) mark. This
276Tire labeling
Wheels and tires
Page 281 of 302
Tire characteristics
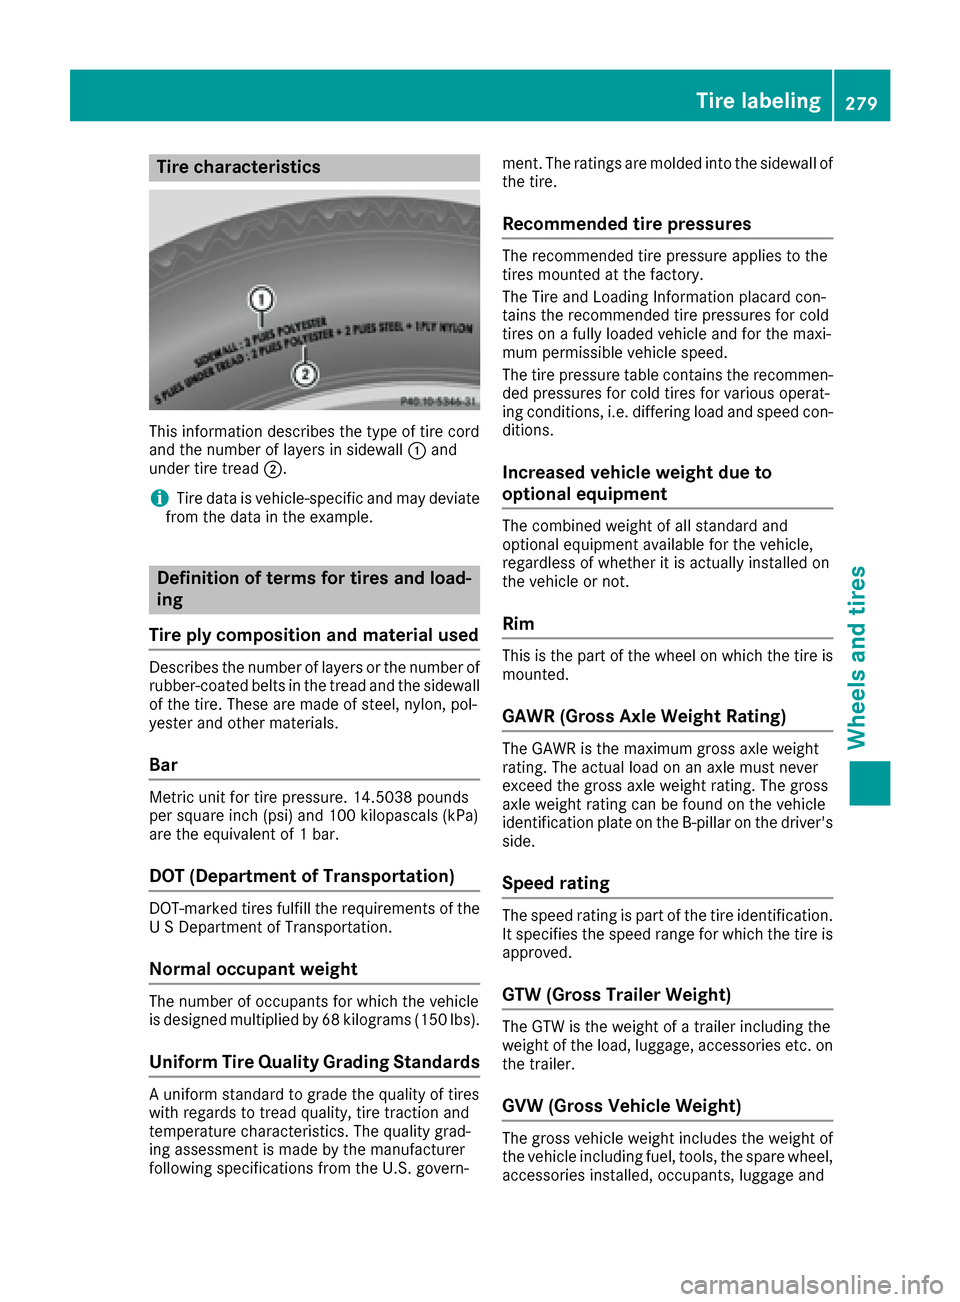
This information describes the type of tire cord
and the number of layers in sidewall:and
under tire tread ;.
iTire data is vehicle-specific and may deviate
from the data in the example.
Definition of terms for tires and load-
ing
Tire ply composition and material used
Describes the number of layers or the number of
rubber-coated belts in the tread and the sidewall
of the tire. These are made of steel, nylon, pol-
yester and other materials.
Bar
Metric unit for tire pressure. 14.5038 pounds
per square inch (psi) and 100 kilopascals (kPa)
are the equivalent of 1 bar.
DOT (Department of Transportation)
DOT-marked tires fulfill the requirements of the
U S Department of Transportation.
Normal occupant weight
The number of occupants for which the vehicle
is designed multiplied by 68 kilograms (150 lb s).
Uniform Tire Quality Grading Standards
A uniform standard to grade the quality of tires
with regards to tread quality, tire traction and
temperature characteristics. The quality grad-
ing assessment is made by the manufacturer
following specifications from the U.S. govern- ment. The ratings are molded into the sidewall of
the tire.
Recommended tire pressures
The recommended tire pressure applies to the
tires mounted at the factory.
The Tire and Loading Information placard con-
tains the recommended tire pressures for cold
tires on a fully loaded vehicle and for the maxi-
mum permissible vehicle speed.
The tire pressure table contains the recommen-
ded pressures for cold tires for various operat-
ing conditions, i.e. differing load and speed con-
ditions.
Increased vehicle weight due to
optional equipment
The combined weight of all standard and
optional equipment available for the vehicle,
regardless of whether it is actually installed on
the vehicle or not.
Rim
This is the part of the wheel on which the tire is
mounted.
GAWR (Gross Axle Weight Rating)
The GAWR is the maximum gross axle weight
rating. The actual load on an axle must never
exceed the gross axle weight rating. The gross
axle weight rating can be found on the vehicle
identification plate on the B-pillar on the driver's
side.
Speed rating
The speed rating is part of the tire identification.
It specifies the speed range for which the tire is
approved.
GTW (Gross Trailer Weight)
The GTW is the weight of a trailer including the
weight of the load, luggage, accessories etc. on
the trailer.
GVW (Gross Vehicle Weight)
The gross vehicle weight includes the weight of
the vehicle including fuel, tools, the spare wheel,
accessories installed, occupants, luggage and
Tire labeling279
Wheels and tires
Z
Page 283 of 302
Weight of optional extras
The combined weight of those optional extras
that weigh more than the replaced standard
parts and more than 2.3 kg (5 lbs). These
optional extras, such as high-performance
brakes, level control, a roof rack or a high-per-
formance battery, are not included in the curb
weight and the weight of the accessories.
TIN (Tire Identification Number)
This is a unique identifier which can be used by
a tire manufacturer to identify tires, for example
for a product recall, and thus identify the pur-
chasers. The TIN is made up of the manufactur- er's identity code, tire size, tire type code and
the manufacturing date.
Load bearing index
The load bearing index (also load index) is a code
that contains the maximum load bearing capa-
city of a tire.
Traction
Traction is the result of friction between the tires
and the road surface.
TWR (Tongue Weight Rating)
The TWR specifies the maximum permissible
weight that the ball coupling of the trailer tow
hitch can support.
Treadwear indicators
Narrow bars (tread wear bars) that are distrib-
uted over the tire tread. If the tire tread is level
with the bars, the wear limit of áin (1.6 mm)
has been reached.
Occupant distribution
The distribution of occupants in a vehicle at their
designated seating positions.
Total load limit
Nominal load and luggage load plus 150 lb
(68 kilograms) multiplied by the number of seats
in the vehicle.
Changing a wheel
Flat tire
The "Breakdown assistance" section
(Ypage 250) contains information and notes on
how to deal with a flat tire.
Rotating the wheels
GWARNING
Interchanging the front and rear wheels may
severely impair the driving characteristics if
the wheels or tires have different dimensions. The wheel brakes or suspension components
may also be damaged. There is a risk of acci-
dent.
Rotate front and rear wheels only if the wheels and tires are of the same dimensions.
!On vehicles equipped with a tire pressure
monitor, electronic components are located
in the wheel.
Tire-mounting tools should not be used near
the valve. This could damage the electronic
components.
Only have tires changed at a qualified spe-
cialist workshop.
Rotating front and rear wheels of differing
dimensions can render the general operating
permit invalid.
Always pay attention to the instructions and
safety notices in the section on "Changing a
wheel and mounting a spare wheel"
(
Ypage 282).
The wear patterns on the front and rear tires
differ, depending on the operating conditions.
Rotate the wheels before a clear wear pattern
has formed on the tires. Front tires typically
wear more on the shoulders and the rear tires in
the center.
If your vehicle's tire configuration allows, you
can rotate the wheels according to the intervals
in the tire manufacturer's warranty book in your
vehicle documents. If no warranty book is avail-
able, the tires should be rotated every 3,000 to
6,000 miles (5,000 to 10,000 km), or earlier if
tire wear requires. Do not change the direction
of wheel rotation.
Clean the contact surfaces of the wheel and the brake disc thoroughly every time a wheel is rota-
Changing a wheel281
Wheels and tires
Z
Page 284 of 302

ted. Check the tire pressure and reactivate the
tire pressure monitor (Ypage 268)if necessary.
Direction of rotation
Tires with a specified direction of rotation have
additional benefits, e.g. if there is a risk of hydro-
planing. You will only gain these benefits if the
correct direction of rotation is observed.
An arrow on the sidewall of the tire indicates its
correct direction of rotation.
You may mount the spare wheel against the
direction of rotation. Adhere to the time restric-
tion on use as well as the speed limitation speci-
fied on the spare wheel.
Storing wheels
Store tires that are not being used in a cool, dry
and preferably dark place. Protect the tires from
oil, grease, gasoline and diesel.
Mounting a wheel
Preparing the vehicle
GWARNING
When you remove the spare wheel from the
spare wheel bracket, the vehicle’s weight dis-
tribution changes. If the vehicle is already
raised, the jack could tip over. There is a risk
of injury.
Remove the spare wheel from the spare wheel
bracket before lifting the vehicle.
XPrepare the vehicle as described
(Ypage 250).
XRemove the vehicle tool kit and the jack
(Ypage 248).
XSecure the vehicle to prevent it from rolling
away.
XRemove the spare wheel from the spare wheel
bracket (Ypage 249).
iVehicles without a spare wheel or emer-
gency spare wheel are not equipped with a
tire-change tool kit at the factory. For more
information on which tools are required to
perform a wheel change on your vehicle e.g. lug wrench or jack, consult an authorized
Mercedes-Benz Center.
Securing the vehicle to prevent it from
rolling away
XOn level ground:
place chocks or other suit-
able items under the front and rear of the
wheel that is diagonally opposite the wheel
you wish to change.
XOn downhill gradients: place chocks or
other suitable items in front of the wheels of
the front and rear axle.
Raising the vehicle
GWARNING
If you do not position the jack correctly at the
appropriate jacking point of the vehicle, the
jack could tip over with the vehicle raised.
There is a risk of injury.
Only position the jack at the appropriate jack-
ing point of the vehicle. The base of the jack
must be positioned vertically, directly under
the jacking point of the vehicle.
!The jack is designed exclusively for jacking
up the vehicle at the jacking points. Other-
wise, your vehicle could be damaged.
Observe the following when raising the vehicle:
RTo raise the vehicle, only use the vehicle-spe-
cific jack that has been tested and approved
by Mercedes-Benz. If used incorrectly, the
jack could tip over with the vehicle raised.
RThe jack is designed only to raise and hold the
vehicle for a short time while a wheel is being
changed. It is not suited for performing main-
tenance work under the vehicle.
RAvoid changing the wheel on uphill and down- hill slopes.
RBefore raising the vehicle, secure it from roll-
ing away by applying the parking brake and
inserting wheel chocks. Do not disengage the
parking brake while the vehicle is raised.
RThe jack must be placed on a firm, flat and
non-slip surface. On a loose surface, a large,
load-bearing underlay must be used. On a
slippery surface, a non-slip underlay must be
used, e.g. rubber mats.
RDo not use wooden blocks or similar objects
as a jack underlay. Otherwise, the jack will not
282Changing a wheel
Wheels and tires
Page 286 of 302

Mounting a new wheel
GWARNING
Oiled or greased wheel bolts/wheel nuts and
damaged wheel bolt/wheel nut/wheel hub
threads can cause wheel bolts/wheel nuts to
come loose. As a result, you could lose a
wheel while driving. There is a risk of an acci-
dent.
Never oil or grease wheel bolts/wheel nuts. In
the event of damage to the threads, contact a
qualified specialist workshop immediately.
Have the damaged wheel bolts/wheel nuts or
hub threads replaced/renewed. Do not con-
tinue driving.
GWARNING
If you tighten the wheel bolts or wheel nuts
when the vehicle is raised, the jack could tip
over. There is a risk of injury.
Only tighten the wheel bolts or wheel nuts
when the vehicle is on the ground.
!To prevent damage to the paintwork, hold
the wheel securely against the wheel hub
while screwing in the first wheel bolt.
Always pay attention to the instructions and
safety notes in the "Changing a wheel" section
(
Ypage 281).
XClean the wheel and wheel hub contact sur-
faces.
XPlace the new wheel on the wheel hub and
push it on.
XTighten the wheel bolts until they are finger-
tight.
Lowering the vehicle
GWARNING
The wheels could work loose if the wheel nuts and bolts are not tightened to the specified
tightening torque. There is a risk of accident.
Have the tightening torque immediately
checked at a qualified specialist workshop
after a wheel is changed.
XOpen the pressure release screw on the jack
using the pump lever (Ypage 282) by approx-
imately one turn.
XLower the vehicle until it is once again stand-
ing firmly on the ground.
XPlace the jack to one side.
XTighten the wheel bolts evenly in a crosswise pattern in the sequence indicated (: toA).
The specified tightening torque is 96 lb-ft
(130 Nm).
XDisassemble the pump lever.
XPush the jack piston back in and close the
drain plug.
XUse the bolts to secure the faulty wheel to the
spare wheel bracket (Ypage 249).
XStow the jack and the vehicle tools in the
vehicle again.
XCheck the tire pressure of the newly installed
wheel and adjust it if necessary.
A table with the tire pressures for your vehicle can be found on the B-pillar on the driver's
side.
Wheel and tire combinations
General notes
GWARNING
If wheels and tires of the wrong size are used, the wheel brakes or suspension components
may be damaged. There is a risk of an acci-
dent.
Always replace wheels and tires with those
that fulfill the specifications of the original
part.
284Wheel and tire combinations
Wheels and tires
Page 287 of 302
When replacing wheels, make sure to use thecorrect:
Rdesignation
Rmodel
When replacing tires, make sure to use the
correct:
Rdesignation
Rmanufacturer
Rmodel
GWarning
A flat tire severely impairs the driving, steer-
ing and braking characteristics of the vehicle.
There is a risk of an accident.
do not drive with a flat tire. Immediately
replace the flat tire with your spare wheel, or
consult a qualified specialist workshop.
!For safety reasons, Mercedes-Benz recom-
mends that you only use tires, wheels and
accessories which have been approved by
Mercedes-Benz specifically for your vehicle.
These tires have been specially adapted for
use with the driving safety systems, such as
ABS or ESP
®.
Only use tires, wheels or accessories tested
and approved by Mercedes-Benz. Certain
characteristics, e.g. handling, vehicle noise
emissions or fuel consumption, may other-
wise be adversely affected. In addition, when
driving with a load, tire dimension variations
could cause the tires to come into contact
with the bodywork and axle components. This
could result in damage to the tires or the vehi-
cle.
Mercedes-Benz accepts no liability for dam-
age resulting from the use of tires, wheels or
accessories other than those tested and
approved.
Further information about wheels, tires and
approved combinations can be obtained from
any authorized Mercedes-Benz Center.
iThe recommended pressures for various
operating conditions can be found:
Ron the Tire and Loading Information placard
with the recommended tire pressures on
the B-pillar on the driver's side
Rin the tire pressure table on the inside of the
fuel filler flap
Observe the notes on recommended tire
pressure under various operating conditions.
Check tire pressures regularly, and only when
the tires are cold. Comply with the mainte-
nance recommendations of the tire manufac-
turer in the vehicle document wallet.
Further information on recommended tire pres-
sure as well as tire pressures for specific driving situations (
Ypage 279).
iNotes on the vehicle equipment – always
equip the vehicle with:
Rtires of the same size on a given axle (left/
right)
Rtires of the same type on your vehicle at a
given time (summer tires, winter tires, all-
weather tires, all-terrain tires)
iThe following pages contain information on
approved wheels and tire sizes for equipping
your vehicle with winter tires. Winter tires are
not available at the factory as standard equip-
ment or optional extras.
If you want to equip your vehicle with
approved winter tires, it may be necessary to
obtain wheel rims in the corresponding size.
The size of the approved winter tires may dif-
fer from the standard tires. This is dependent
on the model and the equipment installed at
the factory.
The tires and wheel rims, as well as further
information, can be obtained at a qualified
specialist workshop.
iNot all wheel and tire combinations are
available at the factory for all countries.
Wheel and tire combinations285
Wheels and tires
Z