2016 MERCEDES-BENZ E-CLASS SALOON ignition
[x] Cancel search: ignitionPage 388 of 557

#
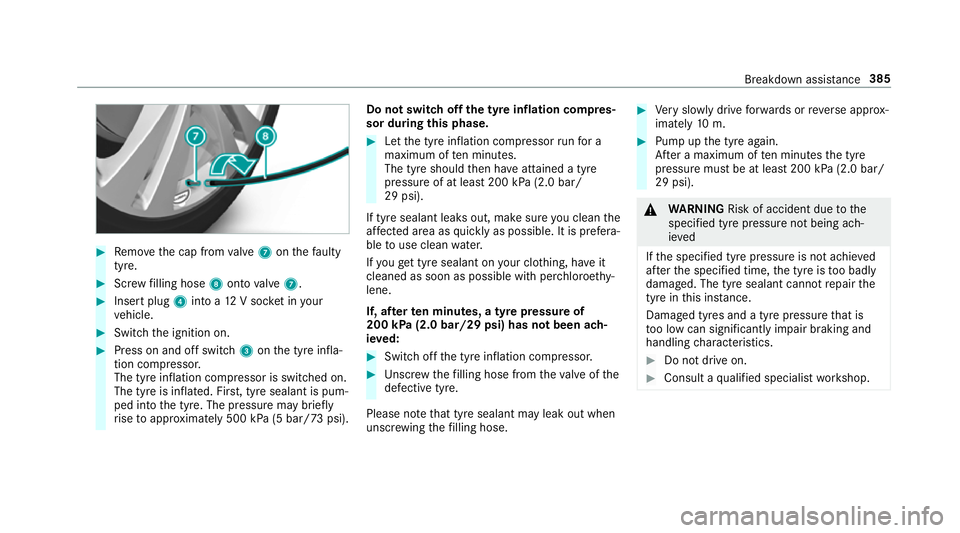
Remo vethe cap from valve 7 onthefa ulty
tyre. #
Screw filling hose 8onto valve 7. #
Insert plug 4into a 12V soc ket in your
ve hicle. #
Switch the ignition on. #
Press on and off switch 3onthe tyre infla‐
tion compressor.
The tyre inflation compressor is switched on.
The tyre is inflated. Fir st, tyre sealant is pum‐
ped into the tyre. The pressure may brief ly
ri se toappr oximately 500 kPa (5 bar/73 psi). Do not switch off
the ty reinflation compres‐
sor during this phase. #
Let the tyre inflation compressor runfo r a
maximum of ten minu tes.
The tyre should then ha veattained a tyre
pressure of at least 200 kPa (2.0 bar/
29 psi).
If tyre sealant leaks out, make sure you clean the
af fected area as quickly as possible. It is prefera‐
ble touse clean water.
If yo uge t tyre sealant on your clo thing, ha veit
cleaned as soon as possible with per chloroe thy‐
lene.
If, af terte n minutes, a tyre pressure of
200 kPa (2.0 bar/29 psi) has not been ach‐
ie ve d: #
Switch off the tyre inflation compressor. #
Unscr ew thefilling hose from theva lve of the
defective tyre.
Please no tethat tyre sealant may leak out when
unscr ewing thefilling hose. #
Very slowly drive forw ards or reve rse appr ox‐
imately 10m. #
Pump up the tyre again.
Af ter a maximum of ten minu testh e tyre
pressure must be at least 200 kPa (2.0 bar/
29 psi). &
WARNING Risk of accident due tothe
specified tyre pressure not being ach‐
ie ved
If th e specified tyre pressure is not achie ved
af te rth e specified time, the tyre is too badly
damaged. The tyre sealant cannot repair the
tyre in this ins tance.
Dama ged tyres and a tyre pressure that is
to o low can significantly impair braking and
handling characteristics. #
Do not drive on. #
Consult a qualified specialist workshop. Breakdown assis
tance 385
Page 394 of 557

R
Non- insulated parts of thete rm inal clamps
must not come into con tact wi thother me tal
parts while the jump lead/charging cable is
connected tothe battery/jump-s tart connec‐
tion point.
R The jump lead/charging cable must not
come into contact wi thany parts which may
mo vewhen the engine is running.
R Alw ays make sure that nei ther you nor the
battery is elect rostatically charge d.
R Keep away from fire and naked flames.
R Do not lean overth e batter y.
R When charging: only use battery charge rs
te sted and appr ovedby Mercedes-Benz and
re ad the battery charge r's operating instruc‐
tions before charging the batter y.
Obser vethe additional following points during
st arting assis tance:
R Starting assis tance may only be pr ovided
using batteries with a nominal voltage of 12
V.
R The vehicles must not touch. R
Petrol engine: Only acce ptstarting assis‐
ta nce if the engine and exhaust sy stem are
cold. #
Secure theve hicle byapplying the electric
parking brake. #
Automatic transmission: Shiftthe trans‐
mission toposition j. #
Manual transmission: Shift into neutral. #
Make sure that the ignition and all electrical
consumers are switched off. #
Open the engine bonn et. #
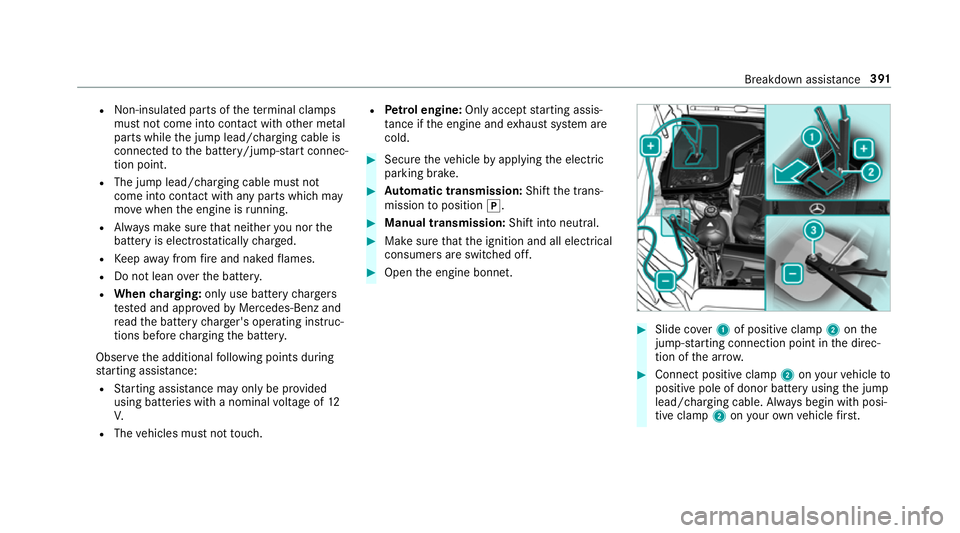
Slide co ver1 of positive clamp 2onthe
jump-s tarting connection point in the direc‐
tion of the ar row. #
Connect positive clamp 2onyour vehicle to
positive pole of donor battery using the jump
lead/charging cable. Alw ays begin with posi‐
tive clamp 2onyour ow nve hicle firs t. Breakdown assi
stance 391
Page 397 of 557

*
NO
TEDama gedue to to wing away at
exc essively high speeds or over long dis‐
ta nces The driv
etra in could be damaged when tow‐
ing at excessively high speeds or over long
dis tances. #
Atowing speed of 50 km/h must not
be exc eeded. #
Atowing dis tance of 50 km must not be
exc eeded. &
WARNING Risk of accident when towing
a ve hicle which is too heavy
If th eve hicle being tow- star ted or towed
aw ay is heavier than the permissible gross
mass, thefo llowing situations can occur:
R theto wing eye may become de tach ed.
R the car/t railer combination may swer ve
or eve nove rturn. #
If ano ther vehicle is tow- star ted or
to we daw ay, its weight must not exceed th
e permissible gross mass of your own
ve hicle. If a
vehicle must be tow- star ted or towe daw ay,
its weight must not exceed the permissible gross
mass of theto wing vehicle. #
Information on the permissible gross mass of
th eve hicle can be found on theve hicle iden‐
tification plate . #
Vehicles with automatic transmission: do
not open the driver's door or front passenger
door, otherwise the automatic transmission
automatically shifts toposition j. #
Fittheto wing eye (→ page 397). #
Attach theto w bar.
* NO
TEDama gedue toincor rect connec‐
tion #
Only connect theto w rope or tow bar to
th eto wing eyes. %
You can also attach theto w bar tothe trailer
hitch. #
Deactivate the automatic locking mechanism
(→ page 71). #
Do not activate the HOLD function. #
Deactivate tow- aw ay protection (→ page 89). #
Deactivate Active Brake Assi st (→page 189). #
Vehicles with automatic transmission:
shift the automatic transmission toposition
i. #
Vehicles with manual transmission: shift
to neutral i. #
Release the electric parking brake. #
Vehicles with manual transmission:
switch on the ignition, otherwise thesteering
wheel locking may engage. &
WARNING Risk of accident due tolimi‐
te d saf ety-re lated functions during the
to wing process
Saf ety-re lated functions are limited or no lon‐
ge rav ailable in thefo llowing situations:
R the ignition is switched off. 394
Breakdown assis tance
Page 400 of 557

Fi
tting the towing eye #
Press the mark on co ver1 inwa rds and
re mo ve. #
Screw intheto wing eyeclockwise tothe
st op.
Ve hicles with a trailer hitch: vehicles with a
trailer hitch do not ha vea brac ket at the back forth
eto wing eye. Connect theto w bar tothe
trailer hitch.
% Makesure that co ver1 engages in the
bumper when youre mo vetheto wing eye.
* NO
TEDama gedue toincor rect use of
th eto wing eye When a
towing eye is used toreco ver a vehi‐
cle, theve hicle may be damaged in the proc‐
ess. #
Only use theto wing eyeto to waw ay or
to w start theve hicle. To
w- starting theve hicle (eme rgency engine
st art) Ve
hicles with automatic transmission
* NO
TEDama getothe automatic trans‐
mission due to tow-starting The automatic transmission may be damaged
in the process of tow- starting vehicles with
automatic transmission. #
Vehicles with automatic transmission
must not be tow- star ted. #
Vehicles with automatic transmission must
not be tow- star ted.
Ve hicles with manual transmission #
Obser vethe no tes on towing away
( → page 393). #
If necessar y,allow the engine and exhaust
sy stem tocool down. #
Switch the ignition on. #
Enga gesecond gear. #
Release the electric parking brake. #
Tow- start theve hicle while the clutch pedal
is fully depressed. #
Slowly release the clutch pedal. #
Immediately shift toneutral if the engine
st arts. #
Pull over and stop theve hicle safely as soon
as possible, paying attention toroad and traf‐
fi c conditions. Breakdown assis
tance 397
Page 401 of 557

#
Remo vetheto w bar. #
Remo vetheto wing eye. #
Have theve hicle checked at a qualified spe‐
cialist workshop. Electrical fuses
Note
s on electrical fuses &
WARNING Risk of accident and inju ry
due to ov erloaded lines
If yo u manipulate or bridge a faulty fuse or if
yo ure place it with a fuse with a higher
amperage, the electric line could be overloa‐
ded.
This could result in a fire. #
Alw aysre place faulty fuses with speci‐
fi ed new fuses conta iningthe cor rect
amperage. *
NO
TEDama gecaused byincor rect fuses Incor
rect fuses may cause damage toelectri‐
cal components or sy stems. #
Only use Mercedes-Benz appr oved
fuses with the cor rect fuse rating. Blown fuses mu
stbe replaced with fuses of the
same rating, which you can recognise bythe col‐
our and fuse rating. The fuse ratings are li sted in
th e fuse assignment diagram.
Fu se assignment diag ram: onthe fuse box in
th e boot (→ page 400).
* NO
TEDama geor malfunctions caused
by moisture Moisture may cause dama
getothe electrical
sy stem or cause it tomalfunction. #
When the fuse box is open, make sure
th at no moisture can enter the fuse
box. #
When closing the fuse box, make sure
th at the seal of the lid is positioned cor‐
re ctly on the fuse box. If
th e newly inser ted fuse also blo ws, ha vethe
cause traced and rectified at a qualified special‐ ist
workshop, e.g. a Mercedes-Benz Service
Centre.
Ensure thefo llowing before replacing a fuse:
R The vehicle is secured against rolling away.
R All electrical consumers are switched off.
R The ignition is switched off.
The electrical fuses are located in various fuse
bo xes:
R Fuse box in the engine compartment on the
driver's side (→ page 399)
R Fuse box on the driver's side of the cockpit
(→ page 400)
R Fuse box in the front-passen gerfo ot we ll
(→ page 400)
R Fuse box in the boot on theright-hand side
of theve hicle, when vie wed in the direction
of tr avel (→ page 400) 398
Breakdown assis tance
Page 402 of 557

Fu
se box in the engine compa rtment Re
quirements:
Obser vethe no tes on electrical fuses
(→ page 398).
Ha ve thefo llowing readily available:
R A dry clo th
R A scr ewdriver
Opening &
WARNING Risk of inju ryfrom using the
windscreen wipers while the engine bon‐
net is open
When the engine bonn etis open, and the
windscreen wipers are set in motion, you can
be trapped bythe wiper linkage. #
Alw ays switch off the windscreen wip‐
ers and ignition before opening the
engine bonn et. #
Turn clip 2on co ver1 aqu arter-turn to
th e left. #
Pull co ver1 upwards in the direction of the
ar row. #
Remo veany existing moisture from the fuse
box using a dry clo th. #
Loosen scr ews4, remo vefuse box lid 3
from theto p.
Closing #
Check whe ther the seal is positioned cor‐
re ctly in the lid. Breakdown assis
tance 399
Page 408 of 557

Sy
stem limitations
The tyre pressure monitoring sy stem does not
issue a warning:
R Ifth e tyre pressure is set incor rectl y.
R Ifth ere is a sudden pressure loss caused, for
ex ample, byafo re ign object penetrating the
tyre.
R Ifth ere is a malfunction caused byano ther
ra dio signal source.
Be sure toalso obse rveth efo llowing fur ther
re lated subjects:
R Notes on tyre pressure (→ page 402)
Checking the ty repressure with the tyre
pressure moni toring sy stem
Requ irements:
R The ignition is switched on.
On-board computer: , Service .
Tyre pressure
One of thefo llowing displa ysappears:
R Cur rent tyre pressure of ea chwheel: R
Tyre pressures will be displayed after a few
minutes of driving
R Tyre pressure monitor active: thete ach-in
process of the sy stem is not yet compl ete.
The tyre pressures are already being moni‐
to re d. #
Compare the tyre pressure with there com‐
mended tyre pressure forth e cur rent operat‐
ing condition (→ page 403). Obse rvethe
no tes on tyre temp erature (→ page 402).
% The values displa yed in the multifunction dis‐
play may deviate from those of the tyre pres‐
sure gauge as they referto sea le vel.At high
altitudes, the tyre pressure values indicated by
pressure gauges are higher than those
shown bythe on-board computer. In this
case, do not reduce the tyre pressure.
Make sure you also obse rveth efo llowing related
subjects:
R Notes on tyre pressure (→ page 402)
Re starting the ty repressure moni toring sys‐
tem
Re quirements:
R The recommended tyre pressure is cor rectly
set forth ere spective operating condition on
each of thefo ur wheels (→ page 402).
Re start the tyre pressure monitoring sy stem in
th efo llowing situations:
R The tyre pressure has changed.
R The wheels or tyres ha vebeen changed or
newly fitted. Wheels and tyres
405
Page 430 of 557

*
NO
TEDama gecaused bythe wrong fuel Even small amounts of
the wrong fuel could
re sult in damage tothe fuel sy stem, the
engine and the emission control sy stem. #
Only refuel using premium-grade unlea‐
ded fuel that con form sto EN 228, or an
equi valent specification.
Fu el of this specification may con tain up to
10 %ethanol. Your vehicle is suitable for use
with E10 fuel.
Do not refuel using:
R Diesel
R E85, E100
R Petrol containing me thanol (M15, M30,
M85, M100)
R Petrol wi thadditives con taining me tal
If yo u accidentally refuel with the wrong fuel: #
Do not switch the ignition on. #
Consult a qualified specialist workshop. E 200, E 250, E 400 4MATIC:
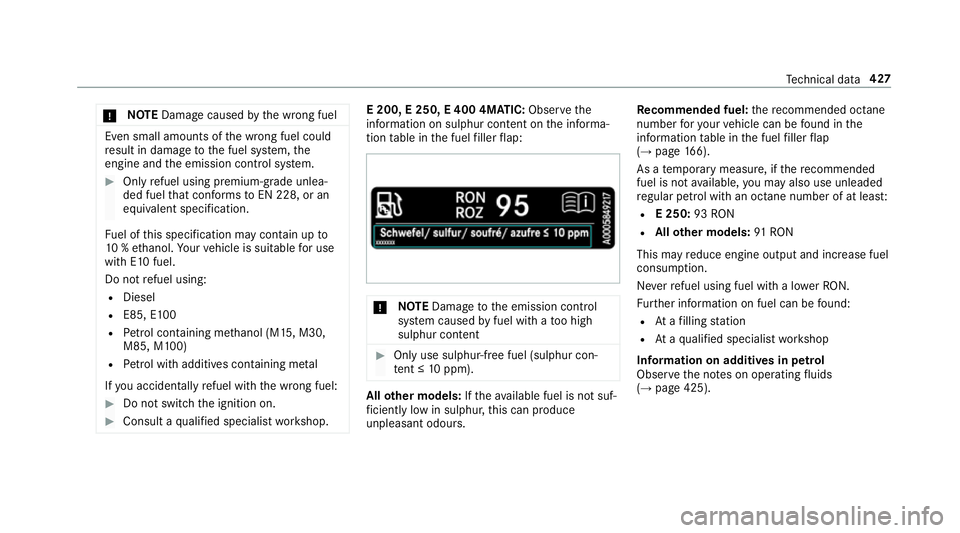
Observethe
information on sulphur con tent on the informa‐
tion table in the fuel filler flap: *
NO
TEDama getothe emission control
sy stem caused byfuel with a too high
sulphur content #
Only use sulphur-free fuel (sulphur con‐
tent ≤ 10ppm). All
other models: Ifth eav ailable fuel is not suf‐
fi ciently low in sulphu r,th is can produce
unpleasant odours. Re
commended fuel: there commended octane
number foryo ur vehicle can be found in the
information table in the fuel filler flap
(→ page 166).
As a temp orary measure, if there commended
fuel is not available, you may also use unleaded
re gular petrol with an octane number of at leas t:
R E 250: 93RON
R Allother models: 91RON
This may reduce engine output and increase fuel
consum ption.
Ne verre fuel using fuel with a lo werRO N.
Fu rther information on fuel can be found:
R Atafilling station
R Ataqu alified specialist workshop
Information on additives in petrol
Obser vethe no tes on operating fluids
(→ page 425). Te
ch nical da ta427