2016 MERCEDES-BENZ E-CLASS SALOON ECU
[x] Cancel search: ECUPage 252 of 557

St
atus displa ysinthe Assis tance graphic:
R é: ATTENTION ASSIST deactivated
R æ: Active Brake Assi stdeactivated
R Light lane markings: Active Lane Keeping
Assist activated
R Green lane markings: Active Lane Keeping
Assist actived R
Grey radar waves next tovehicle: Blind Spot
Assist activated
R Green radar waves next tovehicle: Blind Spot
Assist actived
R Display of Dis tance Pilot DISTRONIC
(→ page 193) Calling up displa
ysintheTr ip menu On-board computer:
, Trip
% Ve
hicles with the instrument display in
th e widescreen cockpit: whenyou ha veset
th e progressive display setting, you can view
information on the journey in theContent
menu. #
Toselect a displa y:swipe upwards or down‐
wa rds on the left-hand Touch Control.
Displa ysintheTrip menu:
R Standard display
R Range and cur rent fuel consu mption
A recuperation displ ayis also available for
cer tain engines. If there is only a small amount of fuel left in
the fuel tank, the dis‐
play sho wsave hicle being refuelled ins tead
of thera nge.
R ECO displ ay (→page 159)
R Trip computer From startandFrom reset
R Digital speedom eter
% Ve
hicles with an instrument display in
th e widescreen cockpit: the digital speed‐
ome ter only appears in the Classic or Sport
display setting. Example:
standard display
1 Trip dis tance
2 Total dis tance recorder Instrument Display and on-board compu
ter249
Page 281 of 557
R
Internet connection (→ page 329)
R listening tomusic via Blue tooth®
audio
(→ page 346)
R trans ferring business cards (vCards) into the
ve hicle
Blue tooth ®
is a regis tere d trademark of Blue‐
toot h Special Interest Group (SIG) Inc.
% Internet connection via Blue tooth®
is not
av ailable in all countries.
Ac tivating/deactivating Blue tooth ®
Multimedia sy stem:
, System .
ö Connectivity #
Activate Oor deacti vate ª Bluetoo th®
. Wi
-Fi Wi
-Fi connection overview
Yo u can use Wi-Fi toestablish a connection with
a Wi -Fi network and toaccess the Internet or
any other network device.
The following connection options are available:
R Wi-Fi connection The
Wi-Fi connection is es tablished with a
Wi -Fi-enabled device, e.g. tothe cus tomer's
mobile phone or tablet PC.
R multimedia sy stem as a Wi-Fi hotspot
Using this function, a tablet PC or no tebook
fo rex ample can be connec ted.
To establish a connection, you can use thefo l‐
lowing me thods:
R WPS PIN
The connection toa secure Wi-Fi network is
made via a PIN.
R WPS PBC
The connection toa secure Wi-Fi network is
made bypressing a button (push button).
R security key
The connection toa secure Wi-Fi network is
made via a secu rity key.
Setting up Wi-Fi
Re quirement:
The device tobe connec ted supports one of the
th re e means of connection described. Multimedia sy
stem:
, System .
ö Connectivity
Ac tivating/deactivating Wi-Fi #
Switch Wi-FionO or off ª.
If Wi-Fi is deactivated ª, communication via
Wi -Fi toall devices is inter rupte d. This also
means that a connection tothe HERMES
communication module cann otbe es tab‐
lished. Functions su chas dynamic route
guidance with Live Traf fic Information are
th en una vailable.
Connecting the multimedia sy stem with a
device via Wi-Fi
This function is available if a HERMES communi‐
cation module is not ins talled.
The type of connection es tablished must be
selected on the multimedia sy stem and on the
device tobe connec ted.
% The connection procedure may dif fer
depending on the device. Follow the instruc‐
tions that are shown in the displa y.Fu rther
information (see the manufacturer's operat‐
ing instructions). 278
Multimedia sy stem
Page 282 of 557

#
Select Internet settings . #
Select Search for Wi-Fi networks .#
Via WPS PIN: highlight aWi-Fi network in
th e list. #
Select ¥Connect via WPS PIN.
The multimedia sy stem generates an eight-
digit PIN. #
Enter this PIN on the device tobe connec ted. #
Confirm the entry. #
By pressing a button: highlight aWi-Fi net‐
wo rkinthe list. #
Select ¥Connect via WPS PBC. #
Select "Connect via WPS PBC" in the options
on the device tobe connec ted. #
Press the WPS button on the device tobe
connec ted. #
Select Continue inthe multimedia sy stem. #
Using a security key:highlight a Wi-Fi net‐
wo rkinthe list. #
Select ¥Connect using security key. #
Have the security key displa yed on the device
to be connec ted (see the manufacturer's
operating instructions). #
Ente rth is security key on the multimedia sys‐
te m. #
Confirm the entry bypressing ¡.
% All devices support a security key as a
means of connection.
Device has already been connec ted #
Toautomatically connect: highlight aWi-Fi
network in the list. #
Activate O¥ Connect automatically. #
Toconnect: highlight a Wi-Fi network in the
list. #
Select ¥Connect.
The connection is es tablished again. These
functions are possible when the device has
already been connected totheWi -Fi networ k.Setting up a
Wi-Fi hotspot
Multimedia sy stem:
, System .
ö Connectivity
Configuring the multimedia sy stem as a Wi-
Fi hotspot
The type of connection es tablished depends on
th e device tobe connec ted. The function must
be suppor tedby the multimedia sy stem and by
th e device tobe connec ted. The type of connec‐
tion es tablished must be selected on the multi‐
media sy stem and on the device tobe connec‐
te d. #
Select Set up hotspot. #
Highlight Connect device to vehicle hotspot. #
Togenerate a WPS PIN: select¥Con-
nect using WPS PIN generation. #
Ente rth e PIN shown in the multimedia sys‐
te m display on the device tobe connec ted
and con firm. #
Connect via WPS pin: select¥Con-
nect using WPS PIN input. #
Select Enter WPS PIN. Multimedia sy
stem 279
Page 283 of 557

#
Enter the PIN that is shown on theex tern al
device's display on the multimedia sy stem. #
Select Continue. #
Toconnect bypressing a button: select
¥ Connect via WPS PBC .#
Press the push button on the device tobe
connec ted. #
Select Continue. #
Toconnect via a security key:select Con-
nect device to vehicle hotspot.
A security key is displa yed. #
Select theve hicle from the device tobe con‐
nec ted. The vehicle is displa yed with the
SSID MB Hotspot XXXXX .#
Enter the security key which is shown in the
multimedia sy stem display on the device to
be connec ted. #
Confirm the entry.
To generate a new security key: #
Select Set up hotspot .#
Select Generate security key . #
Select Generate security key .
A connection will be es tablished with the
newly crea ted security key. #
Tosave a security key:select Save.
When a new security key is sa ved, all existing
Wi -Fi connections are then disconnected. If
th eWi -Fi connections are being re-es tab‐
lished, the new security key must be en tere d. COMAND
Touch Au
thorising a COMAND Touch device
Re quirements:
R The COMAND Touch App is ins talled on the
ex tern al device (e.g. tablet) which is tobe
used as a Rear Seat En tertainment unit.
R Wi-Fi is acti vated (→ page 278) and the mul‐
timedia sy stem is confi gured as a Wi-Fi Hot‐
spot (→ page 279). Mul
timedia sy stem:
, System .
COMAND Touch
Connecting a new device #
Select Authorise a new device. #
Select Connect new device.
A security key is displa yed. #
Ente rth e security key in theex tern al device.
The Please start COMAND Touch on your
device and follow the instructions. The App
is available in the App Store. message
appears
Selecting an already connected device #
Select Authorise a new device.
The devices already connec ted are displa yed. #
Select Continue using connected devices.
The Please start COMAND Touch on your
device and follow the instructions. The App
is available in the App Store. message
appears 280
Multimedia sy stem
Page 312 of 557
Connecting a mobile phone (au
thorisation
using Secure Simple Pairing) #
Select the mobile phone.
A code is displa yed in the multimedia sy stem
and on the mobile phone. #
Ifth e codes match: confirm the code on
th e mobile phone.
Connecting a mobile phone (authorisation by
entering a passk ey) #
Select the Blue tooth®
name of the mobile
phone. #
Choose a one tosixteen-digit number combi‐
nation as a passk ey. #
Multimedia sy stem: enter the passk eyand
select a. #
Mobile phone: enterthe passk eyagain and
con firm.
% Upto15 mobile phones can be auth orised
on the multimedia sy stem.
All telephones are automatically reconnec‐
te d. Disconnecting a mobile phone (de-au
thoris‐
ing)
Multimedia sy stem:
, Telephone .
á Connect device -
Mobile phone #
Select the mobile phone from the device list. #
Select ¥. #
Select De-authorise. #
Select Yes.
Switching mobile phones
Re quirement:
The mobile phones are authorised (→ page 308).
Multimedia sy stem:
, Telephone .
á Connect device -
Mobile phone #
Select the mobile phone from the device list.
% Only one mobile phone can be connected at
any one time. The connected mobile phone
is displa yed at theto p of the list. Using
the mobile phone with NearField Com‐
munication (NFC)
Re quirements:
R NFC is activated on the mobile phone (see
th e manufacturer's operating instructions)
R the mobile phone's screen is switched on
and unloc ked (see the manufacturer's oper‐
ating instructions)
NFC enables short-ra nge wireless data transfer. Multimedia sy
stem 309
Page 394 of 557
R
Non- insulated parts of thete rm inal clamps
must not come into con tact wi thother me tal
parts while the jump lead/charging cable is
connected tothe battery/jump-s tart connec‐
tion point.
R The jump lead/charging cable must not
come into contact wi thany parts which may
mo vewhen the engine is running.
R Alw ays make sure that nei ther you nor the
battery is elect rostatically charge d.
R Keep away from fire and naked flames.
R Do not lean overth e batter y.
R When charging: only use battery charge rs
te sted and appr ovedby Mercedes-Benz and
re ad the battery charge r's operating instruc‐
tions before charging the batter y.
Obser vethe additional following points during
st arting assis tance:
R Starting assis tance may only be pr ovided
using batteries with a nominal voltage of 12
V.
R The vehicles must not touch. R
Petrol engine: Only acce ptstarting assis‐
ta nce if the engine and exhaust sy stem are
cold. #
Secure theve hicle byapplying the electric
parking brake. #
Automatic transmission: Shiftthe trans‐
mission toposition j. #
Manual transmission: Shift into neutral. #
Make sure that the ignition and all electrical
consumers are switched off. #
Open the engine bonn et. #
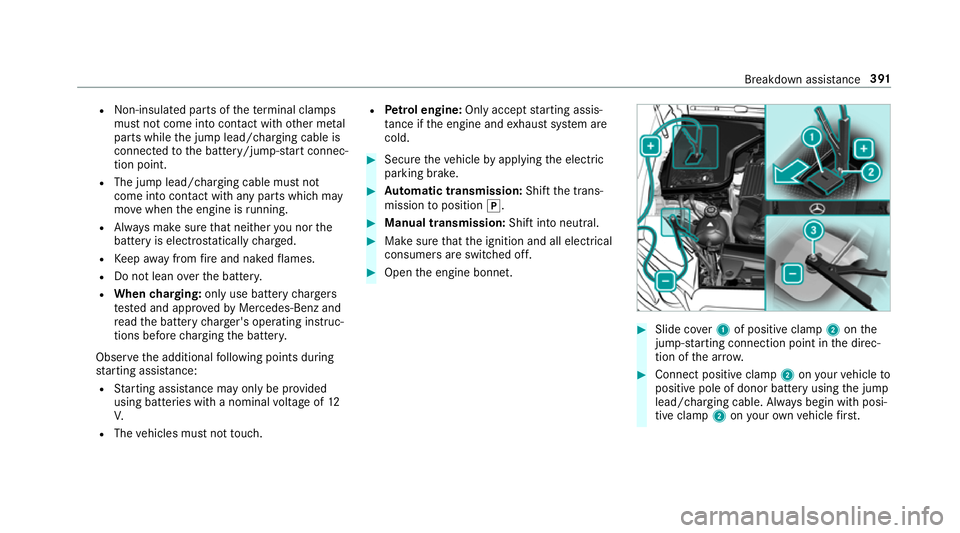
Slide co ver1 of positive clamp 2onthe
jump-s tarting connection point in the direc‐
tion of the ar row. #
Connect positive clamp 2onyour vehicle to
positive pole of donor battery using the jump
lead/charging cable. Alw ays begin with posi‐
tive clamp 2onyour ow nve hicle firs t. Breakdown assi
stance 391
Page 398 of 557
R
the brake sy stem or po werst eering sys‐
te m is malfunctioning.
R the energy supply or the on-board electri‐
cal sy stem is malfunctioning.
When your vehicle is then towe daw ay, signif‐
icantly more ef fort may be requ ired tosteer
and brake than is no rmally requ ired. #
Use a tow bar. #
Make sure that thesteering wheel can
mo vefreely, before towing theve hicle
aw ay. *
NO
TEDama gedue toexcessive tracti ve
po wer If
yo u pull away sharpl y,the tractive po wer
may be too high and theve hicles could be
damaged. #
Pull away slowly and smoo thly. Loading the
vehicle for transport #
Obser vethe no tes on towing away
( → page 393). #
Connect theto w bar totheto wing eyeto
load theve hicle.
% You can also attach theto w bar tothe trailer
hitch. #
Vehicles with automatic transmission:
shift the automatic transmission toposition
i.
% Ve
hicles with automatic transmission:
th e automatic transmission may be loc ked in
position jintheeve nt of dama getothe
electrical sy stem. Toshift toi , pr ovide the
on-board electrical sy stem with po wer
( → page 389). #
Vehicles with manual transmission: shift
to neutral. #
Load theve hicle onto the transpor ter. #
Vehicles with automatic transmission:
shift the automatic transmission toposition
j. #
Vehicles with manual transmission:
engage firs t or reve rsege ar. #
Use the electric parking brake tosecure the
ve hicle and pr event it from rolling away. #
Only secure theve hicle bythe wheels.
Ve hicles with ADS PLUS (Adaptive Damping
Sy stem PLUS) &
WARNING Risk of accident when trans‐
porting vehicles with AIR BODY CON‐
TROL
The reduced damping forc es on theve hicle
being transpor ted can cause theve hicle/
trailer combination tostart toswing.
As a result, when transporting vehicles with
AIR BODY CONTROL theve hicle/trailer com‐
bination may start toskid. Consequentl y,you
could lose control of your vehicle.
There is a risk of accident and injur y. #
Load theve hicle cor rectly onto the
transpo rter. Breakdown assis
tance 395
Page 399 of 557
#
Secu retheve hicle on all four wheels
with suitable tensioning stra ps. #
Do not exceed the maximum permissi‐
ble speed of 60 km/h when transport‐
ing. *
NO
TEDama getotheve hicle from secur‐
ing it incor rectly #
After loading, theve hicle must be
secured on all four wheels. Otherwise,
th eve hicle could be damaged. #
A minimum dis tance of 20 cm up wards
and 10cm down wards must be kept to
th e transport platform. #
Secure theve hicle on all four wheels af ter
loading. 4MATIC
vehicles/ vehicles with automatic
transmission #
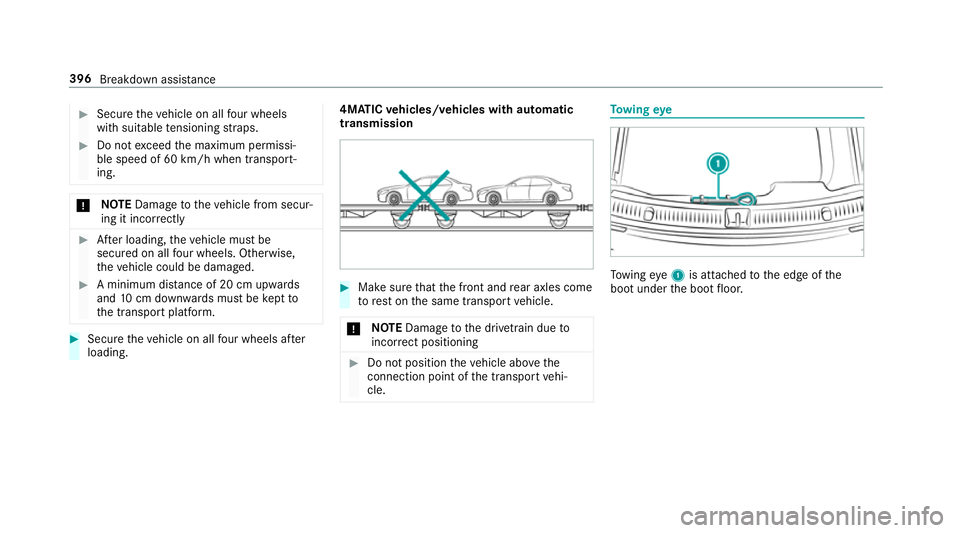
Make sure that the front and rear axles come
to rest on the same transport vehicle.
* NO
TEDama getothe driv etra in due to
incor rect positioning #
Do not position theve hicle abo vethe
connection point of the transport vehi‐
cle. To
wing eye To
wing eye1 is attached tothe edge of the
boot under the boot floor. 396
Breakdown assis tance