2016 MERCEDES-BENZ E-CLASS ESTATE service
[x] Cancel search: servicePage 31 of 565
These data memories
temp orarily or perma‐
nently store tech nical information abou t:
R theve hicle's operating state
R events
R faults
In general, thete ch nical information documents
th est ate of a component part, a module, a sys‐
te m or the sur roundings.
These include, forex ample:
R operating conditions of sy stem components,
e.g. fluid le vels
R theve hicle's status messages and those of
its individual components, e.g. number of
wheel revo lutions/speed, decele ration, lat‐
eral acceleration, accelerator pedal position
R malfunctions and de fects in impor tant sys‐
te m components, e.g. lights, brakes
R vehicle reactions and operating conditions in
special driving situations, e.g. airbag deploy‐
ment, inter vention of stability control sys‐
te ms
R ambient conditions, e.g. outside temp erature This data is of an
exclusively tech nical natu re
and can be used to:
R assist in de tecting and rectifying faults and
defects
R anal yseve hicle functions, e.g. af ter an acci‐
dent
R optimise vehicle functions
The data cannot be used totrace theve hicle's
mo vements.
When your vehicle is serviced, tech nical informa‐
tion can be read from theeve nt da tamemory
and fault data memor y.
Services include, forex ample:
R repair services
R service processes
R warranty events
The vehicle is read out byemplo yees of the
service network (including the manufacturer)
using special diagnostic devices. You can obtain
more information there, if requ ired. Af
ter a fault has been rectified, the information
is dele ted from thefa ult memory or is continu‐
ally overwritten.
When operating theve hicle, situations are con‐
ceivable in which this tech nical da ta, in connec‐
tion with other information (if necessar y,after
consultation wi than authorised expert), could be
traced toa person.
Examples include: R accident reports
R damage totheve hicle
R witness statements
Fu rther additional functions that ha vebeen con‐
tractually agreed upon with the cus tomer allow
cer tain vehicle data tobe con veye dby theve hi‐
cle as well. The additional functions include, for
ex ample, vehicle location in case of an emer‐
ge ncy. Co
pyright
Information on free and open source software
licences foryo ur vehicle's software can be found 28
General no tes
Page 64 of 565
Re
commended "Universal" and "Semi-Universal" category ISOFIX child restra int sy stems We
ight categories Size categor yManufacturer Type Approval number
(E1 ...) Order number (col‐
our code: 9H95)
Catego ry0+:
up to13 kg
up toappr oximately
15 months EB
rita xRö mer BABY SAFE plu s0 4 301146B 6 6 86 8224
Catego ryI:
9 to 18 kg B1
BritaxRömer DUO plus0 4 301133A 00097016 00
A 000 97037 00 %
You can obtain fur ther information on the
cor rect child restra int sy stem at any
Mercedes-Benz Service Centre. Child saf
ety loc ks Ac
tivating/deactivating the child saf ety lock
fo r the rear doors &
WARNING Risk of accident and inju ry
due tochildren left unat tended in the
ve hicle
If yo u lea vechildren unat tended in theve hi‐
cle, they may be able toset theve hicle in
motion, forex ample by:
R Releasing the parking brake. Occupant saf
ety61
Page 73 of 565
Information about suitable mobile phones
can be obtained from your Mercedes-Benz
Service Centre or on the Internet at http://
www.mercedes-benz.com/connect.
% The function is only available in combination
with Mercedes me connect and on lyin cer‐
ta in countries.
% Protective cases around the mobile phone
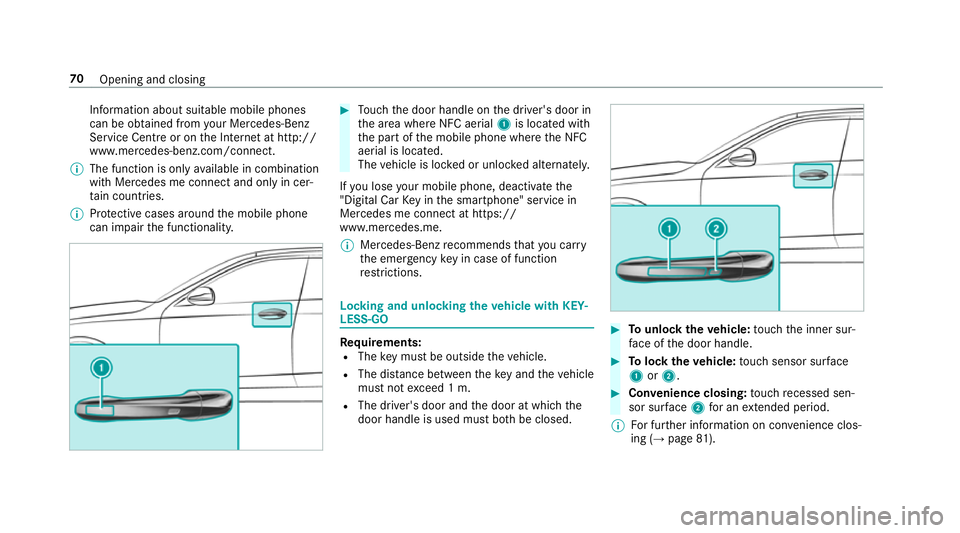
can impair the functionality. #
Touch the door handle on the driver's door in
th e area where NFC aerial 1is located with
th e part of the mobile phone where the NFC
aerial is located.
The vehicle is loc ked or unloc ked alternately.
If yo u lose your mobile phone, deactivate the
"Digital Car Key in the smartphone" service in
Mercedes me connect at https://
www.mercedes.me.
% Mercedes-Benz recommends that you car ry
th e emer gency key in case of function
re strictions. Lo
cking and unlocking theve hicle with KEY‐
LESS-GO Re
quirements:
R The key must be outside theve hicle.
R The dis tance between theke y and theve hicle
must not exceed 1 m.
R The driver's door and the door at which the
door handle is used must bo thbe closed. #
Tounlo cktheve hicle: touch the inner sur‐
fa ce of the door handle. #
Tolock theve hicle: touch sensor sur face
1 or2. #
Convenience closing: touch recessed sen‐
sor su rface 2for an extended pe riod.
% For fur ther information on con venience clos‐
ing (→ page 81). 70
Opening and closing
Page 105 of 565
A switch
toopen theta ilgate from thefo lding
bench seat is located on the wheel ar ch, on the
ri ght-hand side when vie wed in the direction of
tra vel.
Yo u can obtain information on child restra int
sy stems on thefo lding bench seat from any
Mercedes-Benz service centre.
The folding bench seat may only be used when
th e combined luggage co ver and net is ins talled.
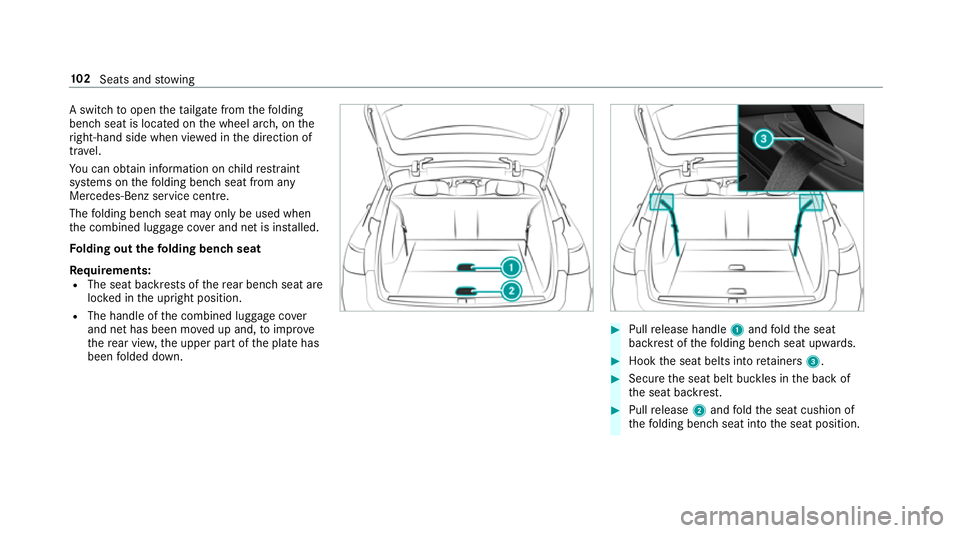
Fo lding out thefo lding bench seat
Re quirements:
R The seat backrests of there ar ben chseat are
loc ked in the upright position.
R The handle of the combined luggage co ver
and net has been mo ved up and, toimpr ove
th ere ar vie w,the upper part of the plate has
been folded down. #
Pull release handle 1and fold the seat
backrest of thefo lding bench seat upwards. #
Hook the seat belts into retainers 3. #
Secure the seat belt buckles in the back of
th e seat backrest. #
Pull release 2and fold the seat cushion of
th efo lding bench seat into the seat position. 102
Seats and stowing
Page 152 of 565
Overview of climate control sy
stems Note
s on climate control In order
forth e air conditioning sy stem, the
monitoring of the le vel of pollution and thefilter‐
ing of the air function cor rectly, an interior air fil‐
te r must alw ays be used. Make sure that thefil‐
te r is ins talled cor rectly and thefilter housing in
th e engine compartment is closed cor rectly
using the co ver and alw ays tightly sealed when
in operation. Use filters recommended and
appr ovedby Mercedes-Benz. Alw ays ha ve
service workcar ried out at a qualified specialist
wo rkshop. THERMATIC control panel
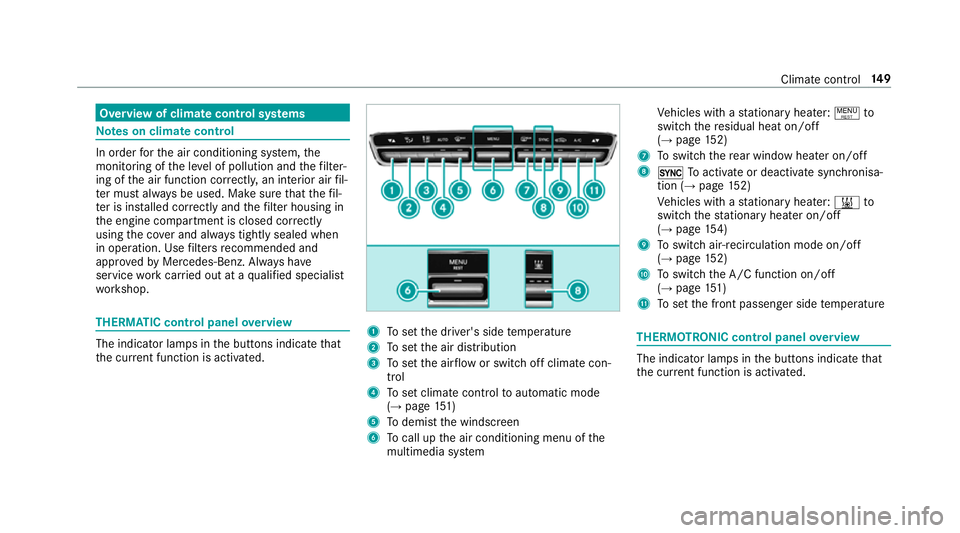
overview The indicator lamps in
the buttons indicate that
th e cur rent function is acti vated. 1
Toset the driver's side temp erature
2 Toset the air distribution
3 Toset the air flow or switch off climate con‐
trol
4 Toset climate contro lto automatic mode
(→ page 151)
5 Todemist the windscreen
6 Tocall up the air conditioning menu of the
multimedia sy stem Ve
hicles with a stationary heater: !to
switch there sidual heat on/off
(→ page 152)
7 Toswitch there ar wind owheater on/off
8 0 Toactivate or deactivate syn chronisa‐
tion (→ page 152)
Ve hicles with a stationary heater: &to
switch thest ationary heater on/off
(→ page 154)
9 Toswitch air-recirculation mode on/off
(→ page 152)
A Toswitch the A/C function on/off
(→ page 151)
B Toset the front passenger side temp erature THERMOTRONIC control panel
overview The indicator lamps in
the buttons indicate that
th e cur rent function is acti vated. Climate control
14 9
Page 166 of 565
%
You can check the suitability of your mobile
phone byentering the phone number at
http://www.mercedes.me.
Information about suitable mobile phones
can be obtained from your Mercedes-Benz
service centre or at http://www.mercedes-
benz.com/connect.
% The function is on lyavailable in combination
with Mercedes me connect and on lyin cer‐
ta in countries.
% Protective cases around the mobile phone
can impair the functionality.
St arting theve hicle for the firs t time af ter
activating the function #
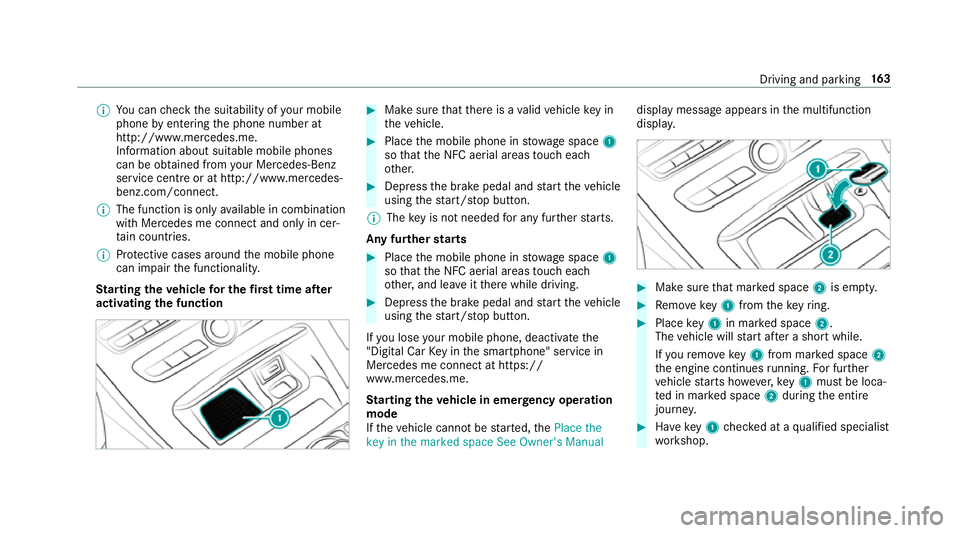
Make sure that there is a valid vehicle key in
th eve hicle. #
Place the mobile phone in stowage space 1
so that the NFC aerial areas touch each
ot her. #
Depress the brake pedal and start theve hicle
using thest art/ stop button.
% The key is not needed for any fur ther starts.
Any fu rther starts #
Place the mobile phone in stowage space 1
so that the NFC aerial areas touch each
ot her, and lea veitth ere while driving. #
Depress the brake pedal and start theve hicle
using thest art/ stop button.
If yo u lose your mobile phone, deactivate the
"Digital Car Key in the smartphone" service in
Mercedes me connect at https://
www.mercedes.me.
St arting theve hicle in emer gency operation
mode
If th eve hicle cannot be star ted, thePlace the
key in the marked space See Owner's Manual display message appears in
the multifunction
displa y. #
Make sure that mar ked space 2is em pty. #
Remo vekey1 from theke yring. #
Place key1 in mar ked space 2.
The vehicle will start af ter a short while.
If yo ure mo vekey1 from mar ked space 2
th e engine continues running. For fur ther
ve hicle starts ho wever,ke y1 must be loca‐
te d in mar ked space 2during the entire
journe y. #
Have key1 checked at a qualified specialist
wo rkshop. Driving and parking
16 3
Page 181 of 565
Ad
Blue ®
(diesel engine vehicles only) Note
s onAdBlue ®
* NOTEWhen you open theAd Blue ®
tank,
small amounts of ammonia vapour may
escape. #
Only fill th eAd Blue ®
tank in well-venti‐
lated areas. #
Do not let AdBlue ®
come into contact
wi th skin, eyes or clo thes. #
Keep AdBlue ®
aw ay from children. *
NOTEDo not ingest AdBlue ®
. If
Ad Blue ®
is swallo wed: #
Immediately rinse out your mouth thor‐
oughl y. #
Drink plenty of water. #
Seek medical attention immediately. Ad
Blue ®
is a fluid urea solution forex haust gas
af te rtre atment of diesel engines. In order forthe ex
haust gas af tertre atment tofunction properly,
only use AdBlue ®
in accordance wi thISO 222 41 .
Ad Blue ®
is ch aracterised bythefo llowing:
R non-t oxic
R colourless and odourless
R non-flammable
Ad Blue ®
may be topped up byfast service at a
qu alified specialist workshop, e.g. a Mercedes-
Benz Service Centre.
Ad Blue ®
is available at many filling stations from
Ad Blue ®
filling pumps.
Alternativel y,Ad Blue ®
is available at qualified
specialist workshops, e.g. Mercedes-Benz
Service Centres, and at many filling stations in
Ad Blue ®
re fill canis ters or AdBlue ®
re fill bottles.
% Ensure the connection between there fill
con tainer and vehicle filler neck does not
drip. To
pping up AdBlue ®
* NOTEEngine dama gedue toAd Blue ®
in
th e fuel #
AdBlue ®
must not be used tofill the
fuel tank. #
Only use AdBlue ®
to fill th eAd Blue ®
ta nk. #
Do not overfill theAd Blue ®
tank. *
NO
TEContamination of theve hicle inte‐
ri or due toAd Blue ®
lea kage #
Afterto pping up, carefully close the
Ad Blue ®
re fill con tainer. #
Avoid car rying AdBlue ®
re fill con tainers
permanently in theve hicle. 17 8
Driving and pa rking
Page 190 of 565
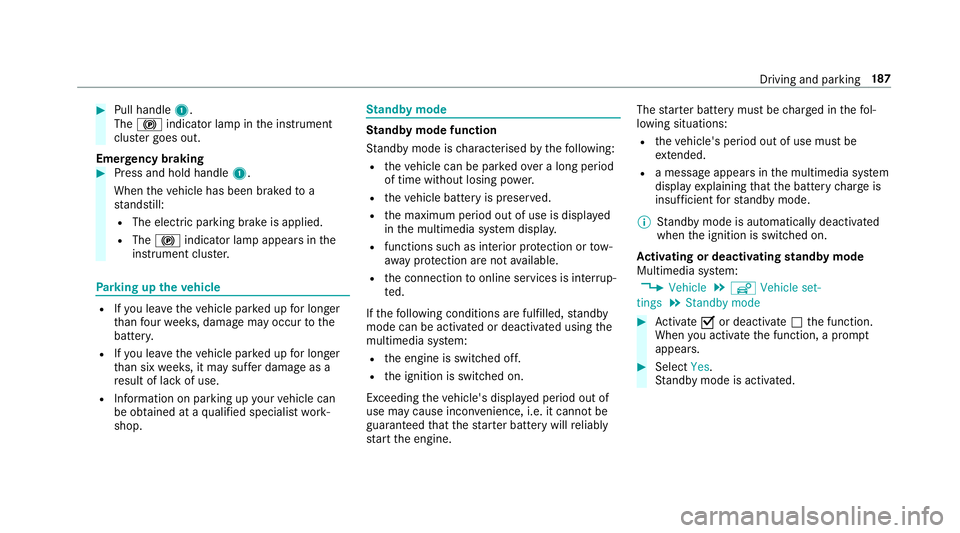
#
Pull handle 1.
The ! indicator lamp in the instrument
clus ter goes out.
Emer gency braking #
Press and hold handle 1.
When theve hicle has been braked to a
st andstill:
R The electric parking brake is applied.
R The ! indicator lamp appears in the
instrument clus ter. Pa
rking up theve hicle R
Ifyo u lea vetheve hicle par ked up for longer
th an four we eks, damage may occur tothe
batter y.
R Ifyo u lea vetheve hicle par ked up for longer
th an six weeks, it may suf fer dama geas a
re sult of lack of use.
R Information on parking up your vehicle can
be obtained at a qualified specialist work‐
shop. St
andby mode St
andby mode function
St andby mode is characterised bythefo llowing:
R theve hicle can be par kedove r a long period
of time without losing po wer.
R theve hicle battery is preser ved.
R the maximum period out of use is displa yed
in the multimedia sy stem displa y.
R functions such as interior pr otection or tow-
aw ay protection are not available.
R the connection toonline services is inter rup‐
te d.
If th efo llowing conditions are fulfilled, standby
mode can be activated or deactivated using the
multimedia sy stem:
R the engine is switched off.
R the ignition is switched on.
Exceeding theve hicle's displa yed period out of
use may cause incon venience, i.e. it cannot be
guaranteed that thest ar ter battery will reliably
st art the engine. The
star ter battery must be charge d in thefo l‐
lowing situations:
R theve hicle's period out of use must be
ex tended.
R a messa geappears in the multimedia sy stem
display explaining that the battery charge is
insuf ficient forst andby mode.
% Standby mode is automatically deactivated
when the ignition is switched on.
Ac tivating or deactivating standby mode
Multimedia sy stem:
, Vehicle .
î Vehicle set-
tings .
Standby mode #
Activate Oor deacti vate ª the function.
When you activate the function, a prom pt
appears. #
Select Yes.
St andby mode is activated. Driving and parking
187