Page 25 of 206

XTouch the touch-sensitive surface again with
one finger.
XSwipe your finger in any direction.
The map is moved is the direction of move-
ment.
Zooming in on the map
XTouch the touch-sensitive surface with two
fingers, spaced slightly apart.
XGlide your fingers away from each other.
The map scale is magnified.
Zooming out of the map
XTouch the touch-sensitive surface with two
fingers, spaced far apart.
XGlide your fingers towards each other.
The map scale is reduced.
Handwriting recognition
Handwriting recognition overview
This function is only available if the touchpad is equipped with handwriting recognition.
You can use handwriting recognition for text,
numbers or characters in any input line.
:Active input line
;Inserts a space (Ypage 24)
=Illustration of the touch-sensitive surface
?Deletes characters (Ypage 24)
If the character that you have entered can be
interpreted in different ways, these options are
displayed. More information on the character
suggestions (
Ypage 24).
You can also switch the text reader function of
the handwriting recognition on and off
(
Ypage 24).
:To exit the menu
;To return to handwriting recognition
=To use the phone book or text templates
Touchpad23
Overview and operation
Page 26 of 206

?To change the input line or the position of
the cursor
ATo change the input language
BTo finish character entry
XTo display the menu:press the touchpad.
Switching the text reader function of
the handwriting recognition on/off
You can switch the text reader function of the
handwriting recognition on or off.
XPress theØbutton.
The vehicle menu is displayed.
XTo select System Settings: slide6, turn
and press the controller.
A menu appears.
XTo select Touchpad: turn and press the con-
troller.
XSelect Read Out Handwriting Recogni‐tion.
The text reader function is switched on Oor
off ª.
Entering characters
Prerequisite: an input line for text, numbers or
characters has been selected.
XUse one finger to draw the desired character
on the touch-sensitive surface.
The character recognized is entered in the
input line. You can draw the next character on
the touch-sensitive surface.
If the character can be interpreted in different
ways, these options are displayed.
More information on the character suggestions
(
Ypage 24).
Character suggestions
:Character recognized
;Character suggestions
XTo select a character suggestion: turn the
controller.
The selected character is entered instead of
the automatically recognized character. Char-
acter entry can be continued.
Inserting a space
Prerequisite: an input line for text, numbers or
characters has been selected.
XUse your finger to touch the touch-sensitive
surface and swipe to the right.
A space is entered into the input line.
Deleting characters
Prerequisite: an input line for text, numbers or
characters has been selected.
XUse your finger to touch the touch-sensitive
surface and swipe to the left.
The character last entered is deleted.
Switching input lines
24Touchpad
Overview and operation
Page 27 of 206

XPress the touchpad.
A symbol is shown.
XTo selectp: glide your finger to the left or
right and press.
XTo select the input line: swipe up or down and press.
The selected input line is active and character
entry can be continued.
Moving the cursor within the input line
XPress the touchpad.
A symbol is shown.
XTo select p: glide your finger to the left or
right and press.
XTo move the cursor: glide to the left or right.
Changing the input language for hand-
writing recognition
Prerequisite: an input line for text, numbers or
characters has been selected.
XPress the touchpad.
A symbol is shown.
XTo select B: swipe your finger to the left or
right and press.
The list of available input languages appears.
XTo select a language: swipe up or down and
press.
The input language for handwriting recogni-
tion has been changed.
Searching in lists
The phone book search is used as an example.
You determine the first letter of the contact you
are looking for with the first character you enter.
XDraw the letter on the touchpad surface.
The first contact with the selected first char-
acter is highlighted in the phone book. Further information on handwriting recogni-
tion on the touchpad (
Ypage 23).
XDraw additional letters on the touchpad sur-
face one after another.
XTo complete the search and return to the
phone book: press the touchpad.
Selecting the touchpad or controller for
character entry
Prerequisite: an input line for text, numbers or
characters has been selected.
XTo switch to character entry on the touch-
pad:press the touchpad with your finger.
Handwriting recognition on the touchpad is
active.
XTo switch to character entry with the con- troller: press the controller.
Character entry with the controller is active.
Quick access for audio and telephone
Changing the station/music track
Depending on the audio source that is currently
activated, you can use this function to select the
next station or music track.
XCall up quick access (Ypage 22).
The current audio source is displayed.
XTo select the previous or next station or music
track: swipe to the left or right.
The selected station or music track is played.
Touchpad25
Overview and operation
Page 28 of 206
.
The current audio source is displayed.
XTo display the available audio sources:
glide down with one finger.
XTo select an audio source: glid")
Changing the audio source
XCall up quick access (Ypage 22).
The current audio source is displayed.
XTo display the available audio sources:
glide down with one finger.
XTo select an audio source: glide your finger
to the left or right and press.
The selected audio source is played.
Sending DTMF tones
The function is not supported by all mobile
phones (see the manufacturer's operating
instructions).
XCall up quick access during a call (Ypage 22).
XTo select characters: glide your finger to the
left or right and press.
Every character selected will be transmitted
immediately.
Basic functions
Switching the multimedia system on/
off
XPress the qcontrol knob.
When you switch the multimedia system on, a
warning message will appear. The multimedia
system calls up the previously selected menu.
If you switch the multimedia system off, play- back of the current media source will also be
switched off.
Adjusting the volume
Adjusting the volume for media sources
XTurn the qcontrol knob.
or
XPress the WorX button on the multi-
function steering wheel.
The volume of the media source currently
selected changes.
Adjusting the volume for traffic
announcements and navigation
announcements
During traffic or navigation announcements:
XTurn the qcontrol knob.
or
XPress the WorX button on the multi-
function steering wheel.
iYou can set the volume for navigation
announcements to be different from the vol-
ume of the respective media source.
Adjusting the volume for phone calls
You can adjust the volume for hands-free mode
during a telephone call.
XTurn the qcontrol knob.
or
XPress the WorX button on the multi-
function steering wheel.
iSetting the volume for the Voice Control
System voice output; see the separate oper-
ating instructions.
26Basic functions
Overview and operation
Page 29 of 206

Switching the sound on/off
Media source sound
XPress the 8button on the control panel or
on the multifunction steering wheel.
The sound is switched off. If the audio output
is switched off, the status line will show the
8 symbol. If you switch the media source
or change the volume, the sound is automat-
ically switched on.
iEven if the sound is switched off, you will still
hear navigation system announcements.
Switching navigation announcements
off and on again
XTo switch navigation announcements off:
press the 8button during an announce-
ment.
The Spoken driving recommendations
have been deactivated.message
appears.
XTo switch navigation announcements on
again: switch the multimedia system off and
then on again (
Ypage 26).
or
XStart a new route calculation (Ypage 58).
or
XSelect +: while route guidance is active,
show the menu and press the controller
(
Ypage 74).
Function menu
XPress the Õbutton or the ß,$,
%, or Øbutton.
Navigation: the map displays the current
vehicle position. Radio:
the basic menu of the last radio mode
set appears.
Media: the basic display for the last media
source set appears. In the example, Media
Interface mode is set.
Communication: the basic menu of the last
communication function set appears (tele-
phone, address book, Internet).
Vehicle functions: the basic display
appears.
XTo show the menu: slide4 the controller.
The menu for the selected functions appears.
Depending on the operation, the marking is
shown:
Rin the main function bar at the top or
Rin the menu bar at the bottom
XTo select a menu item: turn and press the
controller.
If you have selected a menu item from the
main function bar, switch to the last menu set
for the selected function.
The menu bar features options within the cur-
rently set function.
Selecting the operating mode for a
main function
For the main functions, e.g. communication or
media, you can choose from the available oper-
ating modes.
In the communication menu, you can:
Rswitch to telephone mode.
Rcall up the address book.
Raccess the Internet.
Rcall up the digital operating instructions for
Tel/®.
Basic functions27
Overview and operation
Page 30 of 206

XPress the%button.
The phone menu appears.
XTo call up the menu: press the%button
again.
or
XTo select Tel/®: slide5and press the
controller.
The communication menu appears. Phone
is
at the front.
XTo select Info on Phone, for example: turn
and press the controller.
Character entry (telephony)
Entering characters using the charac-
ter bar
In the example, a new entry is added to the
phone book (Ypage 104). The new entry has
three input lines for entering the last name, first name and phone number. The input line for the
surname is selected automatically.
Entering characters
XTurn and press the controller.
The character selected in character bar ;is
entered into surname input line :.
XEnter the complete last name.
Deleting individual characters
XTo switch to the bottom line of the character
bar: slide 6the controller.
XTo select F: turn and press the controller.
The character last entered is deleted.
Deleting an entire entry
XTo switch to the bottom line of the character
bar: slide 6the controller.
XTo select F: turn and hold the controller until
the entire entry has been deleted. Switching input line
XTo switch to the bottom line of the character
bar: slide
6the controller.
XTo select 5: turn and press the controller.
The input line for the first name is selected.
You can enter the characters for the first
name.
When the telephone number input line is selec-
ted, the character bar is adapted for entering
digits.
Entering characters
XTurn and press the controller.
The character selected in character bar ?is
entered into telephone number input line =.
Finishing an entry and saving a contact
XTo switch to the bottom line of the character
bar: slide 6the controller.
XTo select ¬: turn and press the controller.
Further functions available in the character bar
SymbolFunction
ÄSwitches the character bar for
entering characters, digits and
symbols
*Switches the character bar to
upper-case or lower-case letters
BChanges the country setting for
the character bar
FDeletes a character or an entry
4, 5Selects the input line
2,3Moves the cursor within the input
line
bConfirms an entry
28Character entry (telephony)
Overview and operation
Page 31 of 206

SymbolFunction
%Cancels input
SInserts a paragraph
Entering characters using the number
keypad
If an input line for text or numbers is selected,
the number keypad is used for the character
entry.
XFor example, to enter the letterc: press the
l number key briefly three times in suc-
cession.
An additional display area is shown with all
the available characters. Press the key
repeatedly to go through the characters until
c
is highlighted.
XWait until the character display goes out.
The letter cis entered in the input line.
Character entry (navigation)
Entering characters using the charac-
ter bar
:Characters NEW(orange color) entered by
the user
;Characters automatically added by the mul-
timedia system YORK
=Characters not currently available
?Currently selected character
ACharacters currently available
BCharacter bar
The example shows the address entry
(
Ypage 57).
XTo enter a character: turn, slide6or5
and press the controller.
Selected character :is entered in the upper
line. The multimedia system adds the missing
characters and shows the entry that best
matches the current input.
The characters are available Aor not =,
depending on the characters already entered
and the data stored in the digital map.
The Gsymbol indicates that an entry exists
more than once.
XTo delete a character: slide6and turn the
controller, then press it after selecting F.
XTo delete an entire entry:slide6and turn
the controller; then after selecting Fpress
and hold down the controller until the entire
entry is deleted.
XTo confirm an entry: slide6and turn the
controller, then press it after selecting ¬.
or
XSlide 5the controller repeatedly until the
character bar disappears.
The location selection list appears. The selec-
ted entry is highlighted.
The example shows the character entry when
you save a destination as a navigable contact in
the address book (
Ypage 58). The cursor is
located in the input line.
XTo select an input line: slide6and turn
the controller, then press it after selecting 4
or 5.
or
XSlide 5the controller repeatedly until the
character bar disappears.
XTurn and press the controller.
XTo move the cursor: select the input line.
XSlide6and turn the controller, then press it
after selecting 2or3.
Character entry (navigation)29
Overview and operation
Page 32 of 206

XTo change the character bar language:
slide6and turn the controller, then press it
after selecting B.
A menu appears.
XTurn and press the controller.
The character set for the selected language is set.
The character bar entry functions are listed in
the table.
SymbolFunction
ÄSwitches between digits and sym-
bols
*Switches the character bar from
uppercase to lowercase letters
BChanges the character bar lan-
guage
FDeletes a character or an entry
èSwitches to keyword search
(Ypage 59)
4, 5Selects the input line
2,3Moves the cursor within the input
line
¬Confirms an entry
&Cancels input
Entering characters using the number
keypad
XPress one of the number keypad buttons, e.g.
l, once or repeatedly in quick succession.
The character appears at the bottom of the
display when the key is pressed. The first
available letter is highlighted. You see which characters you can enter with
that key. Each time the key is pressed, the
next character is selected.
XWait until the character display goes out.
The entries matching your input are shown in
the list.
Favorites
Overview of favorites
:Adds a new favorite (Ypage 31)
;Renames a selected favorite (Ypage 31)
=Moves a selected favorite (Ypage 31)
?Deletes a selected favorite (Ypage 31)
XTo display the favorites overview: press
the favorites button on the controller.
The favorites are displayed.
XTo show the menu bar: slide6the con-
troller.
You can manage a total of 20 favorites.
Further information on how to select and display
a favorite (
Ypage 30).
Displaying and selecting favorites
XPress the favorites button on the controller.
The favorites are displayed.
XTo call up a favorite: turn and press the con-
troller.
30Favorites
Overview and operation
 1
1 2
2 3
3 4
4 5
5 6
6 7
7 8
8 9
9 10
10 11
11 12
12 13
13 14
14 15
15 16
16 17
17 18
18 19
19 20
20 21
21 22
22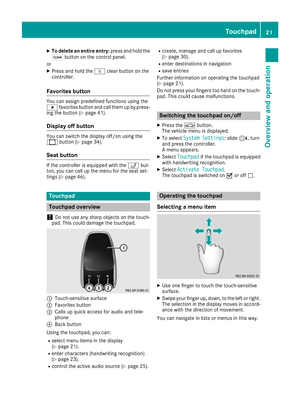 23
23 24
24 25
25 26
26 27
27 28
28 29
29 30
30 31
31 32
32 33
33 34
34 35
35 36
36 37
37 38
38 39
39 40
40 41
41 42
42 43
43 44
44 45
45 46
46 47
47 48
48 49
49 50
50 51
51 52
52 53
53 54
54 55
55 56
56 57
57 58
58 59
59 60
60 61
61 62
62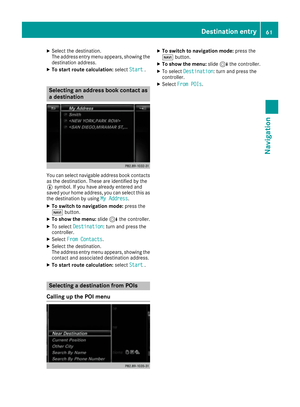 63
63 64
64 65
65 66
66 67
67 68
68 69
69 70
70 71
71 72
72 73
73 74
74 75
75 76
76 77
77 78
78 79
79 80
80 81
81 82
82 83
83 84
84 85
85 86
86 87
87 88
88 89
89 90
90 91
91 92
92 93
93 94
94 95
95 96
96 97
97 98
98 99
99 100
100 101
101 102
102 103
103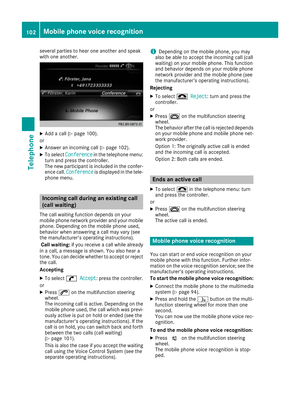 104
104 105
105 106
106 107
107 108
108 109
109 110
110 111
111 112
112 113
113 114
114 115
115 116
116 117
117 118
118 119
119 120
120 121
121 122
122 123
123 124
124 125
125 126
126 127
127 128
128 129
129 130
130 131
131 132
132 133
133 134
134 135
135 136
136 137
137 138
138 139
139 140
140 141
141 142
142 143
143 144
144 145
145 146
146 147
147 148
148 149
149 150
150 151
151 152
152 153
153 154
154 155
155 156
156 157
157 158
158 159
159 160
160 161
161 162
162 163
163 164
164 165
165 166
166 167
167 168
168 169
169 170
170 171
171 172
172 173
173 174
174 175
175 176
176 177
177 178
178 179
179 180
180 181
181 182
182 183
183 184
184 185
185 186
186 187
187 188
188 189
189 190
190 191
191 192
192 193
193 194
194 195
195 196
196 197
197 198
198 199
199 200
200 201
201 202
202 203
203 204
204 205
205