Page 193 of 206

XTo open the battery compartment:remove
battery compartment cover =on the back of
the remote control.
XTo do so, press down retaining lug ;and
take off battery compartment cover =.
XRemove discharged batteriesAfrom the
tray.
XInsert the new batteries. Observe the polarity
markings on the batteries and battery com-
partment when doing so.
Left-hand battery: the positive pole (+) must
face upwards.
Right-hand battery: the positive pole (+) must
face downwards.
XTo close the battery compartment: insert
battery compartment cover =starting with
retaining lugs ?into the battery compart-
ment and allow catch tab ;to engage in
place.
On the cordless headphones
The battery compartment is located on the left
headphone. The cordless headphones require
two type AAA, 1.5 V batteries.
XTo open the battery compartment: turn
battery compartment cover :counter-
clockwise and remove.
XRemove the discharged batteries from the
tray.
XInsert the new batteries. Observe the polarity markings on the batteries and battery tray
when doing so.
XTo close the battery compartment: replace
battery housing cover :and turn it clock-
wise until it engages.
If the batteries have been inserted correctly,
the indicator lamp will light up green when the
headphones are switched on.
iThe operating duration of the headphones
with a set of batteries is up to 40 hours.
Basic functions
Using headphones
You can use the cordless headphones supplied
and/or up to two sets of corded headphones
connected to the corresponding jack of the rear-
compartment screens (
Ypage 187).
Information on the cordless headphones
(
Ypage 189).
Using the main loudspeakers
This function is available in conjunction with
COMAND.
You can use the vehicle loudspeakers to listen to
a disc inserted in the rear-compartment drive.
To do so, disc mode (audio CD/audio DVD/
MP3) must be activated on at least one rear
screen.
The headphones' volume setting does not affect
the main loudspeakers.
XTo set on COMAND: press the$button,
for example, to switch on an audio mode.
XTo select Info6slide and press the con-
troller.
A menu appears.
XTurn the controller until Rear Seat Enter‐tainment System: Audiois brought to the
front.
XPress the controller.
Basic functions191
Rear Seat Entertainment System
Z
Page 194 of 206

RAUX
XSwitch on an operating mode (e.g. audio C")
Selecting sound settings
You can select sound settings in the following
operating modes:
RAudio CD/MP3
RVideo DVD
RRadio (active media source in COMAND)
RAUX
XSwitch on an operating mode (e.g. audio CD
mode) (Ypage 193).
XSelectTrebleorBassusing
the :=; buttons on the remote
control and press the 9button to confirm.
An adjustment scale appears.
XSelect a setting using the 9:buttons
and press the 9button to confirm.
Multiple users
Simultaneous use of the rear-compart-
ment disc drive
The two rear-compartment screens can be oper- ated almost entirely independently from one
another. However, a conflict may occur in some
menus if the two screens are used simultane-
ously.
The following functions affect both screens:
Rchanging playback options
Rselecting a track (from a track list or folder)
Rusing the play, pause and stop functions
Rfast forward and rewind or scrolling
Rcalling up the DVD menu and navigating
within it
Rsetting the language, subtitles and camera
angle
Rcalling up interactive DVD content
The following functions affect only one screen:
Rchanging audio and video functions as well as picture settings
Rswitching between full screen and the menu
Switching between operating modes
When you exit an operating mode (e.g. audio CD
mode), the current setting is saved. If you call up
this operating mode again later, there are two
possibilities:
Rthe operating mode has been changed on the
other screen.
Rthe operating mode has not been changed.
In the first case, the operating mode appears as it is on the other screen.
In the second case, the setting appears on the
screen as it was when you last exited the oper-
ating mode.
Picture settings
Overview
You can select the picture settings in video DVD and AUX mode (Ypage 202).
Adjusting the brightness, contrast and
color
XSwitch to video DVD mode (Ypage 196).
XTo show the menu: press the9button on
the remote control.
XSelect DVD-Videousing the :=;
buttons and press the 9button to confirm.
XSelect Brightness,Contrastor Colorusing the 9: buttons and press the 9
button to confirm.
A scale appears.
XSelect a setting using the 9:buttons
and press the 9button to confirm.
Changing the picture format
XTo show the menu: press the9button on
the remote control.
XSelect DVD-Videousing the :=;
buttons and press the 9button to confirm.
The dot in front of one of the menu items
Automatic
, 16:9 Optimized,4:3or Wide‐screenshows the currently set picture for-
mat.
XSelect a format using the 9:buttons
and press the 9button to confirm.
192Basic functions
Rear Seat Entertainment System
Page 195 of 206

System settings
Note
You can adjust all system settings individually
for each rear screen without affecting the other
screen.
Selecting the display language
XSelect Systemusing the 9=; but-
tons on the remote control and press 9to
confirm.
You see the system menu on the selected rear screen.
XSelect Settingsusing the :button and
press the 9button to confirm.
XConfirm Languageby pressing the 9button.
The list of languages appears. The #dot indi-
cates the current setting.
XSelect a language using the 9:but-
tons and press the 9button to confirm.
The Rear Seat Entertainment System sets the
selected language.
Switching the display design
XSelect Settingsusing the :button and
press the 9button to confirm.
XSelect Day Mode,Night Modeor Automaticwith the 9: buttons and confirm with
the 9button.
The dot indicates the current setting.
DesignExplanation
Day ModeThe display is set perma-
nently to day design.
Night ModeThe display is set perma-
nently to night design.
AutomaticThe display design
changes depending on
the vehicle instrument
cluster illumination.
Setting the brightness
XSelect Settingsusing the :button and
press the 9button to confirm.
XSelect Brightnesswith the 9: but-
tons and confirm with the 9button.
A scale appears.
XAdjust the brightness using the 9:
buttons and press the 9button to confirm.
The bar moves up or down. The picture
becomes lighter or darker.
Showing/hiding the picture
XTo hide the picture: selectDisplay Offin
the system menu with the :;buttons
on the remote control and confirm with the 9
button.
The picture is hidden.
XTo display the picture: press the9button.
Audio CD/DVD and MP3 mode
Important safety notes
GWARNING
The CD/DVD drive is a class 1 laser product.
If you open the housing of the CD/DVD drive,
there is a risk of exposure to invisible laser
radiation. This laser radiation could damage
your retina. There is a risk of injury.
Never open the housing. Always have main-
tenance and repair work carried out at a quali- fied specialist workshop.
General notes
The rear-compartment drive is a single disc
drive.
Notes on audio mode can be found in the
"Media" section (
Ypage 150):
RNotes on CDs and DVDs
RNotes on MP3 mode
RNotes on copyright
Audio CD/DVD and MP3 mode193
Rear Seat Entertainment System
Z
Page 196 of 206

Inserting and removing a CD/DVD
from the rear-compartment drive
:Disc slot
;Disc ejectbutto n
The rear-compartmen tdriv eis locate dbehind
th ecenter console in afoldin gcompartment.
Dependin gon th evehicl eequipmen tlevel, th e
rear-compartmen tdriv eis located:
Runder th erear bench seat or
Rin th ecenter console between th edriver' s
and front-passenger seat s
If there is already adisc inserted, this must be
ejecte dbefore another is inserted.
XTo remove: press theþ button.
The rear-compartmen tdriv eejects th edisc .
XTo insert: insertadisc int oth edisc slot wit h
th eprinte dside facing upwards.
The rear-compartmen tdriv ecloses and th e
disc is played.
The rear-compartmen tdriv eplays th edisc :
Rif it has been inserted correctl yand is aper -
missible disc ,and
Rafter you have switched on disc mod e(audio
CD or audio DV Dor MP3 mode)
(
Ypage 194).
Dat aon an MP3 CD first needs to be loade dby
th edrive. Loading may tak esom etime, depend -
ing on th enumber of folder sand tracks.
Switching to audio CD, audio DVD or
MP3 mode
:Calls up CD functions, other displays: MP3
(MP3 mode), DVD- A(audio DV Dmode)
;Calls up track list (audio CD and audio DV D
mode), call sup folder s(MP3 mode)
=Sets th etreble
?Sets th ebass
The exampl eshows audio CD mode. The num -
ber and th eelapsed playbac ktime for th ecur -
ren ttrack are displayed.
XInser t aCD or DV D (Ypage 194).
The Rear Seat Entertainmen tSyste mloads
th einserted disc .
XSelectDis cin th emen uusin gth e
9=; buttons on theremot econ-
trol and confirm by pressin gth e9 button.
The corresponding mod eis switched on .The
Rear Seat Entertainmen tSyste mplays th e
disc .
iVariable bit rates in MP3 track scan result in
th eelapsed time shown bein gdifferen tfrom
th eactual elapsed time.
Selecting a track
Via skip function
XPress th e= or; buttonon th eremot e
control .
or
XPress th eE orF button.
The skip forward function skips to th enext
track .
If th eelapsed track time has passed 8sec -
onds, th efunction skips bac kto th ebeginning
of th etrack .If th eelapsed time is shorter, it
will skip to th estart of th eprevious track .
194Audio CD/DVD and MP3 mode
Rear Seat Entertainment System
Page 197 of 206

If theRandom TracksorRandom Folderplayback option has been selected, the track
order is random.
Via track list
In audio CD mode, the track list contains all
tracks on the disc currently playing. In audio
DVD mode, the track list contains all tracks in
the currently active group.
In MP3 mode, the track list shows all tracks in
the currently active folder as well as the folder
structure, allowing you to select any track on the
MP3 CD.
XSelect Tracks(audio CD/DVD mode) or
Folder(MP3 mode) using
the :=; buttons on the remote
control, and confirm by pressing the 9but-
ton.
or
XPress the 9button when the selection win-
dow is active.
The track list appears. The #dot indicates the
current track.
XSelect a track using the 9:buttons
and press the 9button to confirm.
By entering the track number directly
XPress the hbutton on the remote control.
The track entry display appears.
Example: track 2
XPress the ·button.
Example: track 23
XPress the ·and¸ buttons in quick
succession.
XWait for approximately three seconds after
making the entry.
You will hear the track which has been
entered. The corresponding basic menu then
reappears.
iIt is not possible to enter numbers that
exceed the number of tracks on the CD or in
the currently active folder.
Fast forwarding/rewinding
XWith the selection window active, press the
= or; button on the remote control repeatedly until you reach the desired posi-
tion.
or
XPress and hold the EorF button until
the desired position has been reached.
Selecting a folder
This function is available in MP3 mode.
XSelect Folderin MP3 mode using
the :=; buttons on the remote
control and press the 9button to confirm.
or
XPress the 9button when the selection win-
dow is active.
The folder content appears.
XTo switch to the superordinate folder:
select symbol Uusing the 9: but-
tons on the remote control and press the 9
button to confirm.
The display shows the next folder up.
XTo select a folder: select a folder by pressing
the 9: button and confirm by pressing
the 9button.
You will see the tracks in the folder.
XSelect a track using the 9:buttons
and press the 9button to confirm.
The track is played and the selected folder is
now the active folder.
Pause function
This function is available in audio DVD mode.
XTo pause playback: selectËusing
the :=; buttons on the remote
control and press the 9button to confirm.
The Ë display changes to Ì.
XTo continue playback: selectÌand
press the 9button to confirm.
The Ì display changes to Ë.
Stop function
This function is available in audio DVD mode.
Audio CD/DVD and MP3 mode195
Rear Seat Entertainment System
Z
Page 198 of 206

XTo interrupt playback:selectÉusing
the :=; buttons on the remote
control and press the 9button to confirm.
The Ë display changes to Ì.
XTo continue playback: selectÌand
press the 9button to confirm.
Playback continues from the point where it
was interrupted.
XTo stop playback: while playback is inter-
rupted, select Éagain and press the 9
button to confirm.
Playback stops and returns to the beginning
of the DVD. Ìis highlighted.
XTo restart playback: selectÌand press
the 9button to confirm.
Playback starts from the beginning of the
DVD.
Setting the audio format
The content of an audio DVD can be divided into
up to 9 groups. The availability and type of group
depends on the respective DVD. A group can
contain music of different sound qualities
(stereo and multichannel formats, for example),
or bonus tracks.
XSelect DVD-Ausing the :=; but-
tons on the remote control and press 9to
confirm.
XSelect Groupusing the 9: buttons
and press the 9button to confirm.
The list of available audio formats appears.
The #dot indicates the format currently
selected.
XSelect an audio format using the 9:
buttons and press the 9button to confirm.
XTo exit the menu: press the=or;
button.
Playback options
XSelect CD,DVD-Aor MP3using
the :=; buttons on the remote
control and press the 9button to confirm.
A list appears. The #dot indicates the play-
back option currently selected.
XSelect Normal Track Sequence,RandomTracksor Random Folderusing the 9:
buttons and press the 9button to
confirm.
The option is switched on. For all options
except Normal Track Sequence
, you will
see a corresponding display in the selection
window.
iIf you switch the data carrier which you are
currently listening to, the Normal Track
Sequenceoption is activated automatically. If
an option is selected, it remains selected after
the Rear Seat Entertainment System is
switched on or off.
Switching track information on/off
(MP3 mode only)
If the function is switched on, folder and track
names are displayed.
If the function is switched off, disc and file
names are displayed.
XSelect MP3using the :=; buttons
on the remote control and press the 9button
to confirm.
XSelect Display Track Informationusing
the 9: buttons and press the 9but-
ton to confirm.
The function is switched on Oor off ª,
depending on the previous status.
Video DVD mode
Important safety notes
GWARNING
The CD/DVD drive is a class 1 laser product.
If you open the housing of the CD/DVD drive,
there is a risk of exposure to invisible laser
radiation. This laser radiation could damage
your retina. There is a risk of injury.
Never open the housing. Always have main-
tenance and repair work carried out at a quali- fied specialist workshop.
196Video DVD mode
Rear Seat Entertainment System
Page 199 of 206

General notes
DVD playback conditions
Playback problems may occur when playing
copied discs. There is a large variety of discs,
DVD authoring software, writing software and
writers available. This variety means that there
is no guarantee that the Rear Seat Entertain-
ment System will be able to play video DVDs that
you have copied yourself.
Further information (
Ypage 167). Information
regarding COMAND also applies to the Rear
Seat Entertainment System.
Function restrictions
Depending on the DVD, it is possible that certain
functions or actions described in this section
will be temporarily blocked or may not function
at all. As soon as you try to activate these func-
tions or actions, you will see the Ksymbol in
the display.
Switching on video DVD mode
XInsert a video DVD (Ypage 194).
The Rear Seat Entertainment System loads
the disc.
If disc mode was the last mode selected, it will
now be active.
If it was not, switch on video DVD mode as
described in the following instructions.
XSelect Discin the menu using the
9=; buttons on the remote con-
trol and confirm by pressing the 9button.
If the video DVD fulfills the playback criteria,
the film either starts automatically or the
menu stored on the DVD appears. If the DVD
menu appears, you must start the film man-
ually.
XSelect the corresponding menu item in the
DVD menu.
Showing/hiding the control menu
:Type of data medium
;Current title
=Current scene
?Track time
AShowing the menu
XTo show: press the9or: button on
the remote control.
XTo hide: press the 9or: button.
or
XWait about eight seconds.
Showing/hiding the menu
:Video DVD options
;Pause function
=Stop function
?Sets the treble
ASets the bass
XTo show: press the9button on the remote
control.
XTo hide: press the 9button and confirm
# by pressing the 9button.
Video DVD mode197
Rear Seat Entertainment System
Z
Page 200 of 206

Fast forwarding/rewinding
XPress and hold theE orF buttonon
th eremot econtrol until th edesired position
has been reached.
You see th econtrol menu.
Pause function
XTo show th emenu: press th e9 butto non
th eremot econtrol .
XTo pause playback: selectËand press
th e9 butto nto confirm .
The Ë display changes to Ì.
XTo continueplayback: selectÌand
press th e9 butto nto confirm .
The men uis hidden .
Stop function
XTo show th emenu: press th e9 butto non
th eremot econtrol .
XTo interrup tplayback: selectÉand
press th e9 butto nto confirm .
The Ë display changes to Ì.The vide o
imag eis hidden .
XTo continu eplayback: selectÌand
press th e9 butto nto confirm .
Playbac kcontinue sfrom th epoin twher eit
was interrupted. The men uis hidden .
XTo stop playback: while playbackis inter-
rupted, select Éagain and press th e9
butto nto confirm .
Playbac kstops and return sto th ebeginning
of th eDVD. Ì is highlighted.
XTo restart playback: selectÌand press
th e9 butto nto confirm .
Playbac kstart sfrom th ebeginning of th e
DVD.
Selecting a scene/chapter
Skipping forwards/backwards
XPress th e= or; buttonon th eremot e
control .
or
XPress th eE orF button.
The navigation men u (Ypage 197) appears
for approximately eigh tseconds.
Selecting a scene/chapter directly
The example sillustrat ehow to select scen eor
chapter 5.
XOptio n1: while th efilm is playing, press th e
h buttonon th eremot econtrol .
XPressabutton, suc has ¿.
XOptio n2: press th e9 butto non th eremot e
control .
XSelectDVD-Videoand press th e9 butto nto
confirm .
XSelectDVDFunctionsand press th e9 but -
to nto confirm .
XSelectScene Selectionand press th e9
butto nto confirm .
XSelectth e¿ digit usin gth e9 or:
butto nand press th e9 butto nto confirm .
In bot hcases, playbac kwill begi nfrom th e5t h
scen eor chapter after abrie fpause .
Selecting a film/track
XOption1: press th e9 butto non th eremot e
control .
XSelectDVD-Videoand press th e9 butto nto
confirm .
XSelectDVDFunctionsand press th e9 but -
to nto confirm .
XSelectTitle Selectionand press th e9
butto nto confirm .
XPress the9 butto nto select th elist .
XSelec t afilm or atitle.
XOptio n2: to select film 2, for example, press
th e· buttonon th eremot econtrol .
Afte r abrie fpause ,th esecon dfilm is played.
198Video DVD mode
Rear Seat Entertainment System
 1
1 2
2 3
3 4
4 5
5 6
6 7
7 8
8 9
9 10
10 11
11 12
12 13
13 14
14 15
15 16
16 17
17 18
18 19
19 20
20 21
21 22
22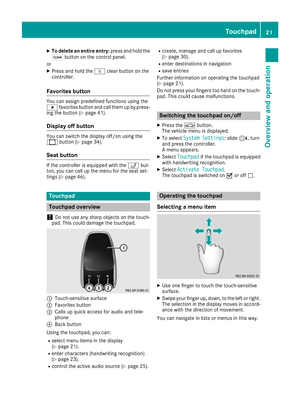 23
23 24
24 25
25 26
26 27
27 28
28 29
29 30
30 31
31 32
32 33
33 34
34 35
35 36
36 37
37 38
38 39
39 40
40 41
41 42
42 43
43 44
44 45
45 46
46 47
47 48
48 49
49 50
50 51
51 52
52 53
53 54
54 55
55 56
56 57
57 58
58 59
59 60
60 61
61 62
62 63
63 64
64 65
65 66
66 67
67 68
68 69
69 70
70 71
71 72
72 73
73 74
74 75
75 76
76 77
77 78
78 79
79 80
80 81
81 82
82 83
83 84
84 85
85 86
86 87
87 88
88 89
89 90
90 91
91 92
92 93
93 94
94 95
95 96
96 97
97 98
98 99
99 100
100 101
101 102
102 103
103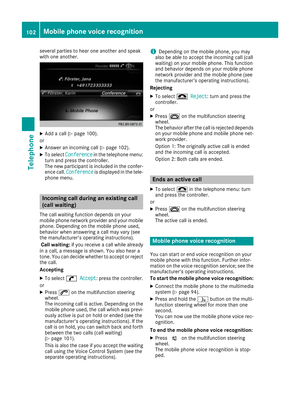 104
104 105
105 106
106 107
107 108
108 109
109 110
110 111
111 112
112 113
113 114
114 115
115 116
116 117
117 118
118 119
119 120
120 121
121 122
122 123
123 124
124 125
125 126
126 127
127 128
128 129
129 130
130 131
131 132
132 133
133 134
134 135
135 136
136 137
137 138
138 139
139 140
140 141
141 142
142 143
143 144
144 145
145 146
146 147
147 148
148 149
149 150
150 151
151 152
152 153
153 154
154 155
155 156
156 157
157 158
158 159
159 160
160 161
161 162
162 163
163 164
164 165
165 166
166 167
167 168
168 169
169 170
170 171
171 172
172 173
173 174
174 175
175 176
176 177
177 178
178 179
179 180
180 181
181 182
182 183
183 184
184 185
185 186
186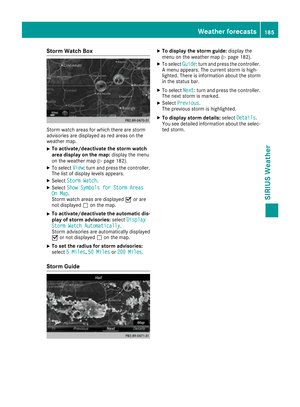 187
187 188
188 189
189 190
190 191
191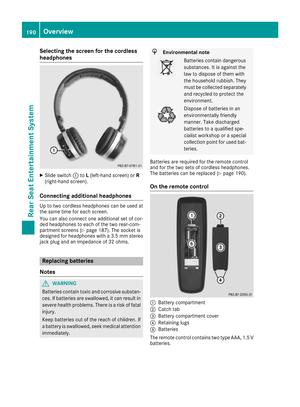 192
192 193
193 194
194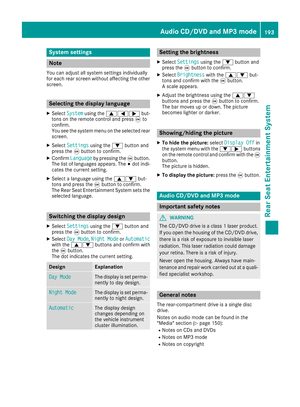 195
195 196
196 197
197 198
198 199
199 200
200 201
201 202
202 203
203 204
204 205
205