2016 MERCEDES-BENZ CLS instrument cluster
[x] Cancel search: instrument clusterPage 297 of 342

Do not start the vehicle using a rapid charging device. If your vehicle's battery is discharged, the
engine can be jump-started from another vehicle or from a second battery using jumper cables.
Observe the following points: R
The battery is not accessible in all vehicles. If the other vehicle's battery is not accessible, jump-
start the vehicle using a second battery or a jump-starting device. R
You may only jump-start the vehicle when the engine and exhaust system are cold. R
Only jump-start from batteries with a 12 V voltage rating. R
Only use jumper cables which have a sufficient cross-section and insulated terminal clamps. R
If the battery is fully discharged, leave the battery that is being used to jump-start connected for
a few minutes before attempting to start. This charges the battery slightly. R
Make sure that the two vehicles do not touch.
Make sure that: R
the jumper cables are not damaged. R
when the jumper cables are connected to the battery, uninsulated sections of the terminal clamp
do not come into contact with other metal sections. R
the jumper cables cannot come into contact with parts which can move when the engine is
running, such a s the V-belt pulley or the fan.X
Apply the parking brake firmly. X
Shift the transmission to position P .X
Make sure that the ignition is switched off. All indicator lamps in the instrument cluster must be
off. When using the SmartKey, turn the SmartKey to position 0 in the ignition lock and remove it
( Y
page 127). X
Switch off all electrical consumers, e.g. rear window defroster, lighting, etc. X
Open the hood.
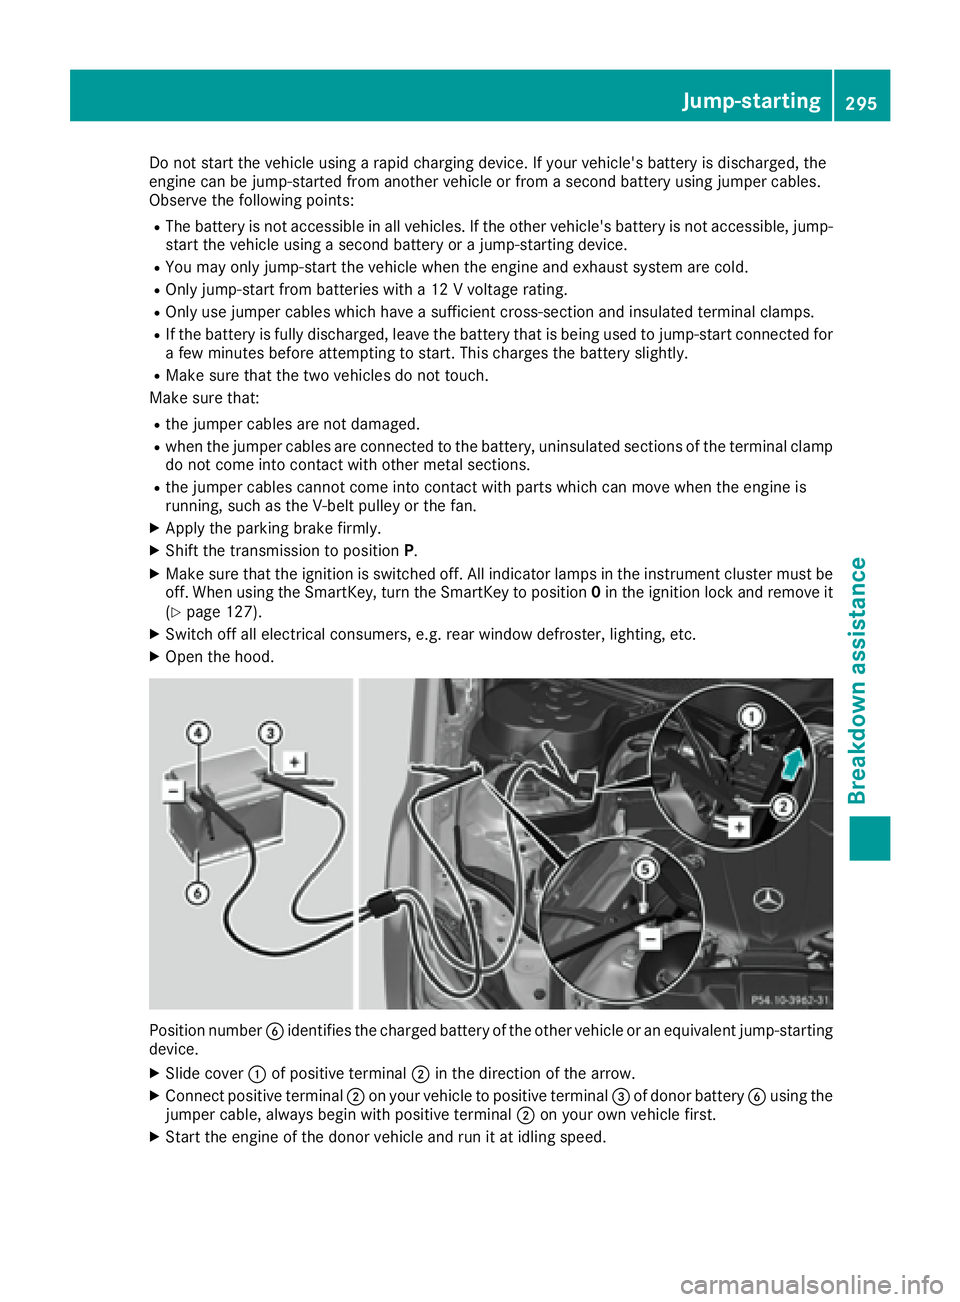
Position number �
Page 301 of 342

As soon as the vehicle has been loaded:X
Prevent the veh icle from rolling away by
applyin g the parking brake.X
Sh ift the automat ic transmission to posi-
tion P .X
Turn the Sm artKey to position 0 in the ignition
lock and remove it. X
Secure the veh icle .
Notes on 4MATIC vehicles
! Veh icle s with 4MATIC must not be towed
wit h either the front or the rear axle raised, as
doin g so will damage the transmission.
If the veh icle has transmission damage or dam-
age to the front or rear axle, have it transported
on a transporter or trailer.
In the event of da ma ge to the electrical sys-
tem
If the battery is defective, the automat ic trans-
mission will be locked in position P . To shift the
automat ic transmission to position N , you must
pro vide power to the veh icle 's electrical system
in the same way as when jump-starting
( Y
page 294).
Have the veh icle transported on a transporter or
trailer.
Tow-starting (emergency engine
starting)
! Veh icle s wit h automat ic transmission must
not be started by tow-starting. This could oth-
erwise damage the transmission.
i You can find information on "Jump-starting"
under ( Y
page 294).
Fuses
Important safety notes
G WAR NING
If you manipulate or brid ge a faulty fuse or if
you replace it wit h a fuse wit h a higher amper-
age, the electr ic cables could be overloaded.
This could result in a fire. There is a risk of an
acc iden t and injury. Always replace faulty fuses with the specified
new fuses having the correct amperage.
Blo wn fuses must be replaced with fuses of the
same rating, whic h you can recognize by the
color and value. The fuse ratings are listed in the
fuse allocation chart.
The fuse allocation chart is located in the vehicle
tool kit in the stowage compartment under the
trunk floor ( Y
page 286).
If a newly inserted fuse also blows, have the
cause traced and rectified at a qualified special-
ist workshop, e.g. an authorized Mercedes-Benz
Center.
! On ly use fuses that have been appr oved for
Mercedes-Benz vehicles and whic h have the
correct fuse rating for the system concerned.
Otherwise, components or systems could be
damaged.
! Make sure that no moisture can enter the
fuse box when the cover is open.
! When closing the cover, make sure that it is
lying correctly on the fuse box. Moisture seep-
ing in or dirt could otherwise impair the oper-
ation of the fuses.
The fuses in your vehicle ser ve to close down
faulty circuits. If a fuse blows, all the compo-
nents on the circuit and their functions stop
operating.
Before changing a fuse Pay attention to the important safety notes
( Y
page 299). X
Swit ch off the engine. X
Swit ch off all electrical consumers. X
Secure the vehicle against rolling away
( Y
page 146). X
Remo ve the Sm artKey from the ignition lock.
or, on vehicles wit h KEYLESS ‑ GO:X
Open the driver's door.
The on-board electronics now have status 0 .
This is the same as the SmartKey having been
remove d. X
Remo ve the St art/Stop button from the igni-
tion lock ( Y
page 127).
All indicator lamps in the instrument cluster
must be off. Fuses 299
Breakdown assistance Z
Page 312 of 342

The tire pressure monitor has a yellow warning
lamp in the instrument cluster for indicating
pressure loss or a malfunction. Whether the
warning lamp flashes or lights up indicates
whether a tire pressure is too low or the tire
pressure monitor is malfunctioning: R
if the warning lamp is lit continuously, the tire
pressure on one or more tires is significantly
too low. The tire pressure monitor is not mal-
functioning. R
if the warning lamp flashes for around a
minute and then remains lit constantly, the
tire pressure monitor is malfunctioning.
In addition to the warning lamp, a message
appears in the multifunction display. Observe
the information on display messages
( Y
page 230).
It may take up to ten minutes for a malfunction
of the tire pressure monitor to be indicated. A
malfunction will be indicated by the tire pres-
sure warning lamp flashing for approximately
one minute and then remaining lit. When the
malfunction has been rectified, the tire pressure
warning lamp goes out after a few minutes of
driving.
The tire pressure values indicated by the on-
board computer may differ from those meas-
ured at a gas station with a pressure gauge. The
tire pressures shown by the on-board computer
refer to those measured at sea level. At high
altitudes, the tire pressure values indicated by a
pressure gauge are higher than those shown by
the on-board computer. In this case, do not
reduce the tire pressures.
The operation of the tire pressure monitor can
be affected by interference from radio transmit-
ting equipment (e.g. radio headphones, two-way
radios) that may be being operated in or near the
vehicle.
Checking the tire pressure electroni-
cally X
Make sure that the SmartKey is in position 2
in the ignition lock ( Y
page 127).X
Press the �Y or �e button on the steering
wheel to select the Service menu.X
Press the �c or �d button to select
Tire Pressure .X
Press the �v button.
The current tire pressure of each tire is shown
in the multifunction display. If the vehicle has been parked for over
20 minutes, the Tire pressures will be
displayed after driving a few minutes
message appears.
After a teach-in process, the tire pressure mon-
itor automatically detects new wheels or new
sensors. As long as a clear allocation of the tire
pressure value to the individual wheels is not
possible, the Tire Pressure Monitor Active
display message is shown instead of the tire
pressure display. The tire pressures are already
being monitored.
If an emergency spare wheel is mounted, the
system may continue to show the tire pressure
of the wheel that has been removed for a few
minutes. If this occurs, note that the value dis-
played for the position where the spare wheel is
mounted is not the same as the current tire
pressure of the emergency spare wheel.
Tire pressure monitor warning mes-
sages If the tire pressure monitor detects a pressure
loss in one or more tires, a warning message is
shown in the multifunction display. The yellow
tire pressure warning lamp then lights up. R
If the Correct Tire Pressure message
appears in the multifunction display, the tire
pressure in at least one tire is too low. The tire
pressure must be corrected when the oppor-
tunity arises. R
If the Check Tires message appears in the
multifunction display, the tire pressure in one
or more tires has dropped significantly. The
tires must be checked. R
If the Warning Tire Malfunction message
appears in the multifunction display, the tire
pressure in one or more tires is dropping sud-
denly. The tires must be checked.
Observe the instructions and safety notes in the
display messages in the "Tires" section
( Y
page 230).
If the wheel positions on the vehicle are rotated,
the tire pressures may be displayed for the
wrong positions for a short time. This is rectified
after a few minutes of driving, and the tire pres-
sures are displayed for the correct positions.310
Tire pressure
Wheels and tires