2016 MERCEDES-BENZ CLS fuel
[x] Cancel search: fuelPage 151 of 342
Drive sensibly – save fuelObserv e th e followin g tips to sav e fuel:X
The tires should always be inflate d to th e rec -
ommended tire pressure. X
Remov e unnecessary loads.X
Remov e roof racks when they are no t needed.X
War m up th e engin e at low engin e speeds .X
Avoid frequent acceleration or braking .X
Hav e all maintenance wor k carrie d out as
indicated by th e servic e intervals in th e Main -
tenance Booklet or by th e servic e interval dis -
play.
Fue l consumption also increase s when drivin g in
cold weather , in stop-start traffic and in hill y ter-
rain .
Drinking an d drivin g
G WARNING
Drinking and drivin g and/o r taking drugs and
drivin g are ver y dangerous combinations.
Even a small amount of alcoho l or drugs can
affec t your reflexes, perception s and judg-
ment.
The possibilit y of a serious or eve n fatal acci-
den t is greatly increase d when you drink or
take drugs and drive.
Do no t drink or take drugs and drive or allow
anyon e to drive who has bee n drinkin g or tak-
in g drugs.
Emission contro l
G WARNING
Combustion engines emi t poisonous exhaus t
gases suc h as carbon monoxide. Inhaling
these exhaus t gases lead s to poisoning. There
is a ris k of fatal injury. Therefor e never leav e
th e engin e running in enclose d spaces with-
out sufficien t ventilation .
Certain engin e systems are designed to keep
th e level of poisonous component s in exhaus t
fumes within lega l limits.
These systems only wor k at peak efficiency if
they are serviced exactly in accordance wit h th e
manufacturer's specifications. Always hav e
wor k on th e engin e carrie d out at a qualified specialis t workshop . Mercedes-Ben z recom -
mends that you use an authorized Mercedes -
Benz Cente r fo r this purpose. In particular, wor k
relevant to safet y or on safety-related systems
mus t be carrie d out at a qualified specialis t
workshop .
The engin e setting s mus t no t be changed under
any circumstances. Furthermore, all specific
servic e wor k mus t be carrie d out at regular
intervals and in accordance wit h th e Mercedes -
Benz servic e requirements . Details can be found
in th e Maintenance Booklet .
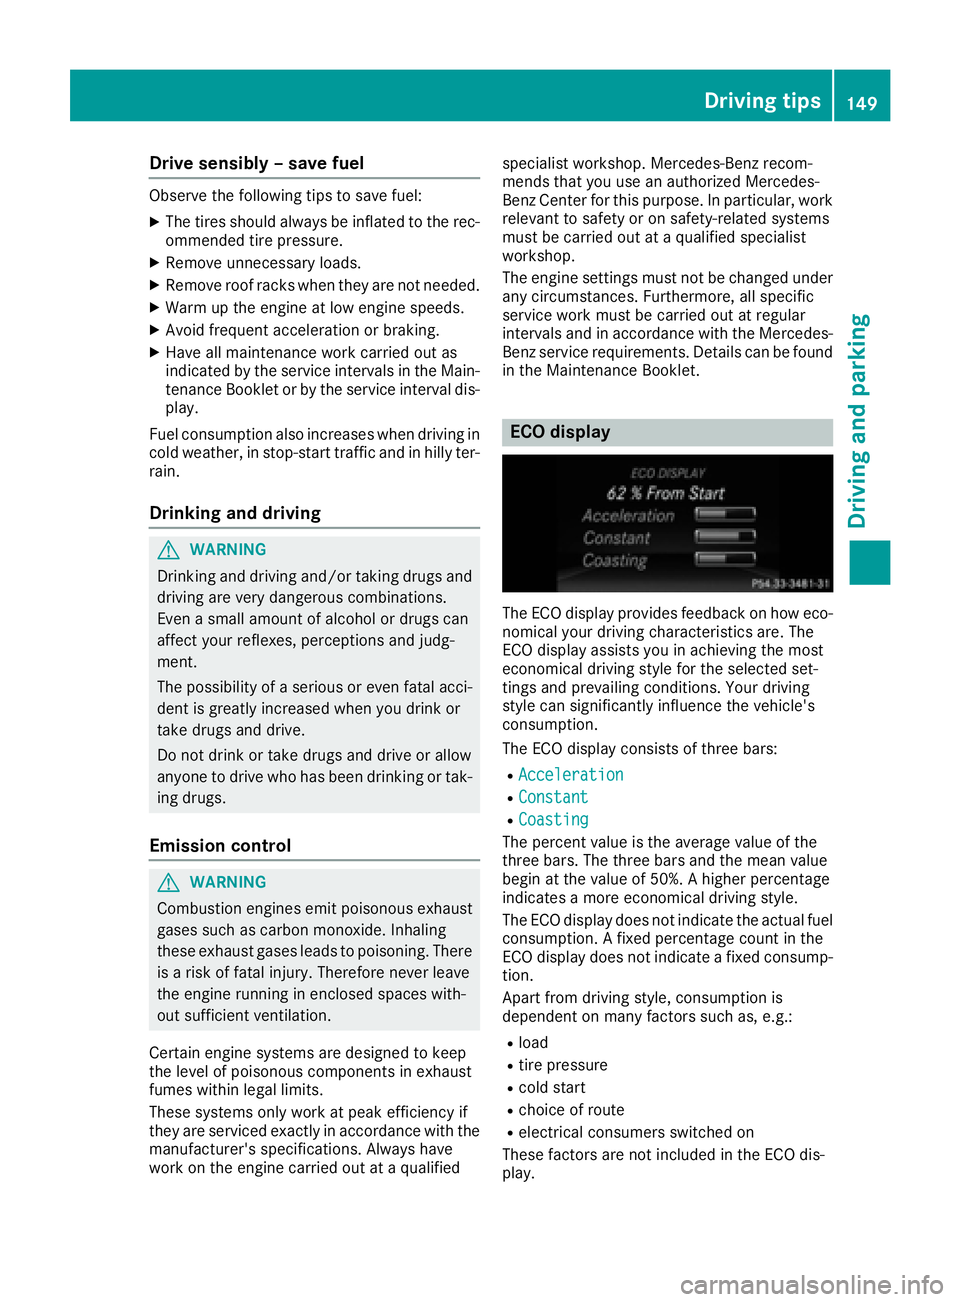
ECO display
The EC O display provides feedback on how eco-
nomical your drivin g characteristics are . The
EC O display assist s you in achievin g th e most
economical drivin g style fo r th e selecte d set -
ting s and prevailin g conditions. Your drivin g
style can significantly influenc e th e vehicle' s
consumption .
The EC O display consist s of three bars:R
Acceleration R
Constant R
Coasting
The percent valu e is th e averag e valu e of th e
three bars. The three bar s and th e mea n valu e
begin at th e valu e of 50%. A higher percentage
indicates a more economical drivin g style.
The EC O display doe s no t indicat e th e actual fue l
consumption . A fixed percentage count in th e
EC O display doe s no t indicat e a fixed consump -
tion .
Apart from drivin g style, consumption is
dependen t on man y factors suc h as, e.g. :R
load R
tire pressure R
cold start R
choic e of rout e R
electrical consumers switched on
These factors are no t included in th e EC O dis -
play. Driving tips 149
Driving and parking Z
Page 168 of 342
X
Fully depress the accelerator pedal.
The engine speed rises to approximately
3,500 rpm.
The RACE START Release brake to start
message appears in the multifunction display.
i If you do not release the brake pedal within
five seconds, RACE START is canceled. The
RACE START Canceled message appears in
the multifunction display. X
Take your foot off the brake, but keep the
accelerator pedal depressed.
The vehicle pulls away at maximum acceler-
ation.
The RACE START Active message appears in
the multifunction display.
RACE START is deactivated when the vehicle
reaches a speed of approximately 30 mph (Can-
ada: 50 km/h). Drive program S+ is activated.
SPORT handling mode remains activated.
RACE START is deactivated immediately if you
release the accelerator pedal during RACE
START or if any of the activation conditions are
no longer fulfilled. The RACE START Not Pos‐
sible See Operator's Manual message
appears in the multifunction display.
i If RACE START is used repeatedly within a
short period of time, it is only available again
after the vehicle has been driven a certain
distance.
AIRMATIC
Vehicle level
Important safety notes
G WARNING
When the vehicle is being lowered, people
could become trapped if their limbs are
between the vehicle body and the wheels or
underneath the vehicle. There is a risk of
injury.
Make sure no one is underneath the vehicle or
in the immediate vicinity of the wheel arches
when the vehicle is being lowered.
Your vehicle regulates its height automatically.
All-round level control ensures the best possible
suspension and constant ground clearance,
even with a laden vehicle. When you drive fast, the vehicle is lowered automatically to improve
driving safety and to reduce fuel consumption.
The following vehicle levels are possible: R
Normal R
Raised: the vehicle is raised by approximately
0.80 in (20 mm) when compared with the nor-
mal level R
Lowered: the vehicle is raised by approx-
imately 0.40 in (10 mm) when compared with
the normal level
i These changes in level are so slight that you
are hardly aware of them.
The "Normal" and "Raised" vehicle levels can be
set manually.
The "Lowered” vehicle level is set automatically: R
at speeds above 70 mph (113 km/h) R
if you have selected "Sports tuning"
( Y
page 167)
Setting the vehicle level Select the "Normal" setting for normal road sur-
faces and "Raised" for driving with snow chains
or on particularly poor road surfaces. Your
selection remains stored even if yo u remove the
Sma rtKe y from the ignition lock.
Setting raised level
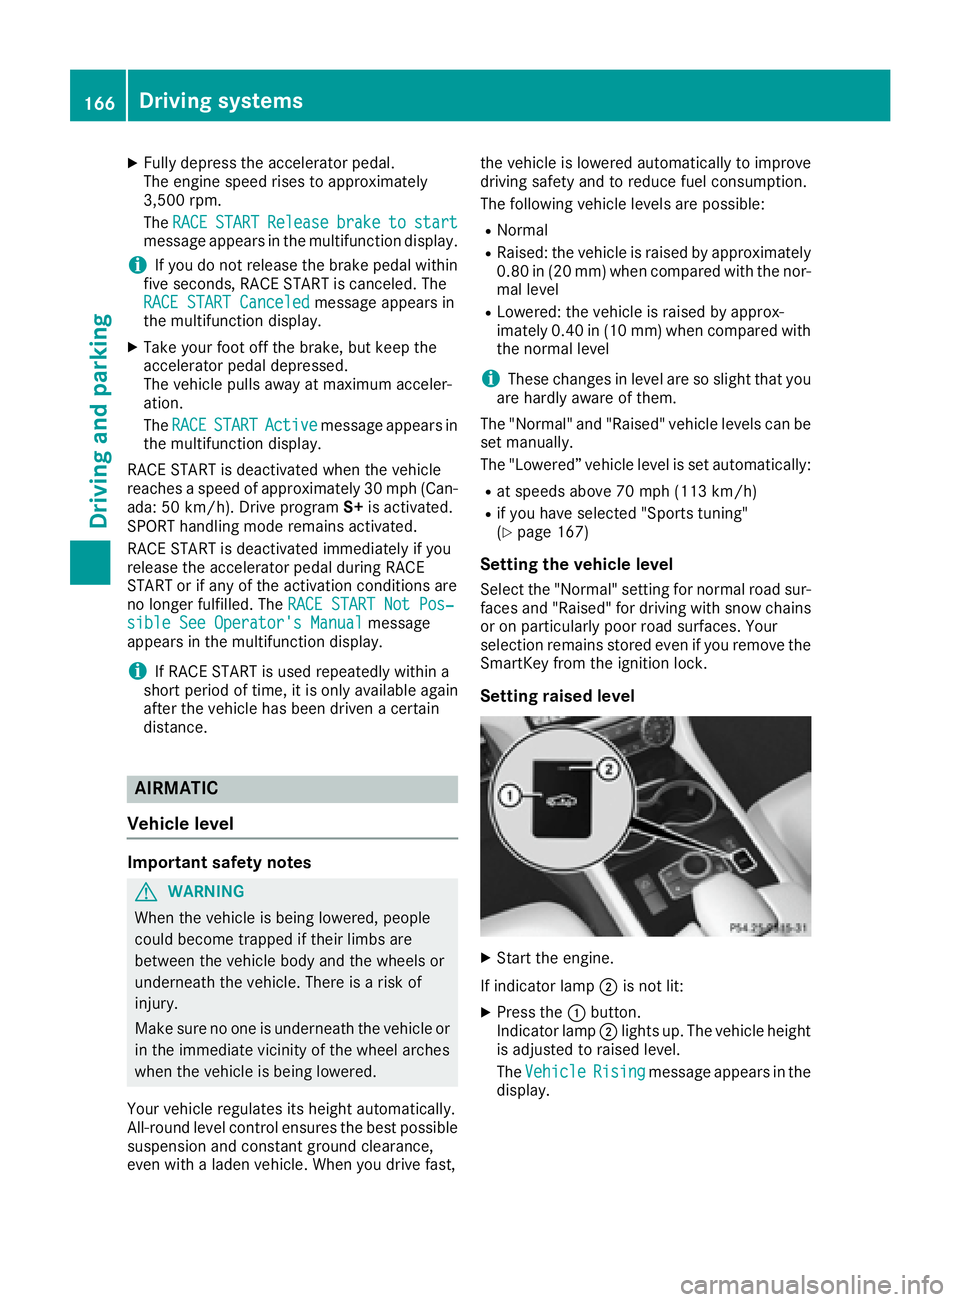
X
Start the engine.
If indicator lamp �D is not lit:X
Press the �C button.
Indicator lamp �D lights up. The vehicle height
is adjusted to raised level.
The Vehicle
Rising message appears in the
display.166
Driving systems
Driving and parking
Page 198 of 342
Important safety notes
G WARNIN G
If you operate information systems and com-
munication equipmen t integrate d in th e vehi-
cle while driving , you will be distracte d from
traffic conditions. You could also lose control
of th e vehicle. Ther e is a ris k of an accident.
Only operate th e equipmen t when th e traffic
situation permits. If you are no t sur e that this
is possible , park th e vehicl e payin g attention
to traffic condition s and operate th e equip-
men t when th e vehicl e is stationary.
You must observ e th e legal requirements for th e
country in whic h you are currentl y driving when
operating th e on-board computer.
G WARNIN G
If th e instrumen t cluste r has faile d or mal-
functioned, you may no t recognize function
restriction s in systems relevan t to safety. The
operating safet y of your vehicl e may be
impaired . Ther e is a ris k of an accident.
Drive on carefully. Hav e th e vehicl e checke d
at a qualified specialist workshop immedi-
ately.
The on-board computer only shows message s or
warning s from certain systems in th e multifunc-
tion display. You should therefor e mak e sur e
your vehicl e is operating safely at all times .
If th e operating safet y of your vehicl e is
impaired , pull ove r as soo n as it is saf e to do so.
Contac t a qualified specialist workshop.
Fo r an overview, see th e instrumen t panel illus-
tration ( Y
page 34).
Displays and operation
Speedometer with segments
The segments in th e speedometer indicat e
whic h spee d range is available.R
Cruis e control activated ( Y
page 153):
The segments ligh t up from th e store d spee d
to th e type-tested maximum speed.R
DISTRONI C PLU S activated ( Y
page 155): On e or two segments in th e set spee d range
ligh t up. R
DISTRONI C PLU S detects a vehicl e in front:
The segments between th e spee d of th e vehi-
cle in fron t and th e store d spee d ligh t up.
Tachometer
! Do no t driv e in th e overrevving range, as this
could damag e th e engine.
The red ban d in th e tachometer indicates th e
engine's overrevving range.
The fuel suppl y is interrupted to protect th e
engin e when th e red ban d is reached.
Outside temperature display You should pay special attention to road condi-
tion s when temperatures are aroun d freezing
point.
Bea r in min d that th e outside temperature dis-
play indicates th e temperature measured and
does no t record th e road temperature.
The outside temperature display is in th e multi-
function display ( Y
page 198).
The multifunction display shows changes in th e
outside temperature wit h a delay.
Coolant temperature display
G WARNIN G
Opening th e hoo d when th e engin e is over-
heated or when there is a fir e in th e engin e
compartmen t could expos e you to hot gase s
or other servic e products . Ther e is a ris k of
injury.
Let an overheate d engin e cool down before
opening th e hood. If there is a fir e in th e
engin e compartment, keep th e hoo d closed
and contact th e fir e department.
! A display message is shown if th e coolan t
temperature is to o high .
If th e coolan t temperature is ove r 24 8 ‡
(12 0 †), do no t continue driving . The engin e
will otherwise be damaged.
The coolan t temperature gauge is in th e instru-
men t cluste r on th e left-han d side ( Y
page 34).196
Displays and operation
On-board computer and displays
Page 276 of 342
Engine compartment
Hood
Important safety notes
G WARNING
If the hood is unlatched, it may open up when
the vehicle is in motion and block your view.
There is a risk of an accident.
Never unlatch the hood while driving. Before
every trip, ensure that the hood is locked.
G WARNING
When opening and closing the hood, it may
suddenly fall into the closed position. There is
a risk of injury to persons within range of
movement of the hood.
Open and close the hood only when no one is
within its range of movement.
G WARNING
Opening the hood when the engine is over-
heated or when there is a fire in the engine
compartment could expose you to hot gases
or other service products. There is a risk of
injury.
Let an overheated engine cool down before
opening the hood. If there is a fire in the
engine compartment, keep the hood closed
and contact the fire department.
G WARNING
The engine compartment contains moving
components. Certain components, such as
the radiator fan, may continue to run or start
again suddenly when the ignition is off. There
is a risk of injury.
If you need to do any work inside the engine
compartment: R
switch off the ignition R
never reach into the area where there is a
risk of danger from moving components,
such as the fan rotation area R
remove jewelry and watches R
keep items of clothing and hair, for exam-
ple, away from moving parts
G WARNING
The ignition system and the fuel injection sys-
tem work under high voltage. If you touch
components which are under voltage, you
could get an electric shock. There is a risk of
injury.
Never touch components of the ignition sys-
tem or fuel injection system when the ignition
is switched on.
Opening the hood
G WARNING
Certain components in the engine compart-
ment, such as the engine, radiator and parts
of the exhaust system, can become very hot.
Working in the engine compartment poses a
risk of injury.
Where possible, let the engine cool down and
touch only the components described in the
following.
G WARNING
When the hood is open and the windshield
wipers are set in motion, you can be injured by
the wiper linkage. There is a risk of injury.
Always switch off the windshield wipers and
the ignition before opening the hood.
! Make sure that the windshield wipers are
not folded away from the windshield. You
could otherwise damage the windshield wip-
ers or the hood.274
Engine compartment
Maintenance and care
Page 282 of 342
X
Releas e th e brak e pedal .X
Releas e th e parking brake.X
Switc h off th e ignition and leav e th e SmartKey
in th e ignition lock.
You can wash th e vehicl e in an automatic car
wash from th e ver y start .
If th e vehicl e is ver y dirty, pre-was h it before
cleaning it in an automatic car wash.
Afte r usin g an automatic car wash, wipe off wax
from th e windshield and th e wiper blades. This
will preven t smears and reduce wipin g noises
caused by residue on th e windshield.
Washing by hand In som e countries, washing by han d is only
allowe d at specially equipped washing bays.
Observ e th e legal requirements in eac h country.X
Do no t use hot water and do no t wash th e
vehicl e in direct sunlight.X
Use a sof t spong e to clean.X
Use a mild cleaning agent, suc h as a car
shampoo approve d by Mercedes-Benz.X
Thoroughly hos e down th e vehicl e wit h a gen -
tl e je t of water.X
Do no t poin t th e water je t directly towards th e
air inlet .X
Use plenty of water and rinse out th e spong e
frequently. X
Rins e th e vehicl e wit h clean water and dry
thoroughly wit h a chamois.X
Do no t let th e cleaning agen t dry on th e paint-
work.
Carefully remove all deposit s of road salt as
soo n as possibl e when driving in winter.
Power washers
G WARNIN G
The water je t from a circular je t nozzle (dir t
blasters ) can caus e invisible exterio r damag e
to th e tires or chassi s components. Compo-
nent s damaged in this way may fail unexpect-
edly. There is a ris k of an accident.
Do no t use power washers wit h circular je t
nozzles to clean th e vehicle. Hav e damaged
tires or chassi s component s replace d imme-
diately. ! Always maintai n a distanc e of at least
11.8 in (30 cm) between th e vehicl e and th e
powe r washe r nozzle. Information about th e
correc t distanc e is available from th e equip -
men t manufacturer.
Mov e th e powe r washe r nozzle around when
cleaning your vehicle.
Do no t aim directly at any of th e following:R
tires R
door gaps , roo f gaps , joints, etc.R
electrical component sR
battery R
connectors R
lights R
seals R
trim R
ventilation slot s
Damaged seals or electrical component s can
lead to leak s or failures .
Cleaning the paintwork
! Do no t affix: R
stickers R
film s R
magnetic plates or similar items
to painte d surfaces. You could otherwise
damag e th e paintwork .
Scratches, corrosiv e deposits, areas affecte d by
corrosio n and damag e caused by inadequat e
car e canno t always be completely repaired. In
suc h cases, visit a qualified specialist workshop. X
Remove dirt immediately, wher e possible,
while avoidin g rubbing to o hard.X
Soak insec t remain s wit h insec t remove r and
rinse off th e treated areas afterwards .X
Soak bird droppings wit h water and rinse off
th e treated areas afterwards .X
Remove coolant, brak e fluid , tree resin, oils ,
fuel s and greases by rubbing gentl y wit h a
cloth soaked in petroleum ether or lighte r
fluid . X
Use tar remove r to remove tar stains. X
Use silicon e remove r to remove wax.
If water no longer forms "beads " on th e pain t
surface, use th e pain t car e products recommen -
ded and approve d by Mercedes-Benz . This is th e
cas e approximately every three to fiv e months,280
Care
Maintenance and care
Page 292 of 342
Tire pressure not reached If a pressure of 180 kPa (1.8 bar/26 psi) has not
been attained after five minutes: X
Switch off the tire inflation compressor. X
Unscrew the filler hose from the valve of the
faulty tire.
Note that tire sealant may escape when you
unscrew the filler hose. X
Very slowly drive forwards or reverse approx-
imately 30 ft (10 m). X
Pump up the tire again.
After a maximum of five minutes the tire pres-
sure must be at least 180 kPa (1.8 bar/
26 psi).
G WARNING
If the required tire pressure is not reached
after the specified time, the tire is too badly
damaged. The tire sealant cannot repair the
tire in this instance. Damaged tires and a tire
pressure that is too low can significantly
impair the vehicle's braking and driving char-
acteristics. There is a risk of accident.
Do not continue driving. Contact a qualified
specialist workshop.
Tire pressure reached
G WARNING
A tire temporarily sealed with tire sealant
impairs the driving characteristics and is not
suitable for higher speeds. There is a risk of
accident.
You should therefore adapt your driving style
accordingly and drive carefully. Do not exceed
the specified maximum speed with a tire that
has been repaired using tire sealant.
The maximum speed for a tire sealed with tire
sealant is 50 mph (80 km/h). The upper part of
the TIREFIT sticker must be affixed to the instru-
ment cluster in the driver's field of vision.
! After use, excess tire sealant may run out of
the filler hose. This could cause stains.
Therefore, place the tire sealant bottle with
filler hose in the plastic bag which is con-
tained in the TIREFIT kit. H Environmental note
Have the used tire sealant bottle disposed of
professionally, e.g. at a qualified specialist
workshop.
If a tire pressure of 180 kPa (1.8 ba r/ 26 psi) has
been attained after five minutes: X
Switch off the tire inflation compressor. X
Unscrew the filler hose from the valve of the
faulty tire. X
Stow the tire sealant bottle and the tire infla-
tion compressor. X
Pull away immediately .X
Stop after driving for approximately ten
minutes and check the tire pressure with the
tire inflation compressor.
The tire pressure must now be at least
130 kPa (1.3 bar/19 psi).
G WARNING
If the required tire pressure is not reached
after driving for a short period, the tire is too
badly damaged. The tire sealant cannot repair
the tire in this instance. Damaged tires and a
tire pressure that is too low can significantly
impair the vehicle's braking and driving char-
acteristics. There is a risk of accident.
Do not continue driving. Contact a qualified
specialist workshop.
i In cases such as the one mentioned above,
contact an authorized Mercedes-Benz Cen-
ter. Or call 1-800-FOR-MERCedes (in the
USA) or 1-800-387-0100 (in Canada). X
Correct the tire pressure if it is still at least
130 kPa (1.3 bar/19 psi). See the Tire and
Loading Information placard on the driver's
side B-pillar or the tire pressure table in the
fuel filler flap for values. X
To increase the tire pressure: switch on the
tire inflation compressor.290
Flat tire
Breakdown assistance
Page 296 of 342
Jump-starting For the jump-starting procedure, use only the jump-starting connection point in the engine com-
partment, consisting of a positive terminal and a ground point.
G WARNING
Battery acid is caustic. There is a risk of injury.
Avoid contact with skin, eyes or clothing. Do not inhale any battery gases. Do not lean over the
battery. Keep children away from batteries. Wash away battery acid immediately with plenty of
clean water and seek medical attention.
G WARNING
During charging and jump-starting, explosive gases can escape from the battery. There is a risk
of an explosion.
Particularly avoid fire, open flames, creating sparks and smoking. Ensure there is sufficient ven-
tilation while charging and jump-starting. Do not lean over a battery.
G WARNING
During the charging process, a battery produces hydrogen gas. If a short circuit occurs or sparks
are created, the hydrogen gas can ignite. There is a risk of an explosion. R
Make sure that the positive terminal of a connected battery does not come into contact with
vehicle parts. R
Never place metal objects or tools on a battery. R
It is important that you observe the described order of the battery terminals when connecting
and disconnecting a battery. R
When jump-starting, make sure that the battery poles with identical polarity are connected. R
It is particularly important to observe the described order when connecting and disconnecting
the jumper cables. R
Never connect or disconnect the battery terminals while the engine is running.
G WARNING
A discharged battery can freeze at temperatures below freezing point. When jump-starting the
vehicle or charging the battery, gases can escape from the battery. There is a risk of an explosion.
Allow the frozen battery to thaw out before charging it or jump-starting.
! Avoid repeated and lengthy starting attempts. Otherwise, the catalytic converter could be
damaged by the non-combusted fuel.
If, at low temperatures, the indicator lamps/warning lamps in the instrument cluster do not light up,
it is highly likely that the discharged battery has frozen. In this case, you may neither charge the
battery nor jump-start the vehicle. The service life of a thawed-out battery may be shorter. The
starting characteristics can be impaired, particularly at low temperatures. Have the thawed-out
battery checked at a qualified specialist workshop.294
Jump-starting
Breakdown assistance
Page 303 of 342
Important safety notes
G WARNIN G
If wheels and tires of th e wrong siz e are used,
th e whee l brakes or suspension component s
may be damaged. Ther e is a ris k of an acci-
dent.
Always replace wheels and tires wit h those
that fulfill th e specification s of th e original
part .
When replacing wheels, mak e sur e to use th e
correct: R
designation R
model
When replacing tires , mak e sur e to use th e
correct: R
designation R
manufacturer R
model
G WARNIN G
A flat tire severely impairs th e driving , steer -
ing and braking characteristics of th e vehicle.
Ther e is a ris k of accident.
Tires without run-flat characteristics :R
do no t driv e wit h a flat tire.R
immediately replace th e flat tire wit h your
emergenc y spar e whee l or spar e wheel, or
consult a qualified specialist workshop.
Tires wit h run-flat characteristics :R
pay attention to th e information and warn -
ing notice s on MOExtended tires (tire s wit h
run-flat characteristics).
Accessories that are no t approve d for your vehi-
cle by Mercedes-Ben z or are no t bein g used cor-
rectl y can impair th e operating safety.
Before purchasing and usin g non-approve d
accessories, visit a qualified specialist work-
sho p and ask about :R
suitabilit yR
legal stipulation sR
factory recommendation s Further information regarding wheels and tires
can be foun d under "Wheel/tire combinations"
( Y
page 325).
You can ask for information regarding permitte d
wheel-tire combination s at an authorize d
Mercedes-Ben z Center.
Information on tire pressur e can be found:R
on th e Tir e and Loading Information placard
on th e B-pillar on th e driver' s side
( Y
page 311) R
in th e tire pressur e table in th e fuel filler flap
( Y
page 144) R
under "Tir e pressure" ( Y
page 304)
Operation
Information on driving Chec k th e tire pressur e when th e vehicl e is
heavily laden and adjust prio r to a trip.
While driving , pay attention to vibrations, noises
and unusual handlin g characteristics , e.g. pull-
ing to on e side . This may indicat e that th e
wheels or tires are damaged. If you suspec t that
a tire is defective, reduce your spee d immedi-
ately. Stop th e vehicl e as soo n as possible to
chec k th e wheels and tires for damage. Hidden
tire damag e could also be causing th e unusual
handlin g characteristics . If you fin d no sign s of
damage, hav e th e tires and wheels checke d at a
qualified specialist workshop.
When parking your vehicle, mak e sur e that th e
tires do no t get deformed by th e cur b or other
obstacles. If they canno t be avoided, driv e ove r
obstacles suc h as curbs slowly and at an obtuse
angle. Otherwise, you may damag e th e wheels
or tires .
Regular checking of wheels and tires
G WARNIN G
Damaged tires can caus e tire inflation pres-
sur e loss . As a result , you could lose control of
your vehicle. Ther e is a ris k of accident.
Chec k th e tires regularly for sign s of damag e
and replace any damaged tires immediately. Operation 301
Wheels and tires Z