2016 MERCEDES-BENZ CLS seats
[x] Cancel search: seatsPage 101 of 342
X
Turn the SmartKey to position 1 or 2 in the
ignition lock ( Y
page 127).X
To switch on: press button �C repeatedly
until the desired ventilation level is set. X
To switch off: press button �C repeatedly
until all the indicator lamps go out.
i If the battery voltage is too low, the seat
ventilation may switch off.
i You can open the side windows and the slid-
ing sunroof using the "Convenience opening"
feature ( Y
page 88). The seat ventilation of
the driver's seat automatically switches to the
highest level. Seats 99
Seats, steering wheel and mirrors Z
Page 102 of 342
Problems with the seat heating or seat ventilation Problem
Possible causes/consequences and �P Solutions
The seat heating or seat
ventilation has switched
off prematurely or can-
not be switched on. The on-board voltage is too low because too many electrical consum-
ers are switched on. X
Switch off electrical consumers that you do not need, such as the
rear window defroster or interior lighting.
Once the battery is sufficiently charged, the seat heating or seat
ventilation can be switched back on manually.
Steering wheel
Important safety notes
G WARNING
You could lose control of your vehicle if you do
the following while driving: R
adjust the driver's seat, head restraint,
steering wheel or mirrors R
fasten the seat belt
There is a risk of an accident.
Adjust the driver's seat, head restraint, steer-
ing wheel and mirror and fasten your seat belt
before starting the engine.
G WARNING
Children could injure themselves if they
adjust the steering wheel. There is a risk of
injury.
When leaving the vehicle, always take the
SmartKey with you and lock the vehicle. Never
leave children unsupervised in the vehicle.
The electrically adjustable steering wheel can
still be adjusted when there is no SmartKey in
the ignition lock. Adjusting the steering wheel electri-
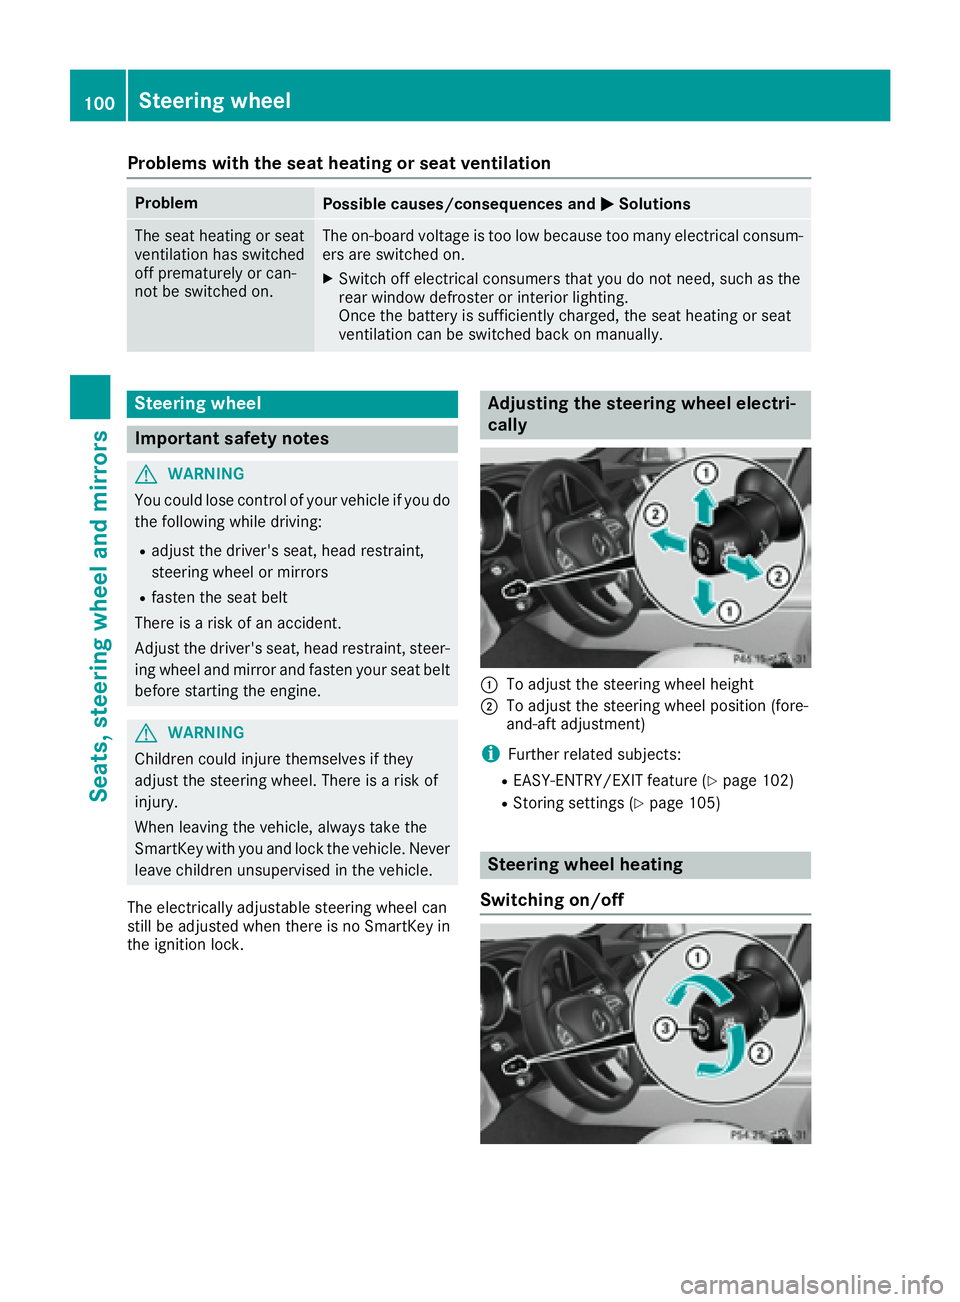
cally
�C
To adjust the steering wheel height �D
To adjust the steering wheel position (fore-
and-aft adjustment)
i Further related subjects: R
EASY-ENTRY/EXIT feature ( Y
page 102)R
Storing settings ( Y
page 105)
Steering wheel heating
Switching on/off100
Steering wheel
Seats, steering wheel and mirrors
Page 104 of 342
Problems with the steering wheel heating Problem
Possible causes/consequences and �P Solutions
The steering wheel heat-
ing has switched off pre-
maturely or cannot be
switched on. The on-board voltage is too low because too many electrical consum-
ers are switched on. X
Switch off electrical consumers that you do not need, such as the
rear window defroster or interior lighting.
Once the battery is sufficiently charged, the steering wheel heating
will switch back on automatically.
EASY-ENTRY/EXIT feature
Important safety notes
G WARNING
When the EASY-ENTRY/EXIT feature adjusts
the steering wheel, you and other vehicle
occupants – particularly children – could
become trapped. There is a risk of injury.
While the EASY-ENTRY/EXIT feature is mak-
ing adjustments, make sure that no one has
any body parts in the sweep of the steering
wheel.
Move the steering wheel adjustment lever if
there is a risk of entrapment by the steering
wheel. The adjustment process is stopped.
Vehicles with a memory function: if there is a
risk of becoming trapped by the steering wheel,
you can also one of the memory function posi-
tion buttons. The adjustment process is stop-
ped.
G WARNING
If children activate the EASY-ENTRY/EXIT fea-
ture, they can become trapped, particularly
when unattended. There is a risk of injury.
When leaving the vehicle, always take the
SmartKey with you and lock the vehicle. Never
leave children unsupervised in the vehicle.
G WARNING
If you drive off while the EASY-ENTRY/EXIT
feature is making adjustments, you could lose
control of the vehicle. There is a risk of an
accident. Always wait until the adjustment process is
complete before driving off.
The EASY-ENTRY/EXIT feature makes getting in
and out of your vehicle easier.
You can activate and deactivate the EASY-
ENTRY/EXIT feature in the on-board computer
( Y
page 208).
Position of the steering wheel when the
EASY-ENTRY/EXIT feature is active The steering wheel swings upwards when you: R
remove the SmartKey from the ignition lock R
with KEYLESS-GO: open the driver's door;
KEYLESS-GO must be in position 1R
with the SmartKey: open the driver's door;
the SmartKey is in position 0 or 1 must be in
the ignition lock ( Y
page 127).
i The steering wheel only moves upwards if it
has not already reached the upper stop.
Position of the steering wheel for driv-
ing The steering wheel is moved to the last selected
position when: R
the driver's door is closed R
with KEYLESS-GO: you press the Start/Stop
button once
or R
with the SmartKey: you insert the SmartKey
into the ignition lock
When you close the driver's door with the igni-
tion switched on, the steering wheel is also
automatically moved to the previously set posi-
tion.102
Steering wheel
Seats, steering wheel and mirrors
Page 106 of 342
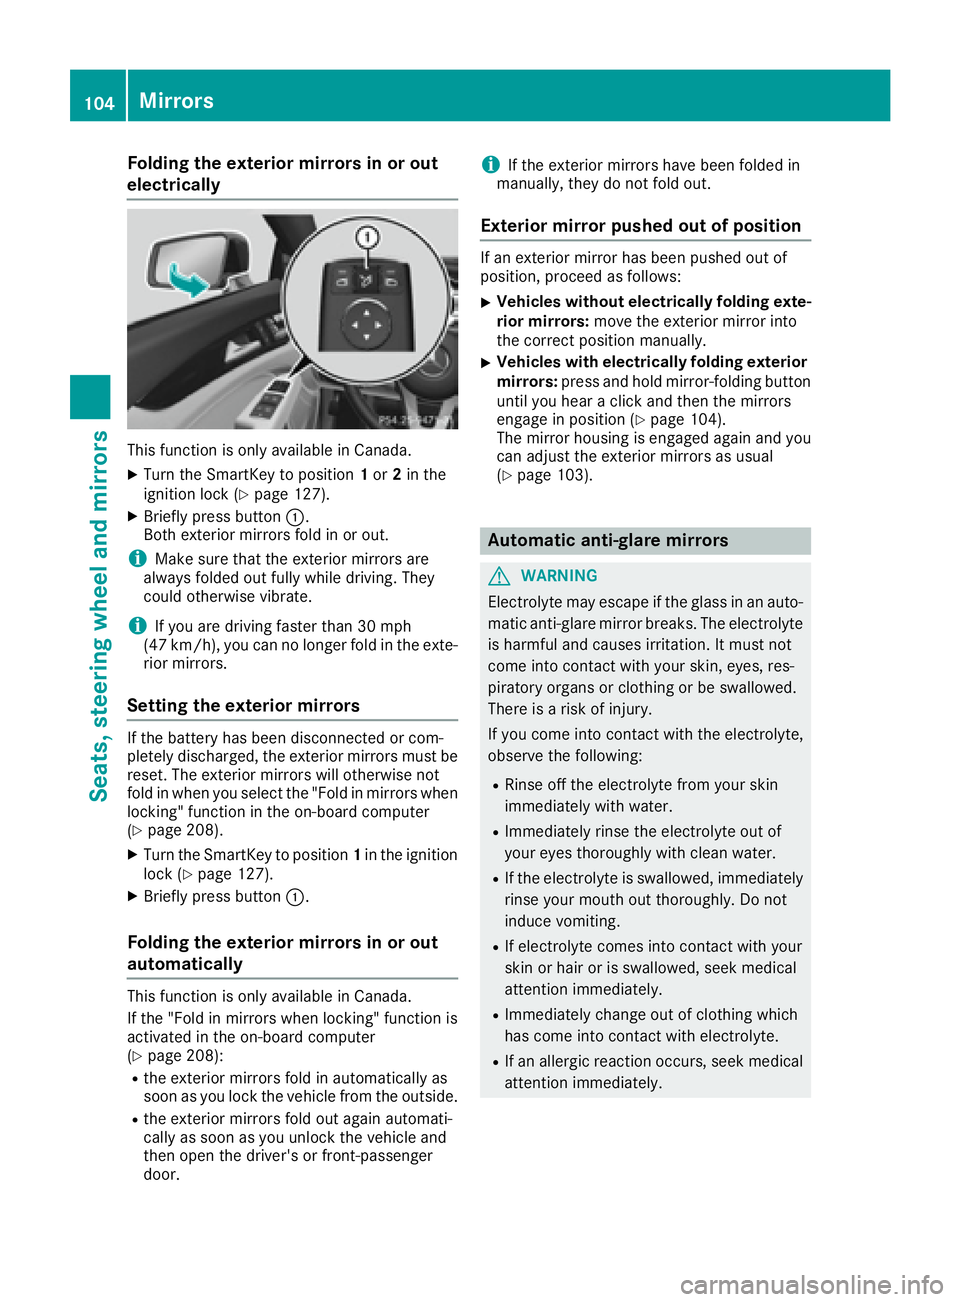
Folding the exterior mirrors in or out
electrically
This function is only available in Canada. X
Turn th e SmartKey to position 1 or 2 in th e
ignition loc k ( Y
page 127).X
Briefly press butto n �C .
Both exterio r mirror s fol d in or out .
i Mak e sure that th e exterio r mirror s are
always folded out fully while driving . They
could otherwise vibrate .
i If you are driving faste r than 30 mph
(47 km/h), you can no longer fol d in th e exte -
rio r mirrors.
Setting the exterior mirrors If th e battery has been disconnected or com-
pletely discharged, th e exterio r mirror s must be
reset . The exterio r mirror s will otherwise no t
fol d in when you select th e "Fold in mirror s when
locking" function in th e on-board computer
( Y
page 208). X
Turn th e SmartKey to position 1 in th e ignition
loc k ( Y
page 127).X
Briefly press butto n �C .
Folding the exterior mirrors in or out
automatically This function is only available in Canada.
If th e "Fold in mirror s when locking" function is
activated in th e on-board computer
( Y
page 208): R
th e exterio r mirror s fol d in automatically as
soo n as you loc k th e vehicl e from th e outside .R
th e exterio r mirror s fol d out again automati-
call y as soo n as you unlock th e vehicl e and
then open th e driver' s or front-passenger
door . i If th e exterio r mirror s have been folded in
manually, they do no t fol d out .
Exterior mirror pushed out of position If an exterio r mirror has been pushed out of
position , procee d as follows :X
Vehicles without electricall y folding exte-
rior mirrors : mov e th e exterio r mirror int o
th e correct position manually. X
Vehicles with electricall y folding exterior
mirrors : press and hold mirror-foldin g butto n
until you hear a click and then th e mirror s
engage in position ( Y
page 104).
The mirror housing is engage d again and you
can adjust th e exterio r mirror s as usual
( Y
page 103).
Automatic anti-glare mirrors
G WARNIN G
Electrolyte may escape if th e glass in an auto -
matic anti-glare mirror breaks . The electrolyt e
is harmful and causes irritation . It must no t
come int o contact wit h your skin, eyes, res -
piratory organs or clothing or be swallowed.
Ther e is a ris k of injury.
If you come int o contact wit h th e electrolyte,
observ e th e following: R
Rins e off th e electrolyt e from your skin
immediately wit h water.R
Immediately rinse th e electrolyt e out of
your eyes thoroughly wit h clean water.R
If th e electrolyt e is swallowed, immediately
rinse your mout h out thoroughly. Do no t
induce vomiting . R
If electrolyt e comes int o contact wit h your
skin or hair or is swallowed, seek medical
attention immediately. R
Immediately chang e out of clothing whic h
has come int o contact wit h electrolyte.R
If an allergic reaction occurs, seek medical
attention immediately.104
Mirrors
Seats, steering wheel and mirrors
Page 108 of 342
the vehicle as a result of the adjustments
being made. There is a risk of an accident.
Only use the memory function on the driver's
side when the vehicle is stationary.
G WARNING
Children could become trapped if they acti-
vate the memory function, particularly when
unattended. There is a risk of injury.
When leaving the vehicle, always take the
SmartKey with you and lock the vehicle. Never
leave children unsupervised in the vehicle.
G WARNING
When the memory function adjusts the seat or
steering wheel, you and other vehicle occu-
pants – particularly children – could become
trapped. There is a risk of injury.
While the memory function is making adjust-
ments, make sure that no one has any body
parts in the sweep of the seat or steering
wheel. If somebody becomes trapped, imme-
diately release the memory function position
button. The adjustment process is stopped.
The memory function can be used at any time,
e.g. even when the SmartKey isn't in the ignition
lock.
With the memory function, you can store up to
three different settings, e.g. for three different
people.
The following settings are stored as a single
memory preset: R
position of the seat, backrest and head
restraint R
active multicontour seat: seat contour,
dynamic function level R
driver's side: position of the exterior mirrors
on the driver's and front-passenger sides X
Adjust the seat ( Y
page 95).X
On the driver's side, adjust the steering wheel
( Y
page 100) and the exterior mirrors
( Y
page 103). X
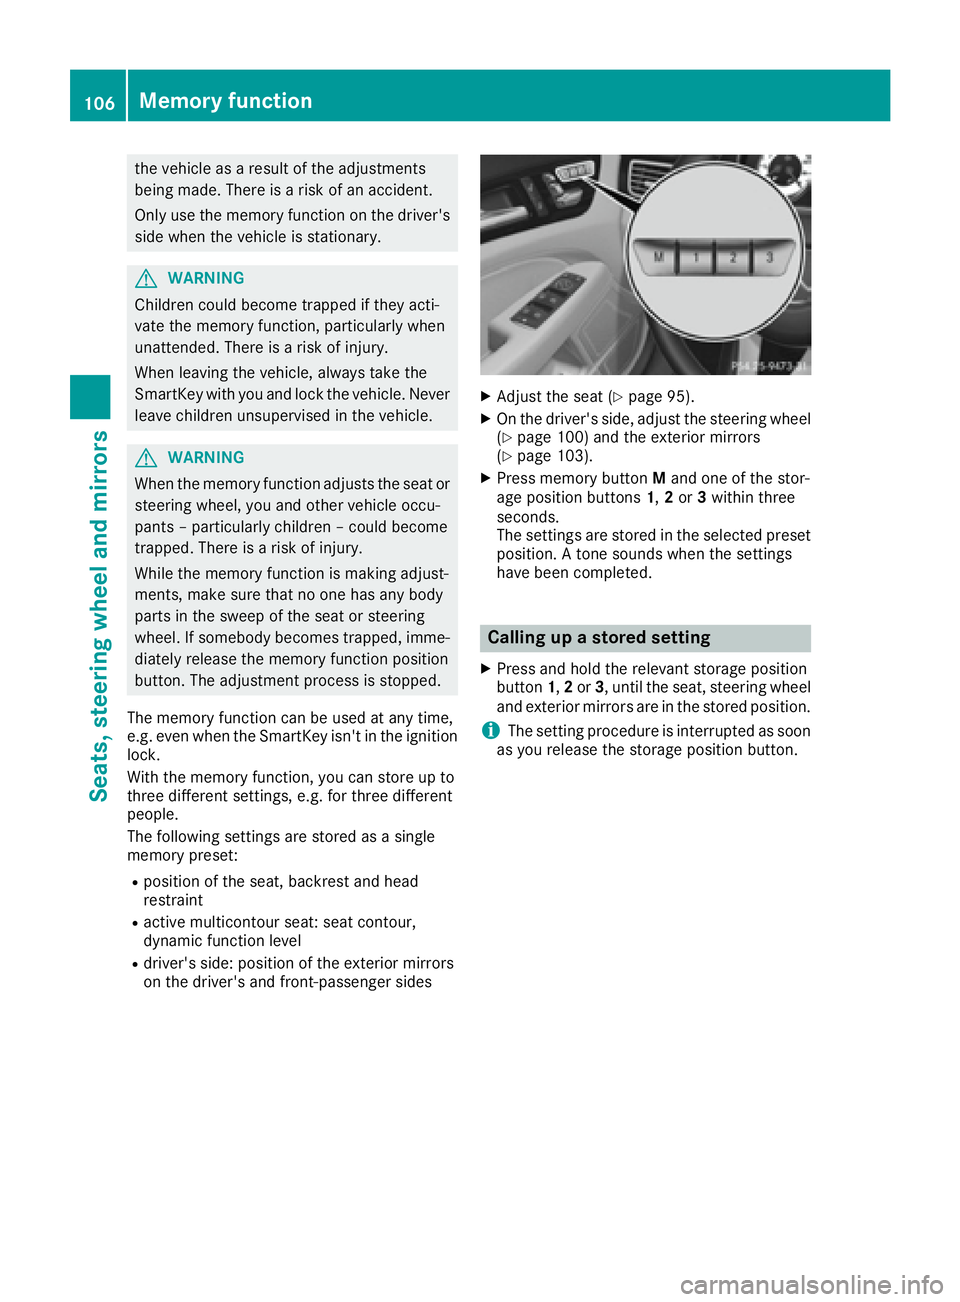
Press memory button M and one of the stor-
age position buttons 1 , 2 or 3 within three
seconds.
The settings are stored in the selected preset
position. A tone sounds when the settings
have been completed.
Calling up a stored setting X
Press and hold the relevant storage position
button 1 , 2 or 3 , until the seat, steering wheel
and exterior mirrors are in the stored position.
i The setting procedure is interrupted as soon
as you release the storage position button.106
Memory function
Seats, steering wheel an d mirrors
Page 253 of 342
Stowage areas
Loading guidelines
G WARNING
If objects, luggage or loads are not secured or
not secured sufficiently, they could slip, tip
over or be flung around and thereby hit vehicle
occupants. There is a risk of injury, particu-
larly in the event of sudden braking or a sud-
den change in direction.
Always store objects so that they cannot be
flung around. Secure objects, luggage or
loads against slipping or tipping before the
journey.
G WARNING
Combustion engines emit poisonous exhaust
gases such as carbon monoxide. Exhaust
gases can enter the vehicle interior if the
trunk lid is open when the engine is running,
especially if the vehicle is in motion. There is a
risk of poisoning.
Always switch off the engine before opening
the trunk lid. Never drive with the trunk lid
open.
G WARNING
The exhaust tail pipe and tail pipe trim can
become very hot. If you come into contact
with these parts of the vehicle, you could burn
yourself. There is a risk of injury.
Always be particularly careful around the
exhaust tail pipe and the tail pipe trim. Allow
these components to cool down before touch-
ing them.
The handling characteristics of a laden vehicle
are dependent on the distribution of the load
within the vehicle. For this reason, you should
observe the following notes when transporting a
load: R
Never exceed the maximum permissible
gross vehicle mass or the gross axle weight
rating for the vehicle (including occupants).
The values are specified on the vehicle iden- tification plate on the B-pillar of the driver's
door. R
The trunk is the preferred place to carry
objects. R
Position heavy loads as far forwards as pos-
sible and as low down in the trunk as possible. R
The load must not protrude above the upper
edge of the seat backrests. R
Always place the load against the rear or front
seat backrests. Make sure that the seat
backrests are securely locked into place. R
Always place the load behind unoccupied
seats if possible. R
Use the cargo tie-down rings and the parcel
nets to transport loads and luggage. R
Use cargo tie-down rings and fastening mate-
rials appropriate for the weight and size of the
load. R
Secure the load with sufficiently strong and
wear-resistant tie-downs. Pad sharp edges for
protection.
Stowage spaces
Important safety notes
G WARNING
If objects in the passenger compartment are
stowed incorrectly, they can slide or be
thrown around and hit vehicle occupants. In
addition, cupholders, open stowage spaces
and mobile phone brackets cannot always
retain all objects they contain. There is a risk
of injury, particularly in the event of sudden
braking or a sudden change in direction. R
Always stow objects so that they cannot be
thrown around in such situations. R
Always make sure that objects do not pro-
trude from stowage spaces, parcel nets or
stowage nets. R
Close the lockable stowage spaces before
starting a journey. R
Always stow and secure heavy, hard, poin-
ted, sharp-edged, fragile or bulky objects in
the trunk.
Observe the loading guidelines ( Y
page 251).Stowage areas 251
Stowage and features Z
Page 255 of 342
X
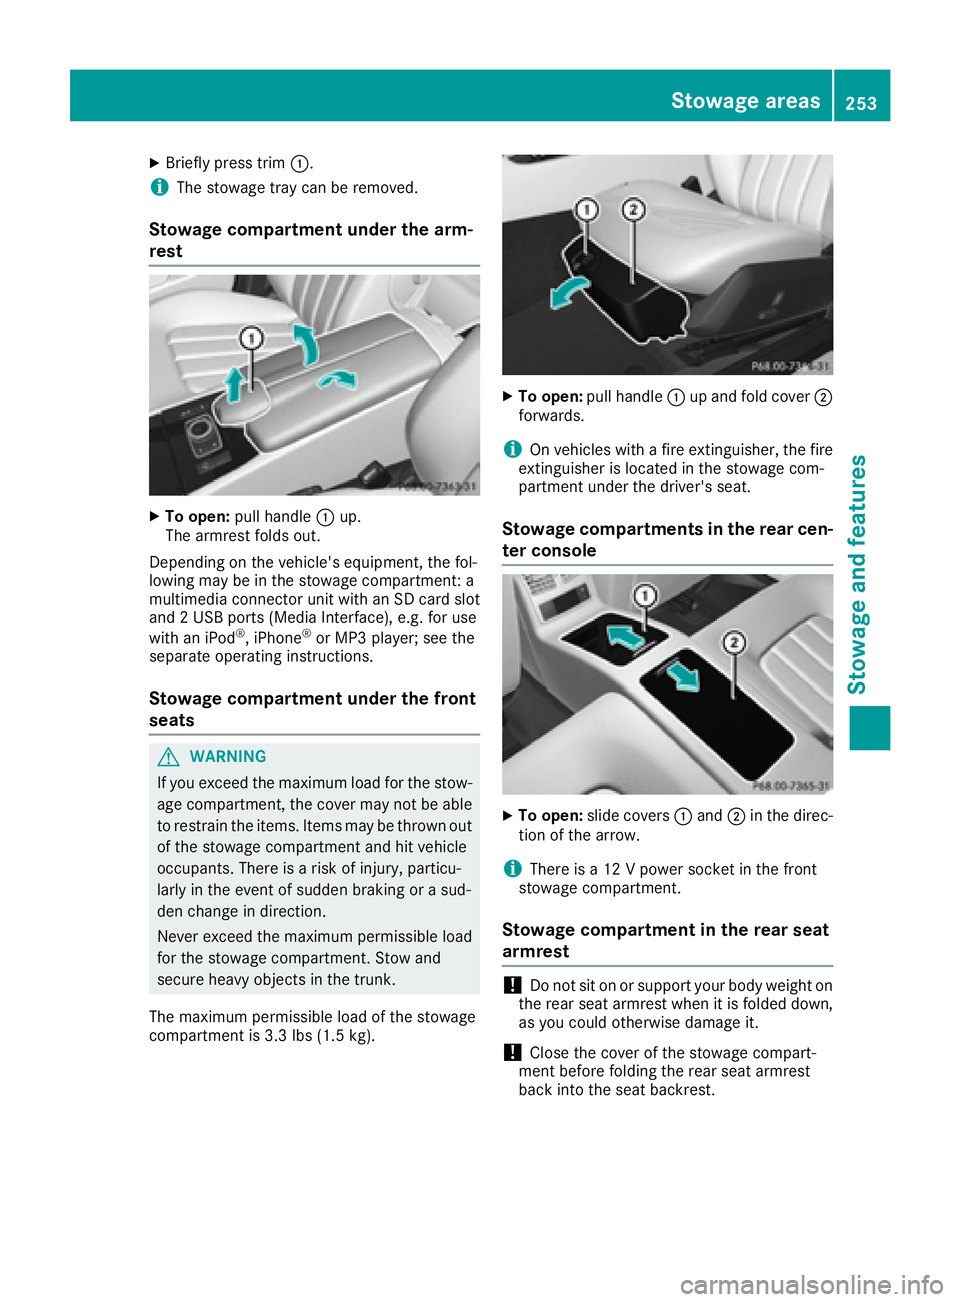
Briefly press trim �C .
i The stowage tray can be removed.
Stowage compartment under the arm-
rest X
To open: pull handle �C up.
The armrest folds out.
Depending on the vehicle's equipment, the fol-
lowing may be in the stowage compartment: a
multimedia connector unit with an SD card slot
and 2 USB ports (Media Interface), e.g. for use
with an iPod ®
, iPhone ®
or MP3 player; see the
separate operating instructions.
Stowage compartment under the front
seats
G WARNING
If you exceed the maximum load for the stow-
age compartment, the cover may not be able
to restrain the items. Items may be thrown out
of the stowage compartment and hit vehicle
occupants. There is a risk of injury, particu-
larly in the event of sudden braking or a sud-
den change in direction.
Never exceed the maximum permissible load
for the stowage compartment. Stow and
secure heavy objects in the trunk.
The maximum permissible load of the stowage
compartment is 3.3 lbs (1.5 kg). X
To open: pull handle �C up and fold cover �D
forwards.
i On vehicles with a fire extinguisher, the fire
extinguisher is located in the stowage com-
partment under the driver's seat.
Stowage compartments in the rear cen-
ter console
X
To open: slide covers �C and �D in the direc-
tion of the arrow.
i There is a 12 V power socket in the front
stowage compartment.
Stowage compartment in the rear seat
armrest
! Do not sit on or support your body weight on
the rear seat armrest when it is folded down,
as you could otherwise damage it.
! Close the cover of the stowage compart-
ment before folding the rear seat armrest
back into the seat backrest.Stowage areas 253
Stowage and features Z
Page 293 of 342
X
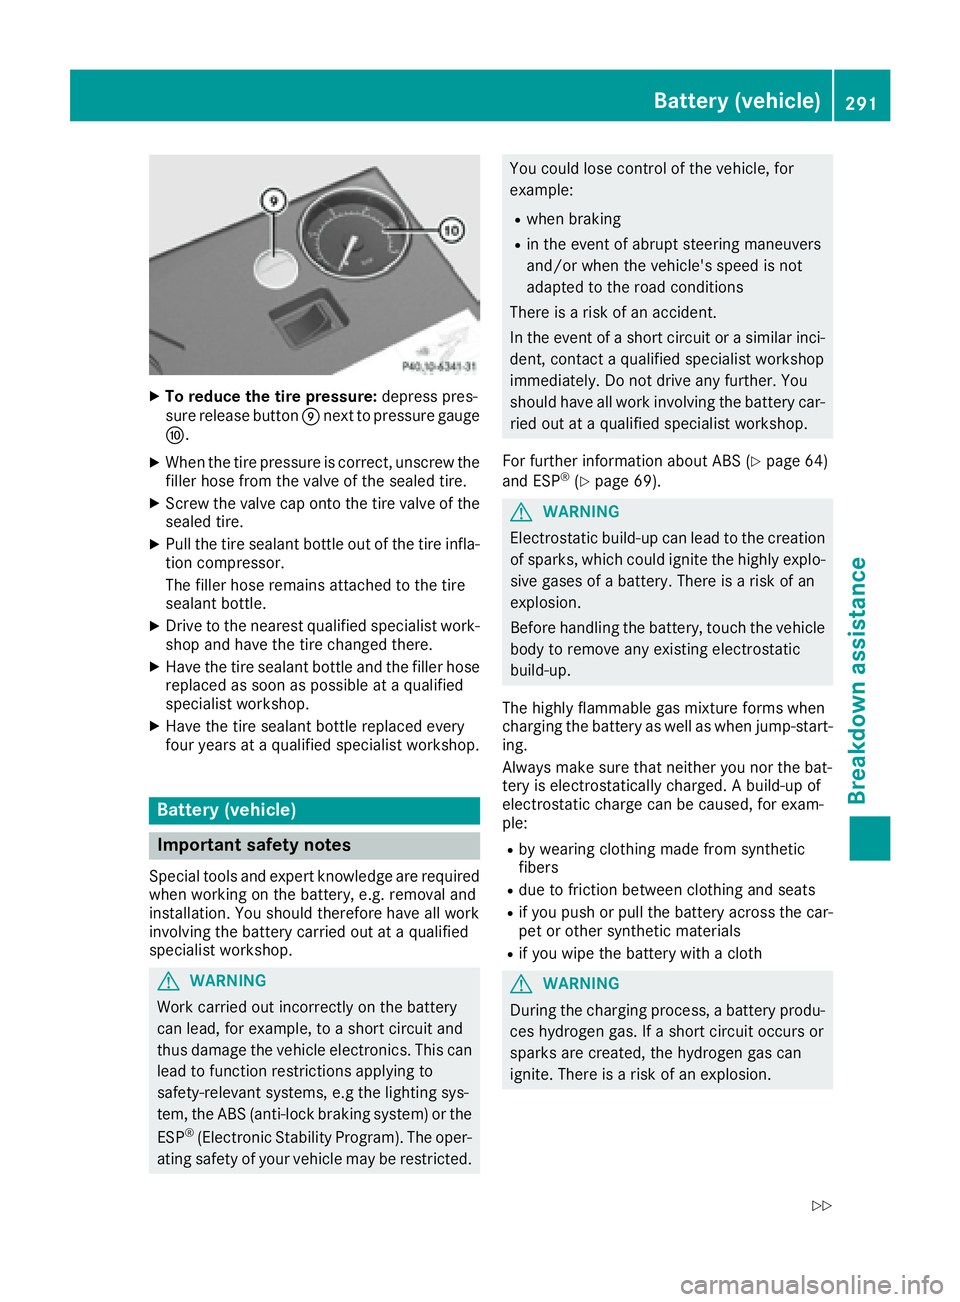
To reduce the tire pressure: depress pres-
sure release button �m next to pressure gauge
�n . X
When the tire pressure is correct, unscrew the
filler hose from the valve of the sealed tire. X
Screw the valve cap onto the tire valve of the
sealed tire. X
Pull the tire sealant bottle out of the tire infla-
tion compressor.
The filler hose remains attached to the tire
sealant bottle. X
Drive to the nearest qualified specialist work-
shop and have the tire changed there. X
Have the tire sealant bottle and the filler hose
replaced as soon as possible at a qualified
specialist workshop. X
Have the tire sealant bottle replaced every
four years at a qualified specialist workshop.
Battery (vehicle)
Important safety notes Special tools and expert knowledge are required
when working on the battery, e.g. removal and
installation. You should therefore have all work
involving the battery carried out at a qualified
specialist workshop.
G WARNING
Work carried out incorrectly on the battery
can lead, for example, to a short circuit and
thus damage the vehicle electronics. This can
lead to function restrictions applying to
safety-relevant systems, e.g the lighting sys-
tem, the ABS (anti-lock braking system) or the
ESP ®
(Electronic Stability Program). The oper-
ating safety of your vehicle may be restricted. You could lose control of the vehicle, for
example: R
when braking R
in the event of abrupt steering maneuvers
and/or when the vehicle's speed is not
adapted to the road conditions
There is a risk of an accident.
In the event of a short circuit or a similar inci-
dent, contact a qualified specialist workshop
immediately. Do not drive any further. You
should have all work involving the battery car-
ried out at a qualified specialist workshop.
For further information about ABS ( Y
page 64)
and ESP ®
( Y
page 69).
G WARNING
Electrostatic build-up can lead to the creation
of sparks, which could ignite the highly explo-
sive gases of a battery. There is a risk of an
explosion.
Before handling the battery, touch the vehicle
body to remove any existing electrostatic
build-up.
The highly flammable gas mixture forms when
charging the battery as well as when jump-start-
ing.
Always make sure that neither you nor the bat-
tery is electrostatically charged. A build-up of
electrostatic charge can be caused, for exam-
ple: R
by wearing clothing made from synthetic
fibers R
due to friction between clothing and seats R
if you push or pull the battery across the car-
pet or other synthetic materials R
if you wipe the battery with a cloth
G WARNING
During the charging process, a battery produ-
ces hydrogen gas. If a short circuit occurs or
sparks are created, the hydrogen gas can
ignite. There is a risk of an explosion.Battery (vehicle) 291
Breakdo wn assis tance Z