2016 MERCEDES-BENZ CLA lock
[x] Cancel search: lockPage 67 of 374

Drivin g safet y systems
Overview of drivin g safet y systemsIn this section , you will fin d information about
th e following drivin g safet y systems :R
AB S ( A nti-loc k B rakin g S ystem)
( Y
page 65) R
BA S ( B rake A ssist S ystem) ( Y
page 66 )R
COLLISION PREVENTION ASSIST PLU S
( Y
page 66 )R
ES P ®
( E lectronic S t ability P rogram)
( Y
page 69 )R
EB D ( E lectroni c B r ak e forc e D i stribution )
( Y
page 72) R
ADAPTIV E BRAKE ( Y
page 72 )R
STEE R CONTROL ( Y
page 72 )
Important safet y notesIf you fail to adapt your drivin g style or if you
are inattentive , th e drivin g safet y systems can
neither reduce th e ris k of an acciden t no r
override th e laws of physics. Driving safet y
systems are merely aids designed to assist
driving. You are responsible fo r maintainin g
th e distanc e to th e vehicle in front, fo r vehicle
speed, fo r braking in goo d time, and fo r stay-
in g in lane. Always adapt your drivin g style to
suit th e prevailin g road and weather condi-
tion s and maintain a saf e distanc e from th e
vehicle in front. Drive carefully.
The drivin g safet y systems described only
wor k as effectively as possible when there is
adequat e contact between th e tires and th e
road surface. Please pay special attention to
th e note s on tires , recommended minimum
tire tread depths, etc. ( Y
page 328).
In wintr y drivin g conditions, always use winte r
tires (M+ S tires ) and if necessary, snow
chains. Only in this way will th e drivin g safet y
systems described in this section wor k as
effectively as possible. ABS (Anti-lock Braking System)
General information AB S regulates brake pressure in suc h a way
that th e wheels do no t loc k when you brake .
Thi s allow s you to continue steerin g th e vehi-
cl e when braking .
The �% AB S warnin g lamp in th e instrumen t
cluster lights up when th e ignition is switched
on . It goe s out when th e engin e is running .
AB S works from a speed of about 5 mph
(8 km/h), regardles s of road-surfac e condi-
tions. AB S works on slipper y surfaces, eve n
when you only brake gently.
Important safet y notes
i Observ e th e "Important safet y notes" sec -
tion ( Y
page 65).
G WARNING
If AB S is faulty, th e wheels could loc k when
braking . The steerability and braking charac -
teristics may be severely impaired. Addition -
ally, further drivin g safet y systems are deac -
tivated. There is an increase d danger of skid-
din g and accidents .
Drive on carefully. Hav e AB S checke d imme-
diately at a qualified specialis t workshop .
Whe n AB S is malfunctioning, other systems ,
includin g drivin g safet y systems , will also
becom e inoperative . Observ e th e information
on th e AB S warnin g lamp ( Y
page 261) and
display message s whic h may be shown in th e
instrumen t cluster ( Y
page 228).
Braking X
If ABS intervenes: continue to depress th e
brake peda l vigorousl y until th e braking sit -
uation is over. X
To make a full brak e application:
depress th e brake peda l wit h full force.
If AB S intervenes when braking , you will feel a
pulsin g in th e brake pedal.Driving safety systems 65
Safety Z
Page 68 of 374
The pulsating brake pedal can be an indica-
tion of hazardous road conditions, and func-
tions as a reminder to take extra care while
driving.
BAS (Brake Assist System)
General information BAS operates in emergency braking situa-
tions. If you depress the brake pedal quickly,
BAS automatically boosts the braking force,
thus shortening the stopping distance.
Important safety notes
i Observe the "Important safety notes" sec-
tion ( Y
page 65).
G WARNING
If BAS is malfunctioning, the braking distance
in an emergency braking situation is
increased. There is a risk of an accident.
In an emergency braking situation, depress
the brake pedal with full force. ABS prevents
the wheels from locking.
Braking X
Keep the brake pedal firmly depressed until
the emergency braking situation is over.
ABS prevents the wheels from locking.
The brakes will function as usual once you
release the brake pedal. BAS is deactivated.
COLLISION PREVENTION ASSIST
PLUS
General information
i Observe the "Important safety notes" sec-
tion ( Y
page 65).
COLLISION PREVENTION ASSIST PLUS con-
sists of a distance warning function with an
autonomous braking function and adaptive
Brake Assist. COLLISION PREVENTION ASSIST PLUS can
help you to minimize the risk of a front-end
collision with a vehicle ahead or reduce the
effects of such a collision.
If COLLISION PREVENTION ASSIST PLUS
detects that there is a risk of a collision, you
will be warned visually and acoustically. If you
do not react to the visual and audible collision
warning, autonomous braking can be initiated
in critical situations. If you apply the brake
yourself in a critical situation, the COLLISION
PREVENTION ASSIST PLUS adaptive Brake
Assist assists you.
Important safety notes Detection of hazardous situations can be par-
ticularly impaired by: R
there is dirt on the sensors or anything else
covering the sensors R
there is snow or heavy rain R
there is interference by other radar sources R
there are strong radar reflections, for
example in parking garages R
a narrow vehicle traveling in front, e.g. a
motorbike R
a vehicle traveling in front on a different line R
new vehicles or after a service on the COL-
LISION PREVENTION ASSIST PLUS system
Observe the important safety notes in the
"Breaking-in notes" section ( Y
page 146).
Following damage to the front end of the vehi-
cle, have the configuration and operation of
the radar sensor checked at a qualified spe-
cialist workshop. This also applies to colli-
sions at low speeds where there is no visible
damage to the front of the vehicle.
Switching on/off
The COLLISION PREVENTION ASSIST PLUS is
automatically active after switching on the
ignition.
You can activate or deactivate COLLISION
PREVENTION ASSIST PLUS in the on-board
computer ( Y
page 220). When deactivated,66
Driving safety systems
Safety
Page 70 of 374
Vehicles with DISTRONIC PLUS: the auton-
omous braking function is available in the fol-
lowing speed ranges: R
4 - 124 mph (7 - 200 km/h) for moving
objects R
4 - 31 mph (7 - 50 km/h) for stationary
objects
Due to the nature of the system, particularly
complicated but non-critical driving condi-
tions may also cause the Autonomous Brak-
ing Function to intervene.
Adaptive Brake Assist General information
i Observe the "Important safety notes" sec-
tion ( Y
page 65).
With the help of adaptive Brake Assist, the
distance warning signal can detect obstacles
that are in the path of your vehicle for an
extended period of time.
If adaptive Brake Assist detects a risk of col-
lision with the vehicle in front, it calculates
the braking force necessary to avoid a colli-
sion. If you apply the brakes forcefully, adap-
tive Brake Assist will automatically increase
the braking force to a level suitable for the
traffic conditions.
Adaptive Brake Assist provides braking assis-
tance in hazardous situations at speeds
above 4 mph (7 km/h). It uses radar sensor
technology to assess the traffic situation.
Up to a speed of approximately 155 mph
(250 km/h), adaptive Brake Assist is capable
of reacting to moving objects that have
already been detected as such at least once
over the period of observation.
Up to a speed of approximately 44 mph
(70 km/h), adaptive Brake Assist reacts to
stationary obstacles. X
Keep the brake pedal depressed until the
emergency braking situation is over.
ABS prevents the wheels from locking. The brakes will work normally again if: R
you release the brake pedal. R
there is no longer any danger of a collision. R
no obstacle is detected in front of your
vehicle.
Adaptive Brake Assist is then deactivated.
Important safety notes
i Observe the "Important safety notes" sec-
tion for driving safety systems ( Y
page 65).
G WARNING
Adaptive Brake Assist cannot always clearly
identify objects and complex traffic situa-
tions.
In such cases, Adaptive Brake Assist can: R
intervene unnecessarily R
not intervene
There is a risk of an accident.
Always pay careful attention to the traffic sit-
uation and be ready to brake. Terminate the
intervention in a non-critical driving situation.
G WARNING
Adaptive Brake Assist does not react: R
to people or animals R
to oncoming vehicles R
to crossing traffic R
when cornering
As a result, the Adaptive Brake Assist may not
intervene in all critical conditions. There is a
risk of an accident.
Always pay careful attention to the traffic sit-
uation and be ready to brake.
Due to the nature of the system, particularly
complicated but non-critical driving condi-
tions may also cause Brake Assist to inter-
vene.
If adaptive Brake Assist is not available due to
a malfunction in the radar sensor system, the
brake system remains available with full
brake boosting effect and BAS.68
Driving safety systems
Safety
Page 74 of 374
R
COLL IS ION PREVENTION AS SIST is no lon-
ger available; nor is it activated if you brake
firmly wit h assistance from ESP ®
.R
ESP ®
st ill provides support when you brake
firmly.
ESP ®
trailer stabilizationGeneral info rm ation
If your veh icle/t railer combination begins to
swerve, ESP ®
assists you in this situation.
ESP ®
slows the vehicle down by braking and
limit ing the engine output unt il the vehicle/
trailer co mbin ation has stabilized.
Import ant safety notes
G WARNIN G
If road and weather condition s are poor ,
trailer stabilization will no t be able to preven t
th e vehicle/traile r combination from swerv-
ing . Trailers wit h a high cente r of gravity can
tip ove r before ES P ®
can detect this. Ther e is
a ris k of an accident.
Always adapt your driving style to th e prevail-
ing road and weather conditions.
If your veh icle wit h trailer (vehicle/trailer
co mbin ation) begins to lurch, you can only
st abiliz e the vehicle /t railer combination by
depr essing the brake firmly.
ESP ®
trailer st abiliz ation is active above
spee ds of about 65 km/h.
ESP ®
trailer stabilization does not work if
ESP ®
is deactivated or disabled because of a
malfunction.
EBD (electronic brake force distribu-
tion)
General information
EBD mon it ors and controls the brake pres-
sure on the rear wheels to improve driving
st abilit y while braking. Important safety notes
i Observe the "Im portant safety notes" sec-
tion ( Y
page 65).
G WARNIN G
If EB D is malfunctioning, th e rear wheels can
lock, e.g. under full braking . This increases th e
ris k of skiddin g and an accident.
You should therefor e adapt your driving style
to th e different handlin g characteristics. Hav e
th e brak e system checked at a qualified spe-
cialist workshop.
Observe information regarding indicator and
warning lamps ( Y
page 261) as well as dis-
play messages ( Y
page 230).
ADAPTIVE BRAKE ADAPTIVE BRAKE enhances braking safety
and offers increased braking comfort. In addi-
tion to the braking function, ADAPTIVE BRAKE
also has the HOLD function ( Y
page 187) and
hill start assist ( Y
page 151).
STEER CONTROL
General information
ST EER CONTROL helps you by transmitting a
noticea ble steering force to the steering
wheel in the direction required for vehicle
st abiliz ation.
This steering assistance is pro vide d in partic-
ular if: R
both right wheels or both left wheels are on
a wet or slippery road surface when you
brake. R
the veh icle starts to skid.
Important safety notes
i Observe the "Im portant safety notes" sec-
tion ( Y
page 65).72
Driving safety systems
Safety
Page 75 of 374
No steering assistance is provided from
STEER CONTROL, if: R
ESP ®
is malfunctioning.R
the lighting is faulty.
If ESP ®
is malfunctioning, you will be assisted
further by the electrical power steering.
Protection against theft
Immobilizer The immobilizer prevents your vehicle from
being started without the correct SmartKey. X
To activate with the SmartKey: remove
the SmartKey from the ignition lock. X
To activate with KEYLESS-GO start-
function or KEYLESS-GO: switch the igni-
tion off and open the driver's door. X
To deactivate: switch on the ignition.
When leaving the vehicle, always take the
SmartKey with you and lock the vehicle. Any-
one can start the engine if a valid SmartKey
has been left inside the vehicle.
i The immobilizer is always deactivated
when you start the engine.
In the event that the engine cannot be star-
ted (yet the vehicle's battery is charged),
the system is not operational. Contact an
authorized Mercedes-Benz Center or call
1-800-FOR-MERCedes (in the USA) or
1-800-387-0100 (in Canada).
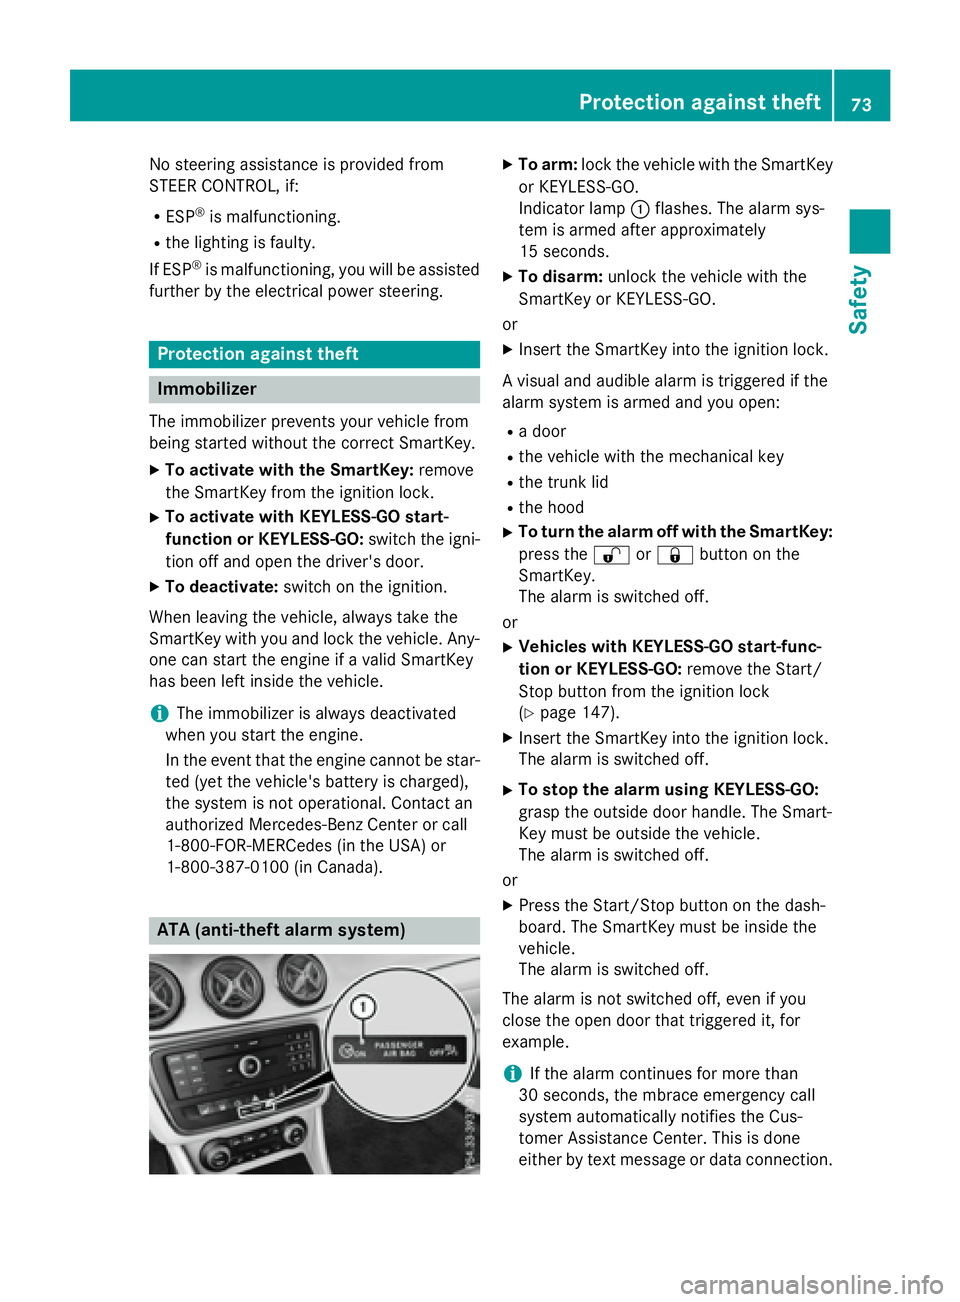
ATA (anti-theft alarm system) X
To arm: lock the vehicle with the SmartKey
or KEYLESS-GO.
Indicator lamp �C flashes. The alarm sys-
tem is armed after approximately
15 seconds. X
To disarm: unlock the vehicle with the
SmartKey or KEYLESS-GO.
or X
Insert the SmartKey into the ignition lock.
A visual and audible alarm is triggered if the
alarm system is armed and you open: R
a door R
the vehicle with the mechanical key R
the trunk lid R
the hood X
To turn the alarm off with the SmartKey:
press the �6 or �7 button on the
SmartKey.
The alarm is switched off.
or X
Vehicles with KEYLESS-GO start-func-
tion or KEYLESS-GO: remove the Start/
Stop button from the ignition lock
( Y
page 147). X
Insert the SmartKey into the ignition lock.
The alarm is switched off. X
To stop the alarm using KEYLESS-GO:
grasp the outside door handle. The Smart-
Key must be outside the vehicle.
The alarm is switched off.
or X
Press the Start/Stop button on the dash-
board. The SmartKey must be inside the
vehicle.
The alarm is switched off.
The alarm is not switched off, even if you
close the open door that triggered it, for
example.
i If the alarm continues for more than
30 seconds, the mbrace emergency call
system automatically notifies the Cus-
tomer Assistance Center. This is done
either by text message or data connection.Protection against theft 73
Safety Z
Page 78 of 374
Useful information
i This Operator's Manual describes all
models and all standard and optional equip-
ment of your vehicle available at the time of
publication of the Operator's Manual.
Country-specific differences are possible.
Please note that your vehicle may not be
equipped with all features described. This
also applies to safety-related systems and
functions.
i Read the information on qualified special-
ist workshops ( Y
page 25).
SmartKey
Important safety notes
G WARNING
If children are left unsupervised in the vehicle,
they could: R
open the doors, thus endangering other
people or road users. R
get out and disrupt traffic. R
operate the vehicle's equipment.
Additionally, children could set the vehicle in
motion if, for example, they: R
release the parking brake. R
shifting the automatic transmission out of
park position PR
Start the engine.
There is a risk of an accident and injury.
When leaving the vehicle, always take the
SmartKey with you and lock the vehicle. Never
leave children or animals unattended in the
vehicle. Always keep the SmartKey out of
reach of children.
G WARNING
If you attach heavy or large objects to the
SmartKey, the SmartKey could be uninten-
tionally turned in the ignition lock. This could
cause the engine to be switched off. There is a
risk of an accident. Do not attach any heavy or large objects to the
SmartKey. Remove any bulky key rings before
inserting the SmartKey into the ignition lock.
! Keep the SmartKey away from strong
magnetic fields. Otherwise, the remote
control function could be affected.
Strong magnetic fields can occur in the
vicinity of powerful electrical installations.
Do not keep the SmartKey: R
with electronic devices, e.g. a mobile
phone or another SmartKey. R
with metallic objects, e.g. coins or metal
foil. R
inside metallic objects, e.g. a metal case.
Vehicles with KEYLESS-GO start function:
do not keep the SmartKey in the cargo com-
partment. Otherwise, the SmartKey may not
be detected, e.g. when starting the engine
using the Start/Stop button.
SmartKey functions
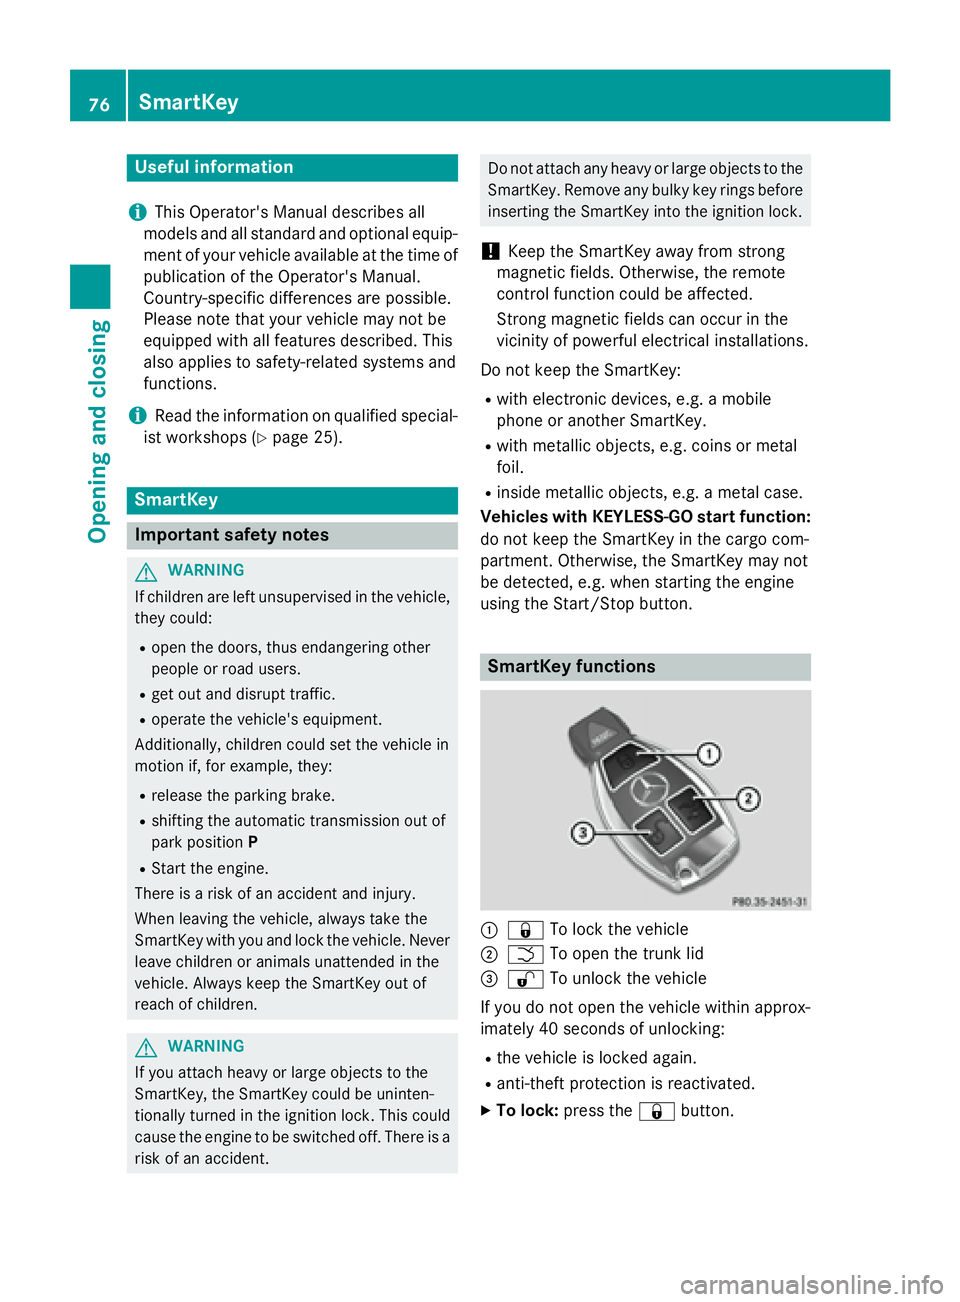
�C
�7 To lock the vehicle�D
�T To open the trunk lid�
Page 79 of 374
The SmartKey centrally locks/unlocks: R
the doors R
the trunk lid R
the fuel filler flap
The turn signals flash once when unlocking
and three times when locking.
When the locator lighting is activated in Audio
20/COMAND, it lights up when it is dark after
the vehicle is unlocked with the remote con-
trol (see separate operating instructions).
You can also set an audible signal to confirm
that the vehicle has been locked. The audible
signal can be activated and deactivated using
the on-board computer ( Y
page 222).X
To open the trunk lid automatically:
press and hold the �T button until the
trunk lid opens ( Y
page 86).
KEYLESS-GO
General notes
Bear in mind that the engine can be started by
any of the vehicle occupants if there is a
SmartKey in the vehicle.
Locking and unlocking
You can start, lock or unlock the vehicle using
KEYLESS-GO. To do this, you only need carry
the SmartKey with you. You can combine the
functions of KEYLESS-GO with those of a con-
ventional SmartKey. Unlock the vehicle by
using KEYLESS-GO, for instance, and lock it
using the �7 button on the SmartKey.
The driver's door and the door at which the
handle is used, must both be closed. The
SmartKey must be outside the vehicle. When
locking or unlocking with KEYLESS-GO, the
distance between the SmartKey and the cor-
responding door handle must not be greater
than 3 ft (1 m). A check which periodically establishes a radio
connection between the vehicle and the
SmartKey determines whether a valid Smart-
Key is in the vehicle. This occurs, for example: R
when starting the engine R
whilst driving R
when the external door handles are
touched R
during convenience closing
X
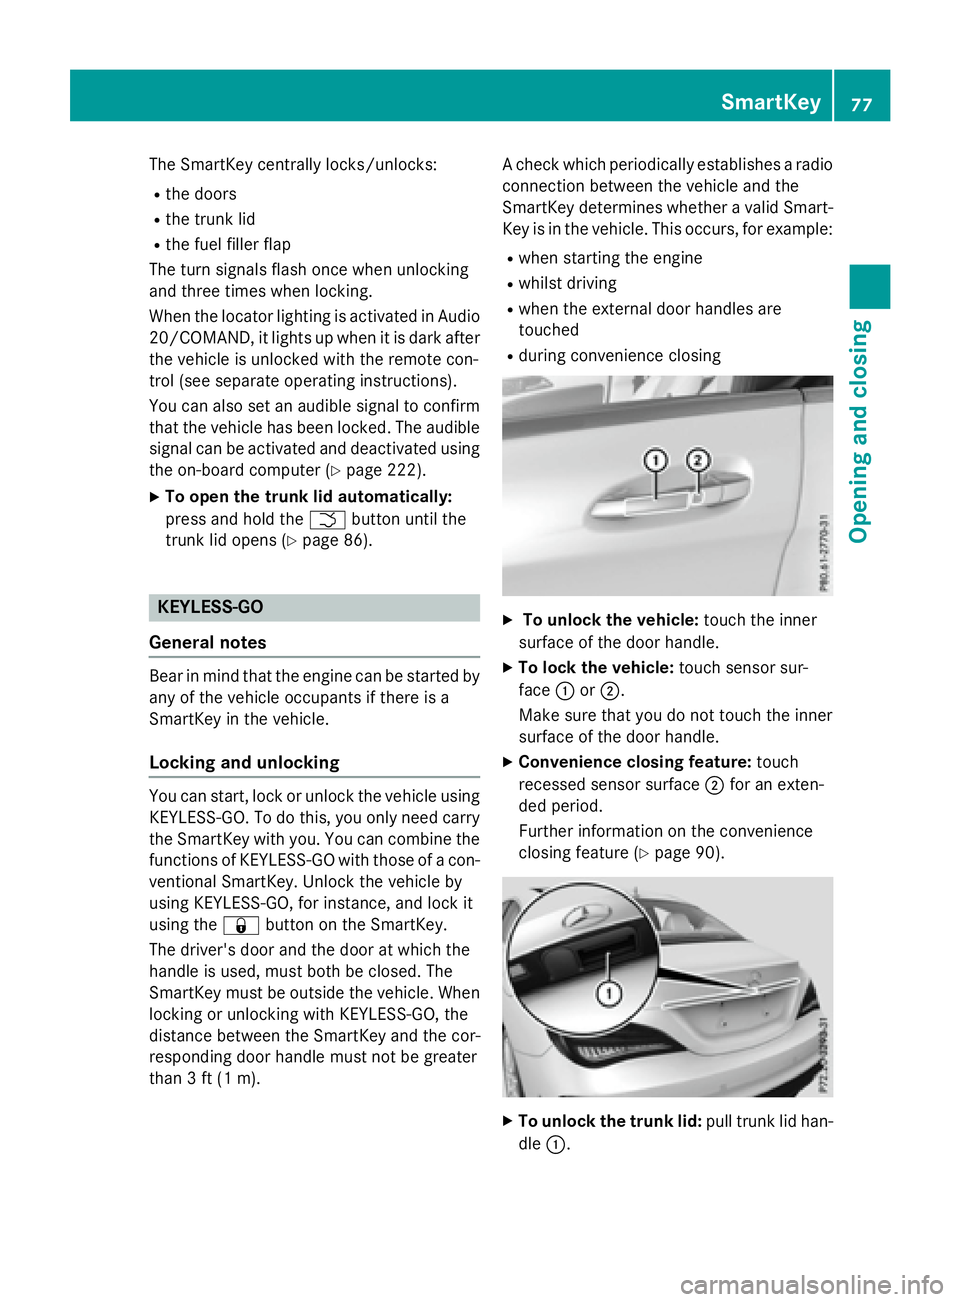
To unlock the vehicle: touch the inner
surface of the door handle. X
To lock the vehicle: touch sensor sur-
face �C or �D .
Make sure that you do not touch the inner
surface of the door handle. X
Convenience closing feature: touch
recessed sensor surface �D for an exten-
ded period.
Further information on the convenience
closing feature ( Y
page 90).
X
To unlock the trunk lid: pull trunk lid han-
dle �C . SmartKey 77
Opening and closing Z
Page 80 of 374
Deactivating an d activatingIf you do no t intend to use th e vehicle fo r a
longer period of time, you can deactivat e KEY-
LESS-GO . The SmartKey will then use ver y lit -
tl e power, thereby conservin g battery power.
Fo r th e purposes of activation/deactivation ,
th e vehicle mus t no t be nearby.X
To deactivate : press th e �7 butto n on
th e SmartKey twic e in rapid succession .
The battery chec k lamp of th e SmartKey
flashes twic e briefly and lights up once ,
then KEYLESS-GO is deactivated
( Y
page 79) .X
To activate : press any butto n on th e
SmartKey.
or X
Inser t th e SmartKey into th e ignition lock.
KEYLESS-GO and all of it s associated fea-
tures are available again .
KEYLESS-G O star t function
General notes
Bear in min d that th e engin e can be started by
any of th e vehicle occupant s if there is a
SmartKey in th e vehicle.
Changin g th e settings of th e locking
syste m
You can chang e th e setting s of th e locking
system. Thi s means that only th e driver's doo r
and th e fue l filler flap are unlocke d when th e
vehicle is unlocked. Thi s is useful if you fre-
quentl y trave l on your own .X
To change th e setting: press and hol d th e
�6 and �7 buttons simultaneousl y fo r approximately six seconds until th e battery
indicator lamp flashes twic e ( Y
page 79) .
If th e setting of th e locking system is changed
within th e signal range of th e vehicle, press-
in g th e �7 or �6 button: R
locks or R
unlocks th e vehicle
The SmartKey no w function s as follows :X
To unlock : press th e �6 butto n once .X
To unlock centrally : press th e �6 but -
to n twice. X
To lock centrally : press th e �7 button.
The KEYLESS-GO function is changed as fol-
lows : X
To unlock th e driver's door: touch th e
inne r surfac e of th e doo r handle on th e
driver's door. X
To unlock centrally : touch th e inne r sur -
fac e of th e doo r handle on th e front-
passenger doo r or th e rea r door.X
To lock centrally : touch th e outer sensor
surfac e on on e of th e doo r handles .X
To restor e th e factory settings: press
and hol d th e �6 and �7 buttons simul-
taneousl y fo r approximately six seconds
until th e battery chec k lamp flashes twic e
( Y
page 79).
Mechanica l key
General notes
If th e vehicle can no longer be locke d or
unlocke d wit h th e SmartKey or KEYLESS-GO ,
use th e mechanical key.
If you use th e mechanical ke y to unloc k and
ope n th e driver's doo r or th e trunk lid, th e
anti-thef t alar m system will be triggere d
( Y
page 73).
There are severa l ways to turn of f th e alarm:X
To deactivate th e alarm wit h th e key :
press th e �6 or �7 butto n on th e key.
or78
SmartKey
Opening and closing