2016 MERCEDES-BENZ CLA wipers
[x] Cancel search: wipersPage 5 of 374

Index ....................................................... 4
Introduction ......................................... 21 At a glance ........................................... 29
Safety ................................................... 41
Opening and closing ........................... 75
Seats, steering wheel and mirrors .... 99
Lights and windshield wipers .......... 113
Climate control ................................. 129
Driving and parking .......................... 145
On-board computer and displays .... 209
Stowage and features ...................... 271
Maintenance and care ...................... 295
Breakdown assistance ..................... 309
Wheels and tires ............................... 327
Technical data ................................... 361Contents 3
Page 22 of 374

Type plate ...................................... 364
WWarning and indicator lamps
ABS ................................................ 261
Brakes .......................................... .2 60
Check Engine ................................. 267
Coolant .......................................... 267
Distance warning ........................... 269
ESP ®
.............................................. 263
ESP ®
OFF ....................................... 264
Fuel tank ........................................ 267
LIM (DISTRONIC PLUS) .................. 182
Overview .......................................... 32
PASSENGER AIR BAG ..................... .4 3
Reserv e fuel .................................. .2 67
Restraint system ............................ 266
Seat belt ........................................ 258
SPORT handling mode ................... 264
Tire pressure monitor .................... 270
Warranty .............................................. 22
Washer fluid
Display message ............................ 256
Wheel and tire combinations
Tires ............................................... 357
Wheel bolt tightening torque ........... 355
Wheel chock ...................................... 352
Wheels
Changing a wheel .......................... 351
Checking ........................................ 329
Cleaning ......................................... 304
General notes ................................ 355
Important safety notes .................. 328
Information on driving .................... 328
Interchanging/changing ................ 351
Mounting a new wheel ................... 354
Removing a wheel .......................... 354
Storing .......................................... .3 51
Tightening torque ........................... 355
Wheel size/tire size ....................... 355
Window curtain air bag
Display message ............................ 236
Operation ......................................... 50
Windows
see Side windows
Windshield
Defrosting ...................................... 139 Windshield washer system
Adding wa sher fl uid ....................... 299
Important safety notes .................. 370
Windshield wipers
Display message ............................ 256
Problem (malfunction) ................... 128
Replacing the wiper blades ............ 125
Switching on/off ........................... 124
Winter driving
Slippery road surfaces ................... 177
Snow chains .................................. 331
Winter operation
General notes ................................ 330
Winter tires
M+S tires ....................................... 330
Wiper blades
Cleaning ......................................... 305
Important safety notes .................. 125
Replacing (windshield) ................... 125
Wooden trim (cleaning instruc-
tions) .................................................. 307
Workshop
see Qualified specialist workshop
Z
ZONE function
Switching on/off ........................... 13820
Index
Page 115 of 374
Useful information ............................ 114
Exterior lighting ................................ 114
Interior lighting ................................. 119
Replacing bulbs ................................. 120
Windshield wipers ............................ 124 113
Lights and windshield wipers
Page 117 of 374
matically depending on the brightness of
the ambient light. R
With the engine running: if you have acti-
vated the daytime running lamps function
via the on-board computer, the daytime
running lamps or the parking lamps and the
low-beam headlamps are switched on or off
automatically depending on the brightness
of the ambient light. X
To switch on the automatic headlamp
mode: turn the light switch to the �X
position.
G WARNING
When the light switch is set to �X , the low-
beam headlamps may not be switched on
automatically if there is fog, snow or other
causes of poor visibility due to the weather
conditions such as spray. There is a risk of an
accident.
In such situations, turn the light switch to
�X .
The automatic headlamp feature is only an
aid. The driver is responsible for the vehicle's
lighting at all times.
Canada only:
The daytime running lamps improve the visi-
bility of your vehicle during the day. The day-
time running lamps function is required by law
in Canada. It cannot therefore be deactivated.
When the engine is running and the vehicle is
stationary: if you move the selector lever from
a drive position to P , the daytime running
lamps/low-beam headlamps go out after
three minutes.
When the engine is running, the vehicle is
stationary and in bright ambient light: if you
turn the light switch to the �` position, the
daytime running lamps and parking lamps
turn on.
If the engine is running and you turn the light
switch to the �X position, the manual set-
tings take precedence over the daytime run-
ning lamps.
USA only: The daytime running lamps improve the visi-
bility of your vehicle during the day. To do this,
the daytime running lamps function must be
switched on using the on-board computer
( Y
page 222).
If the engine is running and you turn the light
switch to the �` or �X position, the man-
ual settings take precedence over the day-
time running lamps.
Low-beam headlamps
Even if the light sensor does not detect that it
is dark, the parking lamps and low-beam
headlamps switch on when the ignition is
switched on and the light switch is set to the
�X position. This is a pa rticularly useful
fu nction in the event of rain and fog. X
To switch on the low-beam headlamps:
turn the SmartKey in the ignition lock to
position 2 or start the engine. X
Turn the light switch to �X .
The green �X indicator lamp in the instru-
ment cluster lights up.
Front fog lamps
In conditions where visibility is poor due to
fog, snow or rain, the fog lamps improve vis-
ibility as well as making it easier for other road
users to see you. They can be operated
together with the parking lamps or together
with the parking lamps and low-beam head-
lamps. X
To switch on the fog lamps: turn the key
in the ignition lock to position 2 or start the
engine. X
Turn the light switch to �X or �X .X
Press the �Z button.
The green �Z indicator lamp in the instru-
ment cluster lights up. X
To switch off the fog lamps: press the
�Z button.
The green �Z indicator lamp in the instru-
ment cluster goes out. Exterior lighting 115
Lights and windshield wipers Z
Page 124 of 374
Changing the front bulbs
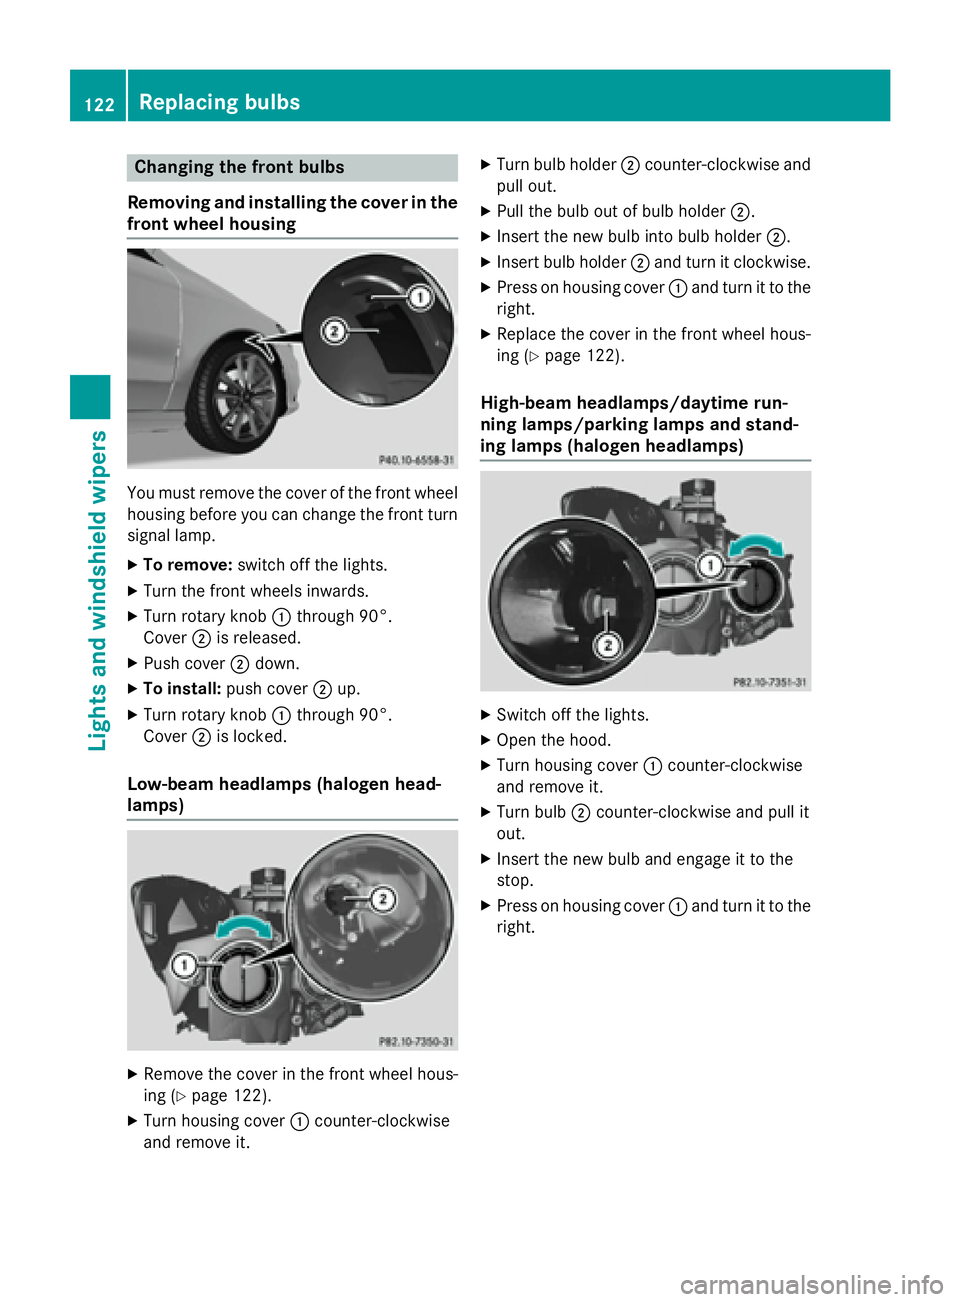
Removing and installing the cover in the
front wheel housing
You must remove the cover of the front wheel
housing before you can change the front turn
signal lamp. X
To remove: switch off the lights.X
Turn the front wheels inwards. X
Turn rotary knob �C through 90°.
Cover �D is released.X
Push cover �D down.X
To install: push cover �D up.X
Turn rotary knob �C through 90°.
Cover �D is locked.
Low-beam headlamps (halogen head-
lamps)
X
Remove the cover in the front wheel hous-
ing ( Y
page 122).X
Turn housing cover �C counter-clockwise
and remove it. X
Turn bulb holder �D counter-clockwise and
pull out. X
Pull the bulb out of bulb holder �D .X
Insert the new bulb into bulb holder �D .X
Insert bulb holder �D and turn it clockwise.X
Press on housing cover �C and turn it to the
right. X
Replace the cover in the front wheel hous-
ing ( Y
page 122).
High-beam headlamps/daytime run-
ning lamps/parking lamps and stand-
ing lamps (halogen headlamps)
X
Switch off the lights. X
Open the hood. X
Turn housing cover �C counter-clockwise
and remove it. X
Turn bulb �D counter-clockwise and pull it
out. X
Insert the new bulb and engage it to the
stop. X
Press on housing cover �C and turn it to the
right.122
Replacing bulbs
Lights and windshield wipers
Page 127 of 374
position, causing the windshield wiper to wipe
more frequently.
If the wiper blades are worn, the windshield
will no longer be wiped properly. This could
prevent you from observing the traffic condi-
tions.
Replacing the wiper blades
Important safety notes
G WARNING
If the windshield wipers begin to move while
you are changing the wiper blades, you could
be trapped by the wiper arm. There is a risk of
injury.
Always switch off the windshield wipers and
ignition before changing the wiper blades.
! To avoid damaging the wiper blades,
make sure that you touch only the wiper
arm of the wiper.
! Never open the hood if a windshield wiper
arm has been folded away from the wind-
shield.
Never fold a windshield wiper arm without a
wiper blade back onto the windshield.
Hold the windshield wiper arm firmly when
you change the wiper blade. If you release
the windshield wiper arm without a wiper
blade and it falls onto the windshield, the
windshield may be damaged by the force of
the impact.
Mercedes-Benz recommends that you have
the wiper blades changed at a qualified
specialist workshop. Replacing the windshield wiper blades
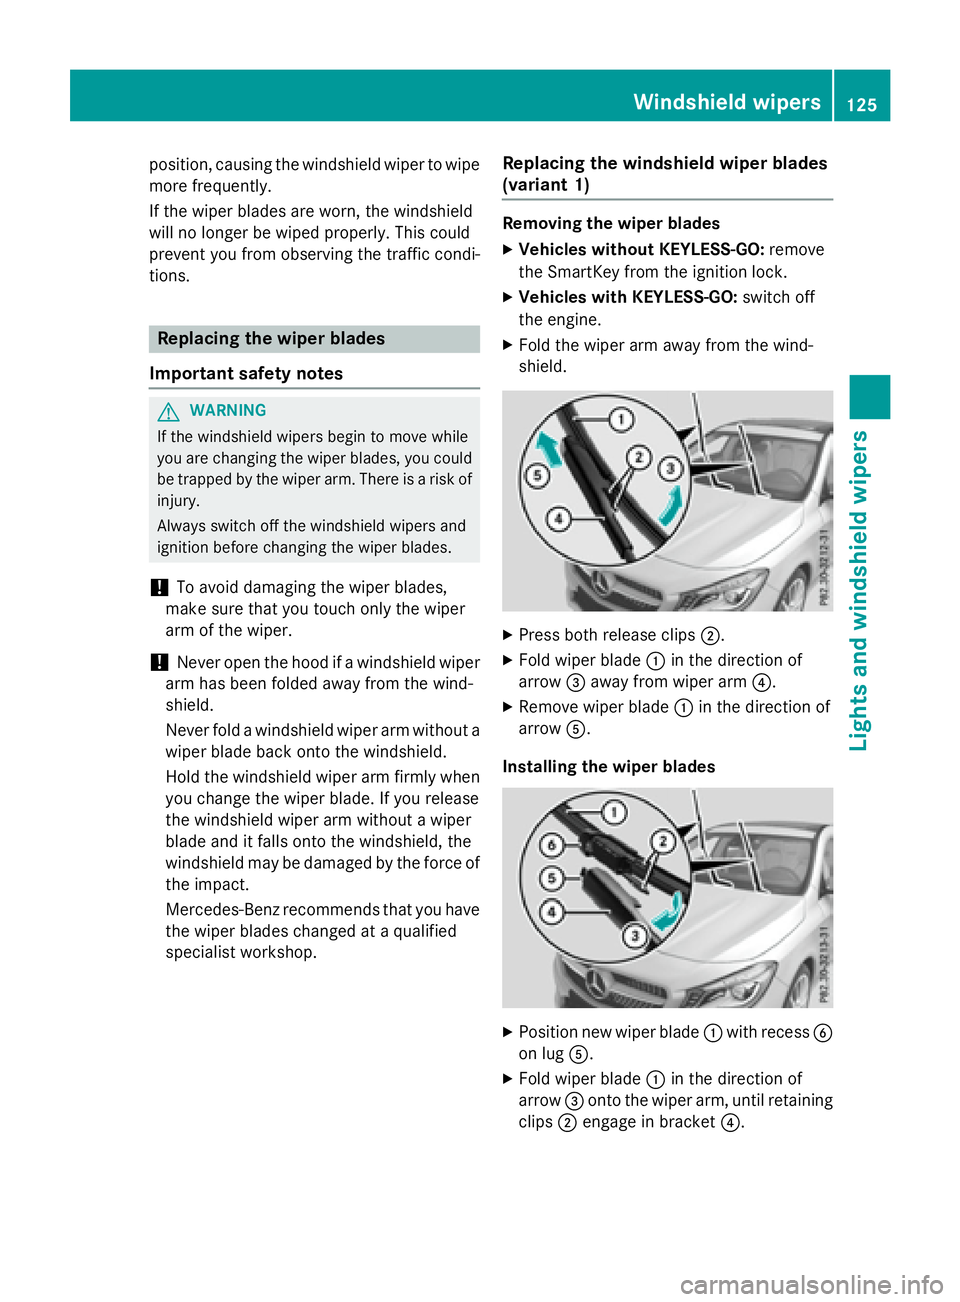
(variant 1) Removing the wiper blades X
Vehicles without KEYLESS-GO: remove
the SmartKey from the ignition lock. X
Vehicles with KEYLESS-GO: switch off
the engine. X
Fold the wiper arm away from the wind-
shield.
X
Press both release clips �D .X
Fold wiper blade �C in the direction of
arrow �
Page 129 of 374

X
Remove protective film �C of th e servic e
indicato r on th e ti p of th e wiper blade .
If th e color of th e servic e indicato r changes
from blac k to yellow , th e wiper blade s should
be replaced.
i The duration of th e color chang e varies
dependin g on th e usage conditions.
Windshield wipers 127
Lights and windshield wipers Z
Page 130 of 374
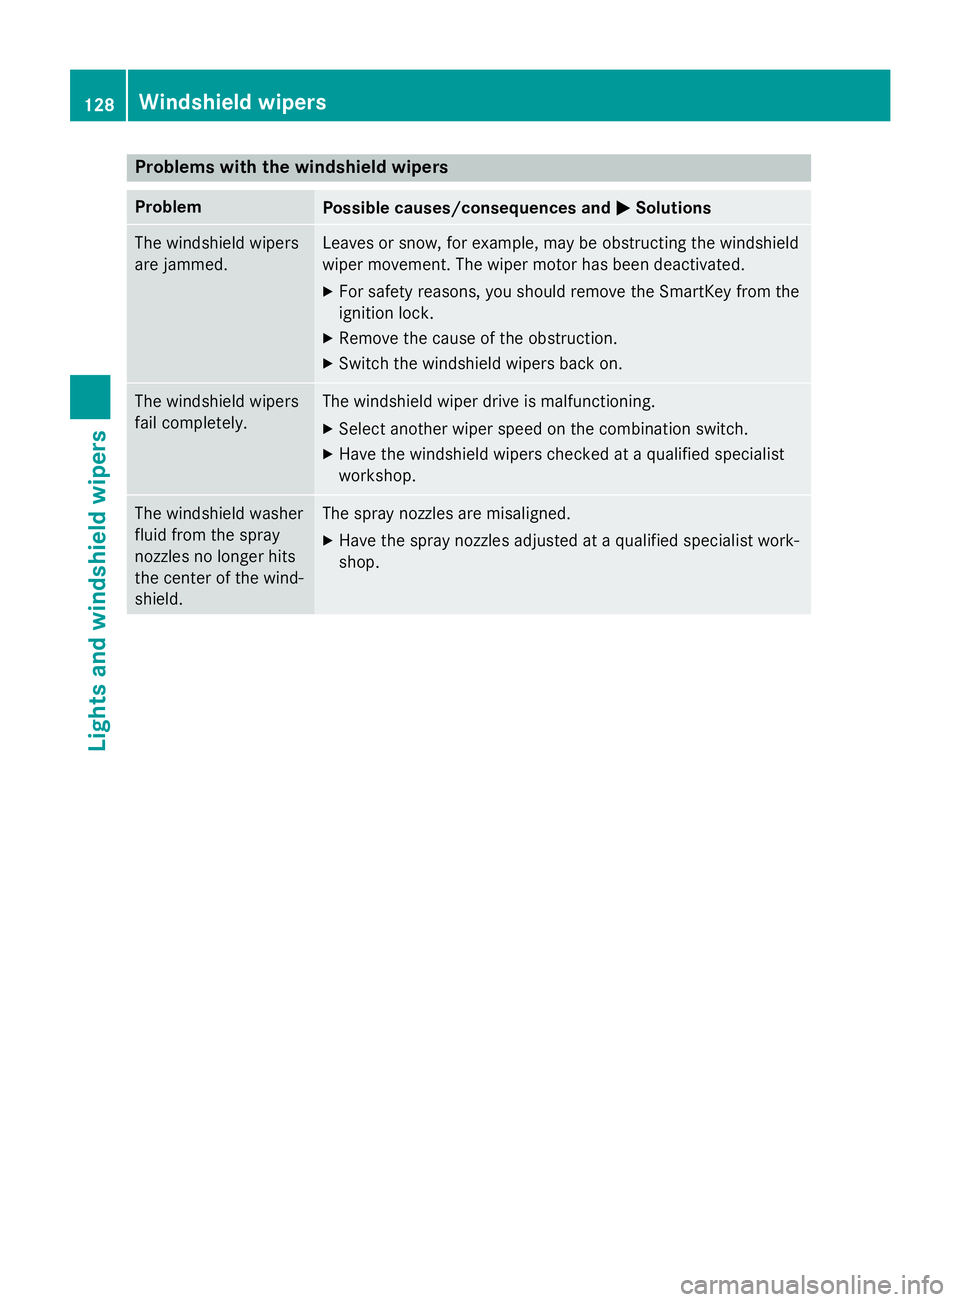
Problems with the windshield wipers Problem
Possible causes/consequences and �P Solutions
The windshield wipers
are jammed. Leaves or snow, for example, may be obstructing the windshield
wiper movement. The wiper motor has been deactivated. X
For safety reasons, you should remove the SmartKey from the
ignition lock. X
Remove the cause of the obstruction. X
Switch the windshield wipers back on.
The windshield wipers
fail completely. The windshield wiper drive is malfunctioning. X
Select another wiper speed on the combination switch. X
Have the windshield wipers checked at a qualified specialist
workshop.
The windshield washer
fluid from the spray
nozzles no longer hits
the center of the wind-
shield. The spray nozzles are misaligned. X
Have the spray nozzles adjusted at a qualified specialist work-
shop.128
Windshield wipers
Lights and windshield wipers