2016 MERCEDES-BENZ CLA COUPE warning lights
[x] Cancel search: warning lightsPage 160 of 345
from the ignition, the automatic transmission
shifts to Pautomatically.
With the Start/Stop button: if you then open
the driver's door or the front-passenger door,
the automatic transmission shifts to Pautomat-
ically.
If you want the automatic transmission to
remain in neutral N, e.g. when having the vehicle
cleaned in an automatic car wash with a towing
system:
X Vehicles with the Start-Stop button:
remove the Start-Stop button from the igni-
tion lock.
X Insert the key into the ignition lock.
X All vehicles: switch the ignition on.
X Depress the brake pedal and keep it
depressed.
X Shift to neutral N.
X Release the brake pedal.
X Release the electric parking brake.
X Switch off the ignition and leave the key in the
ignition lock. Electric parking brake
General notes G
WARNING
If you leave children unattended in the vehi-
cle, they may be able to set the vehicle in
motion if, for example, they:
R release the parking brake
R shift the automatic transmission out of park
position Por shift manual transmission into
neutral
R start the engine
In addition, they may operate vehicle equip-
ment and become trapped. There is a risk of
an accident and injury.
When leaving the vehicle, always take the key with you and lock the vehicle. Never leave
children unattended in the vehicle. The function of the electric parking brake is
dependent on the on-board voltage. If the on-
board voltage is low or if there is a malfunction
in the system, it may not be possible to apply the
released parking brake.
X If this is the case, park the vehicle only on
level ground and secure it to prevent it from
rolling away.
X Vehicles with automatic transmission:
shift the automatic transmission to position
P.
X Vehicles with manual transmission:
engage first gear.
It may not be possible to release an applied
parking brake if the on-board voltage is low or if
there is a malfunction in the system. Contact a
qualified specialist workshop.
The electric parking brake carries out a function check at regular intervals when the engine is
switched off. Noises that occur are normal.
Applying or releasing manually X
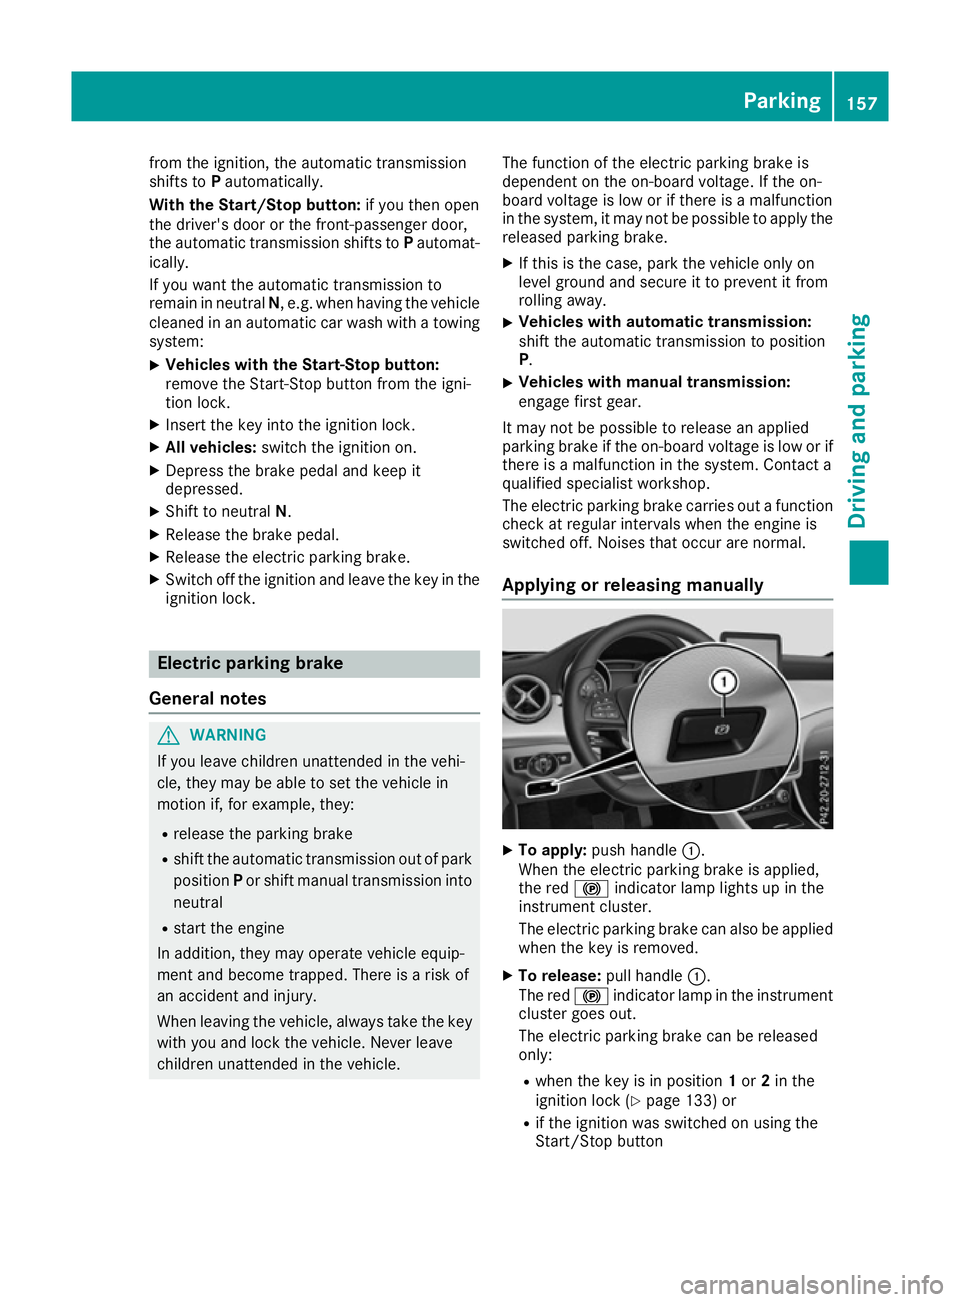
To apply: push handle :.
When the electric parking brake is applied,
the red !indicator lamp lights up in the
instrument cluster.
The electric parking brake can also be applied when the key is removed.
X To release: pull handle:.
The red !indicator lamp in the instrument
cluster goes out.
The electric parking brake can be released
only:
R when the key is in position 1or 2in the
ignition lock (Y page 133) or
R if the ignition was switched on using the
Start/Stop button Parking
157Driving and parking Z
Page 161 of 345

Applying automatically (vehicles with
automatic transmission) The electric parking brake is automatically
applied when the transmission is in position P
and:
R the engine is switched off or
R the driver is not wearing a seat belt and the
driver's door is opened
To prevent the electric parking brake from being applied automatically, pull handle :.
The electric parking brake is also applied auto-
matically if:
R Distance Pilot DISTRONIC brings the vehicle
to a standstill or
R the HOLD function is keeping the vehicle sta-
tionary
R Parking Pilot is keeping the vehicle stationary
In addition, at least one of the following condi-
tions must be fulfilled:
R the engine is switched off
R the driver is not wearing a seat belt and the
driver's door is opened
R there is a system malfunction
R the power supply is insufficient
R the vehicle is stationary for a lengthy period
The red !indicator lamp on the instrument
cluster lights up.
The electric parking brake is not automatically
applied if the engine is switched off by the ECO start/stop function.
Applying automatically (vehicles with
manual transmission) The electric parking brake is applied automati-
cally when the vehicle is being kept stationary by
the HOLD function.
In addition, at least one of the following condi-
tions must be fulfilled:
R the engine is switched off
R the driver is not wearing a seat belt and the
driver's door is open
R there is a system malfunction
R the power supply is insufficient
R the vehicle is stationary for a lengthy period
The red !indicator lamp in the instrument
cluster lights up. The electric parking brake is not automatically
applied if the engine is switched off by the ECO
start/stop function.
Releasing automatically The electric parking brake can only be released
automatically in vehicles with automatic trans-
mission.
The electric parking brake of your vehicle is
released automatically when all the following
conditions are fulfilled:
R the engine is running
R the transmission is in position Dor R
R the seat belt is fastened
R you depress the accelerator pedal
If the transmission is in position R, the boot lid
must be closed.
If your seat belt is not fastened, the following
conditions must be fulfilled for the electric park- ing brake to be released automatically:
R the driver's door is closed
R you have shifted out of transmission position
P or you have previously driven faster than
3 km/h
Ensure that you do not depress the accelerator
pedal unintentionally. Otherwise, the parking
brake will be released and the vehicle will start
to move.
Emergency braking The vehicle can also be braked during an emer-
gency by using the electric parking brake.
X While driving, press handle :of the electric
parking brake (Y page 157).
The vehicle is braked as long as you keep
handle :of the electric parking brake
pressed. The longer the electric parking brake
handle :is depressed, the greater the brak-
ing force.
During braking:
R a warning tone sounds
R the Release parking brake Release parking brake message
appears
R the red !indicator lamp in the instrument
cluster flashes
When the vehicle has been braked to a stand-
still, the electric parking brake is applied. 158
ParkingDriving and pa
rking
Page 162 of 345
Parking up the vehicle
If you leave the vehicle parked up for longer than
four weeks, the battery may be damaged by
exhaustive discharging.
If you leave the vehicle parked up for longer than six weeks, it may suffer from lack of use.
X Contact a qualified specialist workshop and
seek advice.
i You can obtain information on trickle charg-
ers from a qualified specialist workshop. Driving tips
General notes
Important safety notes G
WARNING
If you switch off the ignition while driving,
safety-relevant functions are only available
with limitations, or not at all. This could affect, for example, the power steering and the brake
boosting effect. You will require considerably
more effort to steer and brake. There is a risk of an accident.
Do not switch off the ignition while driving.
Drive sensibly – save fuel Observe the following tips to save fuel:
R The tyres should always be inflated to the rec-
ommended tyre pressure.
R Remove unnecessary loads.
R Remove roof racks when they are not needed.
R Warm up the engine at low engine speeds.
R Avoid frequent acceleration or braking.
R Have all maintenance work carried out as
indicated by the service intervals in the Ser-
vice Booklet or by the service interval display.
Fuel consumption also increases when driving in cold weather, in stop-start traffic, on short jour-
neys and in hilly terrain. ECO display
The ECO display shows you how economical
your driving style is. The ECO display assists you in achieving the most economical driving style
for the selected settings and prevailing condi-
tions. Consumption can be significantly influ-
enced by your driving style.
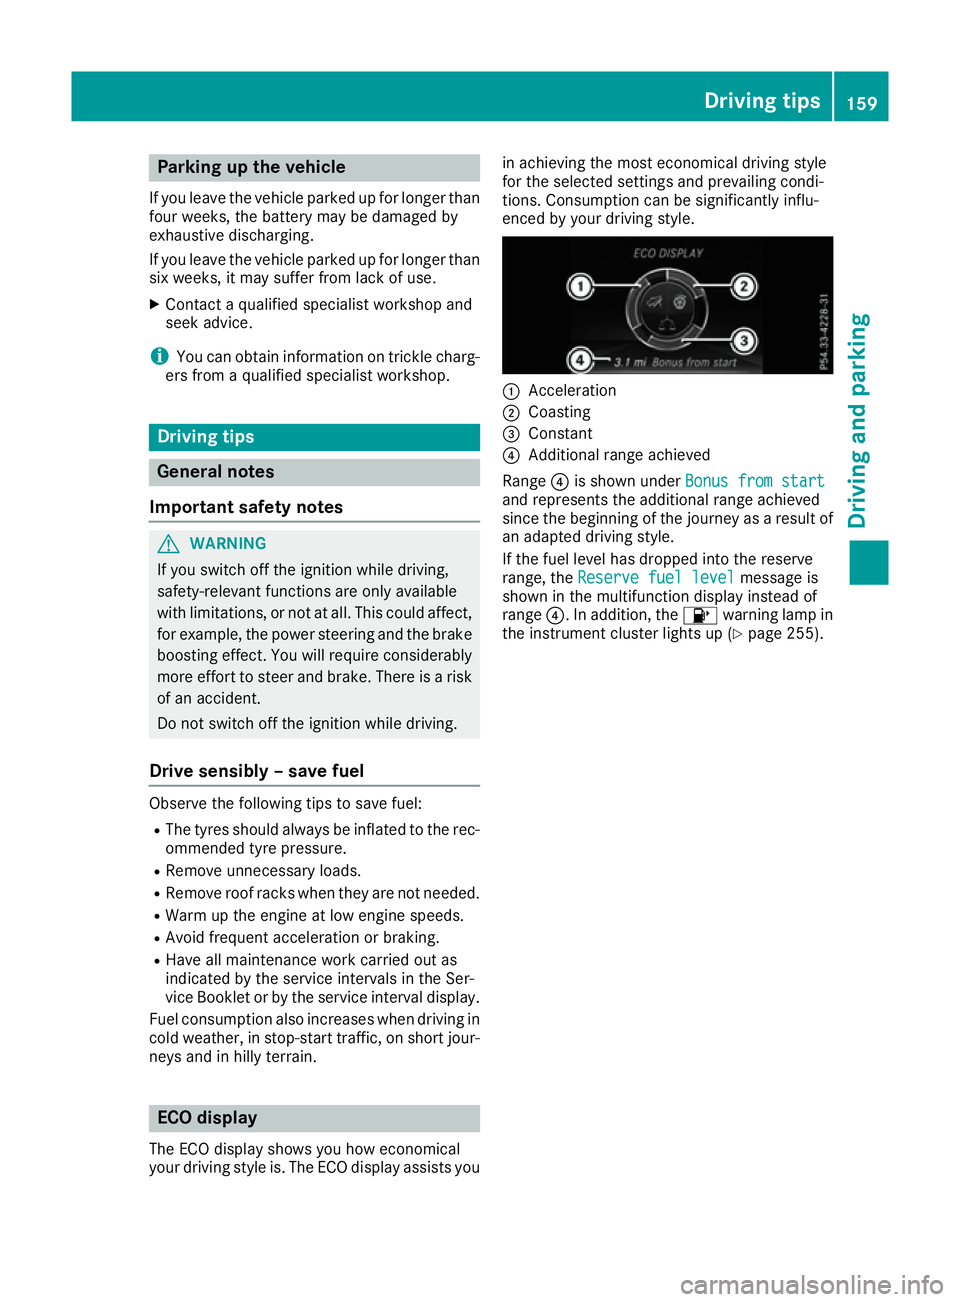
:
Acceleration
; Coasting
= Constant
? Additional range achieved
Range ?is shown under Bonus from start Bonus from start
and represents the additional range achieved
since the beginning of the journey as a result of an adapted driving style.
If the fuel level has dropped into the reserve
range, the Reserve fuel level Reserve fuel level message is
shown in the multifunction display instead of
range ?. In addition, the 8warning lamp in
the instrument cluster lights up (Y page 255). Driving tips
159Driving and parking Z
Page 163 of 345
The ECO display consists of three sections, with
an inner and outer area. The sections corre-
spond to the following three categories: :
Acceleration
(evaluation of the
acceleration processes):
R the outer area fills up and the inner
area lights up green: moderate
acceleration, especially at higher
speeds
R the outer area empties and the
inner area is grey: sporty acceler-
ation ;
Coasting
(evaluation of all decelera-
tion processes):
R the outer area fills up and the inner
area lights up green: anticipatory
driving, keeping your distance and
early release of the accelerator.
The vehicle can coast without use
of the brakes.
R the outer area empties and the
inner area is grey: frequent heavy
braking =
Constant
(continuous evaluation
over the entire journey):
R the outer area fills up and the inner
area lights up green: constant
speed and avoidance of unneces-
sary acceleration and deceleration
R the outer area empties and the
inner area is grey: fluctuations in
speed The three inner areas display the current driving
style and light up green as a result of a particu-
larly economical driving style. Depending on the driving situation, up to two areas may light up
simultaneously.
At the beginning of the journey, the three outer
areas are empty and fill up as a result of eco-
nomical driving. A higher level indicates a more
economical driving style. If the three outer areas
are completely filled at the same time, the driver
has adopted the most economical driving style
for the selected settings and prevailing condi-
tions. The ECO display border lights up.
The ECO display does not indicate the actual fuel consumption. The additionally achieved range
displayed under Bonus from start
Bonus from start does not
indicate a fixed consumption reduction. In addition to driving style, the actual consump-
tion is affected by other factors, such as:
R load
R tyre pressure
R cold start
R choice of route
R the use of electrical consumers
These factors are not included in the ECO dis-
play.
An economical driving style involves driving at a moderate engine speed.
To achieve a higher value in the categories
"Acceleration" and "Constant":
R observe the gearshift recommendation.
R drive the vehicle in drive program Cor E
(vehicles with DYNAMIC SELECT button).
On long journeys at a constant speed, e.g. on the motorway, only the outer area for "Constant"
will change.
The ECO display summarises the driving style
from the start of the journey to its completion.
Therefore, there are more marked changes in
the outer areas at the start of a journey. During
a prolonged driving time, these changes are
smaller. For more marked changes, perform a
manual reset (Y page 204).
Further information on the ECO display
(Y page 204). Brakes
Important safety notes G
WARNING
If you shift down on a slippery road surface in an attempt to increase the engine's braking
effect, the drive wheels could lose their grip.
This increases the risk of skidding and having
an accident.
Do not shift down for additional engine brak-
ing on a slippery road surface.
Downhill gradients Change into a lower gear in good time on long
and steep downhill gradients. For vehicles with
automatic transmission, you need to activate
manual gearshifting beforehand (Y page 150).160
Driving tipsDriving and parking
Page 167 of 345
X
Accelerate the vehicle to the desired speed.
X Briefly press the cruise control lever up :or
down ?.
X Remove your foot from the accelerator pedal.
Cruise control is activated. The vehicle auto-
matically maintains the speed.
i Cruise control may be unable to maintain
the stored speed on uphill gradients. The
stored speed is resumed when the gradient
evens out. Cruise control maintains the
stored speed on downhill gradients by auto-
matically braking the vehicle.
i Vehicles with manual transmission:
R Always drive at adequate, but not exces-
sive, engine speeds.
R Change gear in good time.
R If possible, do not change down several
gears at a time.
Storing the current speed or calling up the
last stored speed G
WARNING
If you call up a stored speed and this is dif-
ferent from the current speed, the vehicle
accelerates or brakes. If you do not know
what the stored speed is, the vehicle may
accelerate or brake unexpectedly. There is a
risk of an accident.
Take the traffic conditions into account
before calling up the stored speed. If you do
not know what the stored speed is, store the
desired speed again.
X Briefly pull the cruise control lever towards
you =.
X Remove your foot from the accelerator pedal.
The first time cruise control is activated, it
stores the current speed or regulates the
speed of the vehicle to the previously stored
speed.
Setting a speed Bear in mind that it may take a brief moment
until the vehicle has accelerated or braked to
the set speed.
X To adjust the set speed in10 km/hincre-
ments:
briefly press cruise control lever :up beyond the pressure point for a higher speed,
or down ?for a lower speed.
or X Keep the cruise control lever pressed beyond
the pressure point until the desired speed is
set. Press cruise control lever up :for a
higher speed or down ?for a lower speed.
X To adjust the set speed in1 km/hincre-
ments:
briefly press cruise control lever up :
to the pressure point for a higher speed or
down ?for a lower speed.
or X Keep the cruise control lever pressed to the
pressure point until the desired speed is set.
Press cruise control lever up :for a higher
speed or down ?for a lower speed.
i Cruise control is not deactivated if you
depress the accelerator pedal. For example, if
you accelerate briefly to overtake, cruise con-
trol adjusts the vehicle's speed to the last
speed stored after you have finished overtak-
ing.
Deactivating cruise control There are several ways to deactivate cruise con-
trol:
X Briefly press the cruise control lever forwards
B.
or X Brake.
or X Briefly press the cruise control lever in the
direction of arrow A.
The variable limiter is selected. LIM indicator lamp ;in the cruise control lever lights up.
Cruise control is automatically deactivated if:
R the vehicle is secured with the electric park-
ing brake
R you are driving at less than 30 km/h
R ESP ®
engages or you deactivate ESP ®
R while driving a vehicle with manual transmis-
sion, you shift into neutral or depress the
clutch pedal for longer than six seconds
R on vehicles with manual transmission, you
shift to a gear that is too high, and as a result
the engine speed is too low
R on vehicles with automatic transmission, you
shift to position Nwhile driving 164
Driving systemsDriving an
d parking
Page 168 of 345

If cruise control is deactivated, you will hear a
warning tone. You will see the Cruise con‐
Cruise con‐
trol off
trol off message in the multifunction display
for approximately five seconds.
i The last speed stored is cleared when you
switch off the engine. Speed limiter
General notes The limiter restricts the speed of the vehicle. The
limiter brakes automatically in order to adjust
the vehicle's speed to the stored speed.
You must select a lower gear in good time on
long and steep downhill gradients, especially if
the vehicle is laden or towing a trailer. On vehi-
cles with automatic transmission, you need to
have selected the manual drive program
M (Y page 150). By doing so, you will make use
of the braking effect of the engine. This relieves
the load on the brake system and prevents the
brakes from overheating and wearing too
quickly.
You can set a variable or permanent limit speed:
R Variable for maximum permissible speeds,
e.g. in built-up areas
R Permanent for a technically permitted max-
imum vehicle speed, e.g. when driving with
winter tyres fitted (Y page 166)
i The speed indicated in the speedometer
may differ slightly from the stored maximum
permissible speed.
Important safety notes If you fail to adapt your driving style, the speed
limiter can neither reduce the risk of an accident
nor override the laws of physics. The limiter can-
not take into account road, weather or traffic
conditions. The limiter is only an aid. You are
responsible for the distance to the vehicle in
front, for vehicle speed, for braking in good time
and for staying in lane.
If a new driver takes over, advise the new driver of the speed stored. Variable speed limiter General notes
:
Activates or increases speed
; LIM indicator lamp
= Activates at the current speed/last stored
speed
? Activates or reduces speed
A Switches between cruise control and the
variable speed limiter
B Switches off the speed limiter
With the cruise control lever, you can operate
cruise control or Distance Pilot DISTRONIC and
the variable speed limiter.
The LIM indicator lamp on the cruise control
lever indicates which system you have selected:
R LIM indicator lamp off: cruise control or Dis-
tance Pilot DISTRONIC is selected.
R LIM indicator lamp on: variable speed lim-
iter is selected.
When the engine is running, you can use the
cruise control lever to limit the speed to any
speed between 30 km/h and the maximum
design speed of the vehicle. If the set value of
the permanent limiter is lower then this value
applies (Y page 166).
Selecting the variable speed limiter
X Check whether LIM indicator lamp ;is on.
If it is on, the variable speed limiter is already
selected.
If it is not, press the cruise control lever in the direction of arrow A.
LIM indicator lamp ;in the cruise control
lever lights up. The variable limiter is selected. Driving systems
165Driving and parking Z
Page 174 of 345
X
To increase: turn control=in direction ;.
Distance Pilot DISTRONIC then maintains a
greater distance between your vehicle and
the vehicle in front.
X To decrease: turn control=in direction :.
Distance Pilot DISTRONIC then maintains a
shorter distance between your vehicle and
the vehicle in front.
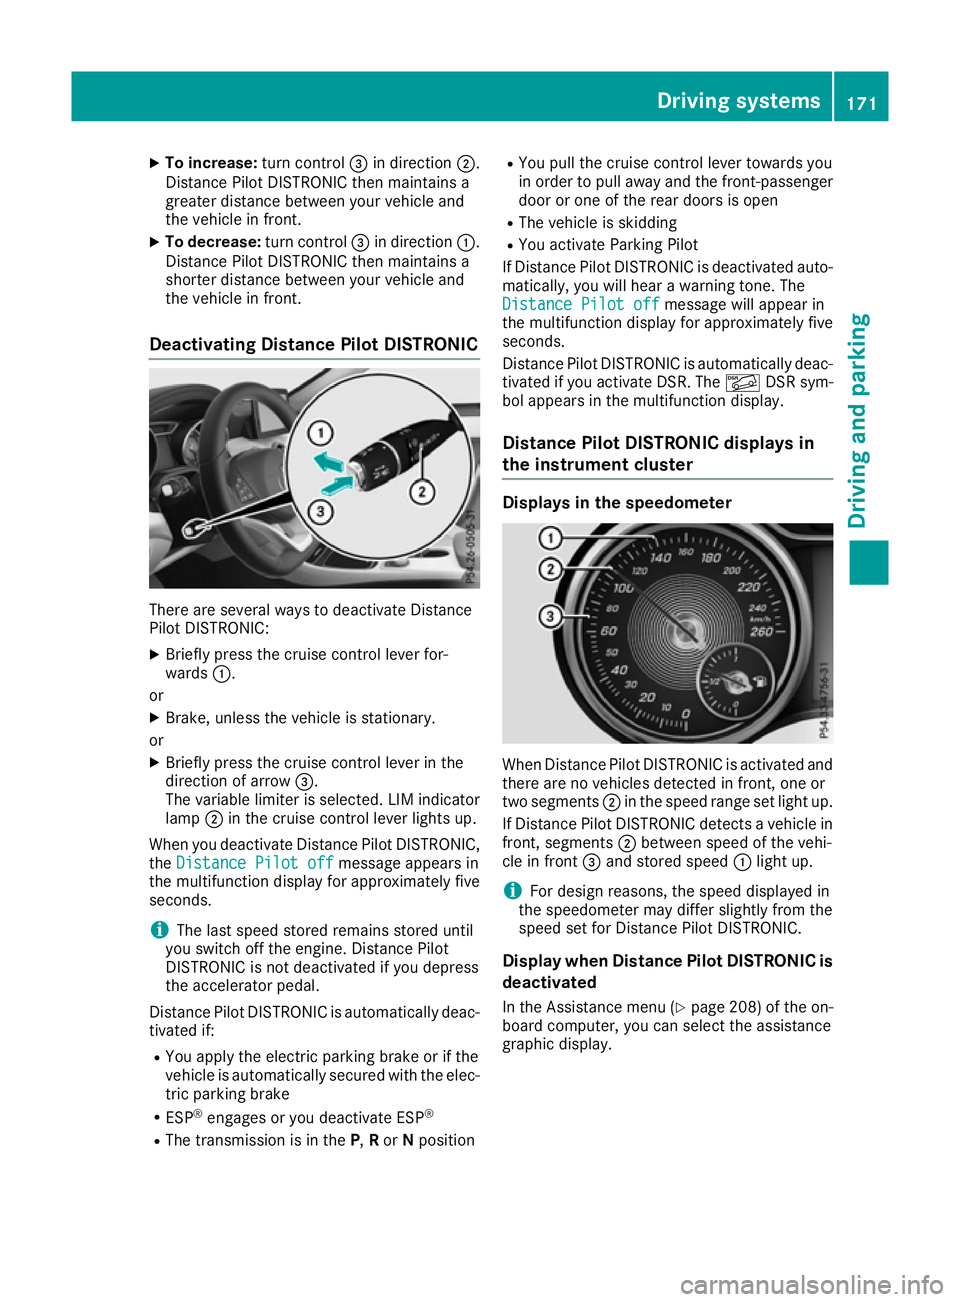
Deactivating Distance Pilot DISTRONIC There are several ways to deactivate Distance
Pilot DISTRONIC:
X Briefly press the cruise control lever for-
wards :.
or X Brake, unless the vehicle is stationary.
or X Briefly press the cruise control lever in the
direction of arrow =.
The variable limiter is selected. LIM indicator lamp ;in the cruise control lever lights up.
When you deactivate Distance Pilot DISTRONIC,
the Distance Pilot off
Distance Pilot off message appears in
the multifunction display for approximately five
seconds.
i The last speed stored remains stored until
you switch off the engine. Distance Pilot
DISTRONIC is not deactivated if you depress
the accelerator pedal.
Distance Pilot DISTRONIC is automatically deac- tivated if:
R You apply the electric parking brake or if the
vehicle is automatically secured with the elec-
tric parking brake
R ESP ®
engages or you deactivate ESP ®
R The transmission is in the P,Ror Nposition R
You pull the cruise control lever towards you
in order to pull away and the front-passenger
door or one of the rear doors is open
R The vehicle is skidding
R You activate Parking Pilot
If Distance Pilot DISTRONIC is deactivated auto- matically, you will hear a warning tone. The
Distance Pilot off
Distance Pilot off message will appear in
the multifunction display for approximately five
seconds.
Distance Pilot DISTRONIC is automatically deac- tivated if you activate DSR. The ÃDSR sym-
bol appears in the multifunction display.
Distance Pilot DISTRONIC displays in
the instrument cluster Displays in the speedometer
When Distance Pilot DISTRONIC is activated and
there are no vehicles detected in front, one or
two segments ;in the speed range set light up.
If Distance Pilot DISTRONIC detects a vehicle in
front, segments ;between speed of the vehi-
cle in front =and stored speed :light up.
i For design reasons, the speed displayed in
the speedometer may differ slightly from the
speed set for Distance Pilot DISTRONIC.
Display when Distance Pilot DISTRONIC is
deactivated
In the Assistance menu (Y page 208) of the on-
board computer, you can select the assistance
graphic display. Driving systems
171Driving and parking Z
Page 182 of 345
Manual transmission:
Gear lever position Warning display
Forward gear
or
Neutral
Front area activated
Reverse gear
or the
vehicle is rolling
backwards Rear and front areas
activated
Automatic transmission:
Transmission posi-
tion Warning display
D
Front area activated
R,
Nor the vehicle is
rolling backwards Rear and front areas
activated
P
No areas activated
One or more segments light up as the vehicle
approaches an obstacle, depending on the vehi-
cle's distance from the obstacle.
From the:
R sixth segment onwards, you will hear an inter-
mittent warning tone for approximately two
seconds.
R seventh segment onwards, you will hear a
warning tone for approximately two seconds. This indicates that you have now reached the
minimum distance.
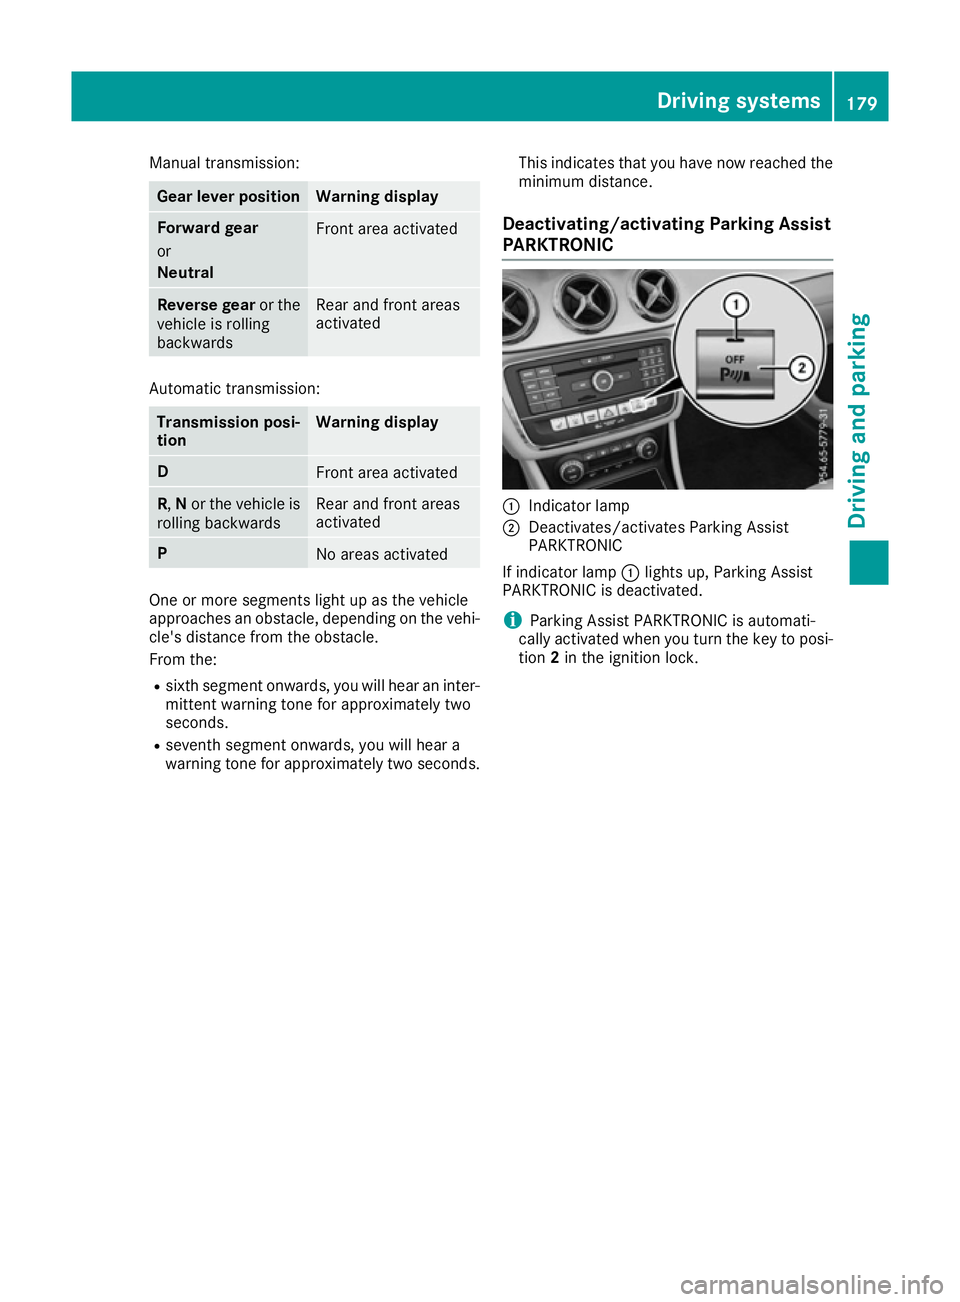
Deactivating/activating Parking Assist
PARKTRONIC :
Indicator lamp
; Deactivates/activates Parking Assist
PARKTRONIC
If indicator lamp :lights up, Parking Assist
PARKTRONIC is deactivated.
i Parking Assist PARKTRONIC is automati-
cally activated when you turn the key to posi- tion 2in the ignition lock. Driving systems
179Driving and parking Z