2016 MERCEDES-BENZ CLA COUPE sensor
[x] Cancel search: sensorPage 86 of 345
Doors
Important safety notes
G
WARNING
If children are left unsupervised in the vehicle, they could:
R open doors, thereby endangering other per-
sons or road users
R get out and be struck by oncoming traffic
R operate vehicle equipment and become
trapped, for example
In addition, the children could also set the
vehicle in motion, for example, if they:
R release the parking brake
R shift the automatic transmission out of park
position P or shift manual transmission into
neutral
R start the engine
There is a risk of an accident and injury.
When leaving the vehicle, always take the key with you and lock the vehicle. Never leave
children and animals unattended in the vehi-
cle. Keep the keys out of the reach of children.
Stow luggage or loads preferably in the luggage compartment. Observe the loading guidelines
(Y page 268).
United Kingdom only: G
WARNING
When the double locks are activated, the
doors can no longer be opened from the
inside. People in the vehicle can no longer get out, e.g. in hazardous situations. There is a
risk of injury.
Therefore, do not leave any people unsuper-
vised in the vehicle, particularly children, eld-
erly people or people in need of special assis-
tance. Do not activate the double lock when
people are in the vehicle.
If the vehicle has been locked with the key, the
double lock function is activated as standard. It
is then not possible to open the doors from
inside the vehicle. You can deactivate the dou-
ble lock function by deactivating the interior
motion sensor (Y page 75). The doors can then be opened from the inside after the vehicle has
been locked from the outside. You can open the
rear doors from inside the vehicle if they are not secured by the child-proof locks (Y page 65).
The anti-theft alarm system is triggered if the
door is opened from the inside. Switch off the
alarm (Y page 73). Unlocking and opening the doors
from the inside
! The side windows will not open/close if the
battery is discharged or if the side windows
have iced up. It will then not be possible to
close the door. Do not attempt to force the
door to close. You could otherwise damage
the door or the side window.
When a door is opened, the side window on that side opens slightly. When the door is closed, the
side window is raised again. X
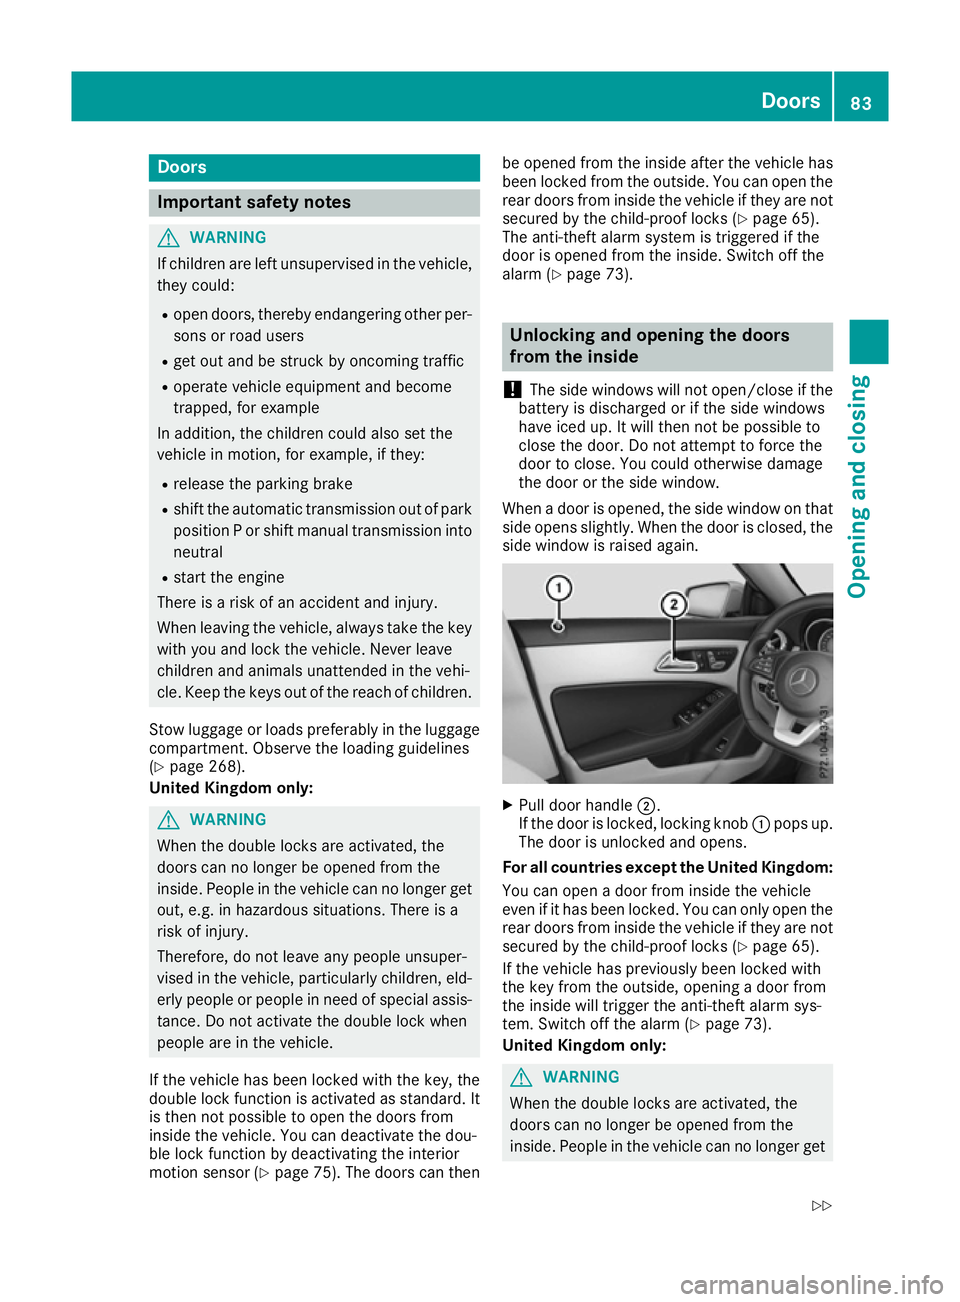
Pull door handle ;.
If the door is locked, locking knob :pops up.
The door is unlocked and opens.
For all countries except the United Kingdom:
You can open a door from inside the vehicle
even if it has been locked. You can only open the rear doors from inside the vehicle if they are not secured by the child-proof locks (Y page 65).
If the vehicle has previously been locked with
the key from the outside, opening a door from
the inside will trigger the anti-theft alarm sys-
tem. Switch off the alarm (Y page 73).
United Kingdom only: G
WARNING
When the double locks are activated, the
doors can no longer be opened from the
inside. People in the vehicle can no longer get Doors
83Opening and closing
Z
Page 87 of 345
out, e.g. in hazardous situations. There is a
risk of injury.
Therefore, do not leave any people unsuper-
vised in the vehicle, particularly children, eld- erly people or people in need of special assis-
tance. Do not activate the double lock when
people are in the vehicle.
If the vehicle has been locked from the outside, the double lock function is activated as stand-
ard. It is then not possible to open the doors
from inside the vehicle. You can deactivate the
double lock function by deactivating the interior
motion sensor (Y page 75). The doors can then
be opened from the inside after the vehicle has been locked from the outside. You can open the
rear doors from inside the vehicle if they are not secured by the child-proof locks (Y page 65).
The anti-theft alarm system is triggered if the
door is opened from the inside. Switch off the
alarm (Y page 73). Centrally locking and unlocking the
vehicle from the inside
You can centrally lock or unlock the vehicle from
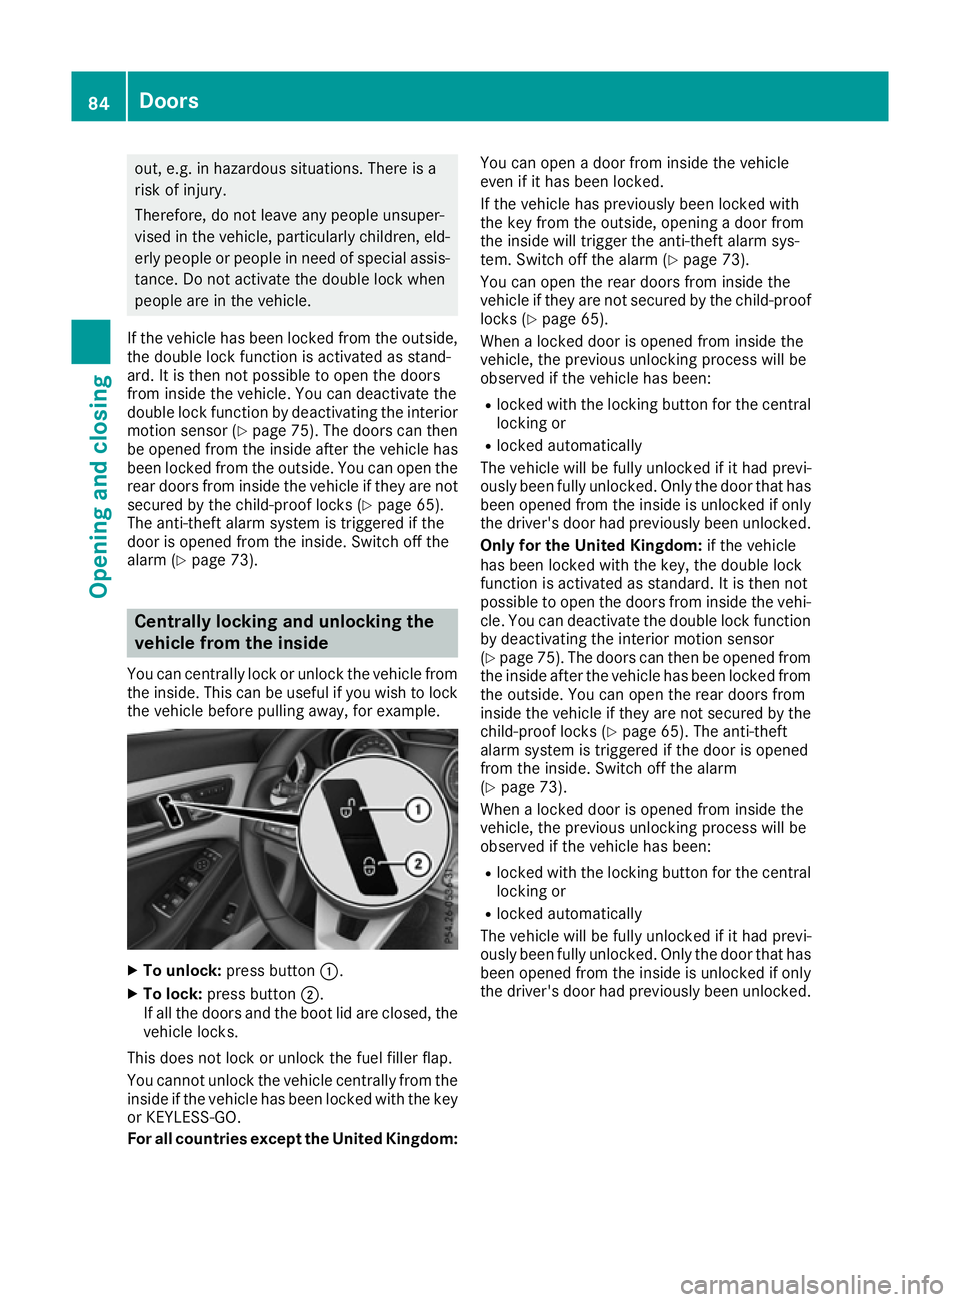
the inside. This can be useful if you wish to lock the vehicle before pulling away, for example. X
To unlock: press button :.
X To lock: press button ;.
If all the doors and the boot lid are closed, the
vehicle locks.
This does not lock or unlock the fuel filler flap.
You cannot unlock the vehicle centrally from the
inside if the vehicle has been locked with the key or KEYLESS-GO.
For all countries except the United Kingdom: You can open a door from inside the vehicle
even if it has been locked.
If the vehicle has previously been locked with
the key from the outside, opening a door from
the inside will trigger the anti-theft alarm sys-
tem. Switch off the alarm (Y page 73).
You can open the rear doors from inside the
vehicle if they are not secured by the child-proof locks (Y page 65).
When a locked door is opened from inside the
vehicle, the previous unlocking process will be
observed if the vehicle has been:
R locked with the locking button for the central
locking or
R locked automatically
The vehicle will be fully unlocked if it had previ-
ously been fully unlocked. Only the door that has been opened from the inside is unlocked if only
the driver's door had previously been unlocked.
Only for the United Kingdom: if the vehicle
has been locked with the key, the double lock
function is activated as standard. It is then not
possible to open the doors from inside the vehi- cle. You can deactivate the double lock function
by deactivating the interior motion sensor
(Y page 75). The doors can then be opened from
the inside after the vehicle has been locked from
the outside. You can open the rear doors from
inside the vehicle if they are not secured by the child-proof locks (Y page 65). The anti-theft
alarm system is triggered if the door is opened
from the inside. Switch off the alarm
(Y page 73).
When a locked door is opened from inside the
vehicle, the previous unlocking process will be
observed if the vehicle has been:
R locked with the locking button for the central
locking or
R locked automatically
The vehicle will be fully unlocked if it had previ-
ously been fully unlocked. Only the door that has been opened from the inside is unlocked if only
the driver's door had previously been unlocked. 84
DoorsOpening and closing
Page 90 of 345

Closing
X
Pull down the boot lid using handle :.
X Let the boot lid drop into the lock.
X If necessary, lock the vehicle with the &
button on the key or with KEYLESS-GO. Opening automatically from outside
General notes !
The boot lid swings upwards when opened.
Therefore, make sure that there is sufficient
clearance above the boot lid.
i The opening dimensions of the boot lid can
be found under "Vehicle data" (Y page 333).
Opening automatically You can open the boot lid automatically using
the key or the handle in the boot lid.
X Press and hold the Fbutton on the key
until the boot lid opens.
or X If the boot lid is unlocked, pull the boot lid
handle and release it again immediately. HANDS-FREE ACCESS
Important safety notes G
WARNING
The vehicle exhaust system can become very
hot. If you use HANDS-FREE ACCESS, you
could burn yourself by touching the exhaust
system. There is a risk of injury. Always ensure that you only make a leg movement
within the detection range of sensors.
! If the key is within the rear detection range
of KEYLESS-GO, the following situations, for
example, could lead to the boot lid opening
unintentionally:
R using a car wash
R using a high-pressure cleaner
Make sure that the key is at least 3 m away
from the vehicle.
i You can also deactivate KEYLESS-GO. Fur-
ther information on deactivating and activat-
ing KEYLESS-GO (Y page 77).
General notes With KEYLESS-GO and HANDS-FREE ACCESS,
you can open the boot lid without using your
hands. This is useful if you have your hands full.
To do this, make a kicking movement under the bumper with your foot.
Observe the following points:
R Carry your KEYLESS-GO key with you. The key
must be in the KEYLESS-GO detection range
to the rear of the vehicle.
R When making the kicking movement, make
sure that you are standing firmly on the
ground and that there is sufficient clearance
to the rear of the vehicle. You could otherwise
lose your balance, e.g. on ice. R
Always ensure that you only make a kicking
movement within the detection range of sen-
sors :.
R Stand at least 30 cm away from the rear area
while doing so.
R Do not come into contact with the bumper
while making the kicking movement. Other-
wise, the sensors may not function correctly. Boot
87Opening and closing Z
Page 91 of 345
R
HANDS-FREE ACCESS does not function dur-
ing engine start.
R Dirt caused by road salt around sensors :
may restrict functionality.
Using HANDS-FREE ACCESS with a pros-
thetic leg may restrict functionality.
R If a KEYLESS-GO key is in the KEYLESS-GO
detection range to the rear of the vehicle,
HANDS-FREE ACCESS could be triggered.
The boot lid could thus be opened uninten-
tionally, for example, when you:
- fold the ball coupling in or out
- couple or uncouple a trailer
- fit or remove a rear-mounted bicycle rack
- load/unload bicycles on/from a rear-
mounted bicycle rack
- set down or lift up an object behind the
vehicle
- polish the rear of the vehicle
Do not carry the KEYLESS-GO key with you in
such situations. This will prevent the uninten- tional opening of the boot lid.
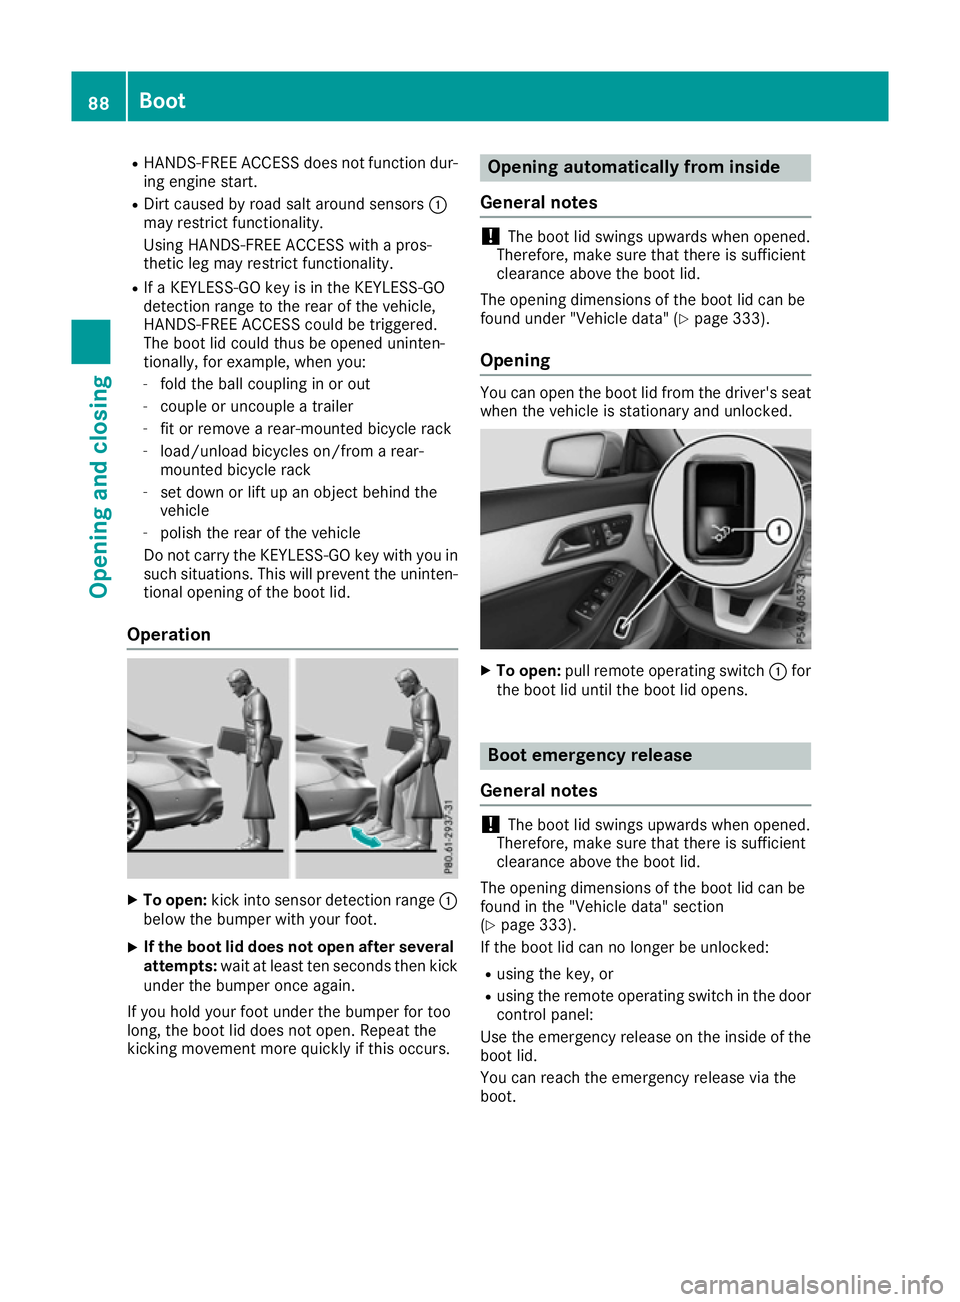
Operation X
To open: kick into sensor detection range :
below the bumper with your foot.
X If the boot lid does not open after several
attempts: wait at least ten seconds then kick
under the bumper once again.
If you hold your foot under the bumper for too
long, the boot lid does not open. Repeat the
kicking movement more quickly if this occurs. Opening automatically from inside
General notes !
The boot lid swings upwards when opened.
Therefore, make sure that there is sufficient
clearance above the boot lid.
The opening dimensions of the boot lid can be
found under "Vehicle data" (Y page 333).
Opening You can open the boot lid from the driver's seat
when the vehicle is stationary and unlocked. X
To open: pull remote operating switch :for
the boot lid until the boot lid opens. Boot emergency release
General notes !
The boot lid swings upwards when opened.
Therefore, make sure that there is sufficient
clearance above the boot lid.
The opening dimensions of the boot lid can be
found in the "Vehicle data" section
(Y page 333).
If the boot lid can no longer be unlocked:
R using the key, or
R using the remote operating switch in the door
control panel:
Use the emergency release on the inside of the boot lid.
You can reach the emergency release via the
boot. 88
BootOpening and closing
Page 94 of 345
Vehicles with KEYLESS-GO, the KEYLESS-
GO start function, Exclusive package or
AMG Exclusive package: at the same time you
can:
R lock the vehicle
R close the side windows
R close the panorama sliding sunroof
On vehicles with a panorama sliding sunroof,
you can then close the roller sunblind.
i Notes on the automatic reversing function
for:
R the side windows (Y page 89)
R the panorama sliding sunroof
(Y page 93)
R the roller sunblind (Y page 94)
Using the key X
Vehicles with Exclusive package or AMG
Exclusive package but without KEYLESS-
GO and the KEYLESS-GO start function: for
the following operations, point the tip of the
key at the door handle on the driver's door.
The key must be close to the driver's door
handle.
i Vehicles with KEYLESS-GO or the KEY-
LESS-GO start function: the key must be in
close proximity to the vehicle.
X Press and hold the &button until the side
windows and the panorama sliding sunroof
are fully closed.
X Make sure that all the side windows and the
panorama sliding sunroof are closed.
On vehicles with a panorama sliding sunroof: X Press and hold the &button again until the
roller sunblind of the panorama sliding sun-
roof closes.
X To interrupt convenience closing: release
the & button.
Using KEYLESS-GO The driver's door and the door at which the han-
dle is used must both be closed. The key must beoutside the vehicle. The gap between the key
and the corresponding door handle should not
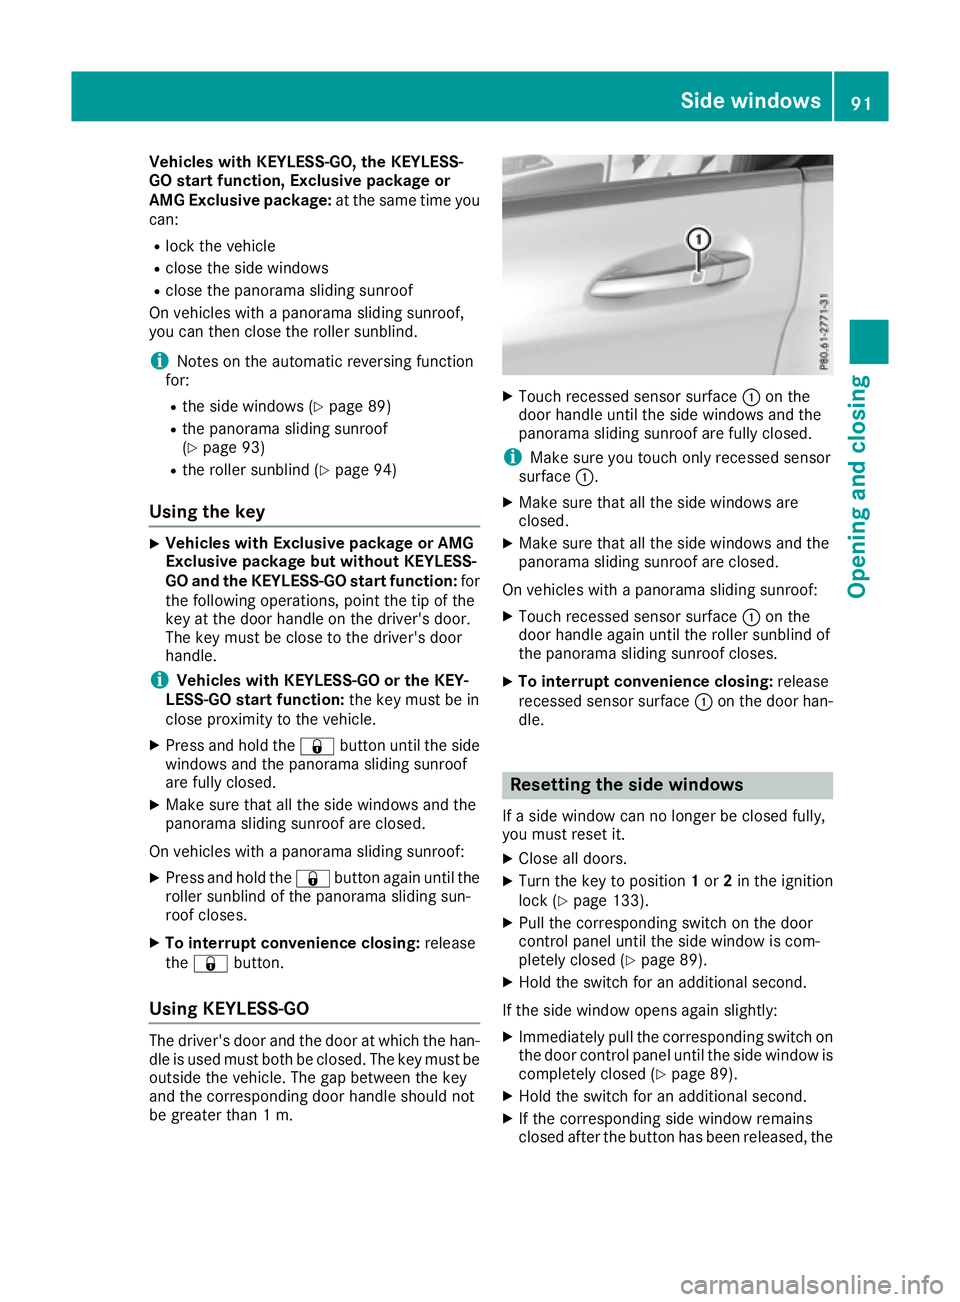
be greater than 1 m. X
Touch recessed sensor surface :on the
door handle until the side windows and the
panorama sliding sunroof are fully closed.
i Make sure you touch only recessed sensor
surface :.
X Make sure that all the side windows are
closed.
X Make sure that all the side windows and the
panorama sliding sunroof are closed.
On vehicles with a panorama sliding sunroof: X Touch recessed sensor surface :on the
door handle again until the roller sunblind of
the panorama sliding sunroof closes.
X To interrupt convenience closing: release
recessed sensor surface :on the door han-
dle. Resetting the side windows
If a side window can no longer be closed fully,
you must reset it.
X Close all doors.
X Turn the key to position 1or 2in the ignition
lock (Y page 133).
X Pull the corresponding switch on the door
control panel until the side window is com-
pletely closed (Y page 89).
X Hold the switch for an additional second.
If the side window opens again slightly:
X Immediately pull the corresponding switch on
the door control panel until the side window is completely closed (Y page 89).
X Hold the switch for an additional second.
X If the corresponding side window remains
closed after the button has been released, the Side windows
91Opening and closing Z
Page 97 of 345
At low speeds it raises again automatically.
You can also temporarily deactivate automatic
lowering. To do so, press the 3switch. The
sliding sunroof raises again automatically.
You can continue to operate the sliding sunroof
after switching off the engine or removing the
key. This function remains active for five
minutes or until you open a front door.
The sliding sunroof cannot be opened if a roof
carrier is fitted. In order to allow ventilation of
the vehicle interior, you can raise the sliding
sunroof.
If contact is made with a roof carrier approved
by Mercedes-Benz, the sliding sunroof lowers
slightly but remains raised at the rear.
Rain-closing feature when the engine is
switched off The rain-closing feature is only available for vehi-
cles with a rain sensor.
When the key is in position 0in the ignition lock
or is removed, the panorama sliding sunroof
closes automatically:
R if it starts to rain
R at extreme outside temperatures
R after six hours
R if there is a malfunction in the power supply
The panorama sliding sunroof remains raised at
the rear in order to allow ventilation of the vehi-
cle interior.
If the panorama sliding sunroof is obstructed
when being closed by the rain-closing feature, it opens again slightly. The rain-closing feature is
then deactivated.
The panorama sliding sunroof does not close if:
R it is raised at the rear.
R it is blocked.
R no rain is falling on the area of the windscreen
being monitored by the rain sensor. If, for
example, the vehicle is under a bridge or in a
carport, the field of the sensor may be cov-
ered.
Rain-closing feature when driving The raised panorama sliding sunroof automati-
cally lowers when driving if it starts to rain. The
sliding sunroof is lowered depending on:
R the road speed and
R the intensity of the rain You can manually cancel the automatic closing
procedure. Press or pull the
3switch in any
direction.
To raise the panorama sliding sunroof again,
press the 3button in direction :. The rain-
closing feature remains activated. Operating the roller sunblind for the
panorama sliding sunroof
Important safety notes G
WARNING
Parts of the body could become trapped
between the roller sunblind and frame or slid- ing sunroof during automatic opening or clos-
ing. There is a risk of injury.
When opening or closing, make sure that no
body parts are in the sweep of the roller sun- blind.
If someone is trapped:
R release the switch immediately or
R press the switch in any direction during the
automatic opening/closing process
The opening/closing process is stopped.
The roller sunblind shields the vehicle interior
from sunlight. The roller sunblind can only be
opened and closed when the panorama sliding
sunroof is closed.
Roller sunblind reversing feature The roller sunblind is equipped with an auto-
matic reversing feature. If an object blocks or
restricts the roller sunblind during the closing
process, the roller sunblind opens again auto-
matically. The automatic reversing feature is,
however, only an aid and is no substitute for your
attention when closing the roller sunblind. G
WARNING
The reversing feature does not react:
R to soft, light and thin objects, e.g. small fin-
gers
R when closing the roller sunblind again man-
ually immediately after automatic reversing 94
Panorama sliding sunroofOpening and closing
Page 110 of 345
Exterior lighting
General notes
For reasons of safety, Mercedes-Benz recom-
mends that you drive with the lights switched on even during the daytime. In some countries,
operation of the headlamps varies due to legal
requirements and self-imposed obligations. Driving abroad
Symmetrical dipped beam It is not necessary to switch your headlamps to
symmetrical dipped beam when driving in coun- tries where vehicles are driven on the opposite
side of the road to the country in which the vehi- cle is registered. Legal requirements are fulfilled
without switching the headlamps to symmetri-
cal dipped beam. Setting the exterior lighting
Setting options Exterior lighting can be set using the:
R light switch
R combination switch (Y page 109)
R headlamp range adjustment (only vehicles
with halogen headlamps) (Y page 108)
R on-board computer (Y page 211)
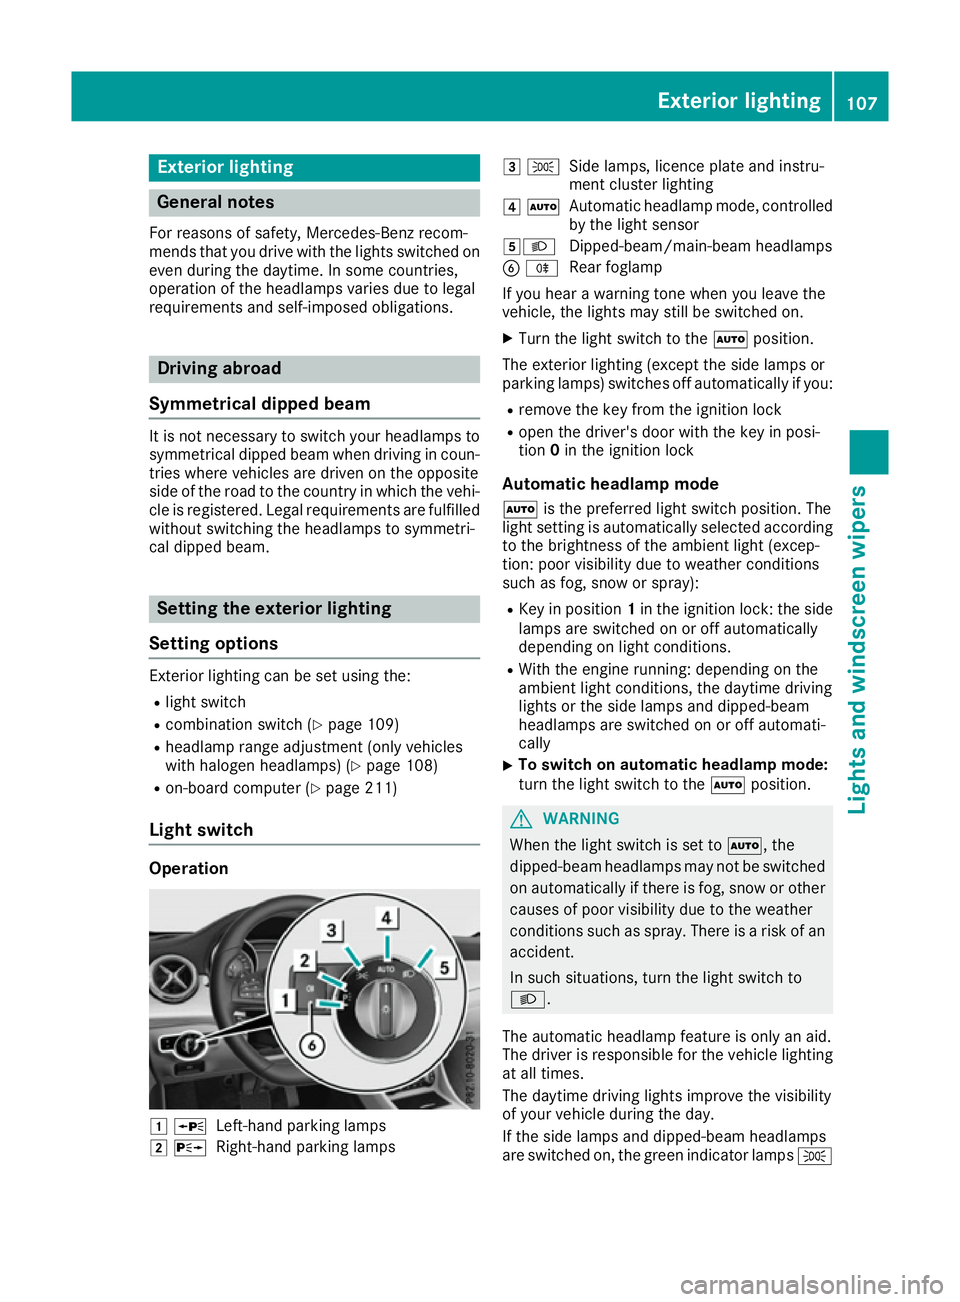
Light switch Operation
1
W
Left-hand parking lamps
2 X
Right-hand parking lamps 3
T
Side lamps, licence plate and instru-
ment cluster lighting
4 Ã
Automatic headlamp mode, controlled
by the light sensor
5L Dipped-beam/main-beam headlamps
B R
Rear foglamp
If you hear a warning tone when you leave the
vehicle, the lights may still be switched on.
X Turn the light switch to the Ãposition.
The exterior lighting (except the side lamps or
parking lamps) switches off automatically if you: R remove the key from the ignition lock
R open the driver's door with the key in posi-
tion 0in the ignition lock
Automatic headlamp mode à is the preferred light switch position. The
light setting is automatically selected according
to the brightness of the ambient light (excep-
tion: poor visibility due to weather conditions
such as fog, snow or spray):
R Key in position 1in the ignition lock: the side
lamps are switched on or off automatically
depending on light conditions.
R With the engine running: depending on the
ambient light conditions, the daytime driving
lights or the side lamps and dipped-beam
headlamps are switched on or off automati-
cally
X To switch on automatic headlamp mode:
turn the light switch to the
Ãposition. G
WARNING
When the light switch is set to Ã, the
dipped-beam headlamps may not be switched on automatically if there is fog, snow or othercauses of poor visibility due to the weather
conditions such as spray. There is a risk of an
accident.
In such situations, turn the light switch to
L.
The automatic headlamp feature is only an aid.
The driver is responsible for the vehicle lighting at all times.
The daytime driving lights improve the visibility
of your vehicle during the day.
If the side lamps and dipped-beam headlamps
are switched on, the green indicator lamps T Exterior lighting
107Lights and windscreen wipers Z
Page 111 of 345
(side lamps) and
L(dipped-beam head-
lamps) in the instrument cluster light up.
Dipped-beam headlamps When the ignition is switched on and the light
switch is in the Lposition, the side lamps
and dipped-beam headlamps are switched on
even if the light sensor does not sense dark
ambient light conditions. This is advantageous
when there is fog or rain.
X To switch on the dipped-beam headlamps:
turn the key in the ignition lock to position 2
or start the engine.
X Turn the light switch to L.
The green Lindicator lamp on the instru-
ment cluster lights up.
Rear foglamp The rear foglamp improves the visibility of your
vehicle in heavy fog for the following traffic.
Please observe the country-specific laws on the
use of rear foglamps.
X To switch on the rear foglamp: turn the key
in the ignition lock to position 2or start the
engine.
X Turn the light switch to LorÃ.
X Press the Rbutton.
The yellow Rindicator lamp in the instru-
ment cluster lights up.
X To switch off the rear foglamp:press the
R button.
The yellow Rindicator lamp in the instru-
ment cluster goes out.
i When the rear foglamp is switched on, the
centre brake lamp in the tail lamp switches off
due to a legal requirement.
Side lamps ! When the battery is discharged heavily, the
side lamps or parking lamps are automatically
switched off to facilitate an engine start.
Always park your vehicle safely and in a well lit area, in accordance with the relevant legal
stipulations. Avoid using the Tside lamps
for periods lasting several hours. Where pos-
sible, switch on the right Xor left W
parking lamp.
X To switch on: turn the light switch to T.
The green Tindicator lamp in the instru-
ment cluster lights up. Parking lamps
Switching on the parking lamps ensures that the
corresponding side of the vehicle is illuminated.
X To switch on the parking lamps: the key
should not be in the ignition lock or it should
be in position 0.
X Turn the light switch to W(left-hand side of
the vehicle) or X(right-hand side of the
vehicle).
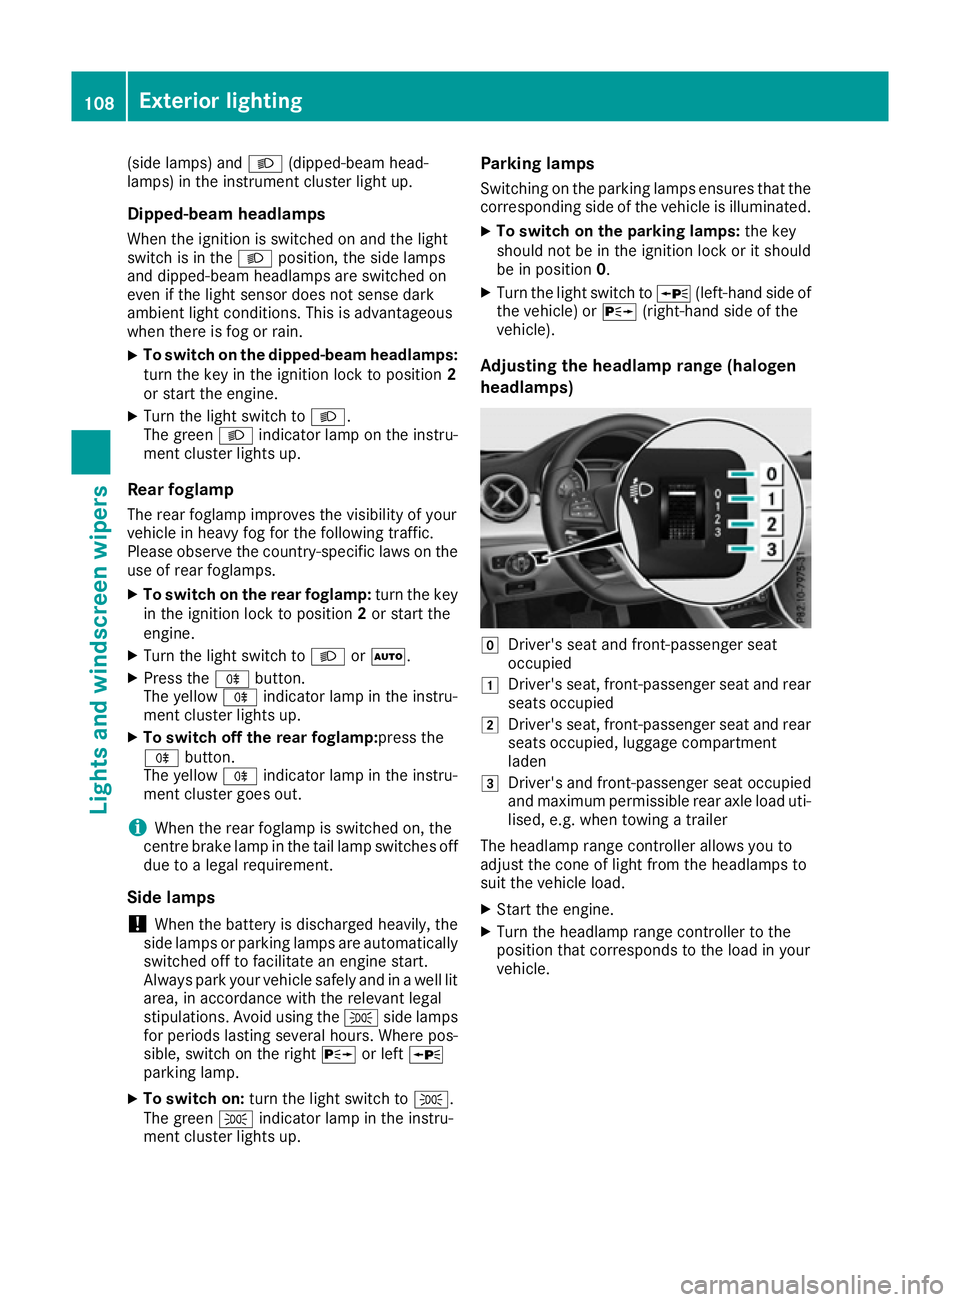
Adjusting the headlamp range (halogen
headlamps) g
Driver's seat and front-passenger seat
occupied
1 Driver's seat, front-passenger seat and rear
seats occupied
2 Driver's seat, front-passenger seat and rear
seats occupied, luggage compartment
laden
3 Driver's and front-passenger seat occupied
and maximum permissible rear axle load uti-
lised, e.g. when towing a trailer
The headlamp range controller allows you to
adjust the cone of light from the headlamps to
suit the vehicle load.
X Start the engine.
X Turn the headlamp range controller to the
position that corresponds to the load in your
vehicle. 108
Exterior lightingLights and windscreen wipers