2016 MERCEDES-BENZ CLA COUPE wheel size
[x] Cancel search: wheel sizePage 10 of 345
Braking assistance appropriate to
the situation
Function/note s................................ 68
Breakdown
Where will I find...? ........................ 293
see Flat tyre
see Tow-starting
see Towing away
Buttons on the steering column ...... 201C
Calling up a fault see Display messages
Car
see Vehicle
Car wash (care) ................................. 286
Care
Automatic car wash ....................... 286
Carpets .......................................... 292
Display ........................................... 290
Exhaust pipe .................................. 290
Exterior lighting ............................. 289
Gear or selector lever .................... 291
High-pressure cleaner .................... 287
Interior ........................................... 290
Matt paintwork .............................. 287
Note s............................................. 286
Paint .............................................. 287
Plastic trim .................................... 290
Reversing camera .......................... 289
Roof lining ...................................... 292
Seat belt ........................................ 291
Seat cove r..................................... 291
Sensors ......................................... 289
Steering wheel ............................... 291
Trim pieces .................................... 291
Washing by hand ........................... 286
Wheels ........................................... 288
Windows ........................................ 288
Wiper blades .................................. 288
Wooden trim .................................. 291
CD
See also Digital Owner's Manua l... 259
CD player (on-board computer) ........ 206
Central locking
Automatic locking (on-board com-puter) ............................................. 211 Locking/unlocking (key) .................. 76
Centre console
Lower section .................................. 35
Upper section .................................. 34
Child
Restraint system .............................. 54
Child seat
Forward-facing restraint system ...... 59
i-Size ................................................ 55
ISOFIX .............................................. 55
On the front-passenger seat ............ 57
Rearward-facing restraint system .... 58
Recommendations ........................... 63
Suitable positions ............................ 59
Top Tether ....................................... 56
Child-proof locks
Important safety notes .................... 64
Rear doors ....................................... 65
Cigarette lighter ................................ 276
Cleaning
Mirror turn signal ........................... 289
Trailer tow hitch ............................. 290
Climate control
Air conditioning ............................. 118
Auxiliary heating/ventilation .......... 126
Controlling automaticall y............... 121
Convenience opening/closing
(air-recirculation mode) ................. 125
Cooling with air dehumidification .. 121
Demisting the windows .................. 124
Demisting the windscreen ............. 123
Indicator lamp ................................ 121
Information on using
THERMOTRONIC automatic cli-
mate control .................................. 120
Notes on using the air-condition-
ing system ..................................... 118
Overview of systems ...................... 117
Problem with the rear window
heating .......................................... 124
Problems with cooling with air
dehumidification ............................ 121
Setting the air distribution ............. 122
Setting the air vents ...................... 130
Setting the airflow ......................... 123
Setting the temperature ................ 122
Switching air-recirculation mode
on/of f............................................ 124 Index
7
Page 25 of 345
Vehicle dimensions
........................... 333
Vehicle emergency locking ................ 85
Vehicle identification number
see VIN
Vehicle identification plate .............. 326
Vehicle tool kit .................................. 294
Ventilation
Setting the vents ........................... 130
Video
Operating the DVD ......................... 206
See also Digital Owner's Manua l... 259
VIN
Seat ............................................... 327
Type plate ...................................... 326 W
Warning and indicator lamps ABS ................................................ 250
Active Brake Assist ........................ 257
Brakes ........................................... 249
Distance warning signal ................. 257
ESP ®
.............................................. 252
ESP ®
OFF ....................................... 253
Fuel tank ........................................ 255
LIM (cruise control) ........................ 163
LIM (Distance Pilot DISTRONIC) .... 168
LIM (variable limiter) ...................... 165
Overview .......................................... 32
PASSENGER AIR BAG ...................... 40
Reserve fue l................................... 255
Seat belt ........................................ 248
Tyre pressure monitor ................... 258
Warning triangle ................................ 293
Washer fluid
Display message ............................ 246
Weather display (COMAND Online)
See also Digital Owner's Manua l... 259
Wheel and tyre combinations
Tyres .............................................. 323
Wheel bolt tightening torque ........... 322
Wheel chock ...................................... 319
Wheels
Changing a whee l.......................... 318
Changing/replacing ....................... 318
Checking ........................................ 310
Cleaning ......................................... 288
Emergency spare whee l................. 323 Fitting a new wheel ........................ 321
Important safety notes .................. 310
Information on driving .................... 310
Removing a whee
l.......................... 321
Storing ........................................... 319
Tightening torque ........................... 322
Wheel size/tyre size ...................... 323
Windowbag
Display message ............................ 225
Operation ......................................... 46
Windows
Cleaning ......................................... 288
see Side windows
Windscreen
Demisting ...................................... 123
Windscreen washer system
Important safety notes .................. 332
Topping up ..................................... 284
Windscreen wipers
Display message ............................ 246
Problem (malfunction) ................... 116
Replacing the wiper blades ............ 115
Switching on/of f........................... 114
Winter driving
General notes ................................ 312
Winter operation
Slippery road surfaces ................... 162
Snow chains .................................. 313
Winter tyres
Limiting the speed (on-board com-
puter) ............................................. 211
M+S tyre s...................................... 312
Wiper blades
Cleaning ......................................... 288
Important safety notes .................. 115
Wooden trim (cleaning instruc-
tions) .................................................. 291
Workshop
see Qualified specialist workshop Z
ZONE function Switching on/of f........................... 123 22
Index
Page 73 of 345
ETS/4ETS (Electronic Traction System)
i
Observe the "Important safety notes" sec-
tion (Y page 66).
ETS traction control is part of ESP ®
. On vehicles
with 4MATIC, 4ETS is part of ESP ®
.
Traction control brakes the drive wheels indi-
vidually if they spin. This enables you to pull
away and accelerate on slippery surfaces, e.g. if
the road surface is slippery on one side. In addi-
tion, more drive torque is transferred to the
wheel or wheels with traction.
Traction control remains active if you deactivate
ESP ®
.
Important safety notes i
Observe the "Important safety notes" sec-
tion (Y page 66). G
WARNING
If ESP ®
is malfunctioning, ESP ®
is unable to
stabilise the vehicle. In addition, other driving
safety systems are switched off. This increa-
ses the risk of skidding and an accident.
Drive on carefully. Have ESP ®
checked at a
qualified specialist workshop.
Vehicles without 4MATIC: when towing your
vehicle with the front axle raised, it is important
that you observe the notes on ESP ®
(Y page 306).
If the å ESP®
OFF warning lamp lights up
continuously, ESP ®
is deactivated.
If the ÷ ESP®
warning lamp and the å
warning lamp are lit continuously, ESP ®
is not
available due to a malfunction.
Read the information on warning lamps
(Y page 252) and display messages that may be
shown in the instrument cluster (Y page 217).
Use only wheels with the recommended tyre
sizes. Only then will ESP ®
function properly.
Characteristics of ESP ®General information
If the ÷ ESP warning lamp goes out before
you begin the journey, ESP ®
is automatically
active. If ESP
®
intervenes, the ÷ESP®
warning lamp
flashes on the instrument cluster.
If ESP ®
intervenes:
X Do not deactivate ESP ®
under any circum-
stances.
X When pulling away, depress the accelerator
pedal only as far as is necessary.
X Adapt your driving style to suit the prevailing
road and weather conditions.
ECO start/stop function
The ECO start/stop function switches the
engine off automatically if the vehicle stops
moving. When pulling away again, the engine
starts automatically. ESP ®
remains in its previ-
ously selected status. Example:if ESP®
was
deactivated before the engine was switched off,
ESP ®
remains deactivated when the engine is
switched on again.
Activating/deactivating ESP ®
(except
Mercedes ‑AMG vehicles) Important safety notes
i Read the "Important safety notes" section
(Y page 66).
You can select between the following ESP ®
sta-
tuses:
R ESP ®
is activated
R ESP ®
is deactivated G
WARNING
If you deactivate ESP ®
, ESP ®
no longer sta-
bilises the vehicle. There is an increased risk
of skidding and an accident.
Only deactivate ESP ®
in the situations descri-
bed in the following.
The spinning of the wheels results in a cut for
better traction on loose surfaces.
It may be best to deactivate ESP ®
in the follow-
ing situations:
R when snow chains are used
R in deep snow
R on sand or gravel
i Activate ESP ®
as soon as the situations
described above no longer apply. ESP ®
will
otherwise not be able to stabilise the vehicle 70
Driving safety systemsSafety
Page 106 of 345
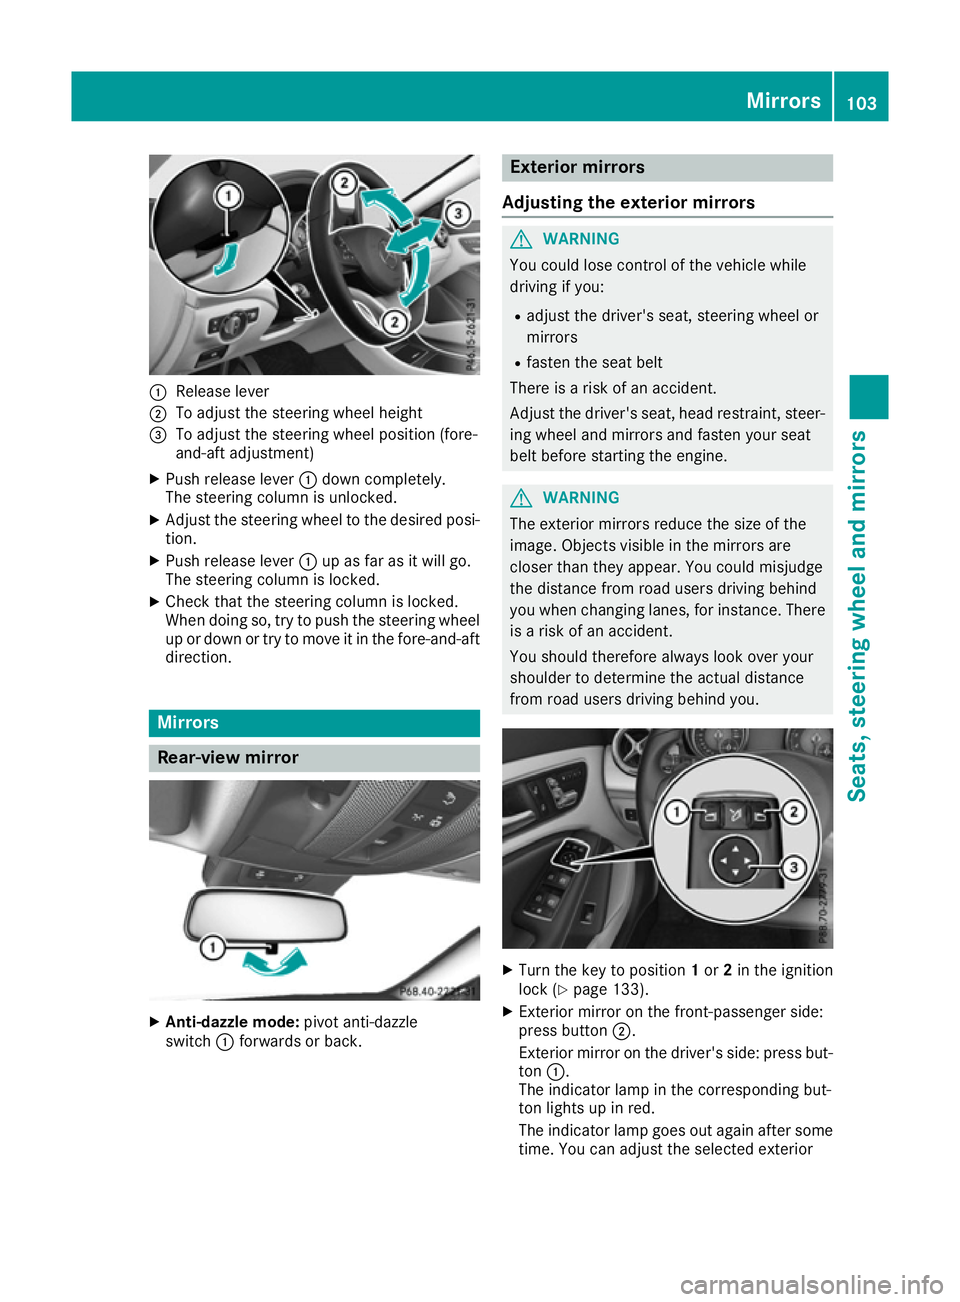
:
Release lever
; To adjust the steering wheel height
= To adjust the steering wheel position (fore-
and-aft adjustment)
X Push release lever :down completely.
The steering column is unlocked.
X Adjust the steering wheel to the desired posi-
tion.
X Push release lever :up as far as it will go.
The steering column is locked.
X Check that the steering column is locked.
When doing so, try to push the steering wheel
up or down or try to move it in the fore-and-aft
direction. Mirrors
Rear-view mirror
X
Anti-dazzle mode: pivot anti-dazzle
switch :forwards or back. Exterior mirrors
Adjusting the exterior mirrors G
WARNING
You could lose control of the vehicle while
driving if you:
R adjust the driver's seat, steering wheel or
mirrors
R fasten the seat belt
There is a risk of an accident.
Adjust the driver's seat, head restraint, steer-
ing wheel and mirrors and fasten your seat
belt before starting the engine. G
WARNING
The exterior mirrors reduce the size of the
image. Objects visible in the mirrors are
closer than they appear. You could misjudge
the distance from road users driving behind
you when changing lanes, for instance. There is a risk of an accident.
You should therefore always look over your
shoulder to determine the actual distance
from road users driving behind you. X
Turn the key to position 1or 2in the ignition
lock (Y page 133).
X Exterior mirror on the front-passenger side:
press button ;.
Exterior mirror on the driver's side: press but- ton :.
The indicator lamp in the corresponding but-
ton lights up in red.
The indicator lamp goes out again after some
time. You can adjust the selected exterior Mirrors
103Seats, steering wheel and mirrors Z
Page 298 of 345
X
If possible, bring the front wheels into the
straight-ahead position.
X Switch off the engine.
X Vehicles without KEYLESS-GO: remove the
key from the ignition lock.
X Vehicles with KEYLESS-GO start-function
or KEYLESS-GO: open the driver's door.
The vehicle electronics now have status 0.
This is the same as the key having been
removed.
X Vehicles with KEYLESS-GO start function
or KEYLESS-GO: remove the Start/Stop but-
ton from the ignition lock (Y page 133).
X Make sure that the passengers are not endan-
gered as they get out of the vehicle. Make
sure that no one is near the danger area while
a wheel is being changed. Anyone who is not directly assisting in the wheel change should, for example, stand behind the barrier.
X Get out of the vehicle. Pay attention to traffic
conditions when doing so.
X Close the driver's door.
X Place the warning triangle a suitable distance
away (Y page 293). Observe legal require-
ments. MOExtended tyres (tyres with run-flat
characteristics)
General notes With MOExtended tyres (tyres with run-flat char-
acteristics), you can continue to drive your vehi- cle even if there is a total loss of pressure in one
or more tyres. The affected tyre must not show
any clearly visible damage.
You can recognise MOExtended tyres by the
"MOExtended" marking that appears on the tyre sidewall. You will find this marking next to the
tyre size designation, the load-bearing capacity
and the speed index.
MOExtended tyres may be used only in conjunc- tion with an activated tyre pressure loss warning
system or tyre pressure monitor.
If a pressure loss warning message appears in the multifunction display:
R observe the instructions in the display mes-
sages (Y page 239)
R check the tyre for damage
R if driving on, observe the following notes The driving distance possible in run-flat mode is
approximately 80 km when the vehicle is parti-
ally laden and approximately 30 km when the
vehicle is fully laden.
In addition to the vehicle load, the driving dis-
tance possible in run-flat mode depends on the:
R vehicle speed
R road condition
R outside temperature
The driving distance possible in run-flat mode
may be reduced by extreme driving conditions/ manoeuvres, or it can be increased through a
moderate style of driving.
The driving distance possible in run-flat mode is
counted from the moment the tyre pressure loss warning appears on the multifunction display.
You must not exceed a maximum speed of
80 km/h.
When replacing one or all tyres, observe the fol-
lowing specifications for your vehicle's tyres:
R size
R type and
R the "MOExtended" marking
If a tyre has gone flat and cannot be replaced
with an MOExtended tyre, a standard tyre may
be used as a temporary measure. Make sure
that you use the proper size and type (summer
or winter tyre).
Vehicles with MOExtended tyres are not equip-
ped with a TIREFIT kit at the factory. It is there-
fore recommended that you additionally equip
your vehicle with a TIREFIT kit if you fit tyres that do not feature run-flat characteristics, e.g. win-
ter tyres. A TIREFIT kit can be obtained from a
qualified specialist workshop.
Important safety notes G
WARNING
When driving in emergency mode, the driving characteristics deteriorate, e.g. when corner-
ing, accelerating quickly and when braking.
There is a risk of accident.
Do not exceed the stated maximum speed.
Avoid abrupt steering and driving manoeu-
vres, and driving over obstacles (kerbs, pot-
holes, off-road). This applies in particular to a laden vehicle. Flat tyre
295Breakdown assistance
Z
Page 313 of 345
Important safety notes
G
WARNING
If wheels and tyres of the wrong size are used, the wheel brakes or suspension components
may be damaged. There is a risk of an acci-
dent.
Always replace wheels and tyres with those
that fulfil the specifications of the original
part.
When replacing wheels, make sure to fit the
correct:
R designation
R type
When replacing tyres, make sure to fit the
correct:
R designation
R manufacturer
R type G
WARNING
A flat tyre severely impairs the driving, steer-
ing and braking characteristics of the vehicle.
There is a risk of accident.
Tyres without run-flat characteristics:
R do not drive with a flat tyre.
R immediately replace the flat tyre with your
emergency spare wheel or spare wheel, or
consult a qualified specialist workshop.
Tyres with run-flat characteristics:
R pay attention to the information and warn-
ing notices on MOExtended tyres (tyres
with run-flat characteristics).
Accessories that are not approved for your vehi-
cle by Mercedes-Benz or are not being used cor- rectly can impair operating safety.
Before purchasing and using non-approved
accessories, visit a qualified specialist work-
shop and enquire about:
R suitability
R legal stipulations
R factory recommendations Further information regarding wheels and tyres
can be found under "Wheel/tyre combinations"
(Y page 323).
You can ask for information regarding permitted
wheel/tyre combinations at a Mercedes-Benz
Service Centre.
Information on tyre pressures can be found:
R in the tyre pressure table in the fuel filler flap
(Y page 154)
R under "Tyre pressure" (Y page 313)
Modification work on the brake system and
wheels is not permitted. The use of spacers or
brake dust shields is not permitted. This inva-
lidates the general operating permit for the vehi- cle.
i Further information on wheels and tyres can
be obtained at any qualified specialist work-
shop. Operation
Information on driving
Check the tyre pressure when the vehicle is
heavily laden and adjust prior to a trip.
While driving, pay attention to vibrations, noises
and unusual handling characteristics, e.g. pull-
ing to one side. This may indicate that the
wheels or tyres are damaged. If you suspect that a tyre is defective, reduce your speed immedi-
ately. Stop the vehicle as soon as possible to
check the wheels and tyres for damage. Hidden
tyre damage could also be causing the unusual
handling characteristics. If you find no signs of
damage, have the tyres and wheels checked at a qualified specialist workshop.
When parking your vehicle, make sure not to
squash the tyre. If you cannot avoid driving over
obstacles, e.g. kerbs, do so slowly and at an
obtuse angle only. You could otherwise damage the wheel rims and tyres. Regular checking of wheels and tyres
G
WARNING
Damaged tyres can cause tyre inflation pres-
sure loss. As a result, you could lose control of your vehicle. There is a risk of accident. 310
OperationWheels and ty
res
Page 314 of 345
Check the tyres regularly for signs of damage
and replace any damaged tyres immediately.
Check wheels and tyres for damage at least
once a month. Check wheels and tyres after
driving off-road or on rough roads. Damaged
wheels can cause a loss of tyre pressure. Pay
particular attention to damage such as:
R cuts in the tyres
R punctures
R tears in the tyres
R bulges on the tyres
R deformation or severe corrosion on the
wheels
Regularly check the tyre tread depth and the
condition of the tread across the whole width of
the tyre (Y page 311). If necessary, turn the
front wheels to full lock to make it easier to
inspect the inner side of the tyre surface.
All wheels must have a valve cap to protect the valve against dirt and moisture. Do not fit any-
thing onto the valve other than the standard
valve cap or other valve caps specially approved
for your vehicle by Mercedes-Benz. Do not fit
any other valve caps or systems, e.g. tyre pres- sure monitors.
Check the pressure of all tyres regularly as well
as prior to long trips. Adjust the tyre pressure as necessary (Y page 313).
Observe the notes on the emergency spare
wheel (Y page 323).
The service life of a tyre depends on various fac- tors, including the following:
R Driving style
R Tyre pressure
R Mileage Notes on the tyre tread
G
WARNING
Insufficient tyre tread will reduce tyre trac-
tion. The tyre is no longer able to dissipate
water. This means that on wet road surfaces, the risk of aquaplaning increases, in particularwhere speed is not adapted to suit the driving
conditions. There is a risk of accident.
If the tyre pressure is too high or too low, tyres may exhibit different levels of wear at differ- ent locations on the tyre tread. Thus, you
should regularly check the tread depth and
the condition of the tread across the entire
width of all tyres.
Minimum tyre tread depth for:
R summer tyres: 3 mm
R M+S tyres: 4 mm
For safety reasons, replace the tyres before
the legally prescribed limit for the minimum
tyre tread depth is reached. Selecting, fitting and replacing tyres
G
WARNING
Exceeding the stated tyre load-bearing capa-
city and the approved maximum speed could
lead to tyre damage or the tyre bursting. There is a risk of accident.
Therefore, only use tyre types and sizes
approved for your vehicle model. Observe the
tyre load rating and speed rating required for your vehicle.
Pay special attention to country-specific
requirements for tyre approval. These require-
ments may stipulate a specific tyre type for your
vehicle. Furthermore, the use of a specific tyre
type in certain regions and areas of operation
can be highly beneficial. You can find further
information regarding tyres at specialist tyre
retailers, at qualified specialist workshops or at
any Mercedes-Benz Service Centre.
R Use only tyres and wheels of the same type
and make.
Exception: it is permissible to fit a different
type or make in the event of a flat tyre.
Observe here the "MOExtended tyres (tyres
with run-flat characteristics)" section
(Y page 295).
R Fit only tyres of the correct size onto the
wheels.
R Run in new tyres at moderate speeds for the
first 100 km. They reach their full perform-
ance only after this distance. Operation
311Wheels and tyres Z
Page 317 of 345

G
WARNING
If the tyre pressure drops repeatedly, the
wheel, valve or tyre may be damaged. Tyre
pressure that is too low may result in a tyre
blow-out. There is a risk of accident.
R Check the tyre for foreign objects.
R Check whether the wheel is losing air or the
valve is leaking.
If you are unable to rectify the damage, con-
tact a qualified specialist workshop. H
Environmental note
Check the tyre pressure regularly, at least
every 14 days.
The recommended tyre pressures for various
operating conditions can be found in the tyre
pressure table on the fuel filler flap
(Y page 154).
Operation with an emergency spare wheel:
information on operation with an emergency
spare wheel can be found in the general notes in the "Emergency spare wheel" section
(Y page 324).
Operation with a trailer: the applicable value
for the rear axle is the maximum value stated in the tyre pressure table inside the fuel filler flap.
Additionally, the tyre pressure table may also
state tyre pressures for different load condi-
tions. These are defined in the table as different numbers of passengers and amounts of lug-
gage. The actual number of seats may vary; for
more information, please refer to the vehicle
documents.
If tyre sizes are not specified, the tyre pressures
stated on the tyre pressure table apply for all
tyres approved at the factory for this vehicle. If a tyre size precedes a tyre pressure, the fol-
lowing tyre pressure information is valid only for that tyre size.
Use a suitable pressure gauge to check the tyre
pressure. The outer appearance of a tyre does
not give any reliable indication of the tyre pres-
sure. On vehicles fitted with the electronic tyre
pressure monitor, you can also check the tyre
pressure using the on-board computer.
If possible, correct tyre pressures only when the
tyres are cold.
The tyres are cold:
R if the vehicle has been parked with the tyres
out of direct sunlight for at least three hours
and
R if the vehicle has been driven less than
1.6 km
Depending on the ambient temperature, the
vehicle speed and the load on the tyres, the tyre temperature and thus the tyre pressure changes by approximately 10 kPa (0.1 bar/1.5 psi) per
10 †. Take this into account when checking the
pressure of warm tyres. Correct the tyre pres-
sure only if it is too low for the current operating
condition.
Driving with a tyre pressure that is too high or
too low can:
R shorten the service life of the tyres
R cause increased tyre damage
R have a negative effect on handling character-
istics and thus driving safety (e.g. aquaplan-
ing)
The tyre pressure values given for low loads are minimum values that offer you good driving
comfort characteristics.
However, you can also use the values given for
higher loads. These are permissible and will not
adversely affect the running of the vehicle. Tyre pressure loss warning system
General notes While the vehicle is in motion, the tyre pressure
loss warning system monitors the set tyre pres-
sure using the rotational speed of the wheels.
This enables the system to detect significant
pressure loss in a tyre. If the rotational speed of
a wheel changes as a result of a loss of tire
pressure, a corresponding warning message will appear in the multifunction display. 314
Tyre pressureWheels and tyres