2016 MERCEDES-BENZ CLA COUPE warning light
[x] Cancel search: warning lightPage 19 of 345
Applying or releasing manuall
y...... 157
Display message ............................ 219
Electric parking brake .................... 157
Emergency braking ........................ 158
General information ....................... 157
Releasing automaticall y................. 158
Warning lamp ................................. 254
Parking lamps
Display message ............................ 229
Switching on/of f........................... 108
Parking Pilot
Cancelling ...................................... 184
Detecting parking spaces .............. 181
Display Message ............................ 235
Exiting a parking space .................. 183
Function/note s............................. 180
Important safety notes .................. 180
Parking .......................................... 182
Towing a trailer .............................. 180
PASSENGER AIR BAG
Display message ............................ 226
Indicator lamps ................................ 40
Problems (malfunctions) ................ 226
Petrol .................................................. 328
Pets in the vehicle ............................... 65
Phone book
See also Digital Owner's Manua l... 259
Plastic trim (cleaning instruc-
tions) .................................................. 290
Power socket
Boot ............................................... 276
Power windows
see Side windows
Pre-Crash Safety System
see PRE-SAFE ®
(anticipatory
occupant protection)
PRE-SAFE ®
(anticipatory occupant
protection)
Operation ......................................... 53
PRE-SAFE ®
(preventive occupant
safety system)
Display message ............................ 223
Protection against theft
ATA (Anti-Theft Alarm system) ......... 73
Immobiliser ...................................... 73
Interior motion sensor ..................... 75
Tow-away protection ........................ 74 Protection of the environment
General notes .................................. 24
Pulling away
Automatic transmission ................. 135
General notes ................................ 135
Hill start assist ............................... 136
Manual transmission ...................... 135
Trailer ............................................ 136 Q
QR code Mercedes-Benz Guide App ................. 1
Rescue card ..................................... 28
Qualified specialist workshop ........... 27 R
RACE START important safety notes ................... 174
RACE START (Mercedes-AMG vehi-
cles) .................................................... 174
RACETIMER (on-board computer) .... 214
Radio
Selecting a station ......................... 206
see separate operating instructions
Radio mode
See also Digital Owner's Manua l... 259
Radio-based vehicle components
Declaration of conformity ................ 26
Rain closing feature (panorama
sliding sunroof) ................................... 94
Reading lamp ..................................... 110
Rear bench seat
Folding the backrest forwards/
back ............................................... 271
Rear compartment
Setting the air vents ...................... 131
Rear foglamp
Changing the bulb .......................... 113
Display message ............................ 229
Switching on/of f........................... 108
Rear lamps
see Lights
Rear window heating
Problem (fault) ............................... 124
Switching on/of f........................... 124 16
Index
Page 22 of 345

SPORT handling mode
Deactivating/activating
(Mercedes-AMG vehicles) ................71
Warning lamp ................................. 253
Start-off assist
Activating ....................................... 174
Important safety notes .................. 174
Start/Stop button
Removing ....................................... 134
Starting the engine ........................ 135
Start/stop function
see ECO start/stop function
Starting (engine) ................................ 134
STEER CONTROL ..................................73
Steering
Display message ............................2 45
Steering assistant STEER CON-
TROL
see STEER CONTROL
Steering wheel
Adjusting (manually) ...................... 102
Button overview ............................... 33
Buttons (on-board computer) ......... 201
Cleaning ......................................... 291
Gearshift paddle s........................... 150
Important safety notes .................. 102
Steering wheel gearshift paddles .... 150
Stopwatch (RACETIMER) ................... 214
Stowage compartment
Map pockets .................................. 270
Stowage compartments
Armrest (front) ............................... 269
Armrest (under) ............................. 270
Centre console .............................. 269
Centre console (rear) ..................... 270
Cup holde r..................................... 273
Glove compartment ....................... 269
Important safety information ......... 268
Spectacles compartment ............... 269
Under driver's seat/front-
passenger sea t.............................. 270
Stowage net ....................................... 270
Stowage space
Stowage net ................................... 270
Stowage well beneath the boot
floor .................................................... 272
Summer tyres .................................... 312 Sun visor
............................................ 275
Suspension
Adaptive Damping System ............. 176
Suspension settings
AMG RIDE CONTROL sports sus-
pension .......................................... 175
Switching on media mode
Via the device list .......................... 266 T
Tail lamps Display message ............................ 229
see Lights
Tank
see Fuel tank
Technical data
Capacities ...................................... 327
Information .................................... 325
Trailer load s................................... 334
Tyres/wheels ................................. 323
Vehicle data ................................... 333
Telephone
Accepting a call (multifunction
steering wheel) .............................. 207
Authorising a mobile phone (con-
necting) ......................................... 263
Connecting a Mobile phone (gen-
eral information) ............................ 262
Display message ............................ 246
Introduction ................................... 207
Menu (on-board computer) ............ 207
Number from the phone book ........ 207
Redialling ....................................... 208
Rejecting/ending a call ................. 207
See also Digital Owner's Manua l... 259
Switching between mobile
phones ........................................... 263
Telephone compartment ................ 270
Telephone module with Bluetooth ®
(SAP profile) Activating and connecting the
module ........................................... 264
Charging a mobile phone ............... 266
Connecting the mobile phone ........ 265
Connecting the module via a USB
cable .............................................. 264
Data modem mode ........................ 265 Index
19
Page 31 of 345
vehicle. This particularly applies to work rele-
vant to safety.
Observe the notes in the Service Booklet.
Always have the following work carried out at a
qualified specialist workshop:
R work relevant to safety
R service and maintenance work
R repair work
R modifications, installations and conversions
R work on electronic components
Mercedes-Benz recommends that you use a
Mercedes-Benz Service Centre. Vehicle registration
Mercedes-Benz may ask its Service Centres to
carry out technical inspections on certain vehi-
cles. The quality or safety of the vehicle is
improved as a result of the inspection.
Mercedes-Benz can only inform you about vehi-
cle checks if it has your registration data.
It is possible that your vehicle has not yet been
registered in your name in the following cases:
R if your vehicle was not purchased at an
authorised specialist dealer
R if your vehicle has not yet been inspected at a
Mercedes-Benz Service Centre
It is advisable to register your vehicle with a
Mercedes-Benz Service Centre.
Inform Mercedes-Benz as soon as possible
about any change in address or vehicle owner-
ship. You can do this at a Mercedes-Benz Ser-
vice Centre, for example. Correct use
If you remove any warning stickers, you or oth-
ers could fail to recognise certain dangers.
Leave warning stickers in position.
Observe the following information when driving
your vehicle:
R the safety notes in this manual
R technical data for the vehicle
R traffic rules and regulations
R laws and safety standards pertaining to motor
vehicles Implied warranty
! Follow the instructions in this manual about
the proper operation of your vehicle as well as about possible vehicle damage. Damage to
your vehicle that arises from culpable contra- ventions against these instructions are not
covered either by Mercedes-Benz implied
warranty or by the New or Used-Vehicle War-
ranty. QR code for rescue card
The QR code is secured in the fuel filler flap and
on the opposite side on the B-pillar. In the event of an accident, rescue services can use the QR
code to quickly find the appropriate rescue card
for your vehicle. The current rescue card con-
tains, in a compact form, the most important
information about your vehicle, e.g. the routing
of the electric cables.
You can find more information under
www.mercedes-benz.de/qr-code. Data stored in the vehicle
Many of the electronic components in your vehi- cle can store data.
These data memories temporarily or perma-
nently store technical information about:
R the vehicle's operating state
R events
R faults
In general, this technical information docu-
ments the state of a component, a module, a
system or the surroundings.
This includes, for example:
R operating conditions of system components,
e.g. fluid levels
R status messages concerning the vehicle and
its individual components, e.g. number of
wheel revolutions/speed, deceleration in
movement, lateral acceleration, accelerator
pedal position
R malfunctions and defects in important system
components, e.g. lights, brakes
R vehicle reactions and operating conditions in
special driving situations, e.g. airbag deploy- 28
Data stored in the vehicleIntroduction
Page 33 of 345
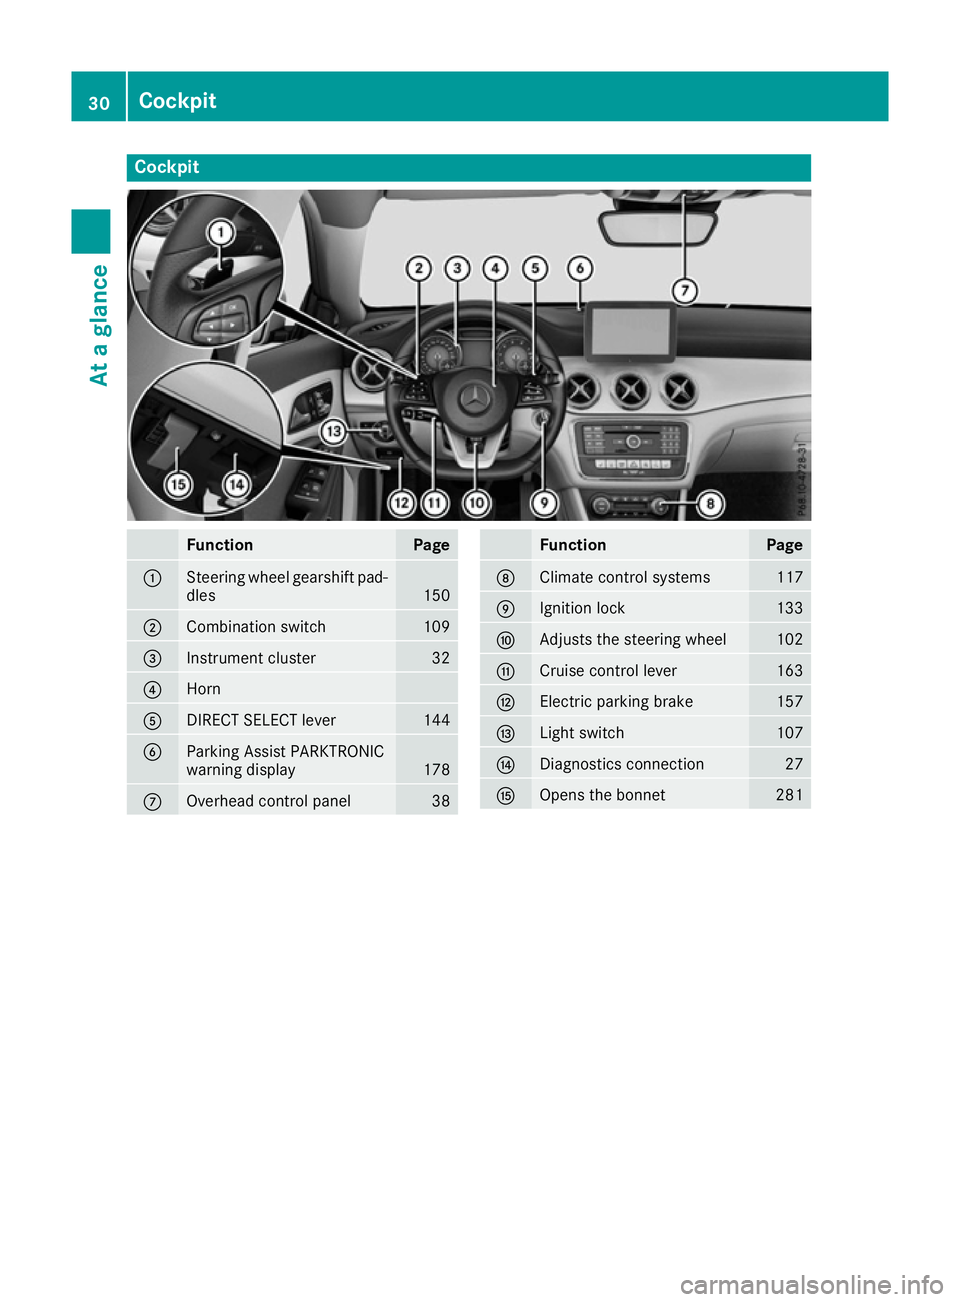
Cockpit
Function Page
:
Steering wheel gearshift pad-
dles 150
;
Combination switch 109
=
Instrument cluster 32
?
Horn
A
DIRECT SELECT lever 144
B
Parking Assist PARKTRONIC
warning display
178
C
Overhead control panel 38 Function Page
D
Climate control systems 117
E
Ignition lock 133
F
Adjusts the steering wheel 102
G
Cruise control lever 163
H
Electric parking brake 157
I
Light switch 107
J
Diagnostics connection 27
K
Opens the bonnet 28130
CockpitAt a glance
Page 34 of 345
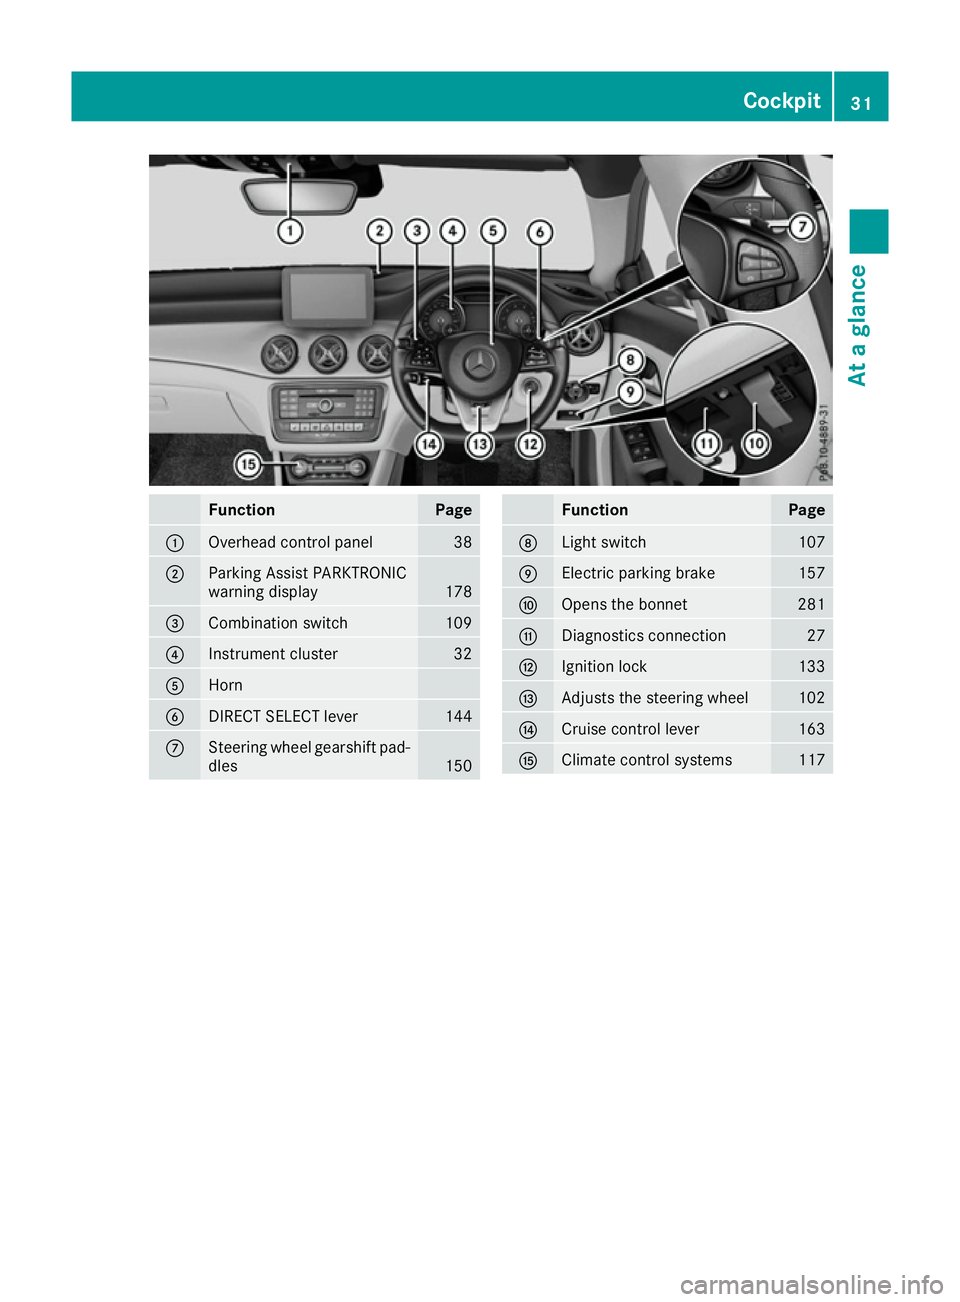
Function Page
:
Overhead control panel 38
;
Parking Assist PARKTRONIC
warning display
178
=
Combination switch 109
?
Instrument cluster 32
A
Horn
B
DIRECT SELECT lever 144
C
Steering wheel gearshift pad-
dles 150 Function Page
D
Light switch 107
E
Electric parking brake 157
F
Opens the bonnet 281
G
Diagnostics connection 27
H
Ignition lock 133
I
Adjusts the steering wheel 102
J
Cruise control lever 163
K
Climate control systems 117Cockpit
31At a glance
Page 43 of 345
Mercedes-Benz recommends that you use only
driving aids that have been approved specifi-
cally for your vehicle by Mercedes-Benz. Restraint system warning lamp
The functions of the restraint system are
checked after the ignition is switched on and at regular intervals while the engine is running.
Therefore, malfunctions can be detected in
good time.
The 6 restraint system warning lamp on the
instrument cluster lights up when the ignition is
switched on. It goes out no later than a few sec- onds after the vehicle is started. The compo-
nents of the restraint system are in operational
readiness.
A malfunction has occurred if the 6restraint
system warning lamp:
R does not light up after the ignition is switched
on
R does not go out after a few seconds with the
engine running
R lights up again while the engine is running G
WARNING
If the restraint system is malfunctioning,
restraint system components may be trig-
gered unintentionally or may not deploy as
intended during an accident. This may affect
the seat belt tensioner or airbag, for example. This poses an increased risk of injury or even
fatal injury.
Have the restraint system checked and
repaired immediately at a qualified specialist
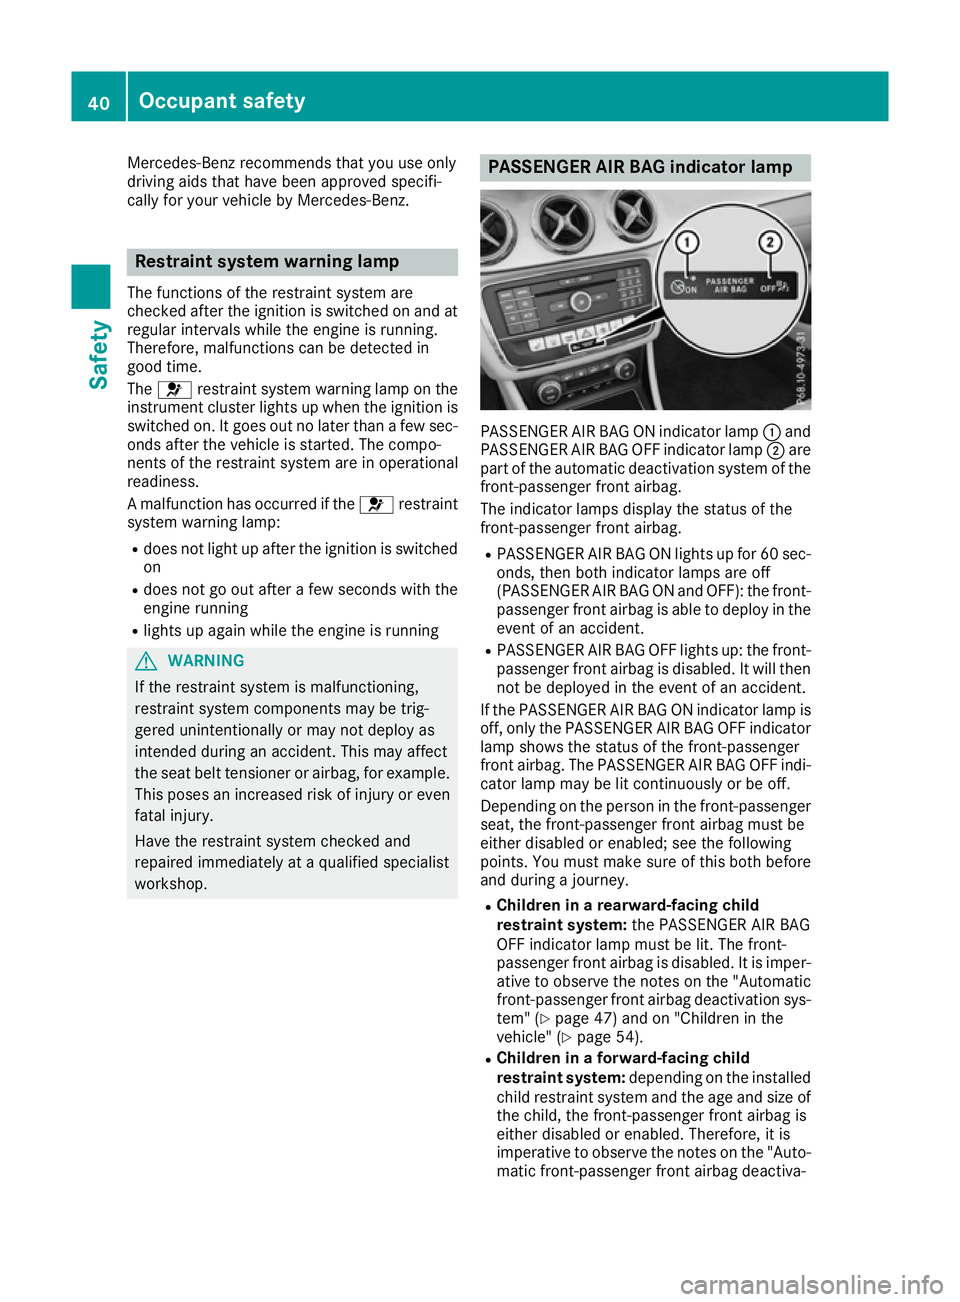
workshop. PASSENGER AIR BAG indicator lamp
PASSENGER AIR BAG ON indicator lamp
:and
PASSENGER AIR BAG OFF indicator lamp ;are
part of the automatic deactivation system of the front-passenger front airbag.
The indicator lamps display the status of the
front-passenger front airbag.
R PASSENGER AIR BAG ON lights up for 60 sec-
onds, then both indicator lamps are off
(PASSENGER AIR BAG ON and OFF): the front-
passenger front airbag is able to deploy in the event of an accident.
R PASSENGER AIR BAG OFF lights up: the front-
passenger front airbag is disabled. It will then
not be deployed in the event of an accident.
If the PASSENGER AIR BAG ON indicator lamp is off, only the PASSENGER AIR BAG OFF indicator
lamp shows the status of the front-passenger
front airbag. The PASSENGER AIR BAG OFF indi-
cator lamp may be lit continuously or be off.
Depending on the person in the front-passenger seat, the front-passenger front airbag must be
either disabled or enabled; see the following
points. You must make sure of this both before
and during a journey.
R Children in a rearward-facing child
restraint system: the PASSENGER AIR BAG
OFF indicator lamp must be lit. The front-
passenger front airbag is disabled. It is imper-
ative to observe the notes on the "Automatic front-passenger front airbag deactivation sys-
tem" (Y page 47) and on "Children in the
vehicle" (Y page 54).
R Children in a forward-facing child
restraint system: depending on the installed
child restraint system and the age and size of the child, the front-passenger front airbag is
either disabled or enabled. Therefore, it is
imperative to observe the notes on the "Auto-
matic front-passenger front airbag deactiva- 40
Occupant safetySafety
Page 44 of 345
tion system" (Y
page 47) and on "Children in
the vehicle" (Y page 54).
R All other persons: the PASSENGER AIR BAG
OFF indicator lamp must be off. The front-
passenger front airbag is enabled. Depending
on the stature of the person on the front-
passenger seat, the PASSENGER AIR BAG
OFF indicator lamp may light up. The front-
passenger front airbag is disabled. It will then
not be deployed in the event of an accident. In this case, the front-passenger seat should not
be used.
It is imperative to observe the notes on the
"Automatic front-passenger front airbag
deactivation system" (Y page 47) as well as
on "Seat belts" (Y page 41) and "Airbags"
(Y page 44). There, you can also find infor-
mation on the correct seat position. Seat belts
Introduction A correctly worn seat belt is the most effective
means of restraining the movement of vehicle
occupants in the event of a collision or if the
vehicle overturns. This reduces the risk of vehi-
cle occupants coming into contact with parts of
the vehicle interior or being ejected from it. The seat belt also helps to keep the vehicle occu-
pants in the best position in relation to the air-
bag being deployed.
The seat belt system consists of:
R seat belts
R belt tensioners for the front seat belts and the
outer seat belts in the rear
R belt force limiters for the front seat belts and
the outer seat belts in the rear
If the seat belt is pulled quickly or sharply from
the belt outlet, the inertia reel locks. The belt
strap cannot be pulled out any further.
The belt tensioner tightens the seat belt in the
event of a collision so that it fits tightly across
your body. However, it does not pull the vehicle
occupants back in the direction of the seat
backrest.
The belt tensioner does not, however, correct an
incorrect seat position or correct the routing of a seat belt that is worn incorrectly.
When triggered, seat belt force limiters help to
reduce the peak force exerted by the seat belt
on the vehicle occupant. The belt force limiters on the front seats are
synchronised with the front airbags, which take
on a part of the deceleration force. This can
reduce the forces to which the vehicle occu-
pants are subjected during an accident.
! If the co-driver's seat is not occupied, do not
engage the seat belt tongue in the buckle on
the co-driver's seat. Otherwise, the belt ten-
sioner could be triggered in the event of an
accident and would have to be replaced.
Important safety notes G
WARNING
If the seat belt is worn incorrectly, it cannot
perform its intended protective function. Fur- thermore, an incorrectly worn seat belt can
cause additional injuries, e.g. in the event of
an accident, heavy braking or sudden
changes of direction. There is an increased
risk of injury, possibly even fatal.
Always ensure that all vehicle occupants havetheir seat belts fastened correctly and are sit-
ting properly. G
WARNING
The seat belt does not offer the intended level of protection if you have not moved the back-
rest to an almost vertical position. When brak-
ing or in the event of an accident, you could
slide underneath the seat belt and sustain
abdomen or neck injuries, for example. This
poses an increased risk of injury or even fatal injury.
Adjust the seat properly before beginning
your journey. Always ensure that the backrest
is in an almost vertical position and that the
shoulder section of your seatbelt is routed
across the centre of your shoulder. G
WARNING
Persons under 1.50 mtall cannot wear the
seat belts correctly without an additional suit- able restraint system. If the seat belt is worn
incorrectly, it cannot perform its intended
protective function. Furthermore, an incor-
rectly worn seat belt can cause additional
injuries, e.g. in the event of an accident, heavy Occupant safety
41Safety
Z
Page 47 of 345
Belt warning for the driver and front
passenger The
7 seat belt warning lamp in the instru-
ment cluster reminds you that all vehicle occu-
pants must fasten their seat belts. It may light up continuously or flash. A warning tone may also
sound.
The 7 seat belt warning lamp goes out and
the warning tone stops as soon as the driver's
and the co-driver's seat belts have been fas-
tened.
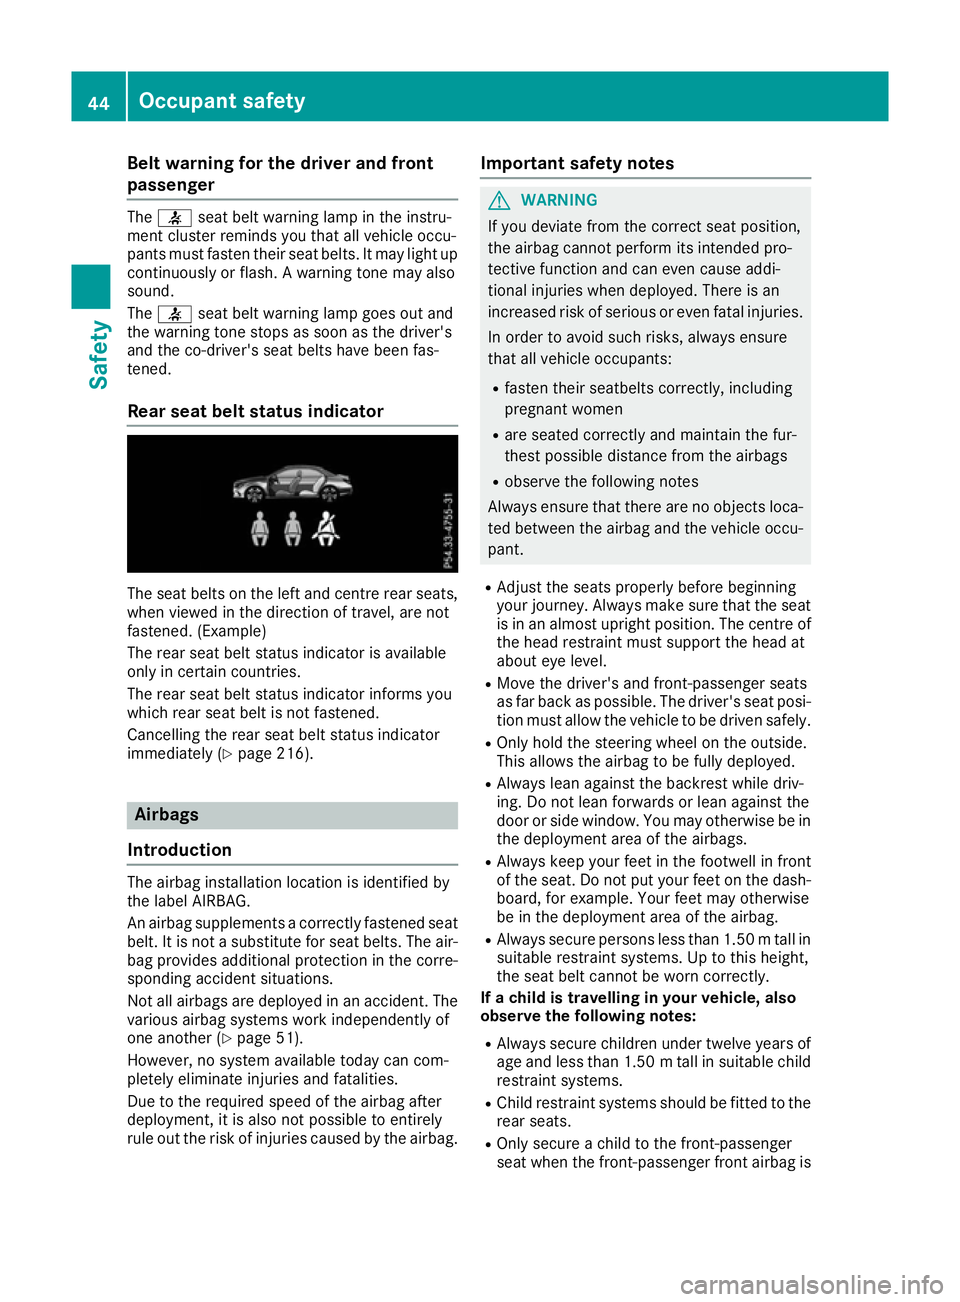
Rear seat belt status indicator The seat belts on the left and centre rear seats,
when viewed in the direction of travel, are not
fastened. (Example)
The rear seat belt status indicator is available
only in certain countries.
The rear seat belt status indicator informs you
which rear seat belt is not fastened.
Cancelling the rear seat belt status indicator
immediately (Y page 216). Airbags
Introduction The airbag installation location is identified by
the label AIRBAG.
An airbag supplements a correctly fastened seat
belt. It is not a substitute for seat belts. The air- bag provides additional protection in the corre-
sponding accident situations.
Not all airbags are deployed in an accident. The
various airbag systems work independently of
one another (Y page 51).
However, no system available today can com-
pletely eliminate injuries and fatalities.
Due to the required speed of the airbag after
deployment, it is also not possible to entirely
rule out the risk of injuries caused by the airbag. Important safety notes G
WARNING
If you deviate from the correct seat position,
the airbag cannot perform its intended pro-
tective function and can even cause addi-
tional injuries when deployed. There is an
increased risk of serious or even fatal injuries.
In order to avoid such risks, always ensure
that all vehicle occupants:
R fasten their seatbelts correctly, including
pregnant women
R are seated correctly and maintain the fur-
thest possible distance from the airbags
R observe the following notes
Always ensure that there are no objects loca-
ted between the airbag and the vehicle occu-
pant.
R Adjust the seats properly before beginning
your journey. Always make sure that the seat
is in an almost upright position. The centre of
the head restraint must support the head at
about eye level.
R Move the driver's and front-passenger seats
as far back as possible. The driver's seat posi-
tion must allow the vehicle to be driven safely.
R Only hold the steering wheel on the outside.
This allows the airbag to be fully deployed.
R Always lean against the backrest while driv-
ing. Do not lean forwards or lean against the
door or side window. You may otherwise be in
the deployment area of the airbags.
R Always keep your feet in the footwell in front
of the seat. Do not put your feet on the dash-
board, for example. Your feet may otherwise
be in the deployment area of the airbag.
R Always secure persons less than 1.50 mtall in
suitable restraint systems. Up to this height,
the seat belt cannot be worn correctly.
If a child is travelling in your vehicle, also
observe the following notes:
R Always secure children under twelve years of
age and less than 1.50 mtall in suitable child
restraint systems.
R Child restraint systems should be fitted to the
rear seats.
R Only secure a child to the front-passenger
seat when the front-passenger front airbag is 44
Occupant safetySafety