2016 MERCEDES-BENZ CLA COUPE key
[x] Cancel search: keyPage 17 of 345
Locking (doors)
Automatic ........................................ 85
Emergency locking .......................... .85
From inside (central locking but-
ton) .................................................. 84
Locking centrally
see Central locking
Locking verification signal (on-
board computer) ............................... 211
Luggage compartment enlarge-
ment ................................................... 271
Lumbar support
Adjusting the 4-way lumbar sup-
port ................................................ 101 M
M+S tyres ........................................... 312
Main-beam headlamps
Adaptive Highbeam Assist ............. 109
Display messag e............................ 229
Replacing bulb s............................. 113
Switching on/of f........................... 109
Maintenance
see ASSYST PLUS
Manual transmission
Drive program ................................ 143
DYNAMIC SELECT button .............. 141
Engaging reverse gear ................... 142
Gear lever ...................................... 142
Pulling away ................................... 135
Shift recommendation ................... 143
Shifting to neutral .......................... 142
Starting the engine ........................ 135
Matt finish (cleaning instructions) .. 287
Memory card (audio) ......................... 206
Memory function ............................... 106
Mercedes-Benz emergency call
system
Switch in the overhead control
panel .............................................. 277
Mercedes-Benz Intelligent Drive
Traffic Sign Assist .......................... 190
Mercedes-Benz Service Centre
see Qualified specialist workshop
Message memory (on-board com-
puter) .................................................. 216 Messages
see Display messages
Mirror turn signal
Cleaning ......................................... 289
Mirrors
see Exterior mirrors
see Rear-view mirror
see Vanity mirror (in sun visor)
Mobile phone
Connecting (Bluetooth ®
inter-
face) .............................................. 262
Connecting another mobile
phone ............................................ 263
Connecting the telephone module
with Bluetooth ®
(SAP profile) ......... 265
Frequencies ................................... 325
Installation ..................................... 325
Menu (on-board computer) ............ 207
Notes/placing in the bracket ......... 277
Transmission output (maximum) .... 325
Mobile telephone
Pre-installed bracket ...................... 278
Modifying the programming (key) ..... 78
MOExtended tyres ............................. 295
MP3
Operating ....................................... 206
See also Digital Owner's Manua l... 259
Multifunction display
Function/note s............................. 202
Permanent display ......................... 210
Multifunction steering wheel
Operating the on-board compute r..2 01
Overview .......................................... 33
Music files
See also Digital Owner's Manual ... 259 N
Navigation Entering a destination .................... 261
Menu (on-board computer) ............ 205
See also Digital Owner's Manual ... 259
Notes on running in a new vehicle .. 132 O
Occupant safety Airbags ............................................ 44 14
Index
Page 24 of 345
Trim pieces (cleaning instruc-
tions)
.................................................. 291
Trip computer (on-board com-
puter) .................................................. 203
Trip meter
Calling up ....................................... 203
Resetting (on-board computer) ...... 204
Turn signal lamp
Replacing bulbs (rear ).................... 113
Turn signals
Replacing bulbs (front) ................... 113
Switching on/of f........................... 109
Two-way radio
Frequencies ................................... 325
Installation ..................................... 325
Transmission output (maximum) .... 325
Type identification plate
see Vehicle identification plate
Tyre inflation compressor
see TIREFIT kit
Tyre pressure
Calling up (on-board computer) ..... 315
Display message ............................ 239
Not reached (TIREFIT) .................... 297
Reached (TIREFIT) .......................... 298
Recommended ............................... 313
Tyre pressure loss warning
General notes ................................ 314
Important safety notes .................. 315
Restarting ...................................... 315
Tyre pressure monitor
Checking the tyre pressure elec-
tronically ........................................ 316
Function/note s............................. 315
General notes ................................ 315
Important safety notes .................. 316
Radio type approval for the tyre
pressure monitor ........................... 317
Restarting ...................................... 317
Warning lamp ................................. 258
Warning message .......................... 317
Tyres
Changing a whee l.......................... 318
Checking ........................................ 310
Direction of rotation ...................... 319
Display message ............................ 239
General notes ................................ 323
Important safety notes .................. 310 Information on driving .................... 310
M+S tyres ...................................... 312
MOExtended tyre
s......................... 312
Replacing ....................................... 318
Service life ..................................... 311
Storing ........................................... 319
Summer tyres ................................ 312
Tyre size (data ).............................. 323
Tyre tread ...................................... 311
see Flat tyre U
Unlocking Emergency unlocking ....................... 85
From inside the vehicle (central
unlocking button) ............................. 84
Upshift indicator (on-board com-
puter, Mercedes-AMG vehicles) ....... 213
USB devices
Connecting to the Media Inter-
face ............................................... 267 V
Vanity mirror (in sun visor) .............. 275
Vehicle
Correct use ...................................... 28
Data acquisition ............................... 28
Display message ............................ 241
Electronics ..................................... 325
Equipment ....................................... 25
Implied warranty .............................. 28
Individual settings .......................... 210
Leaving parked up ......................... 159
Locking (in an emergency) ............... 85
Locking (key) ................................... 76
Lowering ........................................ 322
Pulling away ................................... 135
Raising ........................................... 320
Registration ..................................... 28
Securing from rolling away ............ 319
Transporting .................................. 307
Unlocking (in an emergency) ........... 85
Unlocking (key) ................................ 76
Vehicle data ................................... 333
Vehicle data
Boot load (maximum) ..................... 333
Roof load (maximum) ..................... 333 Index
21
Page 26 of 345
Introduction
The printed Owner's Manual provides informa-
tion about the safe operation of your vehicle.
The Digital Owner's Manual provides compre-
hensive and specifically adapted information on
your vehicle's equipment and multimedia sys-
tem. You can call up the Digital Owner's Manual
via the multimedia system.
i You will not incur any costs when calling up
the Digital Owner's Manual. The Digital Own-
er's Manual works without connecting to the
internet.
There are three ways to access the topics of the Digital Owner's Manual:
R Visual search
The visual search allows you to explore your
vehicle "virtually". Starting from either the
vehicle exterior view or interior view, you can
access many of the different topics covered
by the Digital Owner's Manual. To access the vehicle interior section, select the "Vehicle
interior" view.
R Keyword search
The keyword search allows you to search for a
keyword by entering characters.
R Contents
You can select individual sections in the con-
tents.
i The Digital Owner's Manual is deactivated
for safety reasons while driving. Operation
Calling up the Digital Owner's Manual
X Press the Øbutton on the centre console.
The vehicle overview appears.
X Select the "Owner's Manual" menu item by
turning 3or pressing 7the controller.
X Acknowledge 7the message about the
warning and safety notes.
The basic menu for the Digital Owner's Man-
ual appears. Operating the Digital Owner's Manual
General notes Please observe the information about the oper-
ation of the controller (Y page 260).
Content pages You can access the pages of content by means
of a visual search or a keyword search or by
using the table of contents.
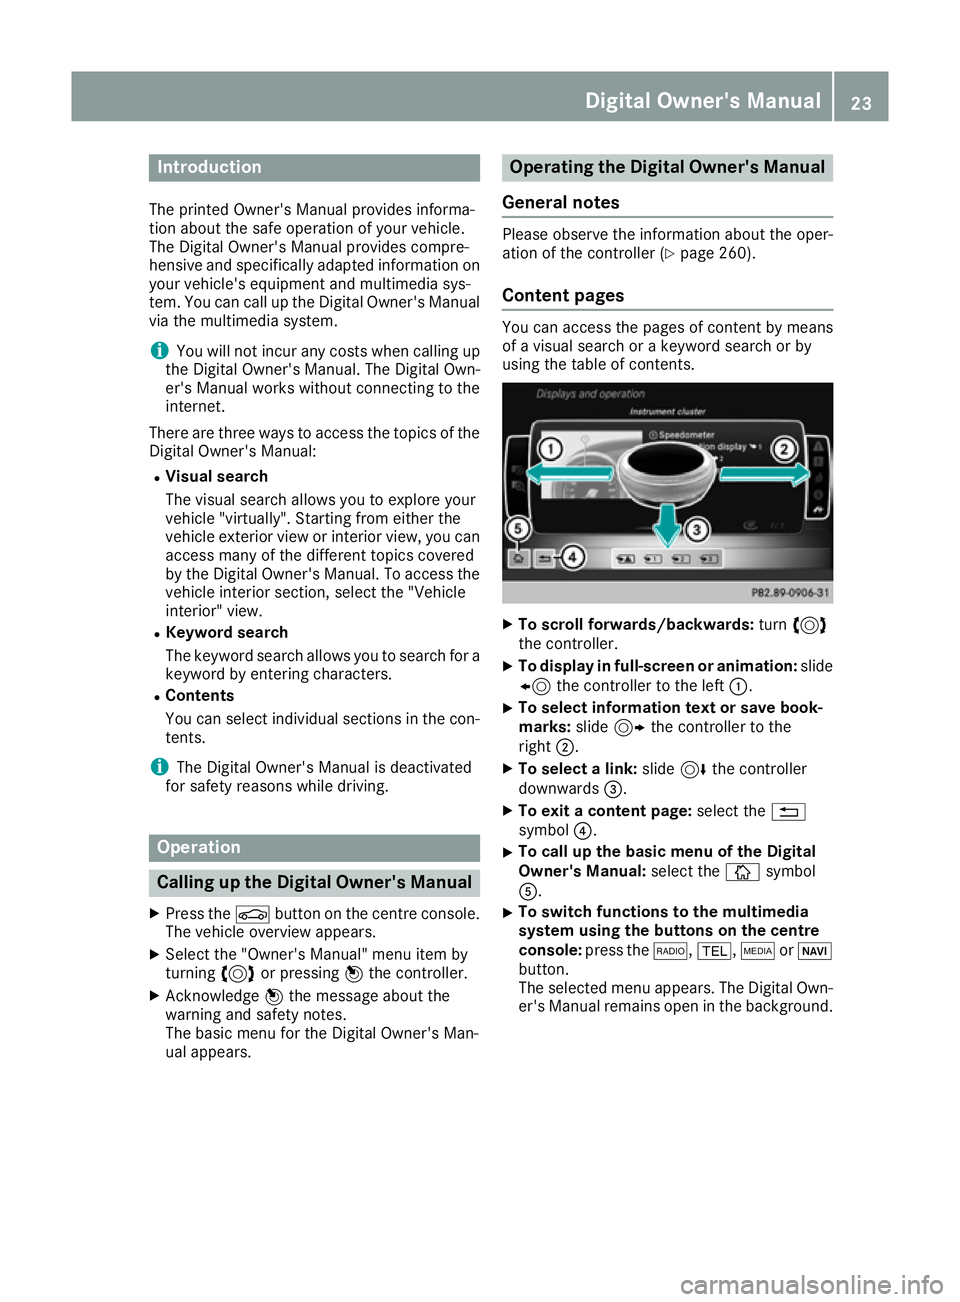
X
To scroll forwards/backwards: turn3
the controller.
X To display in full-screen or animation: slide
8 the controller to the left :.
X To select information text or save book-
marks:
slide9 the controller to the
right ;.
X To select a link: slide6the controller
downwards =.
X To exit a content page: select the%
symbol ?.
X To call up the basic menu of the Digital
Owner's Manual:
select theÞsymbol
A.
X To switch functions to the multimedia
system using the buttons on the centre
console: press the $,%,ÕorØ
button.
The selected menu appears. The Digital Own- er's Manual remains open in the background. Digital Owner's Manual
23
Page 42 of 345

Panic alarm
X
To activate: press and hold
! button :for approx. one second.
A visual and audible alarm is triggered if the
alarm system is primed.
X To deactivate: press!button :again.
or
X Insert the key into the ignition lock.
or, on vehicles with KEYLESS-GO start function
or KEYLESS ‑GO:
X Press the Start/Stop button.
The key must be in the vehicle.
The panic alarm function is only available in cer-
tain countries. Occupant safety
Introduction to the restraint system
The restraint system can reduce the risk of vehi-
cle occupants coming into contact with parts of
the vehicle's interior in the event of an accident. Furthermore, the restraint system can also
reduce the forces to which vehicle occupants
are subjected during an accident.
The restraint system includes:
R Seat belt system
R Airbags
R Child restraint system
R Child seat securing system The various components of the restraint system
work complementary to one another. They can
only perform their intended protective function
if all vehicle occupants:
R have correctly fastened their seat belt
(Y page 42)
R have correctly adjusted their seat and head
restraint (Y page 97).
As the driver, you must also ensure that the
steering wheel is correctly adjusted. Observe
the information relating to the correct driver's
seat position (Y page 97).
Additionally, you must ensure that an airbag can
deploy freely (Y page 44).
The airbag is supplementary to a correctly fas-
tened seat belt. As an additional safety device,
the airbag increases the level of protection for
vehicle occupants in the event of an accident. If
the protection provided by the seat belt is suf-
ficient, the airbags do not deploy. Furthermore, in the event of an accident, only airbags which
provide greater protection in the given accident
situation deploy. However, seat belts and air-
bags generally do not protect against objects
penetrating the vehicle from the outside.
Information on how the restraint system oper-
ates can be found in "Deployment of the seat
belt tensioner and airbags" (Y page 51).
See "Children in the vehicle" for information on
infants and children traveling with you in the
vehicle restraint systems for infants and chil-
dren(Y page 54). Important safety notes
G
WARNING
If the restraint system is modified, it may no
longer work as intended. The restraint system
may then not perform its intended protective function by failing in an accident or triggering
unexpectedly, for example. There is an
increased risk of injury, possibly even fatal.
Never modify parts of the restraint system. Do not attempt to modify the wiring as well as
electronic components or their software.
If the vehicle needs to be adapted to accommo- date a person with disabilities, please contact a
specialist workshop. Occupant safety
39Safety Z
Page 46 of 345
R
The seat belt is not routed over sharp, pointed
or fragile objects.
If such objects are located on or in your cloth- ing, e.g. pens, keys, spectacles, etc. stow
these in a suitable location.
R Only one person should use each seat belt at
any one time.
Babies and children must never travel sitting
on the lap of another vehicle occupant. In the event of an accident, they could be crushed
between the vehicle occupant and seat belt.
R Do not secure any objects with a seat belt if
the seat belt is being used by one of the vehi-
cle's occupants.
You must also make sure that objects, e.g.
cushions, are never placed between a person and the seat.
Seat belts are solely intended to secure and
restrain persons. To secure objects, luggage or
loads, always observe the "Loading guidelines"
(Y page 268).
Fastening and adjusting the seat belts Observe the safety notes on the seat belt
(Y page 41) and the information on the correct
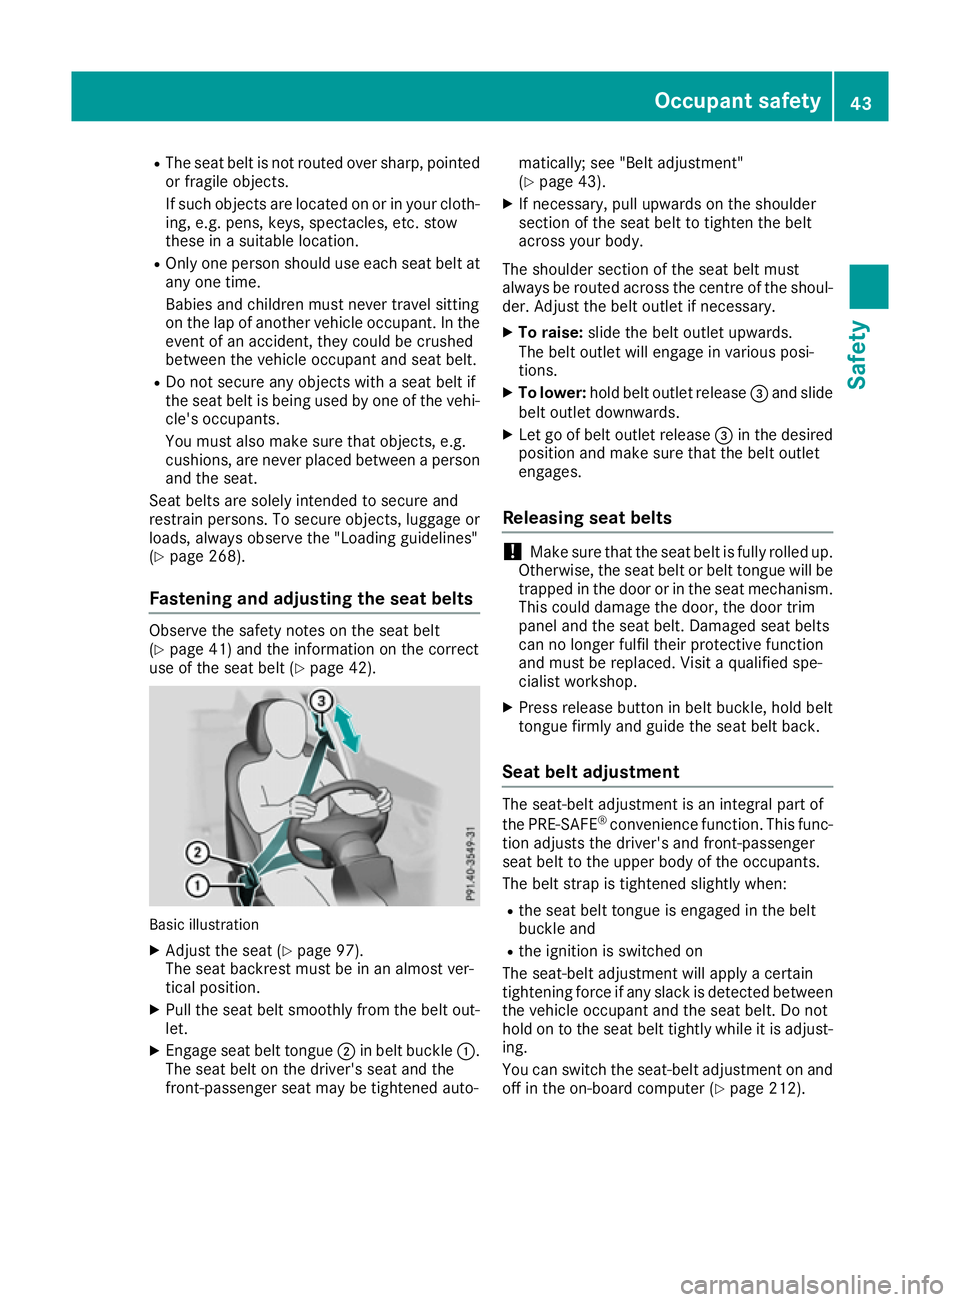
use of the seat belt (Y page 42).Basic illustration
X Adjust the seat (Y page 97).
The seat backrest must be in an almost ver-
tical position.
X Pull the seat belt smoothly from the belt out-
let.
X Engage seat belt tongue ;in belt buckle :.
The seat belt on the driver's seat and the
front-passenger seat may be tightened auto- matically; see "Belt adjustment"
(Y
page 43).
X If necessary, pull upwards on the shoulder
section of the seat belt to tighten the belt
across your body.
The shoulder section of the seat belt must
always be routed across the centre of the shoul-
der. Adjust the belt outlet if necessary.
X To raise: slide the belt outlet upwards.
The belt outlet will engage in various posi-
tions.
X To lower: hold belt outlet release =and slide
belt outlet downwards.
X Let go of belt outlet release =in the desired
position and make sure that the belt outlet
engages.
Releasing seat belts !
Make sure that the seat belt is fully rolled up.
Otherwise, the seat belt or belt tongue will be
trapped in the door or in the seat mechanism. This could damage the door, the door trim
panel and the seat belt. Damaged seat belts
can no longer fulfil their protective function
and must be replaced. Visit a qualified spe-
cialist workshop.
X Press release button in belt buckle, hold belt
tongue firmly and guide the seat belt back.
Seat belt adjustment The seat-belt adjustment is an integral part of
the PRE-SAFE
®
convenience function. This func-
tion adjusts the driver's and front-passenger
seat belt to the upper body of the occupants.
The belt strap is tightened slightly when:
R the seat belt tongue is engaged in the belt
buckle and
R the ignition is switched on
The seat-belt adjustment will apply a certain
tightening force if any slack is detected between
the vehicle occupant and the seat belt. Do not
hold on to the seat belt tightly while it is adjust-
ing.
You can switch the seat-belt adjustment on and
off in the on-board computer (Y page 212). Occupant safety
43Safety Z
Page 50 of 345

belt, a windowbag may be deployed in other
accident situations (Y page 51).Automatic front-passenger front air-
bag deactivation
Introduction In order to recognise a child restraint system on
the front-passenger seat, the automatic front-
passenger front airbag deactivation system cat- egorises the person in the front-passenger seat.Depending on that result, the front-passenger
front airbag is either enabled or disabled. If a
rearward-facing child restraint system is fitted
to the front-passenger seat, the PASSENGER
AIR BAG OFF indicator lamp must light up after
the system self-test and remain lit. The front-
passenger front airbag is disabled.
The system does not disable:
R the sidebag
R the windowbag
R the seat belt tensioner
Make sure that your vehicle is equipped with the automatic front-passenger front airbag deacti-
vation system (Y page 57). If this is not the
case, always install a child restraint system on a
suitable rear seat (Y page 59).
If it is absolutely necessary to install a child
restraint system on the front-passenger seat, be sure to observe the correct positioning of the
child restraint system. Never place objects
under or behind the child restraint system, e.g. a
cushion. Fully retract the seat cushion length.
The entire base of the child restraint system
must always rest on the seat cushion of the
front-passenger seat. The backrest of a forward-
facing child restraint system must, as far as
possible, rest flat against the backrest of the
front-passenger seat. The child restraint system must not touch the roof or be put under strain bythe head restraint. Adjust the angle of the seat
backrest and the head restraint position accord-
ingly. Only then is the correct function of the
automatic front-passenger front airbag deacti-
vation system guaranteed. Always observe the
information on suitable positioning of the child
restraint system (Y page 59) in addition to the
child restraint system manufacturer's installa-
tion instructions. Operation of automatic front-passenger
front airbag deactivation :
PASSENGER AIR BAG ON indicator lamp
; PASSENGER AIR BAG OFF indicator lamp
The indicator lamps inform you whether the
front-passenger front airbag is disabled or ena-
bled.
X Press the Start/Stop button once or twice, or
turn the key to position 1or 2in the ignition
lock.
The system carries out a self-diagnosis.
The PASSENGER AIR BAG OFF and PASSENGER
AIR BAG ON indicator lamps must light up simul- taneously for approximately six seconds.
The indicator lamps display the status of the
front-passenger front airbag:
R PASSENGER AIR BAG ON lights up for 60 sec-
onds, then both indicator lamps are off
(PASSENGER AIR BAG ON and OFF): the front-
passenger front airbag is able to deploy in the
event of an accident.
R PASSENGER AIR BAG OFF lights up: the front-
passenger front airbag is disabled. It will then
not be deployed in the event of an accident.
If the PASSENGER AIR BAG ON indicator lamp is
off, only the PASSENGER AIR BAG OFF indicator lamp shows the status of the front-passenger
front airbag. The PASSENGER AIR BAG OFF indi-
cator lamp may be lit continuously or be off.
If the status of the front-passenger front airbag
changes while the vehicle is in motion, an airbag display message appears on the instrument
cluster (Y page 226). When the front-passenger
seat is occupied, always pay attention to the
PASSENGER AIR BAG OFF indicator lamp. Be
aware of the status of the front-passenger front
airbag both before and during the journey. Occupant safety
47Safety Z
Page 57 of 345
Children in the vehicle
Important safety notes
Accident statistics show that children secured
in the rear seats are safer than children secured in the front seats. For this reason, Mercedes-
Benz strongly advises that you fit a child
restraint system on a rear seat. Children are
generally better protected there.
If a child younger than twelve years old and
under 1.50 min height is travelling in the vehi-
cle:
R always secure the child in a child restraint
system suitable for Mercedes-Benz vehicles.
The child restraint system must be appropri-
ate to the age, weight and size of the child.
R be sure to observe the instructions and safety
notes in this section in addition to the child
restraint system manufacturer's installation
instructions
R be sure to observe the instructions and safety
notes on the automatic front-passenger front airbag deactivation system (Y page 47).G
WARNING
If you leave children unattended in the vehi-
cle, they may be able to set the vehicle in
motion if, for example, they:
R release the parking brake
R shift the automatic transmission out of park
position Por shift manual transmission into
neutral
R start the engine
In addition, they may operate vehicle equip-
ment and become trapped. There is a risk of
an accident and injury.
When leaving the vehicle, always take the key with you and lock the vehicle. Never leave
children unattended in the vehicle. G
WARNING
If persons (particularly children) are exposed
to heat or cold for a prolonged period, there is a risk of serious or even fatal injuries. Never
leave persons (particularly children) unatten-
ded in the vehicle. G
WARNING
If the child restraint system is placed in direct sunlight, the parts could become very hot.
Children could be suffer burns by touching
these parts, in particular on the metallic parts
of the child restraint system. There is a risk of injury.
If you and your child leave the vehicle, always
make sure that the child restraint system is
not in direct sunlight. Cover it with a blanket, for example. If the child restraint system has
been exposed to direct sunlight, leave it to
cool down before securing the child in it.
Never leave children unattended in the vehi-
cle.
Always ensure that all vehicle occupants have
their seat belts fastened correctly and are sitting
properly. Particular attention must be paid to
children.
Observe the safety notes on the seat belt
(Y page 41) and the notes on how to use the seat
belt properly (Y page 42). Child restraint system
If you fit a rearward-facing child restraint system
on the centre rear seat, the rear seat armrest
must be folded back as far as it will go.
Be sure to observe the correct use of the child
restraint system (Y page 59).
For safety reasons, Mercedes-Benz recom-
mends that you only use a child restraint system recommended by Mercedes-Benz
(Y page 63). G
WARNING
If the child restraint system is incorrectly fit-
ted on the seat position suitable for this pur-
pose, it cannot perform its intended protec-
tive function. In the event of an accident,
sharp braking or a sudden change in direction, the child may not be held securely. There is an
increased risk of serious or even fatal injuries.
Observe the manufacturer's installation
instructions and the correct use for the child
restraint system. Make sure that the entire
surface of the child restraint system is resting 54
Children in the vehicleSafety
Page 61 of 345
Vehicles with the automatic front-passenger
front airbag deactivation system: if it is abso-
lutely necessary to fit a child restraint system to the front-passenger seat, always observe the
information on the "Automatic front-passenger
front airbag deactivation system" (Y page 47).
You can thus avoid the risks that could arise as
a result of:
R a child restraint system that is not detected
by the automatic front-passenger front airbag
deactivation system
R unintentional disabling of the front-passenger
front airbag
R unsuitable positioning of the child restraint
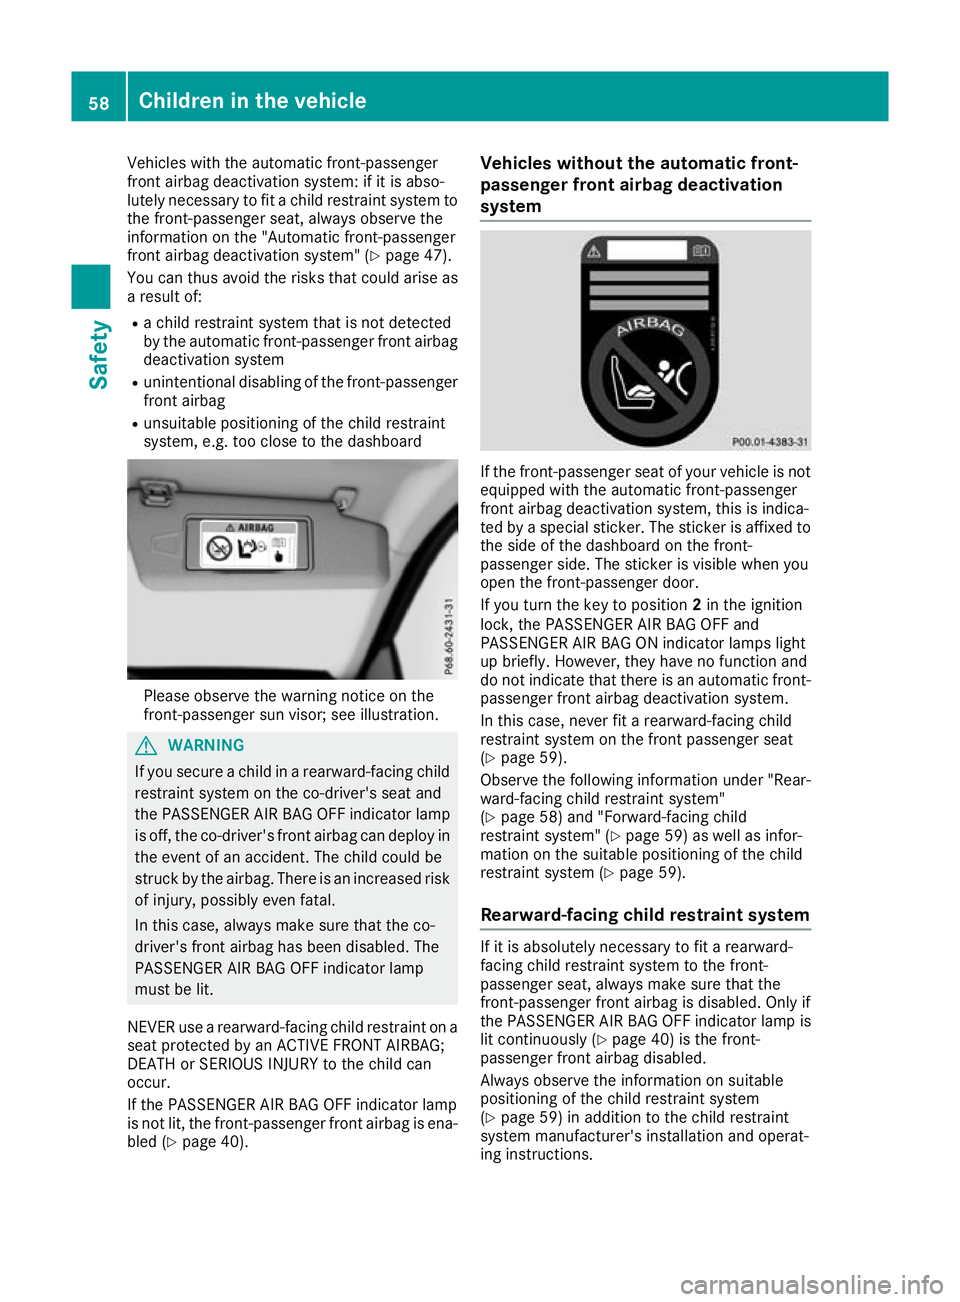
system, e.g. too close to the dashboard Please observe the warning notice on the
front-passenger sun visor; see illustration. G
WARNING
If you secure a child in a rearward-facing child
restraint system on the co-driver's seat and
the PASSENGER AIR BAG OFF indicator lamp
is off, the co-driver's front airbag can deploy in the event of an accident. The child could be
struck by the airbag. There is an increased risk
of injury, possibly even fatal.
In this case, always make sure that the co-
driver's front airbag has been disabled. The
PASSENGER AIR BAG OFF indicator lamp
must be lit.
NEVER use a rearward-facing child restraint on a
seat protected by an ACTIVE FRONT AIRBAG;
DEATH or SERIOUS INJURY to the child can
occur.
If the PASSENGER AIR BAG OFF indicator lamp
is not lit, the front-passenger front airbag is ena- bled (Y page 40). Vehicles without the automatic front-
passenger front airbag deactivation
system If the front-passenger seat of your vehicle is not
equipped with the automatic front-passenger
front airbag deactivation system, this is indica-
ted by a special sticker. The sticker is affixed to
the side of the dashboard on the front-
passenger side. The sticker is visible when you
open the front-passenger door.
If you turn the key to position 2in the ignition
lock, the PASSENGER AIR BAG OFF and
PASSENGER AIR BAG ON indicator lamps light
up briefly. However, they have no function and
do not indicate that there is an automatic front- passenger front airbag deactivation system.
In this case, never fit a rearward-facing child
restraint system on the front passenger seat
(Y page 59).
Observe the following information under "Rear-
ward-facing child restraint system"
(Y page 58) and "Forward-facing child
restraint system" (Y page 59) as well as infor-
mation on the suitable positioning of the child
restraint system (Y page 59).
Rearward-facing child restraint system If it is absolutely necessary to fit a rearward-
facing child restraint system to the front-
passenger seat, always make sure that the
front-passenger front airbag is disabled. Only if
the PASSENGER AIR BAG OFF indicator lamp is lit continuously (Y page 40) is the front-
passenger front airbag disabled.
Always observe the information on suitable
positioning of the child restraint system
(Y page 59) in addition to the child restraint
system manufacturer's installation and operat-
ing instructions. 58
Children in the vehicleSafety