2016 MERCEDES-BENZ CLA COUPE height
[x] Cancel search: heightPage 191 of 345

:
Red guide line at a distance of approximately
0.30 m from the rear of the vehicle
; White guide line without turning the steering
wheel
= End of parking space
X Reverse carefully until you have reached the
end position.
Red guide line :is then at the end of parking
space =. The vehicle is almost parallel in the
parking space.
"Coupling up a trailer" function :
Vehicle centre point on the yellow guide line
at a distance of approximately 1.0 m from
the rear of the vehicle
; Trailer drawbar
This function is available only on vehicles with a
trailer tow hitch.
X Before coupling up a trailer, set the height of
trailer drawbar ;so that it is slightly higher
than the ball coupling.
X Position the vehicle centrally in front of trailer
drawbar ;. :
Red guide line at a distance of approximately
0.30 m from the ball coupling
; Trailer drawbar locating aid
= Trailer drawbar
? Symbol for the "Coupling up a trailer" func-
tion
A Ball coupling
X Select symbol ?using the controller.
The "Coupling up a trailer" function is selec-
ted. The distance specifications now only
apply to objects that are at the same level as the ball coupling.
X Reverse carefully, making sure that trailer
drawbar locating aid ;points approximately
in the direction of trailer drawbar =.
X Reverse carefully until trailer drawbar =rea-
ches the red guide line.
The distance between the trailer drawbar and
the red guide line is now approximately
0.30 m.
X Couple up the trailer (Y page 196).
Wide-angle function :
Symbol for the wide-angle view function
; Own vehicle
= Parking Assist PARKTRONIC warning dis-
plays 188
Driving systemsDriving and pa
rking
Page 199 of 345

not exceed the maximum permissible speed for
your vehicle/trailer combination. Notes on towing a trailer
General notes Trailer towing is not possible on the following
models:
R CLA 180 d BlueEFFICIENCY Edition
R CLA 250 Sport
R CLA 250 Sport 4MATIC
R Mercedes‑AMG CLA 45 4MATIC
When towing a trailer, set the tyre pressure on
the rear axle of the towing vehicle for the max-
imum load. Further information on the tyre pres-
sure table in the fuel filler flap (Y page 313).
Please note that when towing a trailer, the fol-
lowing driving systems have limited availability
or are not available at all.
R Parking Assist PARKTRONIC (Y page 177)
R Blind Spot Assist (Y page 192)
The height of the ball coupling changes with the
load of the vehicle. If necessary, use a trailer
with a height-adjustable drawbar.
You will find fitting dimensions and loads under "Technical data" (Y page 334).
Driving tips Observe the notes on ESP
®
trailer stabilisation
(Y page 72).
The maximum permissible speed for vehicle/
trailer combinations depends on the type of
trailer. Before beginning the journey, check the
trailer's documents to see what the maximum
permitted speed is. Observe the legally prescri-
bed maximum speed in the relevant country.
For certain Mercedes-Benz vehicles, the maxi-
mum permissible rear axle load is increased
when towing a trailer. See the "Technical data"
section to find out whether this applies to your
vehicle. If you utilise any of the added maximum rear axle load when towing a trailer, the vehicle/
trailer combination may not exceed a maximum speed of 100 km/h for reasons concerning the
operating permit. This also applies in countries
in which the permissible maximum speed for
vehicle/trailer combinations is above
100 km/h. When towing a trailer, your vehicle's handling
characteristics will be different to when driving
without a trailer and the vehicle will consume
more fuel.
Shift into a lower gear in good time on long and steep downhill gradients. For vehicles with auto-
matic transmission, you need to have selected
manual drive program M(Y page 150).
This also applies if you have activated cruise
control, SPEEDTRONIC or Distance Pilot
DISTRONIC.
This will use the braking effect of the engine, so
less braking will be required to maintain the
vehicle speed. This relieves the load on the
brake system and prevents the brakes from
overheating and wearing too quickly. If you need additional braking, depress the brake pedal
repeatedly rather than continuously.
Briefly depressing the accelerator pedal on
downhill gradients while the manual drive pro-
gram Mis temporarily activated (vehicles with
automatic transmission): the automatic trans-
mission may switch back to the last active auto-
matic drive program Eor S. The automatic trans-
mission may shift to a higher gear. This can
reduce the engine's braking effect.
Driving tips R
Maintain a greater distance to the vehicle in
front than when driving without a trailer.
R Avoid braking abruptly. If possible, brake gen-
tly at first to allow the trailer to run on. Then,
increase the braking force rapidly.
R The values given for gradient-climbing capa-
bilities from a standstill refer to sea level.
When driving in mountainous areas, note that
the power output of the engine, and conse-
quently the vehicle's gradient-climbing capa-
bility from a standstill, decrease with increas-
ing altitude.
If the trailer swings from side to side:
X Do not accelerate under any circumstances
X Do not countersteer
X Brake, if necessary 196
Towing a trailerDriving an
d parking
Page 285 of 345

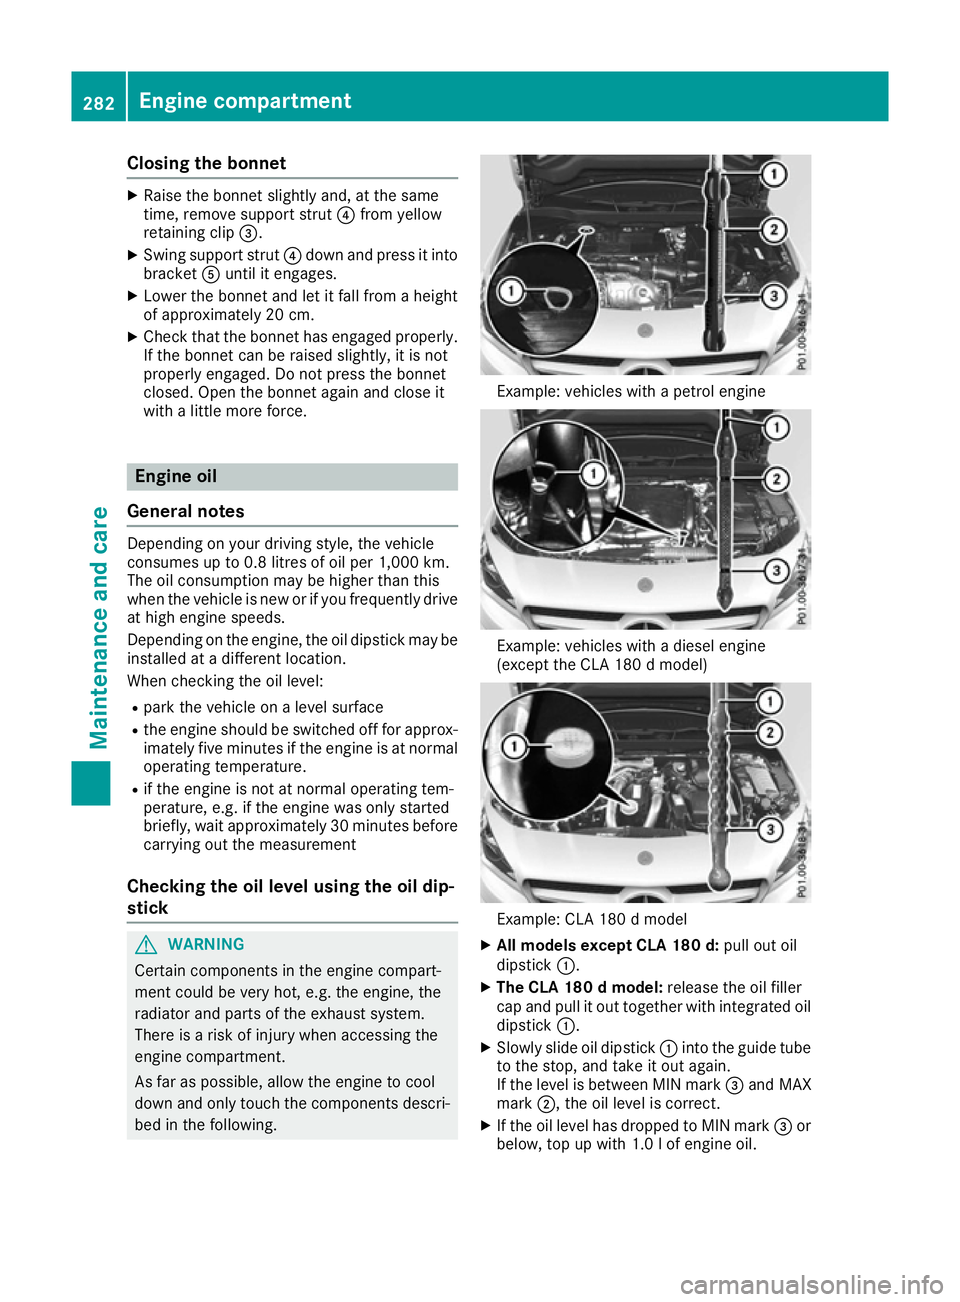
Closing the bonnet
X
Raise the bonnet slightly and, at the same
time, remove support strut ?from yellow
retaining clip =.
X Swing support strut ?down and press it into
bracket Auntil it engages.
X Lower the bonnet and let it fall from a height
of approximately 20 cm.
X Check that the bonnet has engaged properly.
If the bonnet can be raised slightly, it is not
properly engaged. Do not press the bonnet
closed. Open the bonnet again and close it
with a little more force. Engine oil
General notes Depending on your driving style, the vehicle
consumes up to 0.8 litres of oil per 1,000 km.
The oil consumption may be higher than this
when the vehicle is new or if you frequently drive
at high engine speeds.
Depending on the engine, the oil dipstick may be installed at a different location.
When checking the oil level:
R park the vehicle on a level surface
R the engine should be switched off for approx-
imately five minutes if the engine is at normal
operating temperature.
R if the engine is not at normal operating tem-
perature, e.g. if the engine was only started
briefly, wait approximately 30 minute sbefore
carrying out the measurement
Checking the oil level using the oil dip-
stick G
WARNING
Certain components in the engine compart-
ment could be very hot, e.g. the engine, the
radiator and parts of the exhaust system.
There is a risk of injury when accessing the
engine compartment.
As far as possible, allow the engine to cool
down and only touch the components descri- bed in the following. Example: vehicles with a petrol engine
Example: vehicles with a diesel engine
(except the CLA 180 d model)
Example: CLA 180 d model
X All models except CLA 180 d: pull out oil
dipstick :.
X The CLA 180 d model: release the oil filler
cap and pull it out together with integrated oil dipstick :.
X Slowly slide oil dipstick :into the guide tube
to the stop, and take it out again.
If the level is between MIN mark =and MAX
mark ;, the oil level is correct.
X If the oil level has dropped to MIN mark =or
below, top up with 1.0 lof engine oil. 282
Engine compartmentMaintenance and care
Page 323 of 345

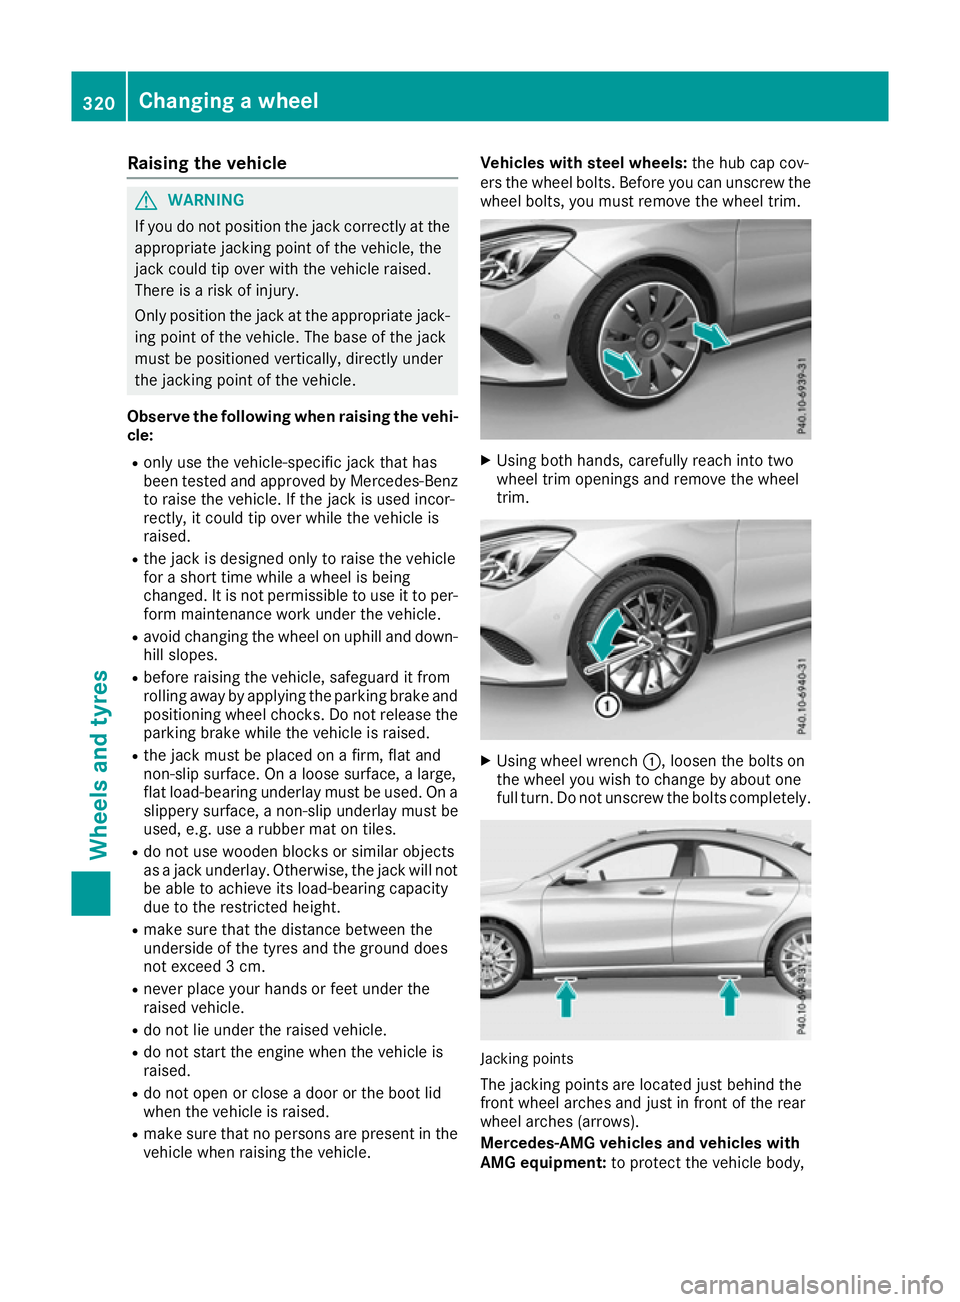
Raising the vehicle
G
WARNING
If you do not position the jack correctly at the appropriate jacking point of the vehicle, the
jack could tip over with the vehicle raised.
There is a risk of injury.
Only position the jack at the appropriate jack-
ing point of the vehicle. The base of the jack
must be positioned vertically, directly under
the jacking point of the vehicle.
Observe the following when raising the vehi- cle:
R only use the vehicle-specific jack that has
been tested and approved by Mercedes-Benz
to raise the vehicle. If the jack is used incor-
rectly, it could tip over while the vehicle is
raised.
R the jack is designed only to raise the vehicle
for a short time while a wheel is being
changed. It is not permissible to use it to per- form maintenance work under the vehicle.
R avoid changing the wheel on uphill and down-
hill slopes.
R before raising the vehicle, safeguard it from
rolling away by applying the parking brake and
positioning wheel chocks. Do not release theparking brake while the vehicle is raised.
R the jack must be placed on a firm, flat and
non-slip surface. On a loose surface, a large,
flat load-bearing underlay must be used. On a
slippery surface, a non-slip underlay must be
used, e.g. use a rubber mat on tiles.
R do not use wooden blocks or similar objects
as a jack underlay. Otherwise, the jack will not
be able to achieve its load-bearing capacity
due to the restricted height.
R make sure that the distance between the
underside of the tyres and the ground does
not exceed 3 cm.
R never place your hands or feet under the
raised vehicle.
R do not lie under the raised vehicle.
R do not start the engine when the vehicle is
raised.
R do not open or close a door or the boot lid
when the vehicle is raised.
R make sure that no persons are present in the
vehicle when raising the vehicle. Vehicles with steel wheels:
the hub cap cov-
ers the wheel bolts. Before you can unscrew the wheel bolts, you must remove the wheel trim. X
Using both hands, carefully reach into two
wheel trim openings and remove the wheel
trim. X
Using wheel wrench :, loosen the bolts on
the wheel you wish to change by about one
full turn. Do not unscrew the bolts completely. Jacking points
The jacking points are located just behind the
front wheel arches and just in front of the rear
wheel arches (arrows).
Mercedes-AMG vehicles and vehicles with
AMG equipment: to protect the vehicle body,320
Changing a wheelWheels and tyres
Page 336 of 345

For the correct mixing ratio, refer to the infor-
mation on the antifreeze reservoir.
i Add washer fluid concentrate, e.g. MB Sum-
merFit or MB WinterFit, to the washer fluid all
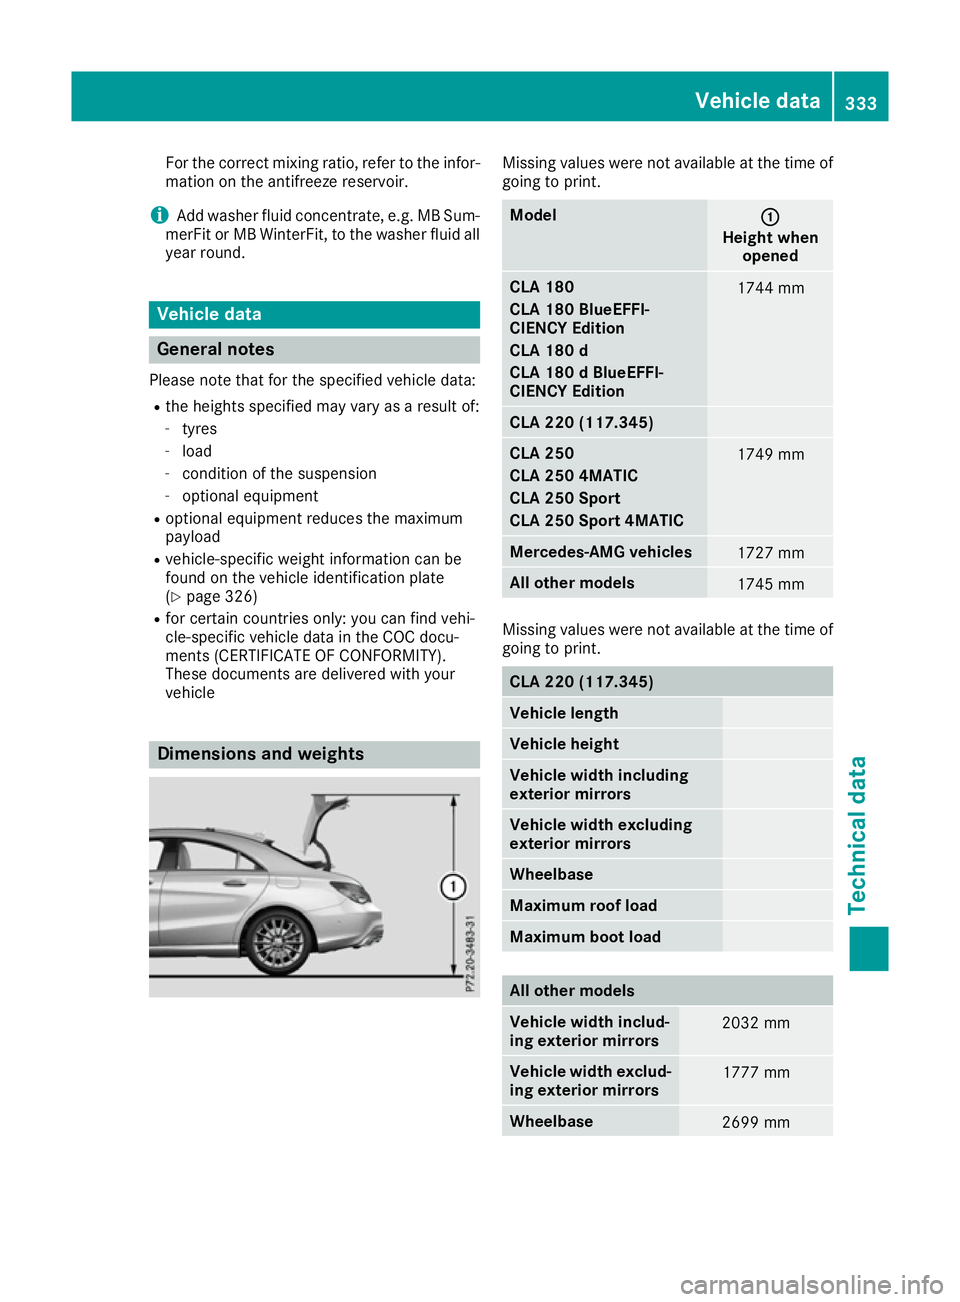
year round. Vehicle data
General notes
Please note that for the specified vehicle data:
R the heights specified may vary as a result of:
- tyres
- load
- condition of the suspension
- optional equipment
R optional equipment reduces the maximum
payload
R vehicle-specific weight information can be
found on the vehicle identification plate
(Y page 326)
R for certain countries only: you can find vehi-
cle-specific vehicle data in the COC docu-
ments (CERTIFICATE OF CONFORMITY).
These documents are delivered with your
vehicle Dimensions and weights Missing values were not available at the time of
going to print. Model
: :
Height when opened CLA 180
CLA 180 BlueEFFI-
CIENCY Edition
CLA 180 d
CLA 180 d BlueEFFI-
CIENCY Edition
1744 mm
CLA 220 (117.345)
CLA 250
CLA 250 4MATIC
CLA 250 Sport
CLA 250 Sport 4MATIC
1749 mm
Mercedes-AMG vehicles
1727 mm
All other models
1745 mm
Missing values were not available at the time of
going to print. CLA 220 (117.345)
Vehicle length
Vehicle height
Vehicle width including
exterior mirrors
Vehicle width excluding
exterior mirrors
Wheelbase
Maximum roof load
Maximum boot load
All other models
Vehicle width includ-
ing exterior mirrors
2032 mm
Vehicle width exclud-
ing exterior mirrors 1777 mm
Wheelbase
2699 mmVehicle data
333Technical data Z
Page 337 of 345

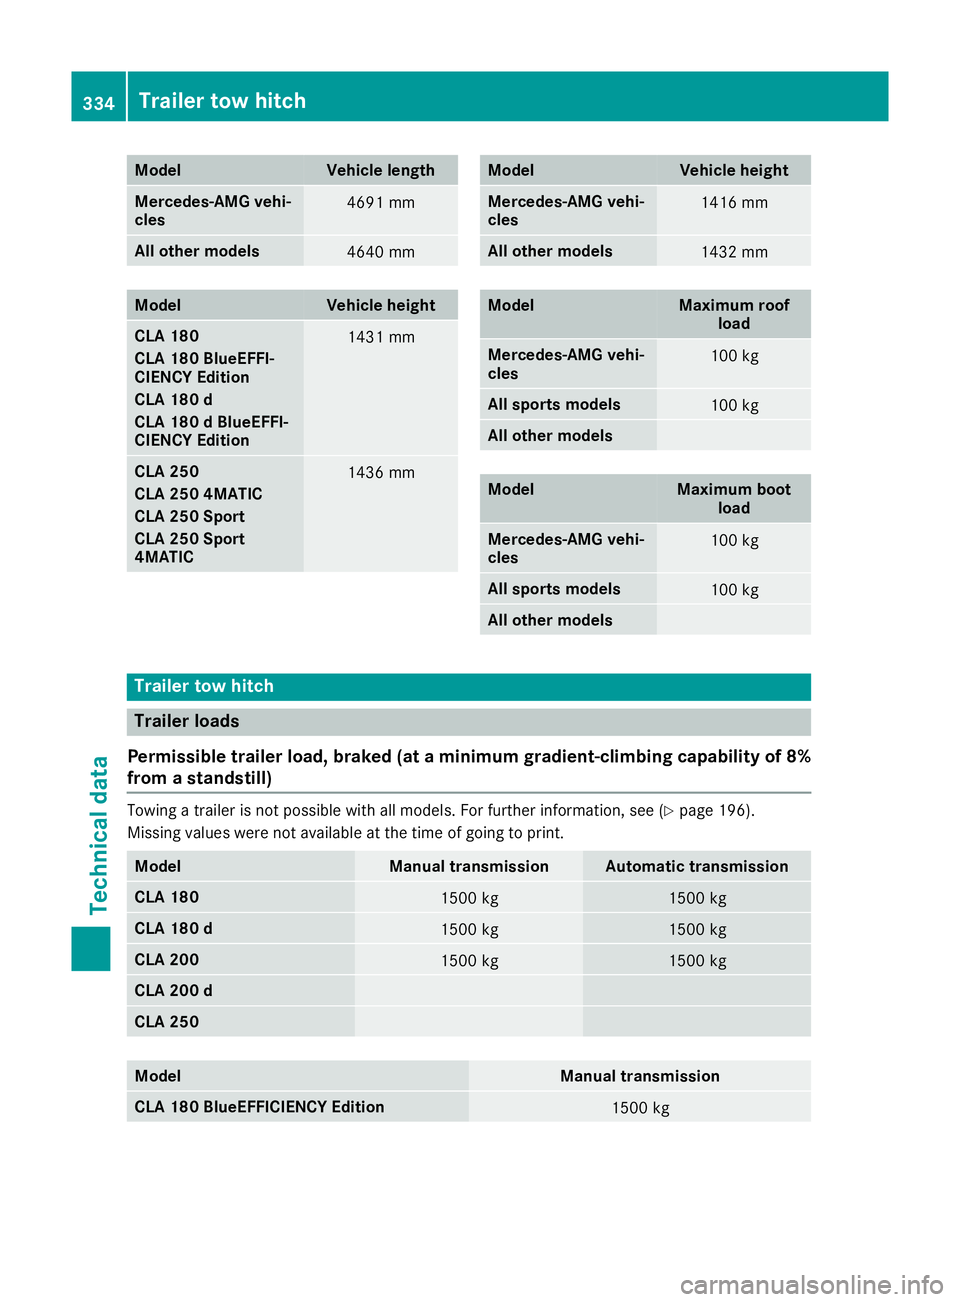
Model Vehicle length
Mercedes-AMG vehi-
cles
4691 mm
All other models
4640 mm
Model Vehicle height
CLA 180
CLA 180 BlueEFFI-
CIENCY Edition
CLA 180 d
CLA 180 d BlueEFFI-
CIENCY Edition
1431 mm
CLA 250
CLA 250 4MATIC
CLA 250 Sport
CLA 250 Sport
4MATIC
1436 mm Model Vehicle height
Mercedes-AMG vehi-
cles
1416 mm
All other models
1432 mm
Model Maximum roof
load Mercedes-AMG vehi-
cles
100 kg
All sports models
100 kg
All other models
Model Maximum boot
load Mercedes-AMG vehi-
cles
100 kg
All sports models
100 kg
All other models
Trailer tow hitch
Trailer loads
Permissible trailer load, braked (at a minimum gradient-climbing capability of 8%
from a standstill) Towing a trailer is not possible with all models. For further information, see (Y
page 196).
Missing values were not available at the time of going to print. Model Manual transmission Automatic transmission
CLA 180
1500 kg 1500 kg
CLA 180 d
1500 kg 1500 kg
CLA 200
1500 kg 1500 kg
CLA 200 d
CLA 250
Model Manual transmission
CLA 180 BlueEFFICIENCY Edition
1500 kg334
Trailer tow hitchTechnical data