2016 MERCEDES-BENZ CLA COUPE brake sensor
[x] Cancel search: brake sensorPage 86 of 345
Doors
Important safety notes
G
WARNING
If children are left unsupervised in the vehicle, they could:
R open doors, thereby endangering other per-
sons or road users
R get out and be struck by oncoming traffic
R operate vehicle equipment and become
trapped, for example
In addition, the children could also set the
vehicle in motion, for example, if they:
R release the parking brake
R shift the automatic transmission out of park
position P or shift manual transmission into
neutral
R start the engine
There is a risk of an accident and injury.
When leaving the vehicle, always take the key with you and lock the vehicle. Never leave
children and animals unattended in the vehi-
cle. Keep the keys out of the reach of children.
Stow luggage or loads preferably in the luggage compartment. Observe the loading guidelines
(Y page 268).
United Kingdom only: G
WARNING
When the double locks are activated, the
doors can no longer be opened from the
inside. People in the vehicle can no longer get out, e.g. in hazardous situations. There is a
risk of injury.
Therefore, do not leave any people unsuper-
vised in the vehicle, particularly children, eld-
erly people or people in need of special assis-
tance. Do not activate the double lock when
people are in the vehicle.
If the vehicle has been locked with the key, the
double lock function is activated as standard. It
is then not possible to open the doors from
inside the vehicle. You can deactivate the dou-
ble lock function by deactivating the interior
motion sensor (Y page 75). The doors can then be opened from the inside after the vehicle has
been locked from the outside. You can open the
rear doors from inside the vehicle if they are not secured by the child-proof locks (Y page 65).
The anti-theft alarm system is triggered if the
door is opened from the inside. Switch off the
alarm (Y page 73). Unlocking and opening the doors
from the inside
! The side windows will not open/close if the
battery is discharged or if the side windows
have iced up. It will then not be possible to
close the door. Do not attempt to force the
door to close. You could otherwise damage
the door or the side window.
When a door is opened, the side window on that side opens slightly. When the door is closed, the
side window is raised again. X
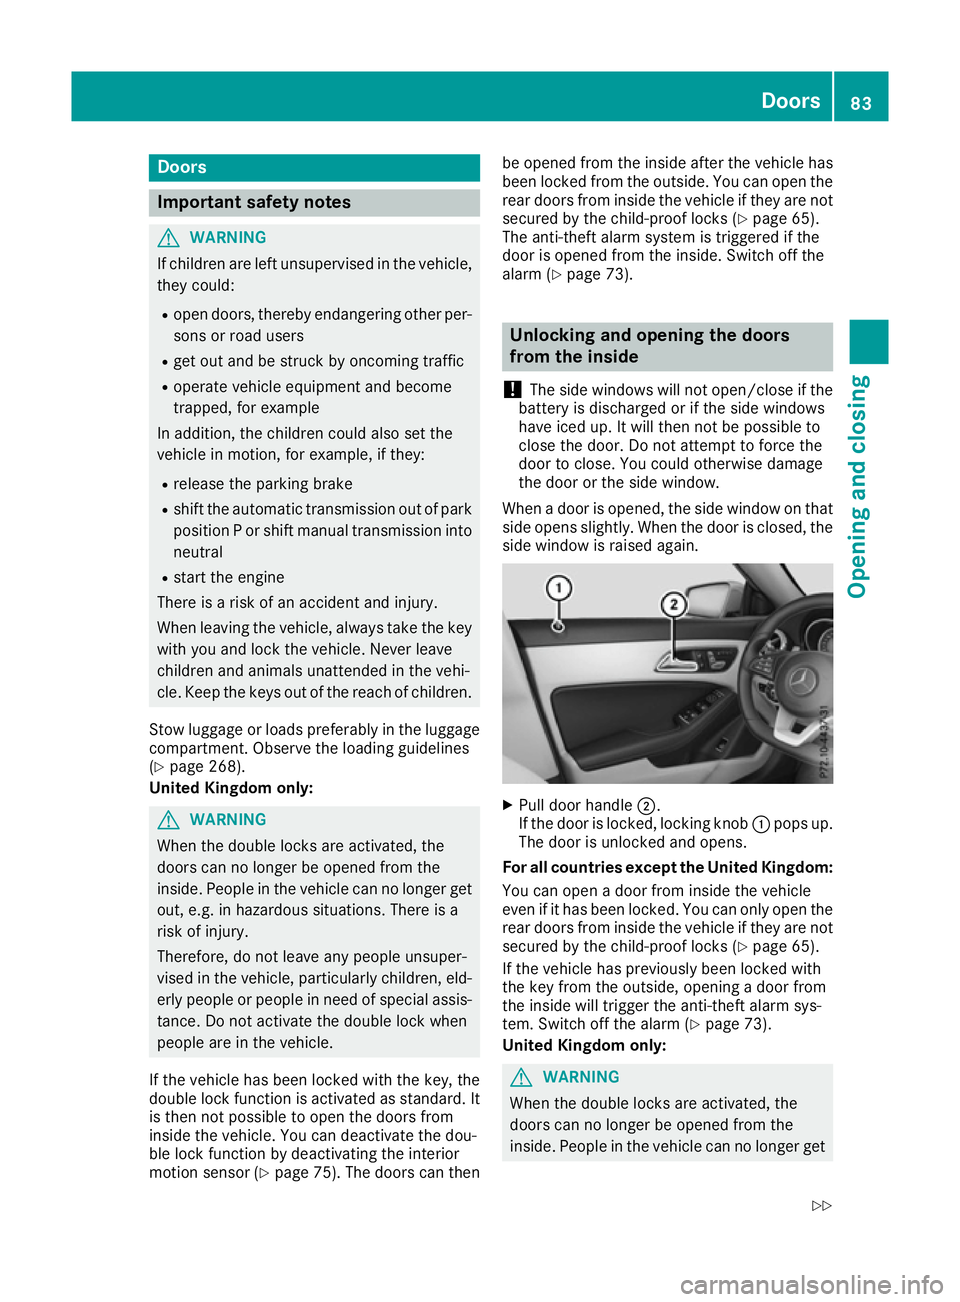
Pull door handle ;.
If the door is locked, locking knob :pops up.
The door is unlocked and opens.
For all countries except the United Kingdom:
You can open a door from inside the vehicle
even if it has been locked. You can only open the rear doors from inside the vehicle if they are not secured by the child-proof locks (Y page 65).
If the vehicle has previously been locked with
the key from the outside, opening a door from
the inside will trigger the anti-theft alarm sys-
tem. Switch off the alarm (Y page 73).
United Kingdom only: G
WARNING
When the double locks are activated, the
doors can no longer be opened from the
inside. People in the vehicle can no longer get Doors
83Opening and closing
Z
Page 111 of 345
(side lamps) and
L(dipped-beam head-
lamps) in the instrument cluster light up.
Dipped-beam headlamps When the ignition is switched on and the light
switch is in the Lposition, the side lamps
and dipped-beam headlamps are switched on
even if the light sensor does not sense dark
ambient light conditions. This is advantageous
when there is fog or rain.
X To switch on the dipped-beam headlamps:
turn the key in the ignition lock to position 2
or start the engine.
X Turn the light switch to L.
The green Lindicator lamp on the instru-
ment cluster lights up.
Rear foglamp The rear foglamp improves the visibility of your
vehicle in heavy fog for the following traffic.
Please observe the country-specific laws on the
use of rear foglamps.
X To switch on the rear foglamp: turn the key
in the ignition lock to position 2or start the
engine.
X Turn the light switch to LorÃ.
X Press the Rbutton.
The yellow Rindicator lamp in the instru-
ment cluster lights up.
X To switch off the rear foglamp:press the
R button.
The yellow Rindicator lamp in the instru-
ment cluster goes out.
i When the rear foglamp is switched on, the
centre brake lamp in the tail lamp switches off
due to a legal requirement.
Side lamps ! When the battery is discharged heavily, the
side lamps or parking lamps are automatically
switched off to facilitate an engine start.
Always park your vehicle safely and in a well lit area, in accordance with the relevant legal
stipulations. Avoid using the Tside lamps
for periods lasting several hours. Where pos-
sible, switch on the right Xor left W
parking lamp.
X To switch on: turn the light switch to T.
The green Tindicator lamp in the instru-
ment cluster lights up. Parking lamps
Switching on the parking lamps ensures that the
corresponding side of the vehicle is illuminated.
X To switch on the parking lamps: the key
should not be in the ignition lock or it should
be in position 0.
X Turn the light switch to W(left-hand side of
the vehicle) or X(right-hand side of the
vehicle).
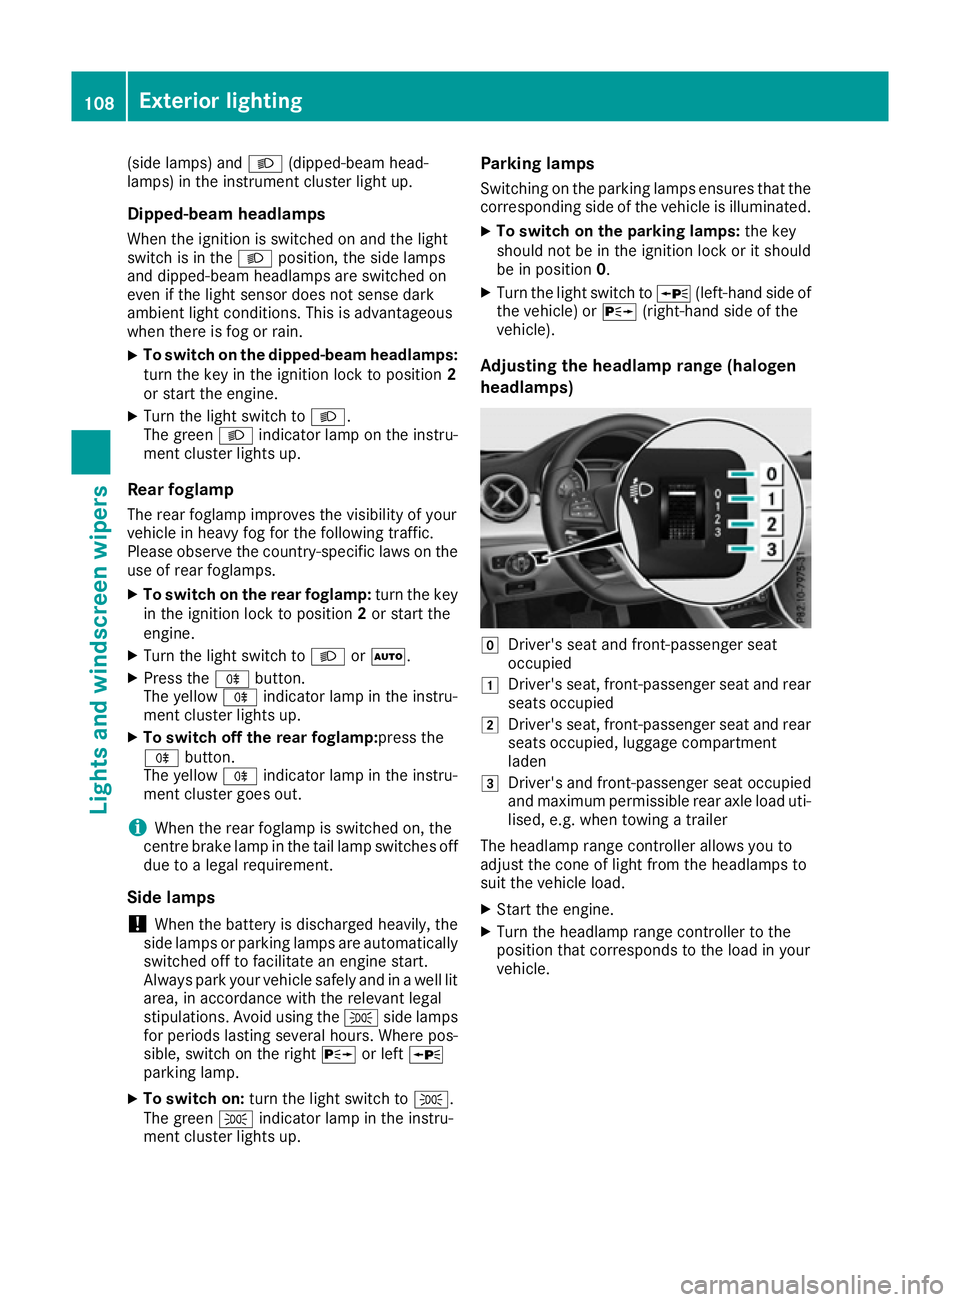
Adjusting the headlamp range (halogen
headlamps) g
Driver's seat and front-passenger seat
occupied
1 Driver's seat, front-passenger seat and rear
seats occupied
2 Driver's seat, front-passenger seat and rear
seats occupied, luggage compartment
laden
3 Driver's and front-passenger seat occupied
and maximum permissible rear axle load uti-
lised, e.g. when towing a trailer
The headlamp range controller allows you to
adjust the cone of light from the headlamps to
suit the vehicle load.
X Start the engine.
X Turn the headlamp range controller to the
position that corresponds to the load in your
vehicle. 108
Exterior lightingLights and windscreen wipers
Page 112 of 345
Combination switch
X
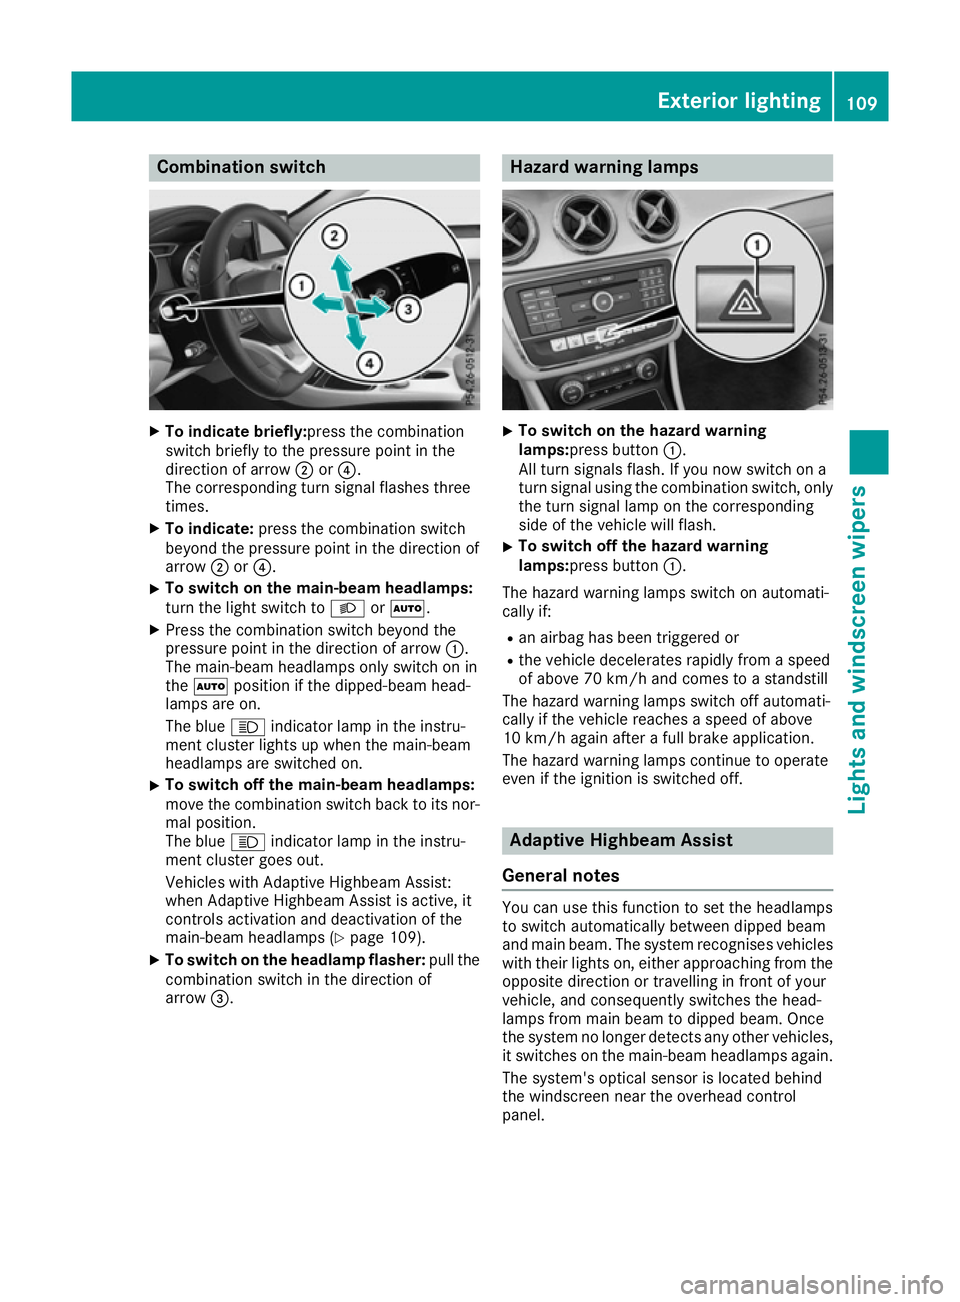
To indicate briefly:press the combination
switch briefly to the pressure point in the
direction of arrow ;or?.
The corresponding turn signal flashes three
times.
X To indicate: press the combination switch
beyond the pressure point in the direction of
arrow ;or?.
X To switch on the main-beam headlamps:
turn the light switch to LorÃ.
X Press the combination switch beyond the
pressure point in the direction of arrow :.
The main-beam headlamps only switch on in
the à position if the dipped-beam head-
lamps are on.
The blue Kindicator lamp in the instru-
ment cluster lights up when the main-beam
headlamps are switched on.
X To switch off the main-beam headlamps:
move the combination switch back to its nor-
mal position.
The blue Kindicator lamp in the instru-
ment cluster goes out.
Vehicles with Adaptive Highbeam Assist:
when Adaptive Highbeam Assist is active, it
controls activation and deactivation of the
main-beam headlamps (Y page 109).
X To switch on the headlamp flasher: pull the
combination switch in the direction of
arrow =. Hazard warning lamps
X
To switch on the hazard warning
lamps:press button
:.
All turn signals flash. If you now switch on a
turn signal using the combination switch, only the turn signal lamp on the corresponding
side of the vehicle will flash.
X To switch off the hazard warning
lamps:press button
:.
The hazard warning lamps switch on automati-
cally if:
R an airbag has been triggered or
R the vehicle decelerates rapidly from a speed
of above 70 km/h and comes to a standstill
The hazard warning lamps switch off automati-
cally if the vehicle reaches a speed of above
10 km/h again after a full brake application.
The hazard warning lamps continue to operate
even if the ignition is switched off. Adaptive Highbeam Assist
General notes You can use this function to set the headlamps
to switch automatically between dipped beam
and main beam. The system recognises vehicles
with their lights on, either approaching from the opposite direction or travelling in front of your
vehicle, and consequently switches the head-
lamps from main beam to dipped beam. Once
the system no longer detects any other vehicles, it switches on the main-beam headlamps again.
The system's optical sensor is located behind
the windscreen near the overhead control
panel. Exterior lighting
109Lights and windscreen wipers Z
Page 117 of 345
X
Press retaining clips :at the same time in
the direction of the arrows.
X Carefully remove the bulb holder together
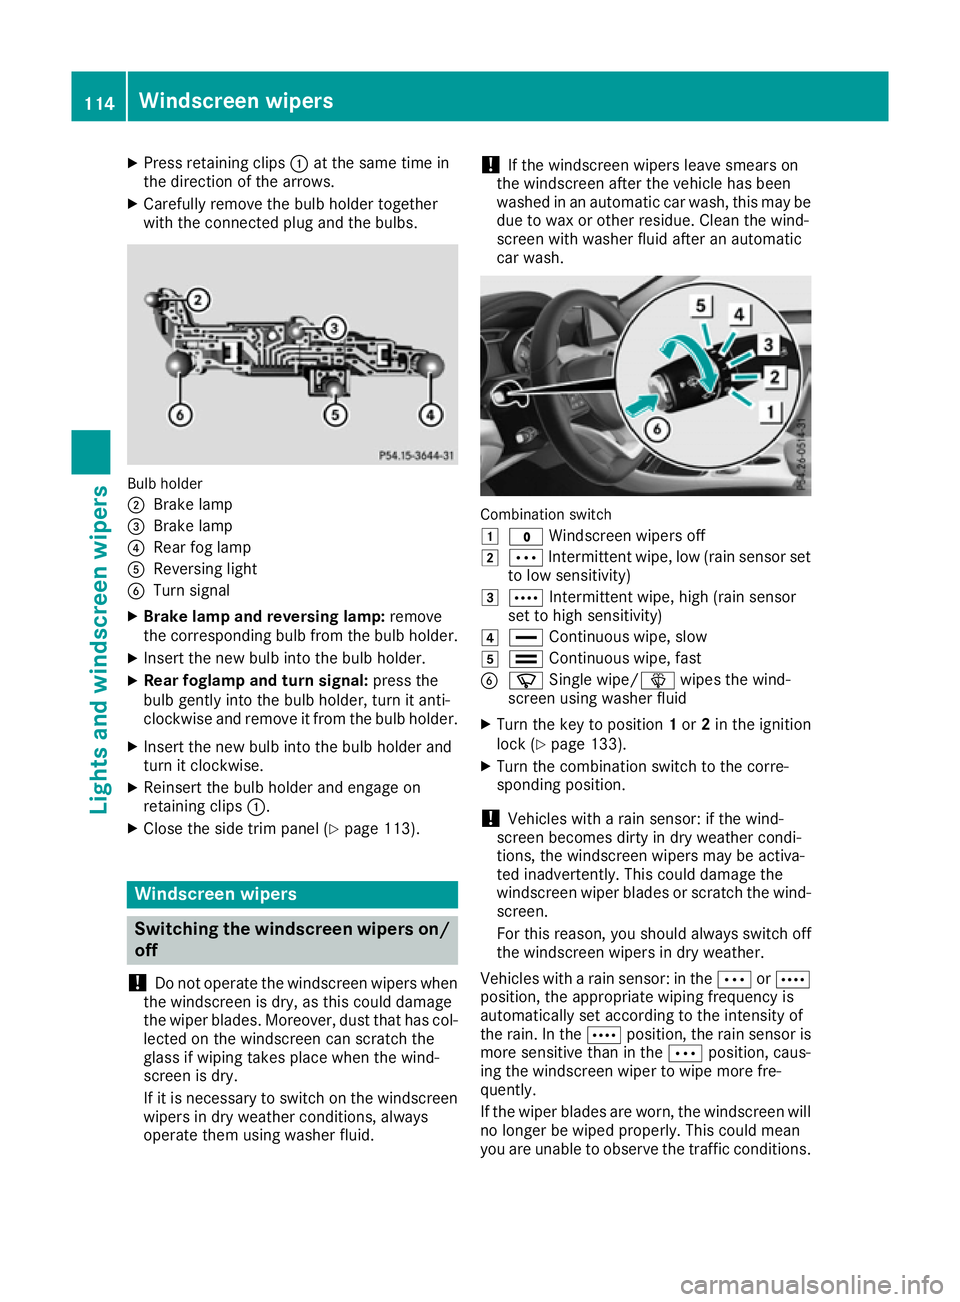
with the connected plug and the bulbs. Bulb holder
;
Brake lamp
= Brake lamp
? Rear fog lamp
A Reversing light
B Turn signal
X Brake lamp and reversing lamp: remove
the corresponding bulb from the bulb holder.
X Insert the new bulb into the bulb holder.
X Rear foglamp and turn signal: press the
bulb gently into the bulb holder, turn it anti-
clockwise and remove it from the bulb holder.
X Insert the new bulb into the bulb holder and
turn it clockwise.
X Reinsert the bulb holder and engage on
retaining clips :.
X Close the side trim panel (Y page 113).Windscreen wipers
Switching the windscreen wipers on/
off
! Do not operate the windscreen wipers when
the windscreen is dry, as this could damage
the wiper blades. Moreover, dust that has col-
lected on the windscreen can scratch the
glass if wiping takes place when the wind-
screen is dry.
If it is necessary to switch on the windscreen wipers in dry weather conditions, always
operate them using washer fluid. !
If the windscreen wipers leave smears on
the windscreen after the vehicle has been
washed in an automatic car wash, this may be
due to wax or other residue. Clean the wind-
screen with washer fluid after an automatic
car wash. Combination switch
1
$ Windscreen wipers off
2 Ä Intermittent wipe, low (rain sensor set
to low sensitivity)
3 Å Intermittent wipe, high (rain sensor
set to high sensitivity)
4 ° Continuous wipe, slow
5 ¯ Continuous wipe, fast
B í Single wipe/î wipes the wind-
screen using washer fluid
X Turn the key to position 1or 2in the ignition
lock (Y page 133).
X Turn the combination switch to the corre-
sponding position.
! Vehicles with a rain sensor: if the wind-
screen becomes dirty in dry weather condi-
tions, the windscreen wipers may be activa-
ted inadvertently. This could damage the
windscreen wiper blades or scratch the wind- screen.
For this reason, you should always switch off
the windscreen wipers in dry weather.
Vehicles with a rain sensor: in the ÄorÅ
position, the appropriate wiping frequency is
automatically set according to the intensity of
the rain. In the Åposition, the rain sensor is
more sensitive than in the Äposition, caus-
ing the windscreen wiper to wipe more fre-
quently.
If the wiper blades are worn, the windscreen will
no longer be wiped properly. This could mean
you are unable to observe the traffic conditions. 114
Windscreen wipersLights and windscreen wipers
Page 135 of 345

Running-in notes
Important safety notes
In certain driving and driving safety systems, the sensors adjust automatically while a certain dis-
tance is being driven after the vehicle has been delivered or after repairs. Full system effective-
ness is not reached until the end of this teach-in process.
Brake pads/linings and discs that are either new or have been replaced only achieve optimum
braking effect after several hundred kilometres
of driving. Compensate for the reduced braking
effect by applying greater force to the brake
pedal. The first 1500 km
The more you treat the engine with sufficient
care at the start, the more satisfied you will be
with the engine performance later on.
R Drive at varying vehicle speeds and engine
speeds for the first 1500 km.
R Avoid overstraining the vehicle during this
period, e.g. driving at full throttle.
R Change gear in good time, before the rev
counter needle is Ôof the way to the red area
of the rev counter.
R Do not shift down a gear manually in order to
brake.
R Vehicles with automatic transmission: try
to avoid depressing the accelerator pedal
beyond the point of resistance (kickdown).
Additional notes on running in Mercedes-AMG
vehicles:
R for the first 1,500 km do not drive at speeds
above 140 km/h.
R only allow the engine to reach a maximum
engine speed of 4,500 rpm briefly.
After 1,500 km, you may gradually bring the
vehicle up to full road and engine speeds.
You should also observe these notes on running- in if the engine or parts of the drive train on your
vehicle have been replaced.
Always observe the maximum permissible
speed. Driving
Important safety notes
G
WARNING
Objects in the driver's footwell may restrict
the clearance around the pedals or block a
depressed pedal. This jeopardises the oper-
ating and road safety of the vehicle. There is a risk of an accident.
Stow all objects securely in the vehicle so that
they do not get into the driver's footwell.
Always fit the floormats securely and as pre-
scribed in order to ensure that there is always sufficient room for the pedals. Do not use
loose floormats and do not place several floor-mats on top of one another. G
WARNING
Unsuitable footwear can hinder correct usage of the pedals, e.g.:
R shoes with thick soles
R shoes with high heels
R slippers
There is a risk of an accident.
Wear suitable footwear to ensure correct
usage of the pedals. G
WARNING
If you switch off the ignition while driving,
safety-relevant functions are only available
with limitations, or not at all. This could affect, for example, the power steering and the brake
boosting effect. You will require considerably
more effort to steer and brake. There is a risk of an accident.
Do not switch off the ignition while driving. G
WARNING
If the parking brake has not been fully
released when driving, the parking brake can:
R overheat and cause a fire
R lose its hold function.
There is a risk of fire and an accident. Release
the parking brake fully before driving off. 132
DrivingDriving and parking
Page 170 of 345
Distance Pilot DISTRONIC
General notes Distance Pilot DISTRONIC regulates the speed
and automatically helps you maintain the dis-
tance to the vehicle detected in front. The sys-
tem detects vehicles using the radar sensor sys-
tem. Distance Pilot DISTRONIC brakes automat- ically to avoid exceeding the set speed or to
maintain the designated distance from the vehi- cle in front.
If Distance Pilot DISTRONIC detects that there is
a risk of a collision, you will be warned visually
and acoustically. Without your intervention, Dis- tance Pilot DISTRONIC cannot prevent a colli-
sion. An intermittent warning tone will then
sound and the distance warning lamp will light
up in the instrument cluster. Brake immediately
to increase the distance to the vehicle in front,
or take evasive action, provided it is safe to do
so.
Distance Pilot DISTRONIC operates in the range between 0 km/h and 200 km/h.
Shift into a lower gear in good time on long andsteep downhill gradients. Take particular note of
this when driving a laden vehicle. By doing so,
you will make use of the braking effect of the
engine. This relieves the load on the brake sys-
tem and prevents the brakes from overheating
and wearing too quickly.
Do not use Distance Pilot DISTRONIC on roads
with steep gradients.
For Distance Pilot DISTRONIC to assist you
when driving, the radar sensor system must be
operational.
Important safety notes G
WARNING
Distance Pilot DISTRONIC does not recognise
R people or animals
R stationary objects on the road, e.g. stopped
or parked vehicles
R oncoming vehicles or crossing traffic
As a result, Distance Pilot DISTRONIC may
neither give warnings nor intervene in such
situations. There is a risk of an accident.
Always pay careful attention to the traffic sit-
uation and be ready to brake. G
WARNING
Distance Pilot DISTRONIC cannot always
clearly identify other road users and complex
traffic situations.
In such cases, Distance Pilot DISTRONIC may:
R give an unnecessary warning and then
brake the vehicle
R neither give a warning nor intervene
R accelerate or brake unexpectedly
There is a risk of an accident.
Continue to drive carefully and be ready to
brake, especially if Distance Pilot DISTRONIC
warns you. G
WARNING
Distance Pilot DISTRONIC brakes your vehicle with up to 50% of the maximum possible
deceleration. If this deceleration is not suffi-
cient, Distance Pilot DISTRONIC alerts you
with a visual and acoustic warning. There is a
risk of an accident.
Apply the brakes yourself in these situations
and try to take evasive action.
! When Distance Pilot DISTRONIC or the
HOLD function is activated, the vehicle
brakes automatically in certain situations.
To avoid damage to the vehicle, deactivate
Distance Pilot DISTRONIC and the HOLD
function in the following or similar situations:
R when towing away
R in a car wash
If you fail to adapt your driving style, Distance
Pilot DISTRONIC can neither reduce the risk of
an accident nor override the laws of physics.
Distance Pilot DISTRONIC cannot take into
account road, weather or traffic conditions. Dis-
tance Pilot DISTRONIC is only an aid. You are
responsible for the distance to the vehicle in
front, for vehicle speed, for braking in good time
and for staying in lane. Driving syste
ms
167Driving an d parking Z
Page 171 of 345

Do not use Distance Pilot DISTRONIC:
R in road and traffic conditions that do not allow
you to maintain a constant speed, e.g. in
heavy traffic or on winding roads.
R on smooth or slippery roads. Braking or accel-
erating can cause the drive wheels to lose
traction and the vehicle could then skid.
R in poor visibility, e.g. due to fog, heavy rain or
snow.
Distance Pilot DISTRONIC may not detect nar-
row vehicles driving in front, e.g. motorcycles, or
vehicles driving on a different line.
In particular, the detection of obstacles can be
impaired in the following situations:
R dirt on the sensors or obscured sensors
R snow or heavy rain
R interference by other radar sources
R strong radar reflections, e.g. in multi-storey
car parks
If Distance Pilot DISTRONIC no longer detects a vehicle in front, Distance Pilot DISTRONIC may
unexpectedly accelerate to the speed stored.
This speed can:
R be too high for a filter lane or a slip road
R be so high on the right lane that you pass
vehicles driving in the left lane
R be so high in the left lane that you pass vehi-
cles driving in the right lane
If a new driver takes over, advise the new driver
of the speed stored.
Cruise control lever :
To store the current speed or a higher speed
; To set the specified minimum distance
= LIM indicator lamp
? To store the current speed or call up the last
stored speed
A To store the current speed or a lower speed B
To switch between Distance Pilot
DISTRONIC and the variable limiter
C To deactivate Distance Pilot DISTRONIC
With the cruise control lever, you can operate
Distance Pilot DISTRONIC and the variable lim-
iter.
LIM indicator lamp =on the cruise control lever
indicates which system you have selected:
R LIM indicator lamp= =off:distance Pilot
DISTRONIC is selected.
R LIM indicator lamp= =on:variable limiter is
selected.
Selecting Distance Pilot DISTRONIC X
Check whether LIM indicator lamp =is off.
If it is off, Distance Pilot DISTRONIC is already selected.
X If it is not, press the cruise control lever in the
direction of arrow B.
LIM indicator lamp =in the cruise control
lever goes out. Distance Pilot DISTRONIC is
selected.
Activating Distance Pilot DISTRONIC Activation conditions
! When Distance Pilot DISTRONIC or the
HOLD function is activated, the vehicle
brakes automatically in certain situations.
To avoid damage to the vehicle, deactivate
Distance Pilot DISTRONIC and the HOLD
function in the following or similar situations:
R when towing away
R in a car wash
To activate Distance Pilot DISTRONIC, the fol-
lowing conditions must be fulfilled:
R The engine must be running. It may take up to
two minutes of driving before Distance Pilot
DISTRONIC is ready for use.
R The electric parking brake must be released.
R ESP ®
must be switched on, but not interven-
ing.
R Parking Pilot must not be activated.
R The transmission must be in position D.
R The driver's door must be closed when you
shift from Pto Dor your seat belt must be
fastened. 168
Driving systemsDriving an
d parking
Page 180 of 345

The damping is tuned individually to each wheel
and depends on:
R your driving style, e.g. sporty
R the road surface conditions
R the drive program selected
The drive program can be set using the
DYNAMIC SELECT button (Y page 141).
Selecting Comfort mode In the
Comfort drive program, the driving char-
acteristics of your vehicle are more comforta-
ble. Select this drive program if you prefer a
more comfortable driving style. Also select the
Comfort drive program when driving fast on
straight roads, e.g. on straight stretches of
motorway.
X Press DYNAMIC SELECT button (Y page 141)
as many times as necessary until the Com-
fort drive program is selected.
Selecting Sport mode The firmer suspension setting in the
Sportdrive
program ensures even better contact with the
road. Select this drive program when employing
a sporty driving style, e.g. on winding country
roads.
X Press DYNAMIC SELECT button (Y page 141)
as many times as necessary until the Sport
drive program is selected. Parking Assist PARKTRONIC
Important safety notes Parking Assist PARKTRONIC is an electronic
parking aid with ultrasound. It monitors the area
around your vehicle using six sensors in the
front bumper and six sensors in the rear
bumper. Parking Assist PARKTRONIC shows you
the distance between your vehicle and an obsta- cle visually and audibly.
Parking Assist PARKTRONIC is only an aid. It is
not a substitute for your attention to the imme-
diate surroundings. The responsibility for safe
manoeuvring and parking remains with you.
Make sure that there are no persons, animals or
objects in range while manoeuvring and parking.
! When parking, pay particular attention to
objects above or below the sensors, such as flower pots or trailer drawbars. Parking Assist
PARKTRONIC does not detect such objects
when they are in the immediate vicinity of the
vehicle. You could damage the vehicle or the
objects.
The sensors may not detect snow and other
objects that absorb ultrasonic waves.
Ultrasonic sources such as an automatic car
wash, the compressed-air brakes of a lorry or a pneumatic drill could cause Parking Assist
PARKTRONIC to malfunction.
Parking Assist PARKTRONIC may not function
correctly on uneven terrain.
! Fold in the ball coupling if the trailer tow
hitch is not required. Parking Assist
PARKTRONIC measures the minimum detec-
tion range to an obstacle from the bumper,
not the ball coupling.
Parking Assist PARKTRONIC is activated auto-
matically when you: R switch on the ignition
R shift the transmission to position D,Ror Non
vehicles with automatic transmission
R release the electric parking brake
Parking Assist PARKTRONIC is deactivated at
speeds above 18 km/h. It is reactivated at lower
speeds.
Vehicles with a trailer tow hitch: Parking
Assist PARKTRONIC is deactivated for the rear
area when you establish the electrical connec-
tion between your vehicle and a trailer.
Range of the sensors General notes
Parking Assist PARKTRONIC does not take into
account obstacles located:
R below the detection range, e.g. persons, ani-
mals or objects
R above the detection range, e.g. overhanging
loads, tail sections or loading ramps of goods
vehicles Driving systems
177Driving and parking Z