2016 MERCEDES-BENZ CLA COUPE transmission
[x] Cancel search: transmissionPage 303 of 345
H
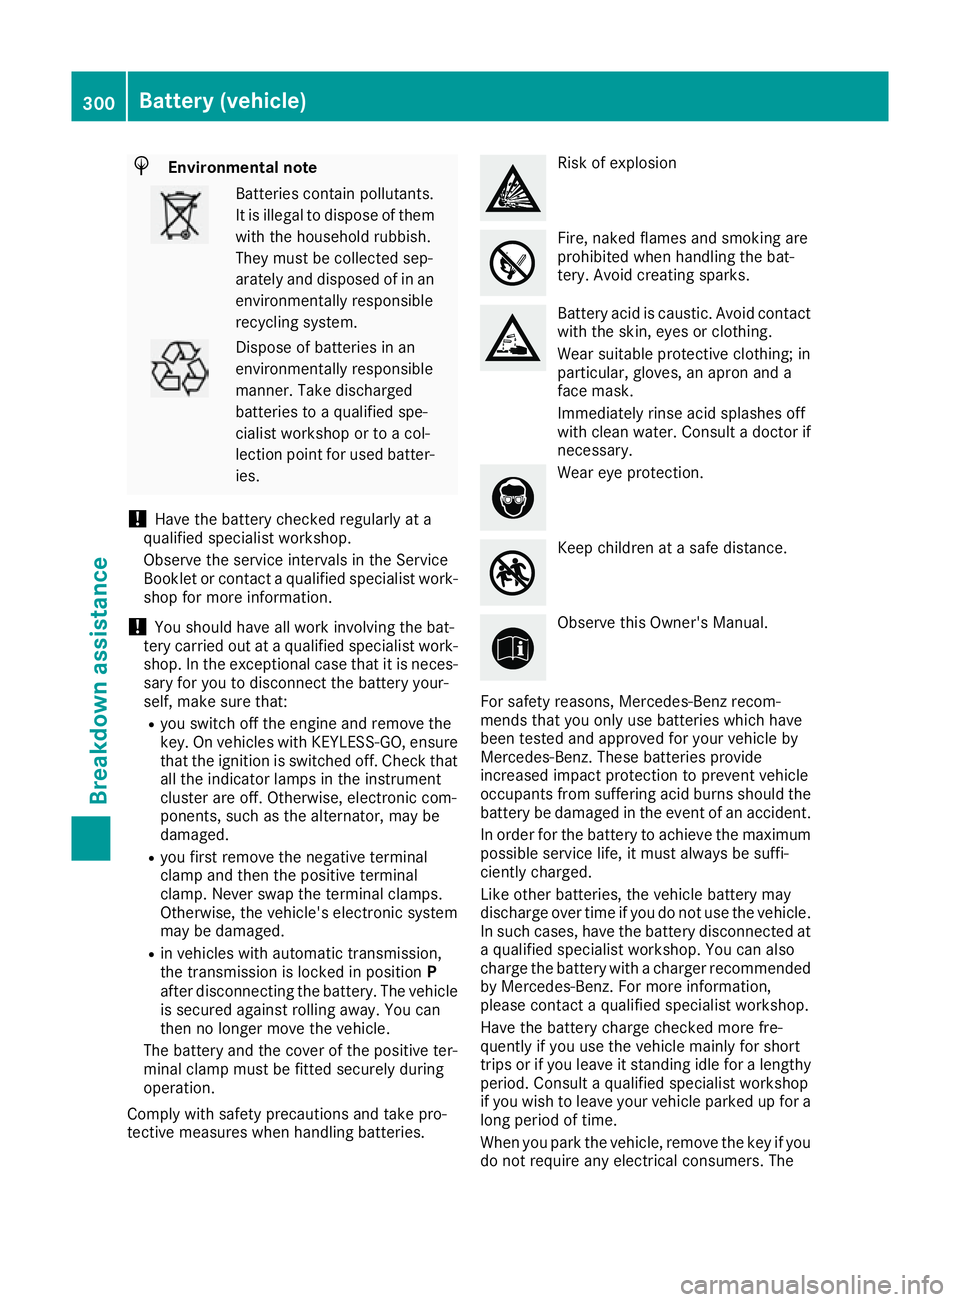
Environmental note Batteries contain pollutants.
It is illegal to dispose of them with the household rubbish.
They must be collected sep-
arately and disposed of in anenvironmentally responsible
recycling system. Dispose of batteries in an
environmentally responsible
manner. Take discharged
batteries to a qualified spe-
cialist workshop or to a col-
lection point for used batter-
ies.
! Have the battery checked regularly at a
qualified specialist workshop.
Observe the service intervals in the Service
Booklet or contact a qualified specialist work- shop for more information.
! You should have all work involving the bat-
tery carried out at a qualified specialist work-
shop. In the exceptional case that it is neces-
sary for you to disconnect the battery your-
self, make sure that:
R you switch off the engine and remove the
key. On vehicles with KEYLESS-GO, ensure
that the ignition is switched off. Check that all the indicator lamps in the instrument
cluster are off. Otherwise, electronic com-
ponents, such as the alternator, may be
damaged.
R you first remove the negative terminal
clamp and then the positive terminal
clamp. Never swap the terminal clamps.
Otherwise, the vehicle's electronic system
may be damaged.
R in vehicles with automatic transmission,
the transmission is locked in position P
after disconnecting the battery. The vehicle
is secured against rolling away. You can
then no longer move the vehicle.
The battery and the cover of the positive ter-
minal clamp must be fitted securely during
operation.
Comply with safety precautions and take pro-
tective measures when handling batteries. Risk of explosion
Fire, naked flames and smoking are
prohibited when handling the bat-
tery. Avoid creating sparks.
Battery acid is caustic. Avoid contact
with the skin, eyes or clothing.
Wear suitable protective clothing; in
particular, gloves, an apron and a
face mask.
Immediately rinse acid splashes off
with clean water. Consult a doctor if
necessary. Wear eye protection.
Keep children at a safe distance.
Observe this Owner's Manual.
For safety reasons, Mercedes-Benz recom-
mends that you only use batteries which have
been tested and approved for your vehicle by
Mercedes-Benz. These batteries provide
increased impact protection to prevent vehicle
occupants from suffering acid burns should the battery be damaged in the event of an accident.
In order for the battery to achieve the maximum possible service life, it must always be suffi-
ciently charged.
Like other batteries, the vehicle battery may
discharge over time if you do not use the vehicle.In such cases, have the battery disconnected ata qualified specialist workshop. You can also
charge the battery with a charger recommended
by Mercedes-Benz. For more information,
please contact a qualified specialist workshop.
Have the battery charge checked more fre-
quently if you use the vehicle mainly for short
trips or if you leave it standing idle for a lengthy period. Consult a qualified specialist workshop
if you wish to leave your vehicle parked up for a
long period of time.
When you park the vehicle, remove the key if you do not require any electrical consumers. The 300
Battery (vehicle)Breakdown assistance
Page 306 of 345
Make sure that:
R The jump leads are not damaged.
R Non-insulated parts of the terminal clamps do not come into contact with other metal parts while
the jump leads are connected to the battery
R The jump leads cannot come into contact with parts that can move when the engine is running,
such as the V-belt pulley or the fan
X Secure the vehicle by applying the electric parking brake.
X Manual transmission: depress the clutch pedal fully and engage neutral.
X Automatic transmission: shift the transmission to position P.
X Turn the key to position 0in the ignition lock and remove it.
X Switch off all electrical consumers, e.g. rear window heating, lighting etc.
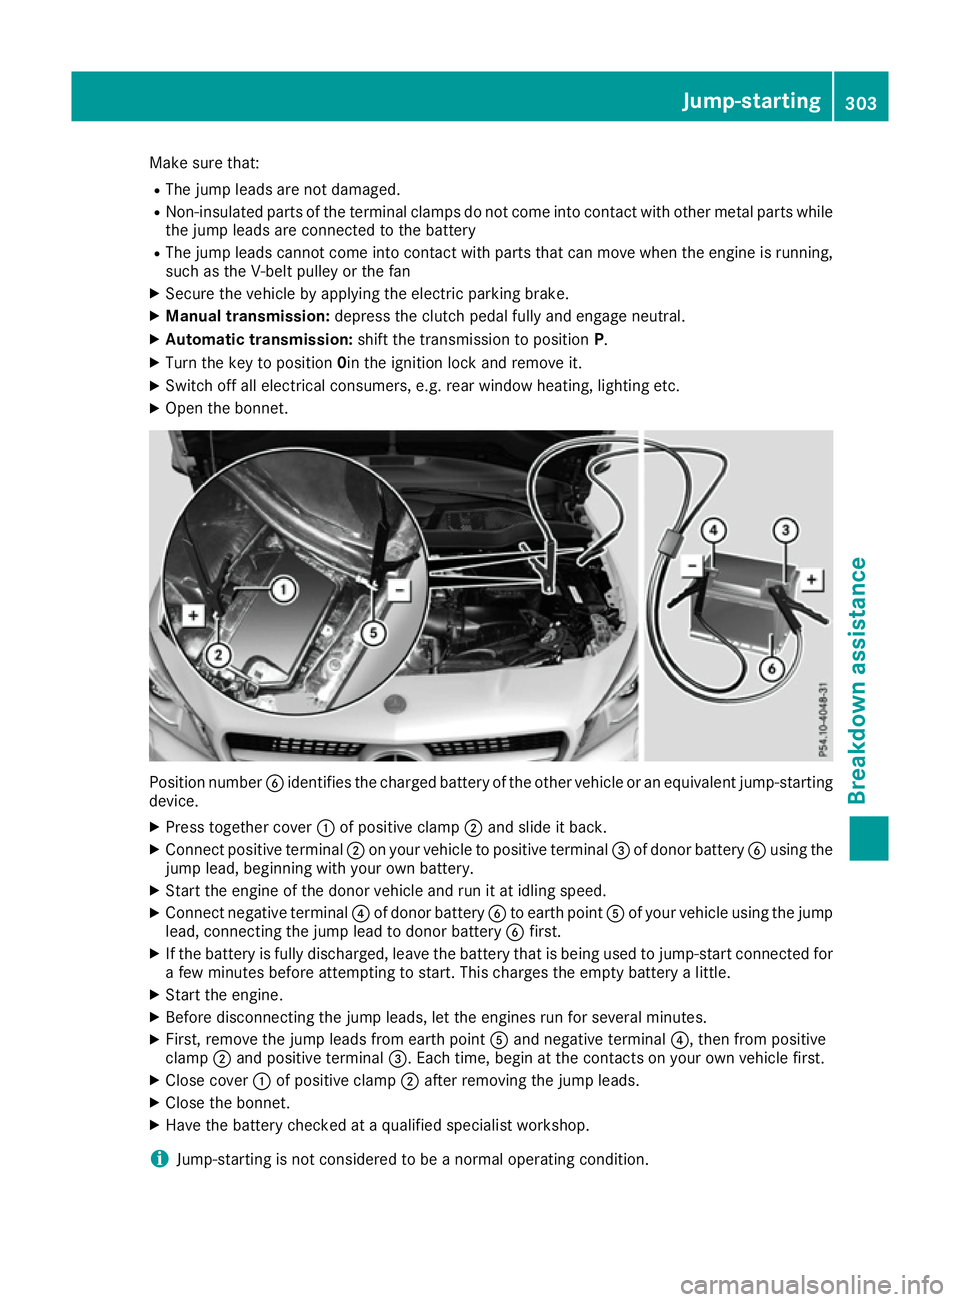
X Open the bonnet. Position number
Bidentifies the charged battery of the other vehicle or an equivalent jump-starting
device.
X Press together cover :of positive clamp ;and slide it back.
X Connect positive terminal ;on your vehicle to positive terminal =of donor battery Busing the
jump lead, beginning with your own battery.
X Start the engine of the donor vehicle and run it at idling speed.
X Connect negative terminal ?of donor battery Bto earth point Aof your vehicle using the jump
lead, connecting the jump lead to donor battery Bfirst.
X If the battery is fully discharged, leave the battery that is being used to jump-start connected for
a few minutes before attempting to start. This charges the empty battery a little.
X Start the engine.
X Before disconnecting the jump leads, let the engines run for several minutes.
X First, remove the jump leads from earth point Aand negative terminal ?, then from positive
clamp ;and positive terminal =. Each time, begin at the contacts on your own vehicle first.
X Close cover :of positive clamp ;after removing the jump leads.
X Close the bonnet.
X Have the battery checked at a qualified specialist workshop.
i Jump-starting is not considered to be a normal operating condition. Jump-starting
303Breakdown assistance Z
Page 308 of 345
For towing distances over 50 km, the front
axle or the entire vehicle must be raised and
transported.
! To tow vehicles with KEYLESS-GO, use the
key instead of the Start/Stop button. The
automatic transmission may otherwise
switch to position Pwhen you open the driv-
er's or front-passenger door which could
damage the transmission.
! Vehicles with automatic transmission must
not be tow-started. The transmission may
otherwise be damaged.
Observe the legal requirements for the relevant
countries when towing and tow-starting.
It is better to have the vehicle transported than
to have it towed.
If the vehicle can no longer be driven because of an accident or breakdown, you have the follow- ing options:
R transporting the vehicle
As a rule, you should have the vehicle trans-
ported.
R towing the vehicle with a tow rope or tow bar
Only tow the vehicle in exceptional cases.
The battery must be connected and charged.
Otherwise, you:
R cannot turn the key to position 2in the igni-
tion lock
R cannot release the electric parking brake
R cannot shift the transmission to position Non
vehicles with automatic transmission
The function of the electric parking brake and
the parking lock is dependent on the on-board
voltage.
If the on-board voltage is low or if there is a sys-
tem malfunction:
R it may not be possible to apply the released
parking brake or
R it may not be possible to shift the transmis-
sion to position P
Switch off non-essential consumers, e.g. the
radio.
Deactivate the automatic locking feature before towing the vehicle (Y page 211). You could oth-
erwise be locked out when pushing or towing
the vehicle.
Deactivate tow-away protection before the vehi-
cle is towed away (Y page 74). Fitting/removing the towing eye
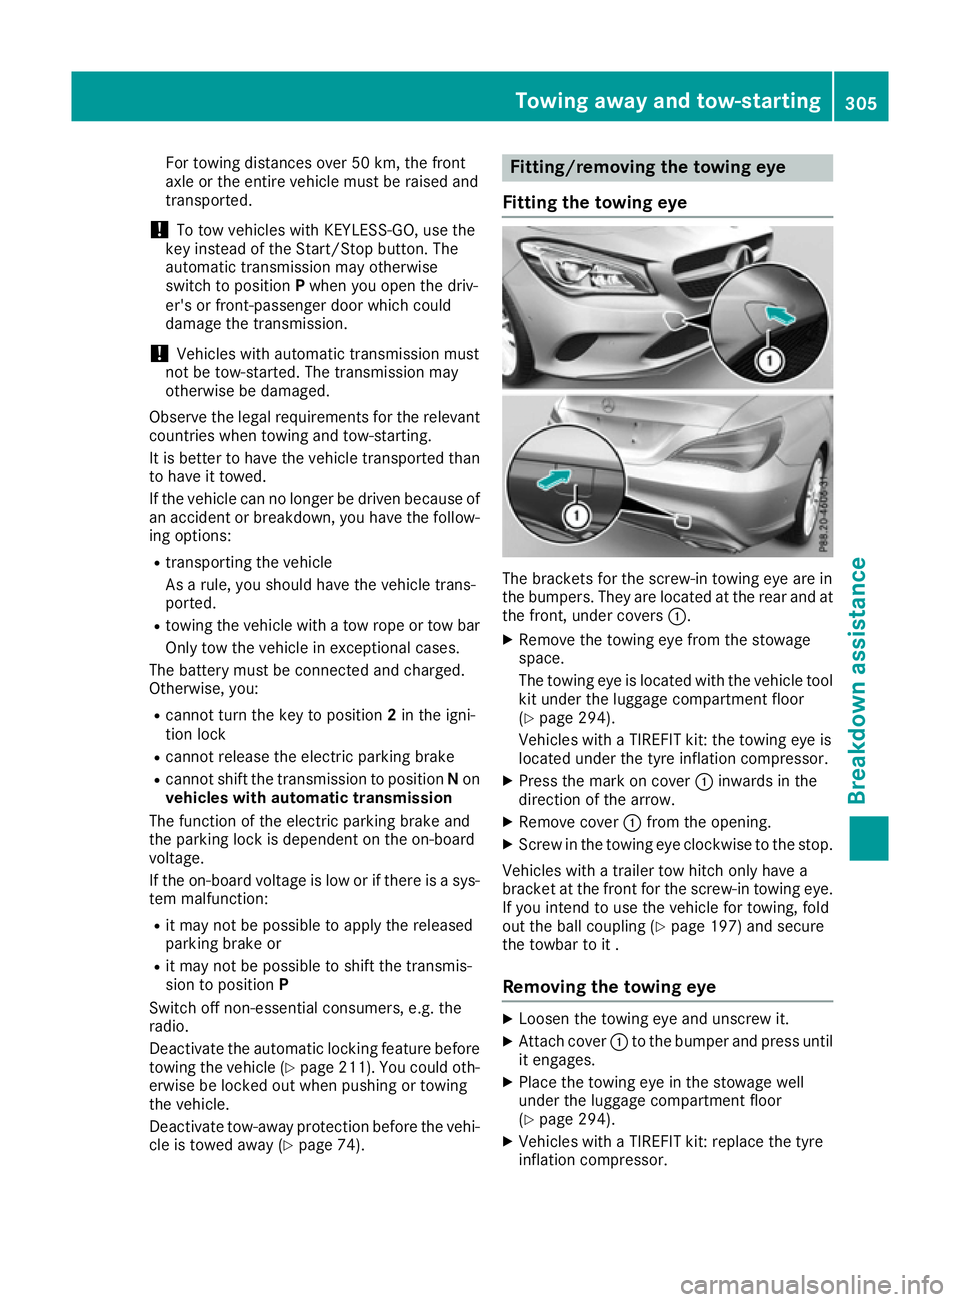
Fitting the towing eye The brackets for the screw-in towing eye are in
the bumpers. They are located at the rear and at
the front, under covers :.
X Remove the towing eye from the stowage
space.
The towing eye is located with the vehicle tool
kit under the luggage compartment floor
(Y page 294).
Vehicles with a TIREFIT kit: the towing eye is
located under the tyre inflation compressor.
X Press the mark on cover :inwards in the
direction of the arrow.
X Remove cover :from the opening.
X Screw in the towing eye clockwise to the stop.
Vehicles with a trailer tow hitch only have a
bracket at the front for the screw-in towing eye.
If you intend to use the vehicle for towing, fold
out the ball coupling (Y page 197) and secure
the towbar to it .
Removing the towing eye X
Loosen the towing eye and unscrew it.
X Attach cover :to the bumper and press until
it engages.
X Place the towing eye in the stowage well
under the luggage compartment floor
(Y page 294).
X Vehicles with a TIREFIT kit: replace the tyre
inflation compressor. Towing away and tow-starting
305Breakdown assistance Z
Page 309 of 345

Towing the vehicle with the front axle
raised
When towing your vehicle with the front axle
raised, it is important that you observe the
safety instructions (Y page 304).
Only vehicles without 4MATIC can be towed
with the front axle raised.
! Vehicles with 4MATIC must not be towed
with the front or rear axle raised; otherwise,
the transmission may be damaged.
Vehicles with 4MATIC may either be towed with
both axles on the ground or be loaded and trans- ported.
! The ignition must be switched off if you are
towing the vehicle with the front axle raised.
Intervention by ESP ®
could otherwise dam-
age the brake system.
X On vehicles with KEYLESS-GO or the KEY-
LESS-GO start function: you must use the
key instead of the Start/Stop button
(Y page 134).
X Make sure that the vehicle is stationary.
X Turn the key to position 2in the ignition lock.
X When the vehicle is stationary, depress the
brake pedal and keep it depressed.
X Vehicles with automatic transmission:
shift the automatic transmission to position
P.
or X Vehicles with manual transmission:
depress the clutch pedal fully and engage
neutral.
X Release the brake pedal.
X Release the electric parking brake.
X Deactivate tow-away protection (Y page 74).
X Deactivate automatic locking (Y page 211).
X Switch on the hazard warning lamps
(Y page 109).
X Turn the key in the ignition lock to position 0
and leave the key in the ignition lock. Towing the vehicle with both axles on
the ground
It is important that you observe the safety
instructions when towing away your vehicle
(Y page 304). X
On vehicles with KEYLESS-GO or the KEY-
LESS-GO start function: you must use the
key instead of the Start/Stop button
(Y page 134).
Vehicles with automatic transmission: the
automatic transmission automatically shifts to
position Pwhen you open the driver's or front-
passenger door or when you remove the key
from the ignition lock. In order to ensure that the automatic transmission stays in position N
when towing away the vehicle, you must
observe the following points:
X Make sure that the vehicle is stationary.
X Turn the key to position 2in the ignition lock.
X Depress the brake pedal and keep it
depressed.
X Shift the automatic transmission to position
N.
Vehicles with manual transmission:
X Turn the key to position 2in the ignition lock.
X When the vehicle is stationary, depress the
brake pedal and keep it depressed.
X Depress the clutch pedal fully and engage
neutral.
Vehicles with manual or automatic trans-
mission:
X Leave the key in position 2in the ignition lock.
X Release the brake pedal.
X Release the electric parking brake.
X Switch on the hazard warning lamps
(Y page 109).
i In order to signal a change of direction when
towing the vehicle with the hazard warning
lamps switched on, use the combination
switch as usual. In this case, only the turn
signals for the desired direction flash. When
you reset the combination switch, the hazard warning lamps start flashing again. 306
Towing away and tow-startingBreakdown assistance
Page 310 of 345
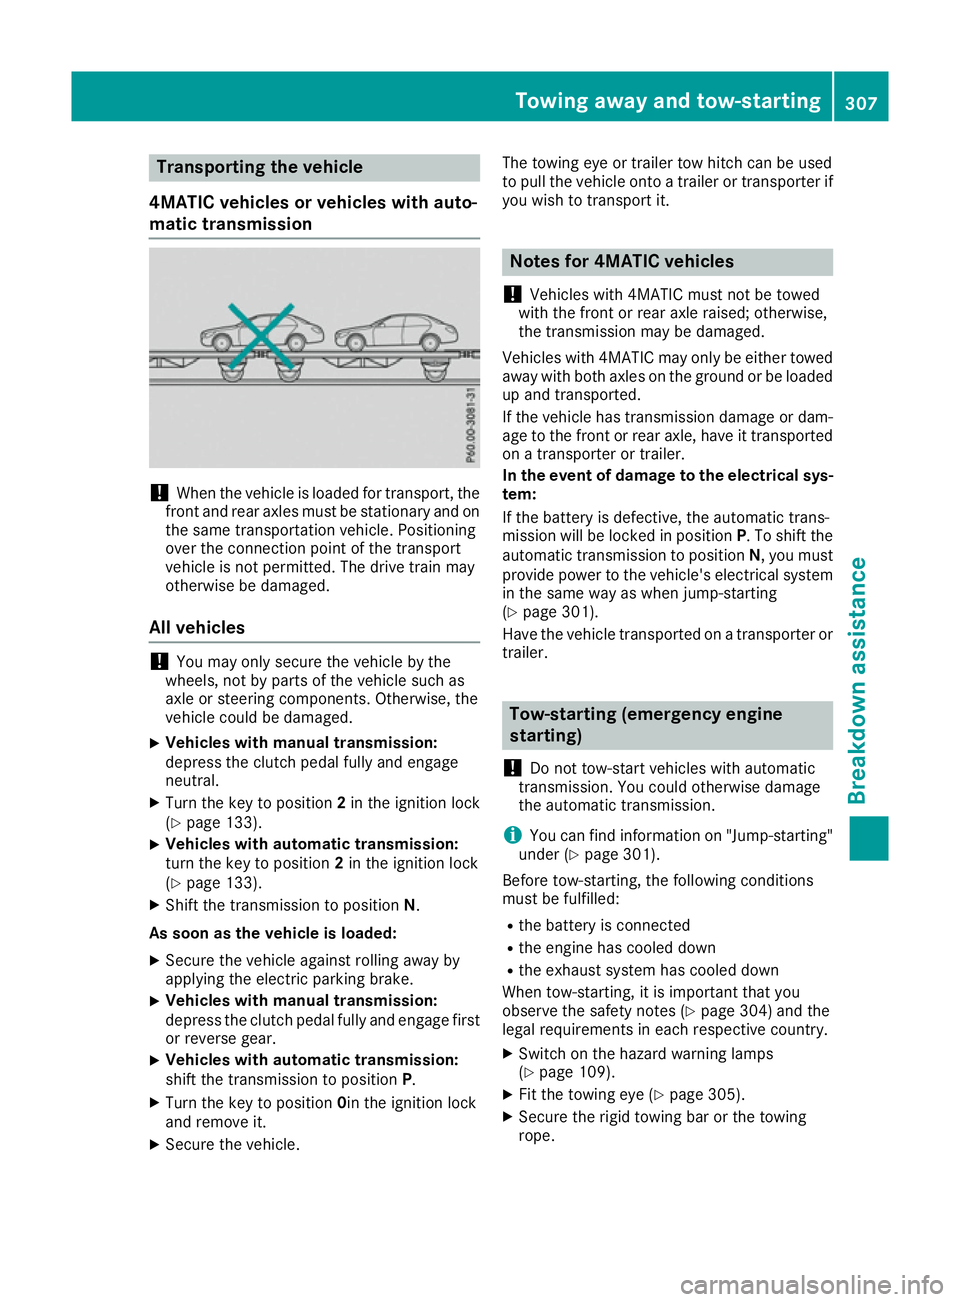
Transporting the vehicle
4MATIC vehicles or vehicles with auto-
matic transmission !
When the vehicle is loaded for transport, the
front and rear axles must be stationary and on the same transportation vehicle. Positioning
over the connection point of the transport
vehicle is not permitted. The drive train may
otherwise be damaged.
All vehicles !
You may only secure the vehicle by the
wheels, not by parts of the vehicle such as
axle or steering components. Otherwise, the
vehicle could be damaged.
X Vehicles with manual transmission:
depress the clutch pedal fully and engage
neutral.
X Turn the key to position 2in the ignition lock
(Y page 133).
X Vehicles with automatic transmission:
turn the key to position 2in the ignition lock
(Y page 133).
X Shift the transmission to position N.
As soon as the vehicle is loaded:
X Secure the vehicle against rolling away by
applying the electric parking brake.
X Vehicles with manual transmission:
depress the clutch pedal fully and engage first
or reverse gear.
X Vehicles with automatic transmission:
shift the transmission to position P.
X Turn the key to position 0in the ignition lock
and remove it.
X Secure the vehicle. The towing eye or trailer tow hitch can be used
to pull the vehicle onto a trailer or transporter if
you wish to transport it. Notes for 4MATIC vehicles
! Vehicles with 4MATIC must not be towed
with the front or rear axle raised; otherwise,
the transmission may be damaged.
Vehicles with 4MATIC may only be either towed away with both axles on the ground or be loadedup and transported.
If the vehicle has transmission damage or dam-
age to the front or rear axle, have it transported on a transporter or trailer.
In the event of damage to the electrical sys-
tem:
If the battery is defective, the automatic trans-
mission will be locked in position P. To shift the
automatic transmission to position N, you must
provide power to the vehicle's electrical system in the same way as when jump-starting
(Y page 301).
Have the vehicle transported on a transporter or
trailer. Tow-starting (emergency engine
starting)
! Do not tow-start vehicles with automatic
transmission. You could otherwise damage
the automatic transmission.
i You can find information on "Jump-starting"
under (Y page 301).
Before tow-starting, the following conditions
must be fulfilled: R the battery is connected
R the engine has cooled down
R the exhaust system has cooled down
When tow-starting, it is important that you
observe the safety notes (Y page 304) and the
legal requirements in each respective country.
X Switch on the hazard warning lamps
(Y page 109).
X Fit the towing eye (Y page 305).
X Secure the rigid towing bar or the towing
rope. Towing away and tow-starting
307Breakdown assistance Z
Page 322 of 345
Direction of rotation
Tyres with a specified direction of rotation have additional benefits, e.g. if there is a risk of aqua-
planing. These advantages can only be gained if the tyres are fitted corresponding to the direc-
tion of rotation.
An arrow on the sidewall of the tyre indicates its
correct direction of rotation. Storing wheels
Store wheels in a cool, dry and preferably dark
place if they are not being used. Protect the
tyres against oil, grease, petrol and diesel. Fitting a wheel
Preparing the vehicle X
Stop the vehicle on solid, non-slippery and
level ground.
X Apply the electric parking brake manually.
X Move the front wheels to the straight-ahead
position.
X Vehicles with manual transmission:
depress the clutch pedal fully and engage first
or reverse gear.
X Vehicles with automatic transmission:
shift the transmission to position
P.
X Switch off the engine.
X Vehicles without KEYLESS-GO: remove the
key from the ignition lock.
X Vehicles with KEYLESS-GO start-function
or KEYLESS-GO: open the driver's door.
The vehicle electronics now have status 0.
This is the same as the key having been
removed.
X Vehicles with KEYLESS-GO start function
or KEYLESS-GO: remove the Start/Stop but-
ton from the ignition lock (Y page 133).
X If included in the vehicle equipment, remove
the tyre-change tool kit from the vehicle.
X In addition, safeguard the vehicle against roll-
ing away (Y page 155).
i Apart from some country-specific variants,
vehicles are not equipped with a tyre-change
tool kit. Some tools for changing a tyre are
specific to the vehicle. For more information
on which tools are required to perform a wheel change on your vehicle, consult a quali-
fied specialist workshop.
Necessary tyre-changing tools may include,
for example:
R Jack
R Wheel chock
R Wheel wrench
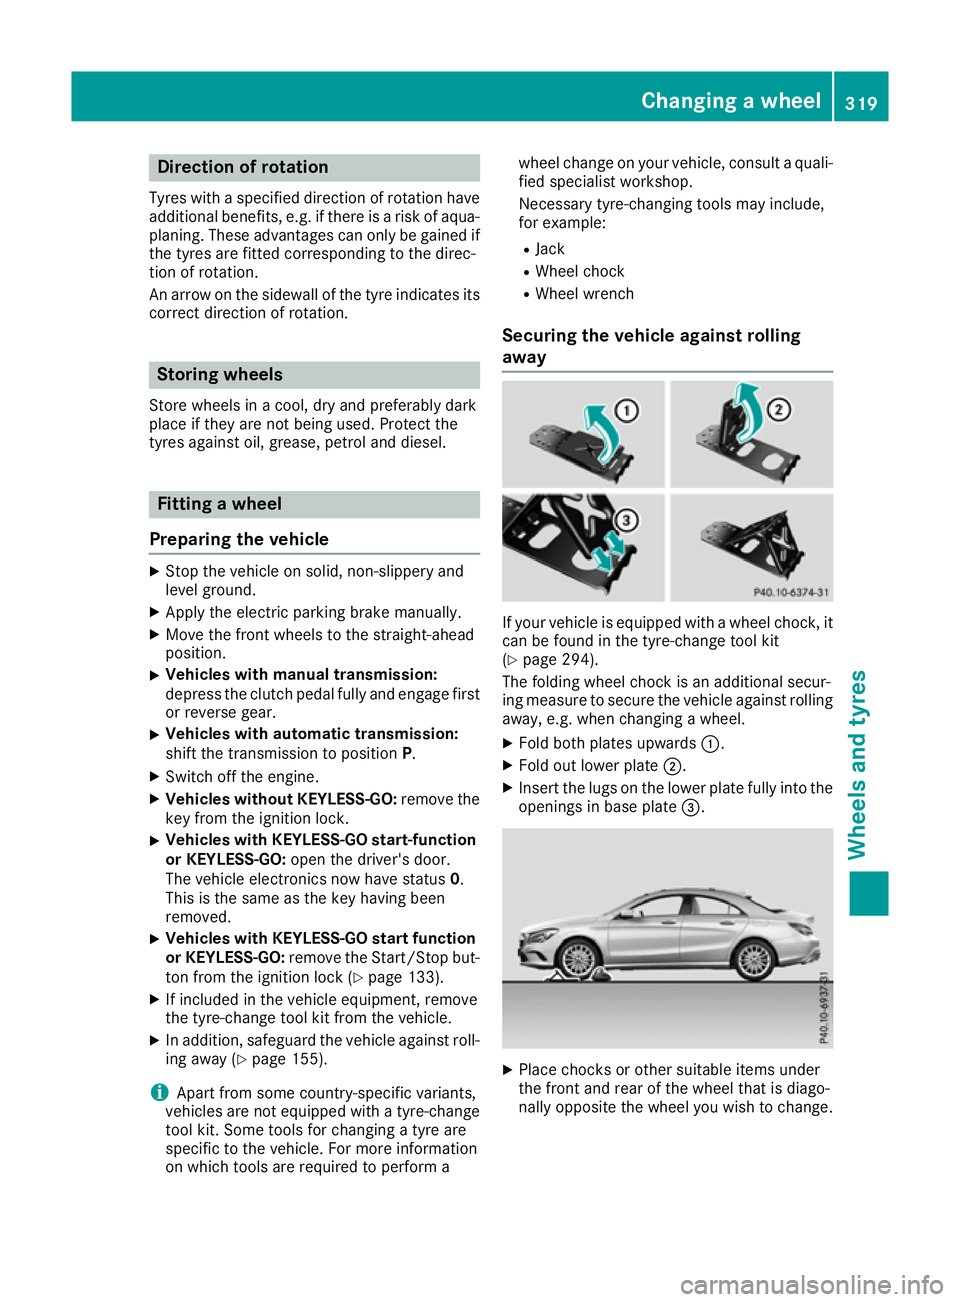
Securing the vehicle against rolling
away If your vehicle is equipped with a wheel chock, it
can be found in the tyre-change tool kit
(Y page 294).
The folding wheel chock is an additional secur-
ing measure to secure the vehicle against rolling
away, e.g. when changing a wheel.
X Fold both plates upwards :.
X Fold out lower plate ;.
X Insert the lugs on the lower plate fully into the
openings in base plate =. X
Place chocks or other suitable items under
the front and rear of the wheel that is diago-
nally opposite the wheel you wish to change. Changing a wheel
319Wheels andtyres Z
Page 329 of 345

Use Technical Specification ISO/TS 21609
(Road Vehicles – "EMC guidelines for installa-
tion of aftermarket radio frequency transmitting
equipment") when retrofitting RF transmitters.
Comply with the legal requirements for add-on
parts.
If your vehicle has fittings for two-way radio
equipment, use the power supply or aerial con-
nections intended for use with the basic fittings.
Be sure to observe the manufacturer's addi-
tional instructions when installing.
Deviations with respect to wavebands, maxi-
mum transmission outputs or aerial positions
must be approved by Mercedes-Benz.
The maximum transmission output (PEAK) at the base of the aerial must not exceed the followingvalues: Waveband Maximum
transmission output Short wave
3–54 MHz 100 W
4 m waveband
74–88 MHz 30 W
2 m waveband
144–174 MHz 50 W
Trunked radio/Tetra
380–460 MHz 10 W
70 cm waveband
400–460 MHz 35 W
Mobile communications
(2G/3G/4G) 10 W
The following can be used in the vehicle without
restrictions:
R RF transmitters with a maximum transmis-
sion output of up to 100 mW
R RF transmitters with transmitter frequencies
in the 380 - 410 MHz waveband and a maxi-
mum transmission output of up to 2 W
(trunked radio/Tetra)
R Mobile phones (2G/3G/4G) There are no restrictions when positioning the
aerial on the outside of the vehicle for the fol-
lowing wavebands:
R Trunked radio/Tetra
R 70 cm waveband
R 2G/3G/4G Identification plates
Vehicle identification plate with vehi-
cle identification number (VIN)
X
Open the front right-hand door.
You will see the vehicle identification
plate :. Vehicle identification plate (example: vehicles with
a trailer tow hitch)
: Vehicle manufacturer (Daimler AG)
; EU type approval number (for certain coun-
tries only)
= VIN
? Maximum gross vehicle weight (kg)
A Maximum gross vehicle weight of vehicle
combination (kg) (for specific countries
only)
B Permissible front axle load (kg) 326
Identification platesTechnical data
Page 330 of 345
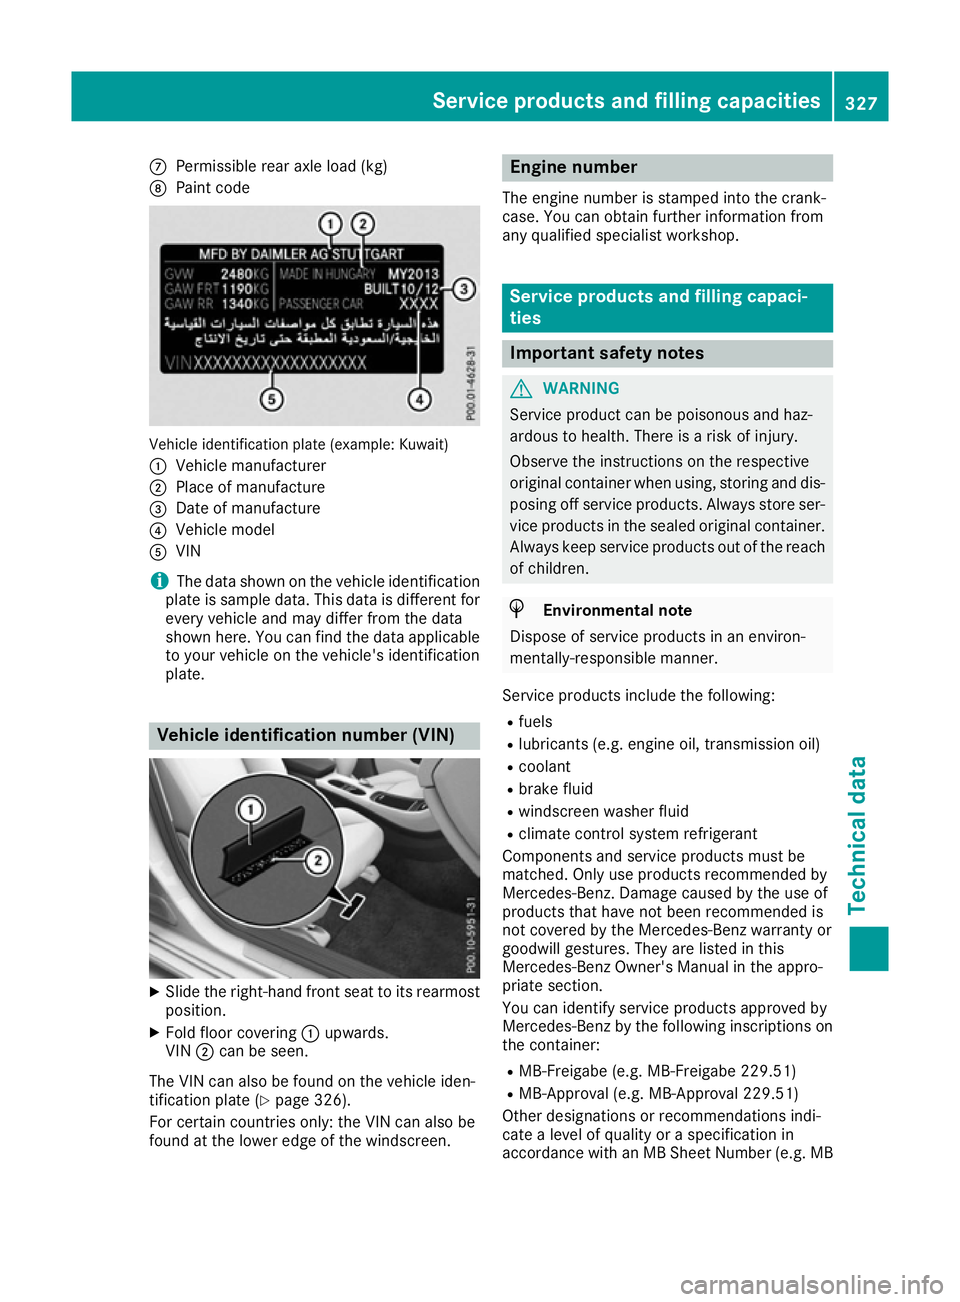
C
Permissible rear axle load (kg)
D Paint code Vehicle identification plate (example: Kuwait)
: Vehicle manufacturer
; Place of manufacture
= Date of manufacture
? Vehicle model
A VIN
i The data shown on the vehicle identification
plate is sample data. This data is different for every vehicle and may differ from the data
shown here. You can find the data applicable to your vehicle on the vehicle's identification
plate. Vehicle identification number (VIN)
X
Slide the right-hand front seat to its rearmost
position.
X Fold floor covering :upwards.
VIN ;can be seen.
The VIN can also be found on the vehicle iden-
tification plate (Y page 326).
For certain countries only: the VIN can also be
found at the lower edge of the windscreen. Engine number
The engine number is stamped into the crank-
case. You can obtain further information from
any qualified specialist workshop. Service products and filling capaci-
ties
Important safety notes
G
WARNING
Service product can be poisonous and haz-
ardous to health. There is a risk of injury.
Observe the instructions on the respective
original container when using, storing and dis- posing off service products. Always store ser-
vice products in the sealed original container. Always keep service products out of the reach
of children. H
Environmental note
Dispose of service products in an environ-
mentally-responsible manner.
Service products include the following:
R fuels
R lubricants (e.g. engine oil, transmission oil)
R coolant
R brake fluid
R windscreen washer fluid
R climate control system refrigerant
Components and service products must be
matched. Only use products recommended by
Mercedes-Benz. Damage caused by the use of
products that have not been recommended is
not covered by the Mercedes-Benz warranty or
goodwill gestures. They are listed in this
Mercedes-Benz Owner's Manual in the appro-
priate section.
You can identify service products approved by
Mercedes-Benz by the following inscriptions on the container:
R MB-Freigabe (e.g. MB-Freigabe 229.51)
R MB-Approval (e.g. MB-Approval 229.51)
Other designations or recommendations indi-
cate a level of quality or a specification in
accordance with an MB Sheet Number (e.g. MB Service products and filling capacities
327Technical data Z