2016 MERCEDES-BENZ CLA COUPE ESP
[x] Cancel search: ESPPage 196 of 345
up to a speed of 30 km/h. At speeds above
30 km/h, the indicator lamp goes out and Blind
Spot Assist is operational.
If a vehicle is detected within the monitoring
range of Blind Spot Assist at speeds above
30 km/h, warning lamp :on the correspond-
ing side lights up red. This warning always
occurs when a vehicle enters the blind spot
monitoring range from behind or from the side.
When you overtake a vehicle, the warning only
occurs if the difference in speed is less than
12 km/h.
The yellow indicator lamp goes out if reverse
gear is engaged. Blind Spot Assist is then deac- tivated.
The brightness of the indicator/warning lamps
is adjusted automatically according to the ambi-
ent light.
Collision warning
If a vehicle is detected in the blind spot moni-
toring range and you switch on the correspond-
ing turn signal, a double warning tone sounds.
Red warning lamp :flashes. If the turn signal
remains on, detected vehicles are indicated by
the flashing of red warning lamp :. There are
no further warning tones.
Activating Blind Spot Assist X Make sure that Blind Spot Assist is activated
in the on-board computer (Y page 209).
X Turn the key to position 2in the ignition lock.
Warning lamps :in the exterior mirrors light
up red for approximately 1.5 seconds and
then turn yellow.
Towing a trailer
If you couple up a trailer, make sure that you
have correctly established the electrical con-
nection. This can be accomplished by checking
the trailer lighting. Blind Spot Assist is then
deactivated. The indicator lamps in the exterior
mirrors light up yellow and the Blind Spot
Blind Spot
Assist not available when towing a Assist not available when towing a
trailer See Owner's Manual trailer See Owner's Manual message
appears in the multifunction display.
i You can deactivate the indicator lamps in
the exterior mirrors. To do so, you will need to deactivate Blind
Spot Assist if:
R the key is in position 2in the ignition lock
R the engine is not running
R the electrical connection to the trailer has
been established
Lane Keeping Assist General notes
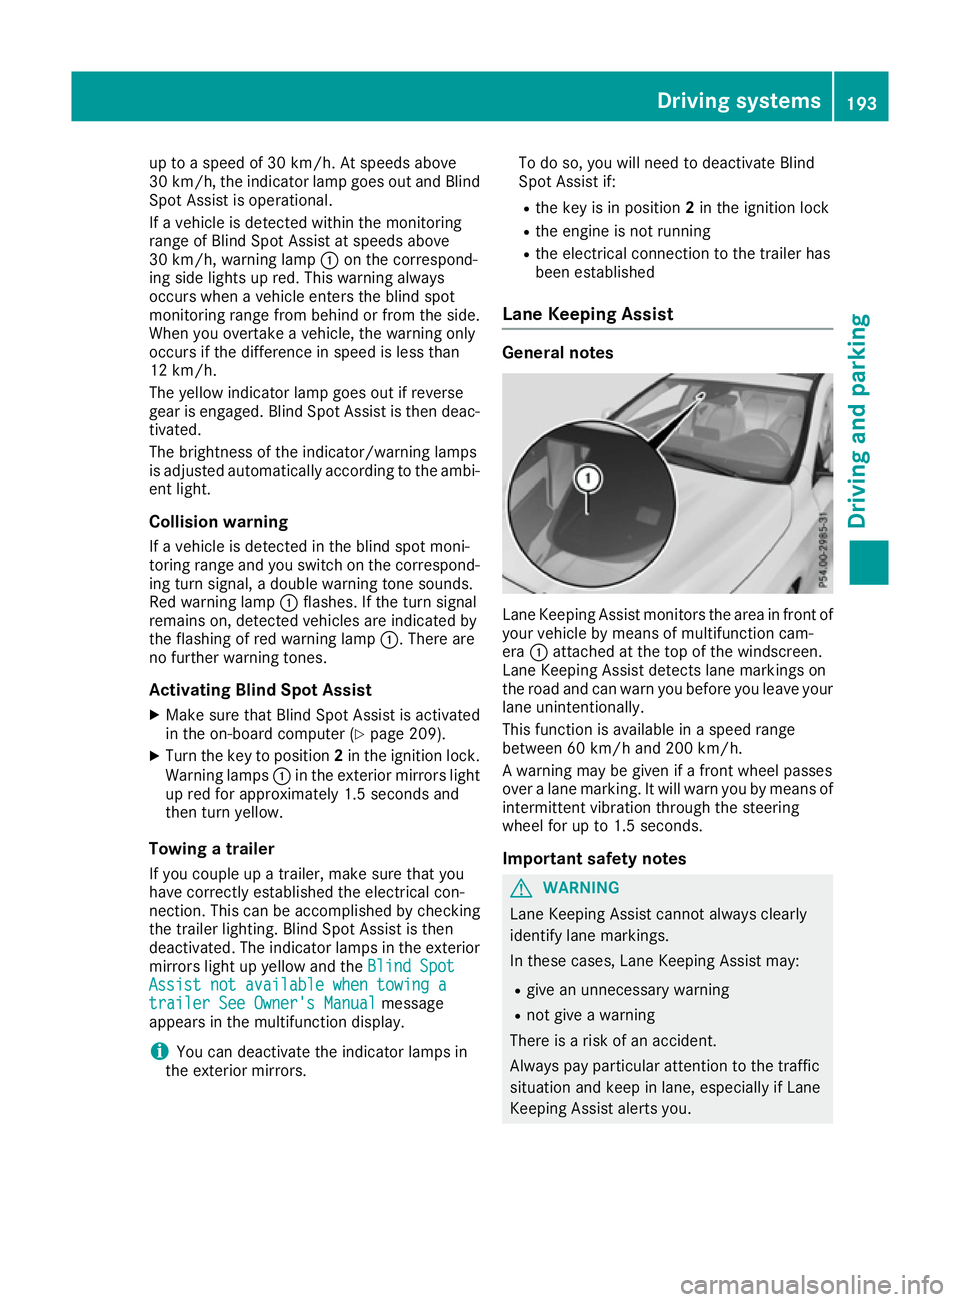
Lane Keeping Assist monitors the area in front of
your vehicle by means of multifunction cam-
era :attached at the top of the windscreen.
Lane Keeping Assist detects lane markings on
the road and can warn you before you leave your lane unintentionally.
This function is available in a speed range
between 60 km/h and 200 km/h.
A warning may be given if a front wheel passes
over a lane marking. It will warn you by means of intermittent vibration through the steering
wheel for up to 1.5 seconds.
Important safety notes G
WARNING
Lane Keeping Assist cannot always clearly
identify lane markings.
In these cases, Lane Keeping Assist may:
R give an unnecessary warning
R not give a warning
There is a risk of an accident.
Always pay particular attention to the traffic
situation and keep in lane, especially if Lane
Keeping Assist alerts you. Driving systems
193Driving and parking Z
Page 197 of 345
G
WARNING
The Lane Keeping Assist warning does not
return the vehicle to the original lane. There is a risk of an accident.
Always steer, apply the brakes or accelerate
the vehicle yourself, especially if Lane Keep-
ing Assist alerts you.
If you fail to adapt your driving style, Lane Keep-
ing Assist can neither reduce the risk of an acci-
dent nor override the laws of physics. Lane
Keeping Assist cannot take into account road,
weather or traffic conditions. Lane Keeping
Assist is only an aid. You are responsible for the distance to the vehicle in front, for vehicle
speed, for braking in good time and for staying in
lane.
Lane Keeping Assist does not keep your vehicle
in its lane.
The system may be impaired or may not function in the following situations:
R Poor visibility, e.g. due to insufficient illumi-
nation of the road, or due to snow, rain, fog or
spray
R Glare, e.g. from oncoming traffic, the sun or
reflection from other vehicles (e.g. if the road surface is wet)
R The windscreen is dirty, misted up, damaged
or covered, for instance by a sticker, in the
vicinity of the camera
R No or several, unclear lane markings are pres-
ent for one lane, e.g. in a construction area
R The lane markings are worn away, dark or
covered up, e.g. by dirt or snow
R The distance to the vehicle in front is so small
that the lane markings cannot be detected
R The lane markings change quickly, e.g. lanes
branch off, cross one another or merge
R The road is narrow and winding
R There are highly variable shade conditions on
the roadway
Activating Lane Keeping Assist
X Activate Lane Keeping Assist using the on-
board computer; to do so, select Standard
Standard or
Adaptive
Adaptive (Ypage 209).
If you drive at speeds above 60 km/h and lane markings are detected, the lane markings in
the assistance graphics display (Y page 208)
are shown in green. If
Standard
Standard is selected, no warning vibration
occurs if:
R You have switched on the turn signal. In this
event, the warnings are suppressed for a cer-
tain period of time.
R A driving safety system such as ABS, BAS or
ESP ®
engages.
When Adaptive
Adaptive is selected, no warning vibra-
tion occurs if:
R You have switched on the turn signal. In this
case, the warnings are suppressed for a cer-
tain period of time
R A driving safety system such as ABS, BAS or
ESP ®
engages
R You accelerate hard, e.g. kickdown
R You brake hard
R You steer actively, e.g. swerve to avoid an
obstacle or change lane quickly
R You cut the corner on a sharp bend
To ensure that you are warned only when nec-
essary and in good time if you cross the lane
marking, the system detects certain conditions
and warns you accordingly.
The warning vibration occurs earlier in the fol-
lowing situations:
R You approach the outer lane marking on a
bend
R The road has very wide lanes, e.g. a motorway
R The system detects solid lane markings
The warning vibration occurs later in the follow- ing situations:
R The road has narrow lanes
R You cut the corner on a bend Towing a trailer
Important safety notes
G
WARNING
You could lose control of the vehicle/trailer
combination if it begins to swerve. The vehi-
cle/trailer combination could even overturn.
There is a risk of an accident.
On no account should you attempt to
straighten out the vehicle/trailer combina-
tion by increasing speed. Decrease your
speed and do not countersteer. Brake if nec-
essary. 194
Towing a trailerDriving and parking
Page 199 of 345

not exceed the maximum permissible speed for
your vehicle/trailer combination. Notes on towing a trailer
General notes Trailer towing is not possible on the following
models:
R CLA 180 d BlueEFFICIENCY Edition
R CLA 250 Sport
R CLA 250 Sport 4MATIC
R Mercedes‑AMG CLA 45 4MATIC
When towing a trailer, set the tyre pressure on
the rear axle of the towing vehicle for the max-
imum load. Further information on the tyre pres-
sure table in the fuel filler flap (Y page 313).
Please note that when towing a trailer, the fol-
lowing driving systems have limited availability
or are not available at all.
R Parking Assist PARKTRONIC (Y page 177)
R Blind Spot Assist (Y page 192)
The height of the ball coupling changes with the
load of the vehicle. If necessary, use a trailer
with a height-adjustable drawbar.
You will find fitting dimensions and loads under "Technical data" (Y page 334).
Driving tips Observe the notes on ESP
®
trailer stabilisation
(Y page 72).
The maximum permissible speed for vehicle/
trailer combinations depends on the type of
trailer. Before beginning the journey, check the
trailer's documents to see what the maximum
permitted speed is. Observe the legally prescri-
bed maximum speed in the relevant country.
For certain Mercedes-Benz vehicles, the maxi-
mum permissible rear axle load is increased
when towing a trailer. See the "Technical data"
section to find out whether this applies to your
vehicle. If you utilise any of the added maximum rear axle load when towing a trailer, the vehicle/
trailer combination may not exceed a maximum speed of 100 km/h for reasons concerning the
operating permit. This also applies in countries
in which the permissible maximum speed for
vehicle/trailer combinations is above
100 km/h. When towing a trailer, your vehicle's handling
characteristics will be different to when driving
without a trailer and the vehicle will consume
more fuel.
Shift into a lower gear in good time on long and steep downhill gradients. For vehicles with auto-
matic transmission, you need to have selected
manual drive program M(Y page 150).
This also applies if you have activated cruise
control, SPEEDTRONIC or Distance Pilot
DISTRONIC.
This will use the braking effect of the engine, so
less braking will be required to maintain the
vehicle speed. This relieves the load on the
brake system and prevents the brakes from
overheating and wearing too quickly. If you need additional braking, depress the brake pedal
repeatedly rather than continuously.
Briefly depressing the accelerator pedal on
downhill gradients while the manual drive pro-
gram Mis temporarily activated (vehicles with
automatic transmission): the automatic trans-
mission may switch back to the last active auto-
matic drive program Eor S. The automatic trans-
mission may shift to a higher gear. This can
reduce the engine's braking effect.
Driving tips R
Maintain a greater distance to the vehicle in
front than when driving without a trailer.
R Avoid braking abruptly. If possible, brake gen-
tly at first to allow the trailer to run on. Then,
increase the braking force rapidly.
R The values given for gradient-climbing capa-
bilities from a standstill refer to sea level.
When driving in mountainous areas, note that
the power output of the engine, and conse-
quently the vehicle's gradient-climbing capa-
bility from a standstill, decrease with increas-
ing altitude.
If the trailer swings from side to side:
X Do not accelerate under any circumstances
X Do not countersteer
X Brake, if necessary 196
Towing a trailerDriving an
d parking
Page 201 of 345
there is an increased risk of an accident and
injury.
Only release the ball coupling if the pivoting
range is unobstructed. Always make sure that the ball coupling engages when folding in.
i Fold the ball coupling in if you are not using
the trailer tow hitch.
X Make sure that the vehicle is stationary and
the trailer cables are disconnected.
X Place the protective cap on the ball coupling.
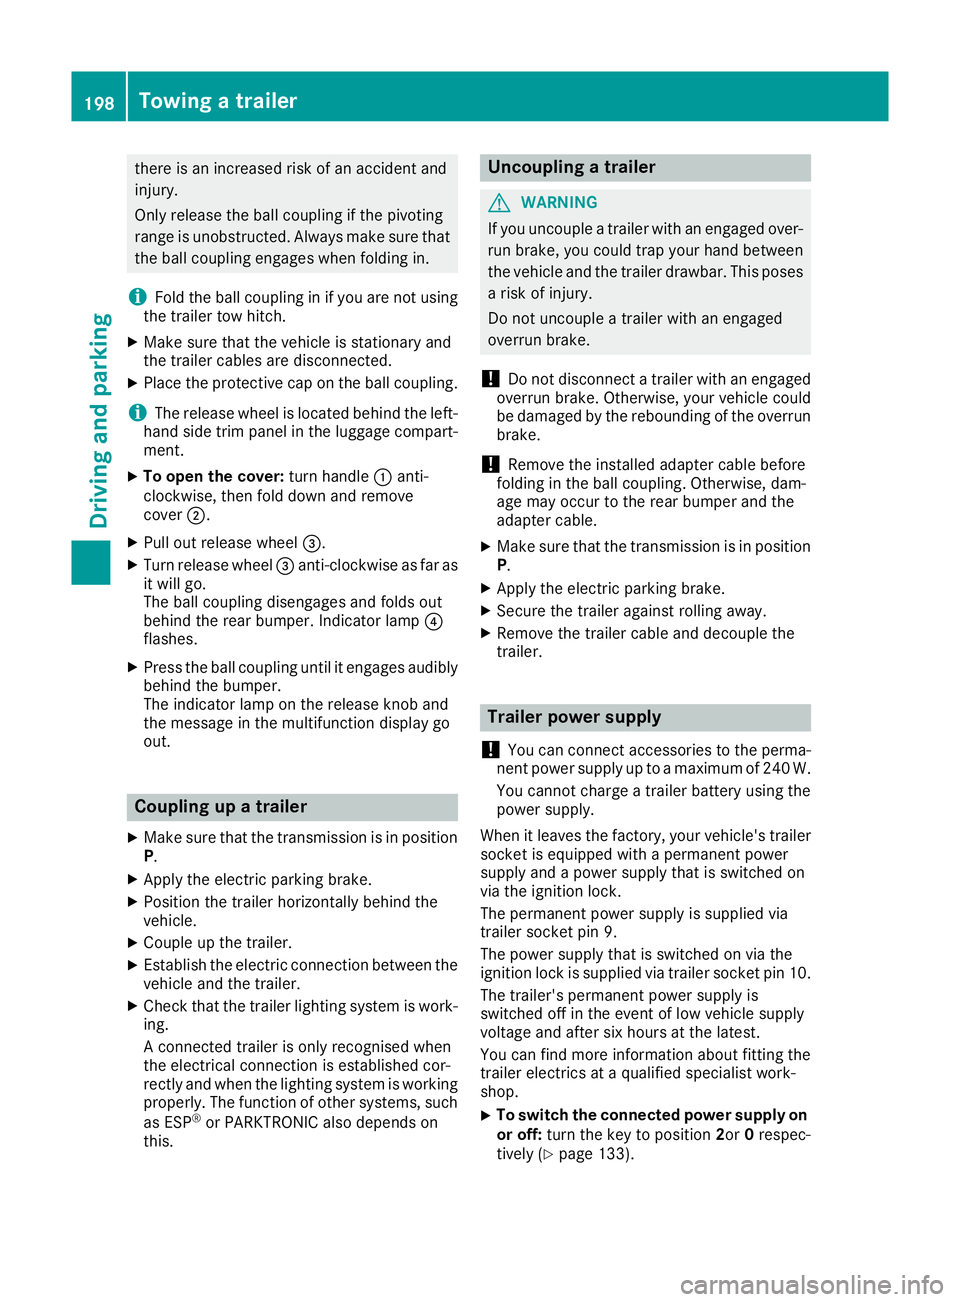
i The release wheel is located behind the left-
hand side trim panel in the luggage compart- ment.
X To open the cover: turn handle:anti-
clockwise, then fold down and remove
cover ;.
X Pull out release wheel =.
X Turn release wheel =anti-clockwise as far as
it will go.
The ball coupling disengages and folds out
behind the rear bumper. Indicator lamp ?
flashes.
X Press the ball coupling until it engages audibly
behind the bumper.
The indicator lamp on the release knob and
the message in the multifunction display go
out. Coupling up a trailer
X Make sure that the transmission is in position
P.
X Apply the electric parking brake.
X Position the trailer horizontally behind the
vehicle.
X Couple up the trailer.
X Establish the electric connection between the
vehicle and the trailer.
X Check that the trailer lighting system is work-
ing.
A connected trailer is only recognised when
the electrical connection is established cor-
rectly and when the lighting system is working
properly. The function of other systems, such
as ESP ®
or PARKTRONIC also depends on
this. Uncoupling a trailer
G
WARNING
If you uncouple a trailer with an engaged over- run brake, you could trap your hand between
the vehicle and the trailer drawbar. This poses a risk of injury.
Do not uncouple a trailer with an engaged
overrun brake.
! Do not disconnect a trailer with an engaged
overrun brake. Otherwise, your vehicle could
be damaged by the rebounding of the overrun brake.
! Remove the installed adapter cable before
folding in the ball coupling. Otherwise, dam-
age may occur to the rear bumper and the
adapter cable.
X Make sure that the transmission is in position
P.
X Apply the electric parking brake.
X Secure the trailer against rolling away.
X Remove the trailer cable and decouple the
trailer. Trailer power supply
! You can connect accessories to the perma-
nent power supply up to a maximum of 240 W.
You cannot charge a trailer battery using the
power supply.
When it leaves the factory, your vehicle's trailer
socket is equipped with a permanent power
supply and a power supply that is switched on
via the ignition lock.
The permanent power supply is supplied via
trailer socket pin 9.
The power supply that is switched on via the
ignition lock is supplied via trailer socket pin 10.
The trailer's permanent power supply is
switched off in the event of low vehicle supply
voltage and after six hours at the latest.
You can find more information about fitting the
trailer electrics at a qualified specialist work-
shop.
X To switch the connected power supply on
or off: turn the key to position 2or0respec-
tively (Y page 133). 198
Towing a trailerDriving an
d parking
Page 211 of 345

X
If only one telephone number is stored for
a name: press the 6ora button to
start dialling.
or X If there is more than one number for a
particular name:press the 6ora
button to display the numbers.
X Press the 9or: button to select the
number you want to dial.
X Press the 6ora button to start dial-
ling.
or
X If you do not want to make the call: press
the ~ or% button.
Redialling The on-board computer saves the last names or
numbers dialled in the redial memory.
X Press the =or; button on the steering
wheel to select the Tel
Telmenu.
X Press the 6button to switch to the redial
memory.
X Press the 9or: button to select the
desired name or number.
X Press the 6ora button to start dial-
ling.
or X If you do not want to make the call: press
the ~ or% button. Assistance menu
Introduction Depending on the equipment fitted in the vehi-
cle, you have the following options in the
Assist.
Assist. menu:
R Showing the assistance graphic
(Y page 208)
R Activating/deactivating the Traffic Sign
Assist message function (Y page 208)
R Deactivating/activating ESP ®
(except
Mercedes‑ AMG vehicles) (Y page 209)
R Activating/deactivating Active Brake Assist
(Y page 209)
R Activating/deactivating ATTENTION ASSIST
(Y page 209) R
Activating/deactivating Blind Spot Assist
(Y page 209)
R Activating/deactivating Lane Keeping Assist
(Y page 209)
Showing the assistance graphic X
Press the =or; button on the steering
wheel to select the Assist. Assist.menu.
X Press 9or: to select Assist.
Assist.
graphic
graphic.
X Press ato confirm.
The multifunction display shows the distance display of Distance Pilot DISTRONIC in the
assistance graphic.
The assistance graphic shows you the status
of and/or information from the following driv-
ing systems or driving safety systems:
R Traffic Sign Assist (Y page 190)
R Distance Pilot DISTRONIC (Y page 167)
R Active Brake Assist (Y page 67)
R ATTENTION ASSIST (Y page 189)
R Lane Keeping Assist (Y page 193)
X Press :to display the ATTENTION ASSIST
assessment.
Traffic Sign Assist In the
Traffic Sign Assist Traffic Sign Assist menu, you can
switch the Traffic Sign Assist message function
on or off. When the message function is activa-
ted, detected traffic signs and information
appear in the multifunction display for five sec-
onds.
X Press the =or; button on the steering
wheel to select the Assist. Assist.menu.
X Press the 9or: button to select
Traffic Sign Assist
Traffic Sign Assist .
X Press ato confirm.
The current selection appears.
X To activate/deactivate the message func-
tion: press aagain. 208
Menus and submenusOn-board computer and displays
Page 212 of 345
Further information about Traffic Sign Assist
(Y page 190).
Activating/deactivating ESP ®Observe the important safety notes on ESP
®
(Y page 70). G
WARNING
If you deactivate ESP ®
, ESP ®
no longer sta-
bilises the vehicle. There is an increased risk
of skidding and an accident.
Only deactivate ESP ®
in the situations descri-
bed in the following.
It may be best to deactivate ESP ®
in the follow-
ing situations:
R when using snow chains
R in deep snow
R on sand or gravel
Deactivating/activating ESP ®
on Mercedes-
AMG vehicles (Y page 71).
For further information about ESP ®
, see
(Y page 69).
X Start the engine.
X Press the =or; button on the steering
wheel to select the Assist. Assist.menu.
X Press 9or: to select ESP ESP.
X Press ato confirm.
The current selection appears.
X To activate/deactivate: pressaagain.
ESP ®
is deactivated if the åwarning lamp
in the instrument cluster lights up continu-
ously when the engine is running.
If the ÷ andå warning lamps light up
continuously, ESP ®
is not available due to a mal-
function.
Observe the information on warning lamps
(Y page 252).
Observe the information on display messages
(Y page 217).
Activating/deactivating Active Brake
Assist X
Press the =or; button on the steering
wheel to select the Assist. Assist.menu.
X Press the 9or: button to select
Brake Assist
Brake Assist. X
Press ato confirm.
The current selection appears.
X To activate/deactivate: pressaagain.
When Active Brake Assist is deactivated, the
æ symbol appears in the multifunction dis-
play in the assistance graphic display.
Further information on Active Brake Assist
(Y page 67).
Activating/deactivating ATTENTION
ASSIST X
Press the =or; button on the steering
wheel to select the Assist. Assist.menu.
X Press the 9or: button to select
Attention Assist
Attention Assist.
X Press ato confirm.
The current selection appears.
X Press ato confirm.
X Press the :or9 button to set Off
Off,
Standard
Standard orSensitive
Sensitive.
X Press the abutton to save the setting.
When ATTENTION ASSIST is deactivated, the
é symbol appears in the multifunction dis-
play in the assistance graphic display.
For further information about ATTENTION
ASSIST, see (Y page 189).
Activating/deactivating Blind Spot
Assist X
Press the =or; button on the steering
wheel to select the Assist. Assist.menu.
X Press the 9or: button to select
Blind Spot Assist
Blind Spot Assist.
X Press ato confirm.
The current selection appears.
X To activate/deactivate: pressaagain.
Further information about Blind Spot Assist
(Y page 192).
Activating/deactivating Lane Keeping
Assist X
Press the =or; button on the steering
wheel to select the Assist. Assist.menu.
X Press the 9or: button to select
Lane Keeping Assist
Lane Keeping Assist.
X Press ato confirm.
The current selection appears.
X Press aagain to confirm. Menus and submenus
209On-board computer and displays Z
Page 214 of 345
![MERCEDES-BENZ CLA COUPE 2016 Owners Manual X
Press the :or9 button to select the
Permanent display:
Permanent display: function.
The current setting, outside temperature
outside temperature
or Dig. speedo [mph]:
Dig. speedo [mph]:, appears.
X MERCEDES-BENZ CLA COUPE 2016 Owners Manual X
Press the :or9 button to select the
Permanent display:
Permanent display: function.
The current setting, outside temperature
outside temperature
or Dig. speedo [mph]:
Dig. speedo [mph]:, appears.
X](/manual-img/4/55479/w960_55479-213.png)
X
Press the :or9 button to select the
Permanent display:
Permanent display: function.
The current setting, outside temperature
outside temperature
or Dig. speedo [mph]:
Dig. speedo [mph]:, appears.
X Press the abutton to save the setting.
Lights Switching the daytime driving lights
on/off
The Daytime driving lights Daytime driving lights function can
only be switched on with the engine turned off.
X Press the =or; button on the steering
wheel to select the Settings
Settingsmenu.
X Press the :or9 button to select the
Lights
Lights submenu.
X Press ato confirm.
X Press the :or9 button to select the
Daytime driving lights
Daytime driving lights function.
If the Daytime Daytime driving drivinglights
lightsfunction has
been switched on, the cone of light and the
W symbol in the multifunction display are
shown in orange.
X Press the abutton to save the setting.
Further information on daytime driving lights
(Y page 107).
Vehicle Setting permanent SPEEDTRONIC
You can set the permanent limiter using the
Limit speed (winter tyres):
Limit speed (winter tyres): function.
X Press the =or; button on the steering
wheel to select the Settings Settingsmenu.
X Press the :or9 button to select the
Vehicle
Vehicle submenu.
X Press ato confirm.
X Press :or9 to select the Limit
Limit
speed (winter tyres):
speed (winter tyres): function.
You will see the current setting.
X Press ato confirm.
X Press the :or9 button to adjust the
permanent speed limiter in increments of ten
(160 km/h 160 km/h to240 km/h
240 km/h). The Off
Offsetting
switches the permanent speed limiter off.
X Press the abutton to store the entry.
Further information on the permanent speed
limiter (Y page 166). Activating/deactivating the automatic
locking feature
X Press the =or; button on the steering
wheel to select the Settings
Settings menu.
X Press the :or9 button to select the
Vehicle Vehicle submenu.
X Press ato confirm.
X Press the :or9 button to select the
Automatic door locks
Automatic door locks function.
If the Automatic door locks
Automatic door locks function is
switched on, the multifunction display shows
the doors in orange.
X Press the abutton to save the setting.
If you activate the Automatic door locks
Automatic door locks
function, the vehicle is centrally locked above a
speed of around 15 km/h.
For further information on the automatic locking feature; see (Y page 85).
Activating/deactivating the acoustic
locking confirmation
If you switch on the Acoustic AcousticLock Lockfunction, an
acoustic signal sounds when you lock the vehi-
cle.
X Press the =or; button on the steering
wheel to select the Settings Settingsmenu.
X Press the :or9 button to select the
Vehicle
Vehicle submenu.
X Press ato confirm.
X Press the :or9 button to select the
Acoustic Lock
Acoustic Lock function.
If the Acoustic Lock
Acoustic Lock function is activated,
the & symbol in the multifunction display
lights up orange.
X Press the abutton to save the setting.
Heating Auxiliary heating departure time
G
DANGER
If the exhaust pipe is blocked or sufficient
ventilation is not possible, toxic exhaust
fumes can enter the vehicle, especially car-
bon monoxide. This is the case, e.g. in
enclosed spaces, or if the vehicle is stuck in
snow. There is a risk of fatal injuries.
You should switch off the auxiliary heating in
enclosed spaces which do not have an extrac- Menus and submenus
211On-board computer and displays
Z
Page 217 of 345
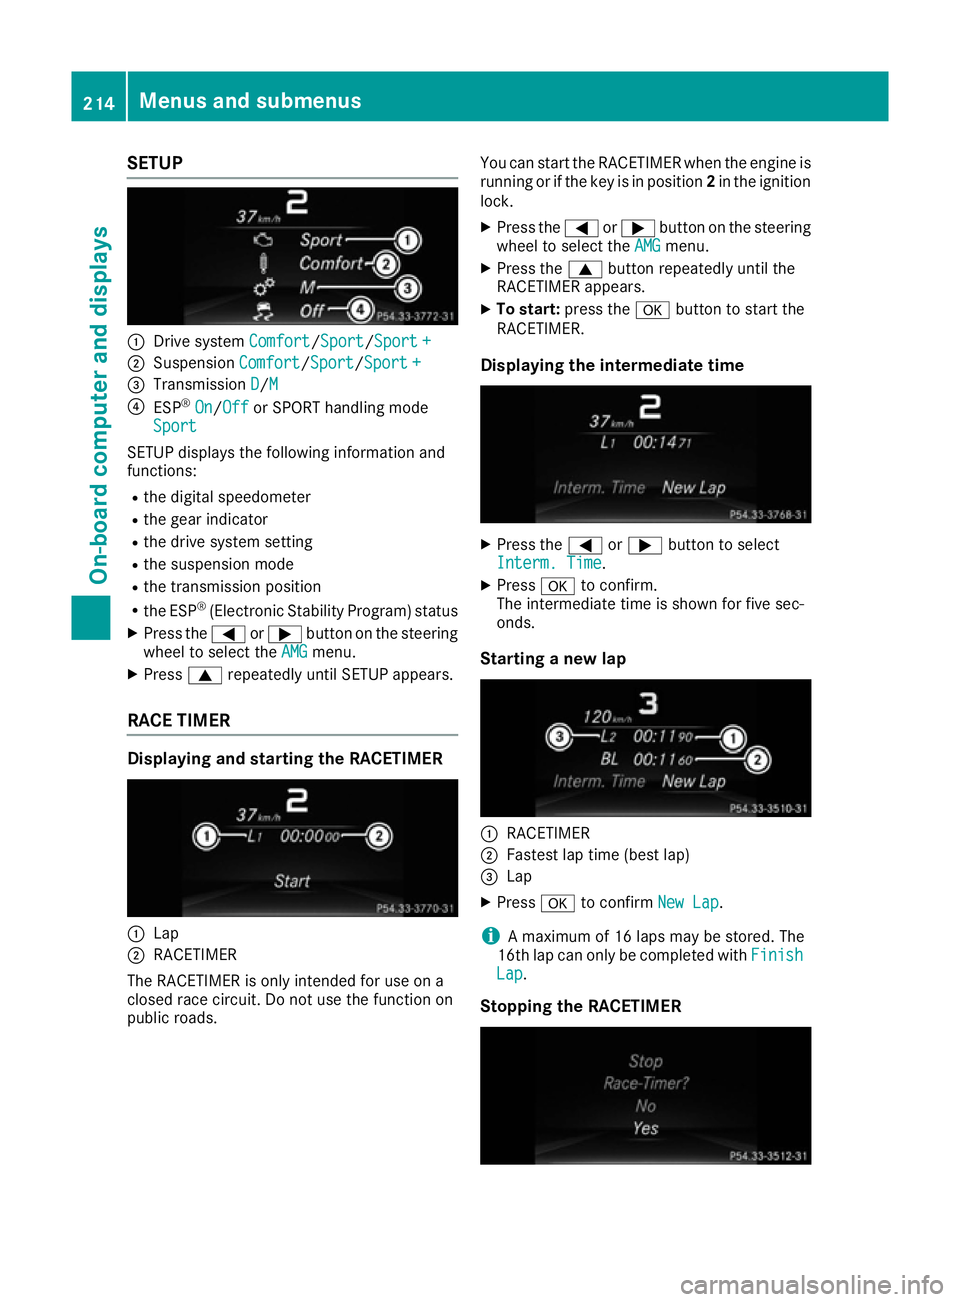
SETUP
:
Drive system Comfort
Comfort/SportSport/Sport +Sport +
; Suspension Comfort
Comfort/Sport Sport/Sport +Sport +
= Transmission D
D/M M
? ESP ®
On
On/Off Off or SPORT handling mode
Sport
Sport
SETUP displays the following information and
functions:
R the digital speedometer
R the gear indicator
R the drive system setting
R the suspension mode
R the transmission position
R the ESP ®
(Electronic Stability Program) status
X Press the =or; button on the steering
wheel to select the AMG
AMG menu.
X Press 9repeatedly until SETUP appears.
RACE TIMER Displaying and starting the RACETIMER
:
Lap
; RACETIMER
The RACETIMER is only intended for use on a
closed race circuit. Do not use the function on
public roads. You can start the RACETIMER when the engine is
running or if the key is in position 2in the ignition
lock.
X Press the =or; button on the steering
wheel to select the AMG
AMG menu.
X Press the 9button repeatedly until the
RACETIMER appears.
X To start: press the abutton to start the
RACETIMER.
Displaying the intermediate time X
Press the =or; button to select
Interm. Time
Interm. Time.
X Press ato confirm.
The intermediate time is shown for five sec-
onds.
Starting a new lap :
RACETIMER
; Fastest lap time (best lap)
= Lap
X Press ato confirm New Lap
New Lap.
i A maximum of 16 laps may be stored. The
16th lap can only be completed with Finish
Finish
Lap
Lap.
Stopping the RACETIMER 214
Menus and submenusOn-board computer and displays