2016 MERCEDES-BENZ C-CLASS CABRIOLET mirror
[x] Cancel search: mirrorPage 208 of 377

fied specialist workshop. Blind Spot Assist may
no longer work properly in such cases.
Monitoring range In particular, the detection of obstacles can be
impaired in the case of:
R dirt on the sensors or obscured sensors
R poor visibility, e.g. due to fog, heavy rain,
snow or spray
R narrow vehicles, e.g. motorcycles or bicycles
R very wide lanes
R narrow lanes
R vehicles not driving in the middle of their lane
R crash barriers or other road boundaries
Vehicles in the monitoring range are then not
indicated. At a distance of around 0.5 m
;from the vehi-
cle, Blind Spot Assist monitors the area up to
3.0 mnext to =and behind :your vehicle, as
shown in the picture.
If the lanes are narrow, vehicles driving in the
lane beyond the lane next to your vehicle may be
indicated, especially if the vehicles are not driv-
ing in the middle of their lane. This may be the
case if the vehicles are driving on the inner side of their lane.
Due to the nature of the system:
R warnings may be issued in error when driving
close to crash barriers or similar solid boun-
daries
R warnings may be interrupted when driving
alongside long vehicles, e.g. lorries, for a pro-
longed time Warning lamp
:
Warning lamp
Blind Spot Assist is not active at speeds below
approximately 30 km/h. Vehicles in the moni-
toring range are then not indicated.
If a vehicle is detected within the blind spot
monitoring range at speeds above approx-
imately 30 km/h, warning lamp :on the cor-
responding side lights up red. This warning lamp always lights up when a vehicle enters the blindspot monitoring range from behind or from the
side. When you overtake a vehicle, the warning
occurs only if the difference in speed is less than
12 km/h.
If you select reverse gear, Blind Spot Assist is
not operational.
The brightness of the warning lamps is auto-
matically adapted to the brightness of the sur-
roundings.
Collision warning
If a vehicle is detected in the blind spot moni-
toring range and you switch on the correspond-
ing turn signal, a double warning tone sounds.
The red warning lamp flashes on the relevant
exterior mirror. If the turn signal remains on,
detected vehicles are indicated by the flashing
of the red warning lamp on the exterior mirror.
There are no further warning tones.
Activating Blind Spot Assist
X Make sure that Blind Spot Assist is activated
in the on-board computer (Y page 233).
X Turn the key to position 2in the ignition lock.
The red warning lamps on the exterior mirrors
light up until the engine is started. Driving systems
205Driving and parking Z
Page 211 of 377

rior mirrors and draws your attention to vehicles
detected in the monitored area. If you then
switch on the corresponding turn signal to
change lanes, you will also receive a visual and
audible warning. If a risk of side impact is detec-
ted, a course-corrective brake application may
help you avoid a collision. Active Blind Spot
Assist evaluates the free space in the direction
of travel and to the side before making a course- correcting brake application. For this, Active
Blind Spot Assist uses the forward-facing radar
sensors.
Active Blind Spot Assist supports you from a
speed of approximately 30 km/h.
Important safety notes
Active Blind Spot Assist is only an aid and is not
a substitute for attentive driving. G
WARNING
Active Blind Spot Assist does not react to
vehicles:
R overtaking too closely on the side, placing
them in the blind spot area
R if the difference in the speed of approach
and overtaking is too great
As a result, Active Blind Spot Assist may nei-
ther give warnings nor intervene in such sit-
uations. There is a risk of an accident.
Always pay careful attention to the traffic sit-
uation and maintain a safe distance at the side of the vehicle.
Radar sensors
The Active Blind Spot Assist radar sensors are
integrated in the front and rear bumpers and
behind a cover in the radiator trim. Make sure
that the bumpers and the cover in the radiator
trim are free of dirt, ice or slush. The rear sen-
sors must not be covered, e.g. by bicycle racks
or overhanging loads. Following a severe impact or in the event of damage to the bumpers, have
the function of the radar sensors checked at a
qualified specialist workshop. Active Blind Spot
Assist might otherwise no longer function prop-
erly. Monitoring range G
WARNING
Active Blind Spot Assist does not detect all
traffic situations and road users. There is a
risk of an accident.
Always make sure that there is sufficient dis-
tance to the side for other traffic or obstacles. At a distance of approximately 0.5 m
;from
the vehicle, Active Blind Spot Assist monitors
the area up to 3.0 m next to =and behind :
your vehicle, as shown in the picture.
The detection of vehicles may be impaired in the
following situations:
R dirt on the sensors or obscured sensors
R poor visibility, e.g. due to rain, snow or spray
Vehicles in the monitoring range are then not
indicated.
Active Blind Spot Assist may not detect narrow
vehicles, such as motorcycles or bicycles, or
may detect them too late.
If the lanes are narrow, vehicles driving in the
lane beyond the lane next to your vehicle may be
indicated, especially if the vehicles are not driv- ing in the middle of their lane. This may be the
case if vehicles are driving on the inner side of
their lane. 208
Driving systemsDriving and parking
Page 213 of 377

Either a course-correcting brake application
appropriate to the driving situation, or none at
all, may occur in the following situations:
R vehicles or obstacles, e.g. crash barriers, are
located on both sides of your vehicle
R a vehicle approaches too closely on the side
R you have adopted a sporty driving style with
high cornering speeds
R you brake or accelerate significantly
R a driving safety system engages, such as
ESP ®
or PRE-SAFE ®
Brake
R ESP ®
is deactivated
R a loss of tyre pressure or a defective tyre is
detected
Activating Active Blind Spot Assist X Make sure that Active Blind Spot Assist is
activated on the on-board computer
(Y page 233).
X Switch on the ignition.
Warning lamps :on the exterior mirrors light
up red for approximately 1.5 second s. Grey
radar waves propagating backwards ;
appear next to the vehicle on the assistant
display on the multifunction display.
Above a speed of 30 km/h, the colour of the
radar waves on the assistant display changes to green ;. Active Blind Spot Assist is then
ready for use.
Towing a trailer
If you couple up a trailer, make sure that you
have correctly established the electrical con-
nection. This can be accomplished by checking
the trailer lighting. Active Blind Spot Assist is
then deactivated. The radar waves ;next to
the vehicle are hidden on the assistant display.
The Active
Active Blind BlindSpot
SpotAssist
Assist not
notavail‐
avail‐
able
able when
whentowing
towing a
atrailer
trailer See
SeeOwner's
Owner's
Manual
Manual message appears on the multifunction
display. Active Lane Keeping Assist General notes
Active Lane Keeping Assist monitors the area in
front of your vehicle by means of multifunction
camera :at the top of the windscreen. Various
different areas to the front, rear and side of your vehicle are also monitored with the aid of the
radar sensor system. Active Lane Keeping
Assist detects lane markings on the road and
can warn you before you leave your lane unin-
tentionally. If you do not react to the warning, a
lane-correcting brake application can bring the
vehicle back into the original lane.
This function is available in a speed range
between 60 km/h and 200 km/h.
Important safety notes Active Lane Keeping Assist can neither reduce
the risk of an accident if you fail to adapt your
driving style nor override the laws of physics.
Active Lane Keeping Assist cannot take account of road and weather conditions. It may not rec-
ognise certain road and traffic conditions.
Active Lane Keeping Assist is only an aid. You
are responsible for the distance to the vehicle in
front, for vehicle speed, for braking in good time
and for staying in lane.
Active Lane Keeping Assist cannot continuously
keep your vehicle in its lane. G
WARNING
Active Lane Keeping Assist cannot always
clearly detect lane markings. 210
Driving systemsDriving and parking
Page 305 of 377

Cup holder (vehicles with manual transmission)
X To fit : insert the cup holder at the front and
then slide it backwards until it reaches edge
= of the underside of the stowage compart-
ment. Insert the cup holder so that the wedge of the upper section of the cup holder faces
forwards.
X Slide upper cup holder sections :on the
driver's and front-passenger sides outwards,
until both left and right sides ;engage. Cup holder (vehicles with automatic transmis-
sion)
If you remove the cup holder insert, you can use
the resulting compartment for stowage.
X To open: open the stowage compartment
(Y page 297).
X To remove: slide catch=forwards and pull
out cup holder ;.
X To insert: insert cup holder ;and slide back
catch =.
X To close: push cover :of the stowage com-
partment closed.
You can remove the rubber mat of the cup
holder to clean it. Wash it with clean, lukewarm water only. Sun visors
Overview :
Mirror light
; Retainer
= Retaining clip, e.g. for a car park ticket
? Vanity mirror
A Mirror cover
Vanity mirror in the sun visor Mirror light
:only functions if the sun visor is
clipped into retainer ;and mirror cover Ahas
been folded up.
Glare from the side X
Fold down the sun visor.
X Pull the sun visor out of retainer ;.
X Swing the sun visor to the side. Ashtray
Front ashtray !
The stowage space under the ashtray is not
heat resistant. Before placing lit cigarettes in the ashtray, make sure that the ashtray is
properly engaged. Otherwise, the stowage
space could be damaged. 302
FeaturesStowing and features
Page 322 of 377

Always switch off the windscreen wipers and
the ignition before cleaning the windscreen or wiper blades.
! Do not use dry cloths, abrasive cleaning
agents, solvents or solvent-based cleaning
agents to clean the inside of the windows/
windscreen. Do not touch the inside of the
windows/windscreen with hard items such
as an ice scraper or a ring. Otherwise, the
windows/windscreen could be damaged.
! Clean the water drainage channels of the
windscreen and the rear window at regular
intervals. Deposits such as leaves, petals and pollen may under certain circumstances pre-
vent water from draining away. This can lead
to corrosion damage and damage to elec-
tronic components.
X Clean the inside and outside of the windows
with a damp cloth and a cleaning agent that is
recommended and approved by Mercedes-
Benz.
Cleaning the wiper blades G
WARNING
If the windscreen wipers are set in motion
when cleaning the windscreen or wiper
blades, you could become trapped. There is a danger of injury.
Always switch off the windscreen wipers and
the ignition before cleaning the windscreen or wiper blades.
! Do not pull on the wiper blade. Otherwise,
the wiper blade could be damaged.
! Do not clean wiper blades too often and do
not rub them too hard. Otherwise, the graph-
ite coating could be damaged. This could
cause wiper noise.
! Hold the wiper arm securely when folding
back. The windscreen could be damaged if
the wiper arm hits against it suddenly.
X Fold the wiper arms away from the wind-
screen (Y page 122).
X Clean the wiper blades carefully using a damp
cloth.
X Fold the windscreen wipers back again before
switching on the ignition. Cleaning the exterior lighting !
Only use cleaning agents or cleaning cloths
that are suitable for plastic lenses. Unsuitable
cleaning agents or cleaning cloths could
scratch or damage the plastic lenses of the
exterior lighting.
X Clean the plastic lenses of the exterior light-
ing using a wet sponge and a mild cleaning
agent, e.g. Mercedes-Benz car shampoo or
cleaning cloths.
Cleaning the mirror turn signal !
Only use cleaning agents or cleaning cloths
that are suitable for plastic lenses. Unsuitable
cleaning agents or cleaning cloths could
scratch or damage the plastic lenses of the
mirror turn signals.
X Clean the plastic lenses of the mirror turn sig-
nals in the exterior mirror housing using a wet sponge and mild cleaning agent, e.g.
Mercedes-Benz car shampoo or cleaning
cloths.
Cleaning the sensors !
If you clean the sensors with a high-pressure
cleaner, make sure that you keep a distance
of at least 30 cm between the vehicle and the high-pressure cleaner nozzle. Information
about the correct distance is available from
the equipment manufacturer. X
Clean sensors :of the driving systems with
water, car shampoo and a soft cloth. Care
319Maintenance and care Z
Page 371 of 377
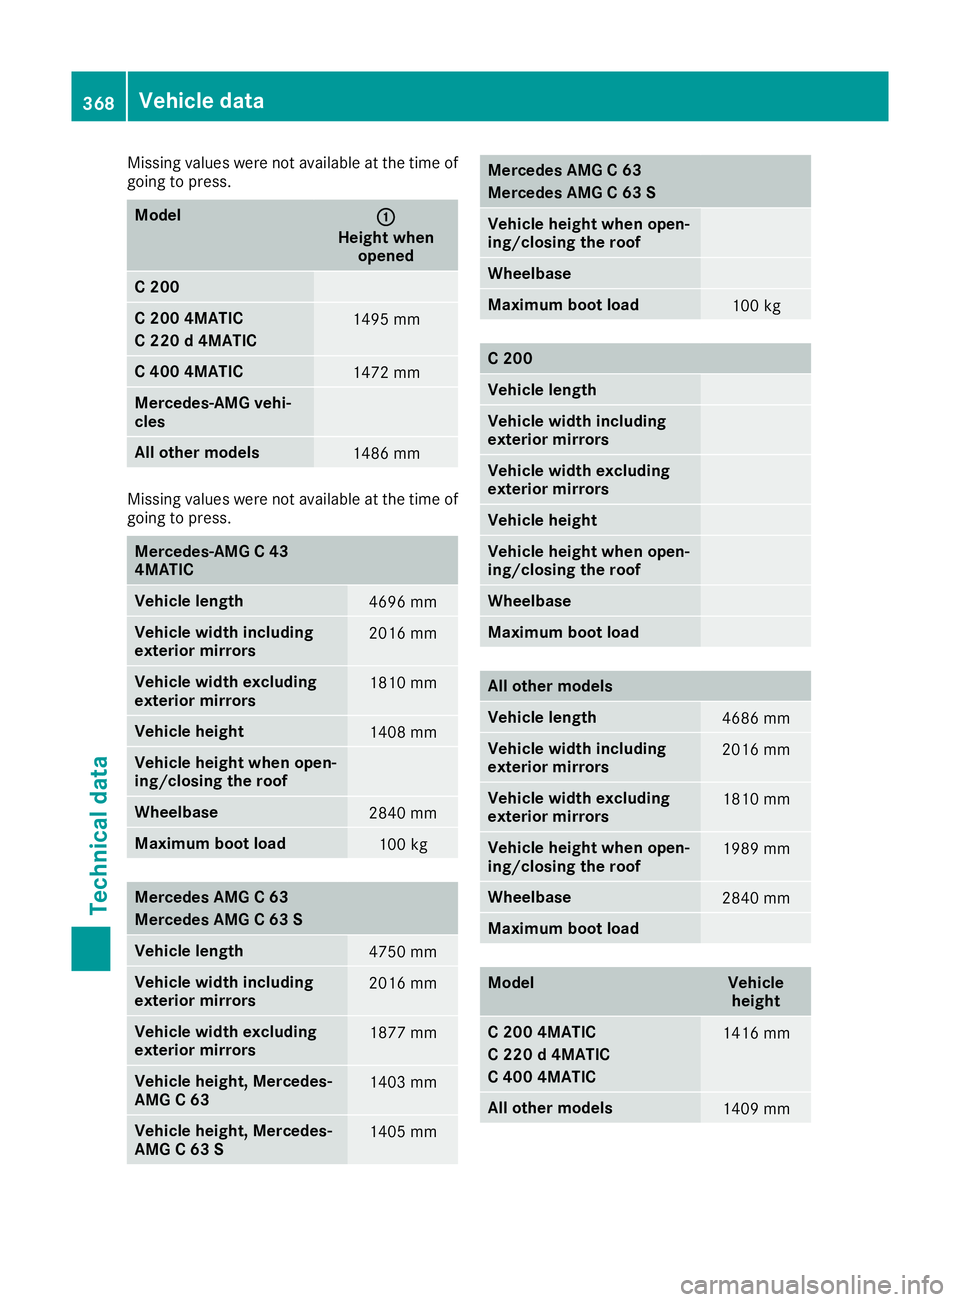
Missing values were not available at the time of
going to press. Model
:
:
Height when opened C 200
C 200 4MATIC
C 220 d 4MATIC
1495 mm
C 400 4MATIC
1472 mm
Mercedes-AMG vehi-
cles
All other models
1486 mm
Missing values were not available at the time of
going to press. Mercedes-AMG C 43
4MATIC
Vehicle length
4696 mm
Vehicle width including
exterior mirrors
2016 mm
Vehicle width excluding
exterior mirrors
1810 mm
Vehicle height
1408 mm
Vehicle height when open-
ing/closing the roof
Wheelbase
2840 mm
Maximum boot load
100 kg
Mercedes AMG C 63
Mercedes AMG C 63 S
Vehicle length
4750 mm
Vehicle width including
exterior mirrors
2016 mm
Vehicle width excluding
exterior mirrors
1877 mm
Vehicle height, Mercedes-
AMG C 63
1403 mm
Vehicle height, Mercedes-
AMG C 63 S
1405 mm Mercedes AMG C 63
Mercedes AMG C 63 S
Vehicle height when open-
ing/closing the roof
Wheelbase
Maximum boot load
100 kg
C 200
Vehicle length
Vehicle width including
exterior mirrors
Vehicle width excluding
exterior mirrors
Vehicle height
Vehicle height when open-
ing/closing the roof
Wheelbase
Maximum boot load
All other models
Vehicle length
4686 mm
Vehicle width including
exterior mirrors
2016 mm
Vehicle width excluding
exterior mirrors
1810 mm
Vehicle height when open-
ing/closing the roof
1989 mm
Wheelbase
2840 mm
Maximum boot load
Model Vehicle
height C 200 4MATIC
C 220 d 4MATIC
C 400 4MATIC
1416 mm
All other models
1409 mm368
Vehicle dataTechnical data