2016 MERCEDES-BENZ B-Class ELECTRIC door lock
[x] Cancel search: door lockPage 158 of 342

The electric parking brake can only be
released:
Rwhen the SmartKey is in position1or 2in
the ignition lock (
Ypage 131) or
Rif the ignition was switched on using the
Start/Stop button
Applying automatically
When the vehicle's HOLD function is holding
the vehicle at a standstill, the electric parking
brake is engaged automatically.
In addition, at least one of the following con-
ditions must be fulfilled:
Rthe drive system is switched off.
Rthe driver's door is open and the seat belt is
not fastened.
Rthere is a system malfunction.
Rthe power supply is insufficient.
Rthe vehicle is stationary for a lengthy
period.
The red F(USA only) or !(Canada
only) indicator lamp in the instrument cluster
lights up.
Releasing automatically
Your vehicle's electric parking brake is auto-
matically released if all of the following con-
ditions are met:
Rthe vehicle has been started.
Rthe transmission is in position Dor R.
Rthe seat belt has been fastened.
Ryou depress the accelerator pedal.
If the transmission is in position R, the tailgate
must be closed.
If your seat belt is not fastened, the following
conditions must be fulfilled to automatically
release the electric parking brake:
Rthe driver's door is closed.
Ryou have shifted out of transmission posi-
tion Por you have previously driven faster
than 2 mph (3 km/h). Ensure that you do not depress the acceler-
ator pedal unintentionally. Otherwise the
parking brake will be released and the vehicle
will start to move.
Emergency braking
The vehicle can also be braked during an
emergency by using the electric parking
brake.
XWhile driving, push handle :of the electric
parking brake (
Ypage 155).
The vehicle is braked as long as you keep
handle :of the electric parking brake
pressed. The longer the electric parking
brake handle :is depressed, the greater
the braking force.
During braking:
Ra warning tone sounds
Rthe Please Release Parking Brake
message appears
Rthe red F(USA only) or !(Canada
only) indicator lamp in the instrument clus-
ter flashes
When the vehicle has been braked to a stand-
still, the electric parking brake is applied.
Parking the vehicle for a long period
If you leave the vehicle parked for longer than
four weeks, the battery may be damaged by
exhaustive discharging.
If you leave the vehicle parked for longer than six weeks, the vehicle may suffer damage as a
result of lack of use.
XVisit a qualified specialist workshop and
seek advice.
iYou can obtain information about trickle
chargers from a qualified specialist work-
shop.
156Parking
Driving and parking
Page 167 of 342

The electric parking brake secures the vehicle
automatically if the HOLD function is activa-
ted and:
Rthe driver's seat belt is not fastened and the
driver's door is open.
Rthe engine is switched off, unless it is auto- matically switched off by the ECO start/
stop function.
Ra system malfunction occurs.
Rthe power supply is not sufficient.
The Brake Immediately
message may also
appear in the multifunction display.
XImmediately depress the brake firmly until
the warning message in the multifunction
display goes out.
The HOLD function is deactivated. The horn
sounds at regular intervals if you have
switched off the engine, released the seat
belt and opened the driver's door with the
HOLD function activated. The sounding of the
horn alerts you to the fact that the HOLD
function is still activated. If you attempt to
lock the vehicle, the tone becomes louder.
The vehicle cannot be locked until you have
deactivated the HOLD function.
iAfter switching off the engine, it can only
be started again once you have deactivated
the HOLD function.
PARKTRONIC
Important safety notes
PARKTRONIC is an electronic parking aid with ultrasonic sensors. It monitors the area
around your vehicle using six sensors in the
front bumper and six sensors in the rear
bumper. PARKTRONIC indicates visually and
audibly the distance between your vehicle
and an object.
PARKTRONIC is only an aid. It is not a replace-
ment for your attention to your immediate
surroundings. You are always responsible for
safe maneuvering, parking and exiting a park-
ing space. When maneuvering, parking or pulling out of a parking space, make sure that
there are no persons, animals or objects in
the area in which you are maneuvering.
!When parking, pay particular attention to
objects above or below the sensors, such
as flower pots or trailer drawbars.
PARKTRONIC does not detect such objects
when they are in the immediate vicinity of
the vehicle. You could damage the vehicle
or the objects.
The sensors may not detect snow and other
objects that absorb ultrasonic waves.
Ultrasonic sources such as an automatic
car wash, the compressed-air brakes on a
truck or a pneumatic drill could cause
PARKTRONIC to malfunction.
PARKTRONIC may not function correctly on
uneven terrain.
PARKTRONIC is activated automatically when
you:
Rswitch on the ignition
Rshift the transmission to position D,Ror N
Rshift the transmission to position D,Ror N
Rrelease the electric parking brake
Range of the sensors
General notes
PARKTRONIC does not take objects into con-
sideration that are:
Rbelow the detection range, e.g. people, ani-
mals or objects.
Rabove the detection range, e.g. overhang-
ing loads, truck overhangs or loading
ramps.
Driving systems165
Driving and parking
Z
Page 200 of 342

XPress the=or; button on the steer-
ing wheel to select the Sett.
menu.
XPress the:or9 button to select the
Instrument Cluster
submenu.
XPress ato confirm.
XPress the :or9 button to select the
Permanent Display:
function.
The current setting Outside
Temperature
orSpeedometer [km/h]/Speedometer
[mph]appears.
XPress the abutton to save the setting.
Lights
Switching the daytime running lamps on/
off
XPress the =or; button on the steer-
ing wheel to select the Sett.
menu.
XPress the:or9 button to select the
Light
submenu.
XPress ato confirm.
XPress the :or9 button to select the
Daytime Running Lights
function.
If the Daytime Running Lights
function
has been switched on, the multifunction
display shows the cone of light and the
W symbol in orange.
XPress the abutton to save the setting.
Further information on daytime running
lamps (
Ypage 100).
Vehicle
Activating/deactivating the automatic
door locking mechanism
XPress the =or; button on the steer-
ing wheel to select the Sett.
menu.
XPress the:or9 button to select the
Vehicle
submenu.
XPress ato confirm.
XPress the :or9 button to select the
Automatic Door Lock
function.
If the Automatic Door Lock
function is
switched on, the multifunction display
shows the doors in orange.
XPress the abutton to save the setting.
If you activate the Automatic door locks
function, the vehicle is centrally locked above
a speed of around 9 mph (15 km/h).
For further information on the automatic lock-
ing feature, see (
Ypage 80).
Activating/deactivating the acoustic
locking verification signal
If you switch on the Acoustic
Lockfunction,
an acoustic signal sounds when you lock the
vehicle.
XPress the =or; button on the steer-
ing wheel to select the Sett.
menu.
XPress the:or9 button to select the
Vehicle
submenu.
XPress ato confirm.
XPress the :or9 button to select the
Acoustic Lock
function.
If the Acoustic
Lockfunction is activated,
the multifunction display shows the &
symbol in orange.
XPress the abutton to save the setting.
Restoring the factory settings
XPress the =or; button on the steer-
ing wheel to select the Sett.
menu.
XPress the:or9 button to select the
Factory Setting
submenu.
XPress ato confirm.
The Reset All Settings?
function
appears.
XPress the :or9 button to select No
orYes.
XPress the abutton to confirm the selec-
tion.
If you have selected Yes
, the multifunction
display shows a confirmation message.
For safety reasons, not all functions are reset.
198Menus and submenus
On-board computer and displays
Page 227 of 342

Vehicle
Display messagesPossible causes/consequences andMSolutions
Depress Brake to
Start Engine
You have attempted to start the drive system with the transmis-
sion in positionNwithout depressing the brake pedal.
XDepress the brake pedal.
To Deselect P or
N, Depress Brake
and Start Engine
You have attempted to shift the transmission to position Ror D
without starting the drive system.
XStart the drive system.
XDepress the brake pedal.
iIt is only possible to shift the transmission from position Pto
the desired position if you depress the brake pedal. Only then
can the parking lock be deactivated. If you do not depress the
brake pedal, the DIRECT SELECT lever can still be moved but the parking lock remains engaged.
iAt transmission fluid temperatures below Ò4‡( Ò20 †) you can
only shift out of position Pinto another transmission position
when the engine is running.
Apply Brake to
Shift from 'P'
You have attempted to shift the transmission to position R,Nor D
without depressing the brake pedal.
XDepress the brake pedal.
Transmission Not
in P Risk of Vehi‐
cle Rolling Away
The driver's door is open or not fully closed and the transmission
is in position R,Nor D.
A warning tone also sounds.
GWARNING
The vehicle may roll away.
There is a risk of an accident.
XShift the transmission to position P.
XSecure the vehicle against rolling away (Ypage 153).
XClose the driver's door completely.
Display messages225
On-board computer and displays
Z
Page 228 of 342

Display messagesPossible causes/consequences andMSolutions
Service Required
DoNotShiftGears
Visit Dealer
You cannotchangeth e transmission position due to a malfunction.
A warning tone also sounds.
If transmission position Dis selected:
XDrive to a qualified specialist workshop without shifting the
transmission from position D.
If transmission position R,N or Pis selected:
XSecur eth e vehicle against rolling away (Ypage 153).
XNotify a qualified specialist workshop or breakdown service.
XDo no tto w the vehicle.
Only Shift to 'P'
when Vehicle is
Stationary
The vehicle is moving.
XPull over and stop the vehicle safely as soon as possible, paying
attention to road and traffic conditions.
XShift th e transmission to position P.
AThe tailgate is open.
XClosethe tailgate.
?The hood is open.
A warning tone also sounds.
GWARNING
The open hood may block your view when the vehicle is in motion.
There is a risk of an accident.
XPull over and stop the vehicle safely as soon as possible, paying
attention to road and traffic conditions.
XSecur eth e vehicle against rolling away (Ypage 153).
XClose the hood.
CAt least one door is open.Awarning tone also sounds.
XClose all the doors.
226Display messages
On-board computer and displays
Page 230 of 342

SmartKey
Display messagesPossible causes/consequences andMSolutions
Â
Key Does Not
Belong to Vehicle
You have put the wrong SmartKey in the ignition lock.
XUse the correct SmartKey.
Â
TakeYourKeyfrom
Ignition
The SmartKey is in the ignition lock.
XRemove the SmartKey.
Â
Obtain a New Key
The SmartKey needs to be replaced.
XVisit a qualified specialist workshop.
Â
ReplaceKeyBattery
The SmartKey battery is discharged.
XChange the battery (Ypage 75).
Â
Don't Forget Your
Key
The display message is shown for a maximum of 60 seconds and
is only a reminder.
You open the driver's door with the drive system switched off. The
SmartKey is not in the ignition lock.
XTake the SmartKey with you when you leave the vehicle.
Â
Key Not Detected
(red display message)
The SmartKey is not in the vehicle.
A warning tone also sounds.
If the drive system is switched off, you can no longer lock the
vehicle centrally or start the drive system.
XPull over and stop the vehicle safely as soon as possible, paying
attention to road and traffic conditions.
XSecure the vehicle against rolling away (Ypage 153).
XLocate the SmartKey.
There is interference from a strong source of radio waves, and as
a result the key is not detected while the drive system is running.
A warning tone also sounds.
XPull over and stop the vehicle safely as soon as possible, paying
attention to road and traffic conditions.
XSecure the vehicle against rolling away (Ypage 153).
XInsert the SmartKey into the ignition lock and bring into key
mode.
228Display messages
On-board computer and displays
Page 244 of 342

Useful information
i
This Operator's Manual describes all
models and all standard and optional equip-
ment of your vehicle available at the time of
publication of the Operator's Manual.
Country-specific differences are possible.
Please note that your vehicle may not be
equipped with all features described. This
also applies to safety-related systems and
functions.
iRead the information on qualified special-
ist workshops (
Ypage 26).
Loading guidelines
GWARNING
If objects, luggage or loads are not secured or
not secured sufficiently, they could slip, tip
over or be flung around and thereby hit vehicle
occupants. There is a risk of injury, particu-
larly in the event of sudden braking or a sud-
den change in direction.
Always store objects so that they cannot be
flung around. Secure objects, luggage or
loads against slipping or tipping before the
journey.
The handling characteristics of a laden vehi-
cle are dependent on the distribution of the
load within the vehicle. For this reason, you
should observe the following notes when
transporting a load:
RNever exceed the maximum permissible
gross vehicle mass or the gross axle weight
rating for the vehicle (including occupants).
The values are specified on the vehicle
identification plate on the B-pillar of the
driver's door.
RThe cargo compartment is the preferred
place to carry objects.
RPosition heavy loads as far forwards as pos-
sible and as low down in the cargo com-
partment as possible.
RThe load must not protrude above the
upper edge of the seat backrests.
RAlways place the load against the rear or
front seat backrests. Make sure that the
seat backrests are securely locked into
place.
RAlways place the load behind unoccupied
seats if possible.
RUse the cargo tie-down rings and the parcel
nets to transport loads and luggage.
RUse cargo tie-down rings and fastening
materials appropriate for the weight and
size of the load.
RHook in the cargo net when loading.
RThe maximum load capacity of the stowage
well under the cargo compartment floor is
55 lbs (25 kg).
RSecure the load with sufficiently strong and
wear-resistant tie-downs. Pad sharp edges
for protection.
!Do not position the load on one part of the
folding cargo compartment floor only. The
maximum load capacity of the folding cargo
compartment floor is 220 lbs (100 kg). Dis-
tribute the weight evenly to avoid damaging
the cargo compartment floor. Place a solid
board under the load if necessary. Please
note that the load on the cargo compart-
ment floor will be increased when the load
is lashed down.
Stowage areas
Stowage spaces
Important safety notes
GWARNING
If objects in the passenger compartment are
stowed incorrectly, they can slide or be
thrown around and hit vehicle occupants.
There is a risk of injury, particularly in the
event of sudden braking or a sudden change
in direction.
242Stowage areas
Stowage and features
Page 254 of 342

There is a risk of injury, particularly in the
event of sudden braking or a sudden change
in direction.
RAlways stow objects so that they cannot be
thrown around in such situations.
RAlways make sure that objects do not pro-
trude from stowage spaces, parcel nets or
stowage nets.
RClose the lockable stowage spaces before
starting a journey.
RStow and secure objects that are heavy,
hard, pointed, sharp-edged, fragile or too
large in the cargo compartment.
!Only use the cup holders for containers of
the right size and which have lids. The
drinks could otherwise spill.
Observe the loading guidelines (
Ypage 242).
The stowage compartments in the doors pro-
vide space for bottles:
Rfront: capacity up to 51 fl. oz. (1.5 l)
Rrear: capacity up to 17 fl. oz. (0.5 l)
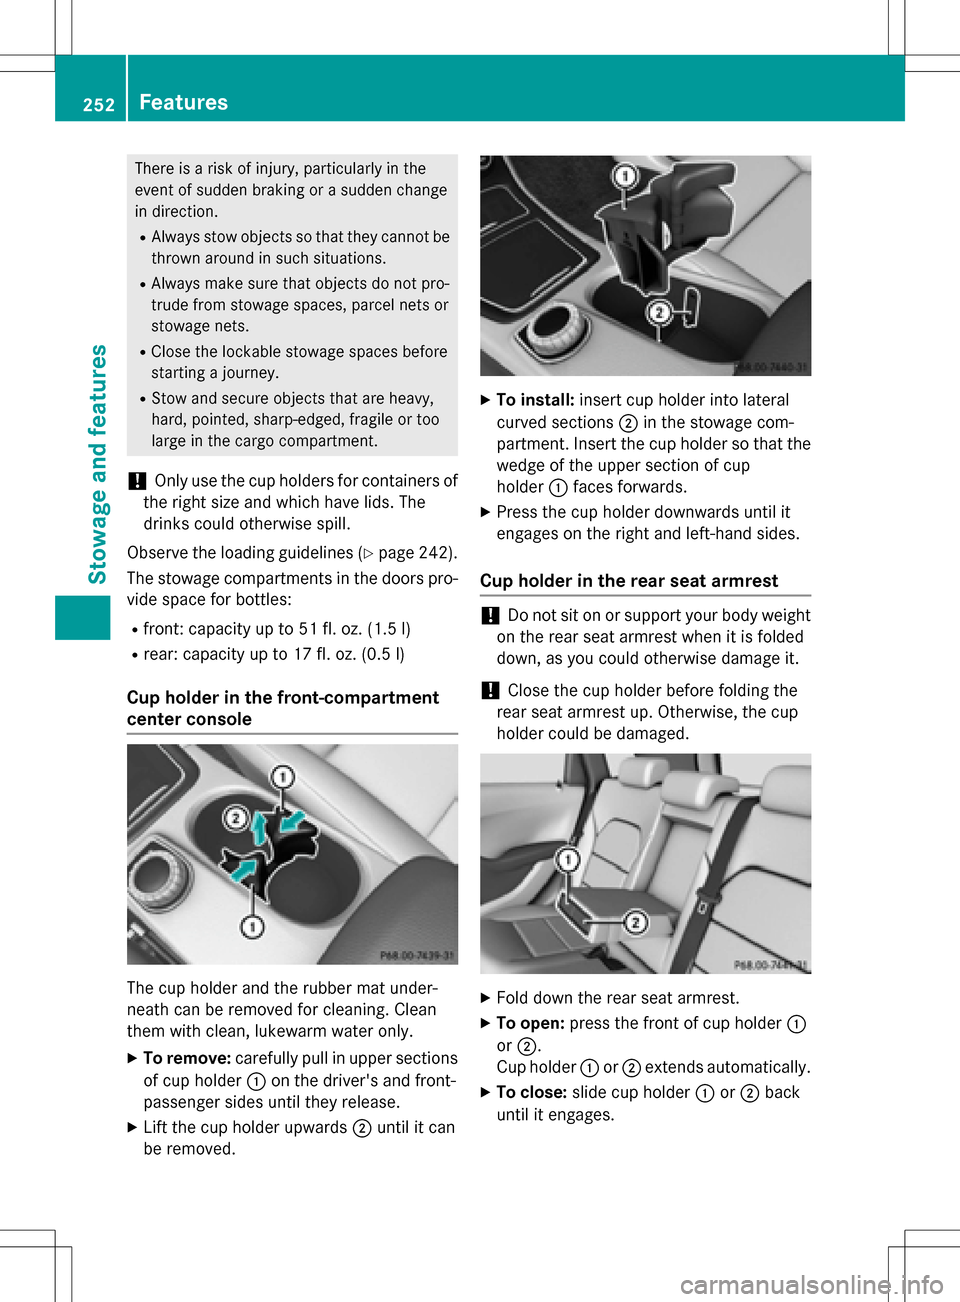
Cup holder in the front-compartment
center console
The cup holder and the rubber mat under-
neath can be removed for cleaning. Clean
them with clean, lukewarm water only.
XTo remove:carefully pull in upper sections
of cup holder :on the driver's and front-
passenger sides until they release.
XLift the cup holder upwards ;until it can
be removed.
XTo install: insert cup holder into lateral
curved sections ;in the stowage com-
partment. Insert the cup holder so that the wedge of the upper section of cup
holder :faces forwards.
XPress the cup holder downwards until it
engages on the right and left-hand sides.
Cup holder in the rear seat armrest
!Do not sit on or support your body weight
on the rear seat armrest when it is folded
down, as you could otherwise damage it.
!Close the cup holder before folding the
rear seat armrest up. Otherwise, the cup
holder could be damaged.
XFold down the rear seat armrest.
XTo open: press the front of cup holder :
or ;.
Cup holder :or; extends automatically.
XTo close: slide cup holder :or; back
until it engages.
252Features
Stowage and features