2016 MERCEDES-BENZ B-Class ELECTRIC ESP
[x] Cancel search: ESPPage 133 of 342
Rin transmission positionN
Rduring and after ESP stability control
If you do not make an additional effort to
apply the brake yourself, the braking effect
may not be sufficient. If necessary, counter-
act the reduced regenerative braking effect
by applying the brake yourself.
Before commencing your journey, ensure that the charging cable required for charging the
high-voltage battery is in the vehicle.
SmartKey positions
SmartKey
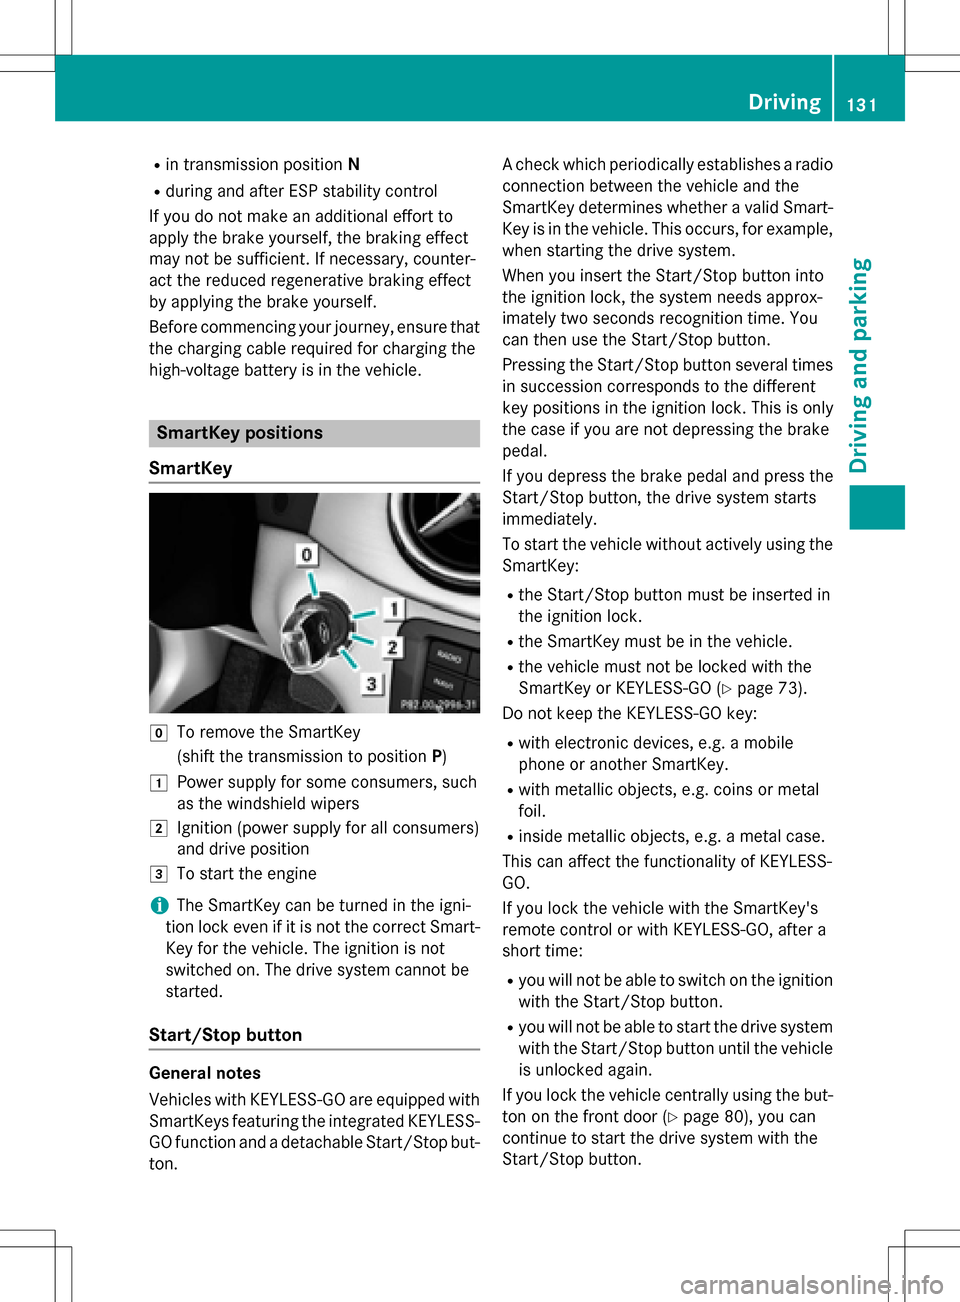
gTo remove the SmartKey
(shift the transmission to position P)
1Power supply for some consumers, such
as the windshield wipers
2Ignition (power supply for all consumers)
and drive position
3To start the engine
iThe SmartKey can be turned in the igni-
tion lock even if it is not the correct Smart- Key for the vehicle. The ignition is not
switched on. The drive system cannot be
started.
Start/Stop button
General notes
Vehicles with KEYLESS-GO are equipped with
SmartKeys featuring the integrated KEYLESS-GO function and a detachable Start/Stop but-
ton. A check which periodically establishes a radio
connection between the vehicle and the
SmartKey determines whether a valid Smart-
Key is in the vehicle. This occurs, for example,
when starting the drive system.
When you insert the Start/Stop button into
the ignition lock, the system needs approx-
imately two seconds recognition time. You
can then use the Start/Stop button.
Pressing the Start/Stop button several times
in succession corresponds to the different
key positions in the ignition lock. This is only
the case if you are not depressing the brake
pedal.
If you depress the brake pedal and press the
Start/Stop button, the drive system starts
immediately.
To start the vehicle without actively using the
SmartKey:
Rthe Start/Stop button must be inserted in
the ignition lock.
Rthe SmartKey must be in the vehicle.
Rthe vehicle must not be locked with the
SmartKey or KEYLESS-GO (
Ypage 73).
Do not keep the KEYLESS-GO key:
Rwith electronic devices, e.g. a mobile
phone or another SmartKey.
Rwith metallic objects, e.g. coins or metal
foil.
Rinside metallic objects, e.g. a metal case.
This can affect the functionality of KEYLESS-
GO.
If you lock the vehicle with the SmartKey's
remote control or with KEYLESS-GO, after a
short time:
Ryou will not be able to switch on the ignition
with the Start/Stop button.
Ryou will not be able to start the drive system
with the Start/Stop button until the vehicle is unlocked again.
If you lock the vehicle centrally using the but-
ton on the front door (
Ypage 80), you can
continue to start the drive system with the
Start/Stop button.
Driving131
Driving and parking
Z
Page 134 of 342
The drive system can be switched off while
the vehicle is in motion by pressing and hold-
ing the Start/Stop button for three seconds.
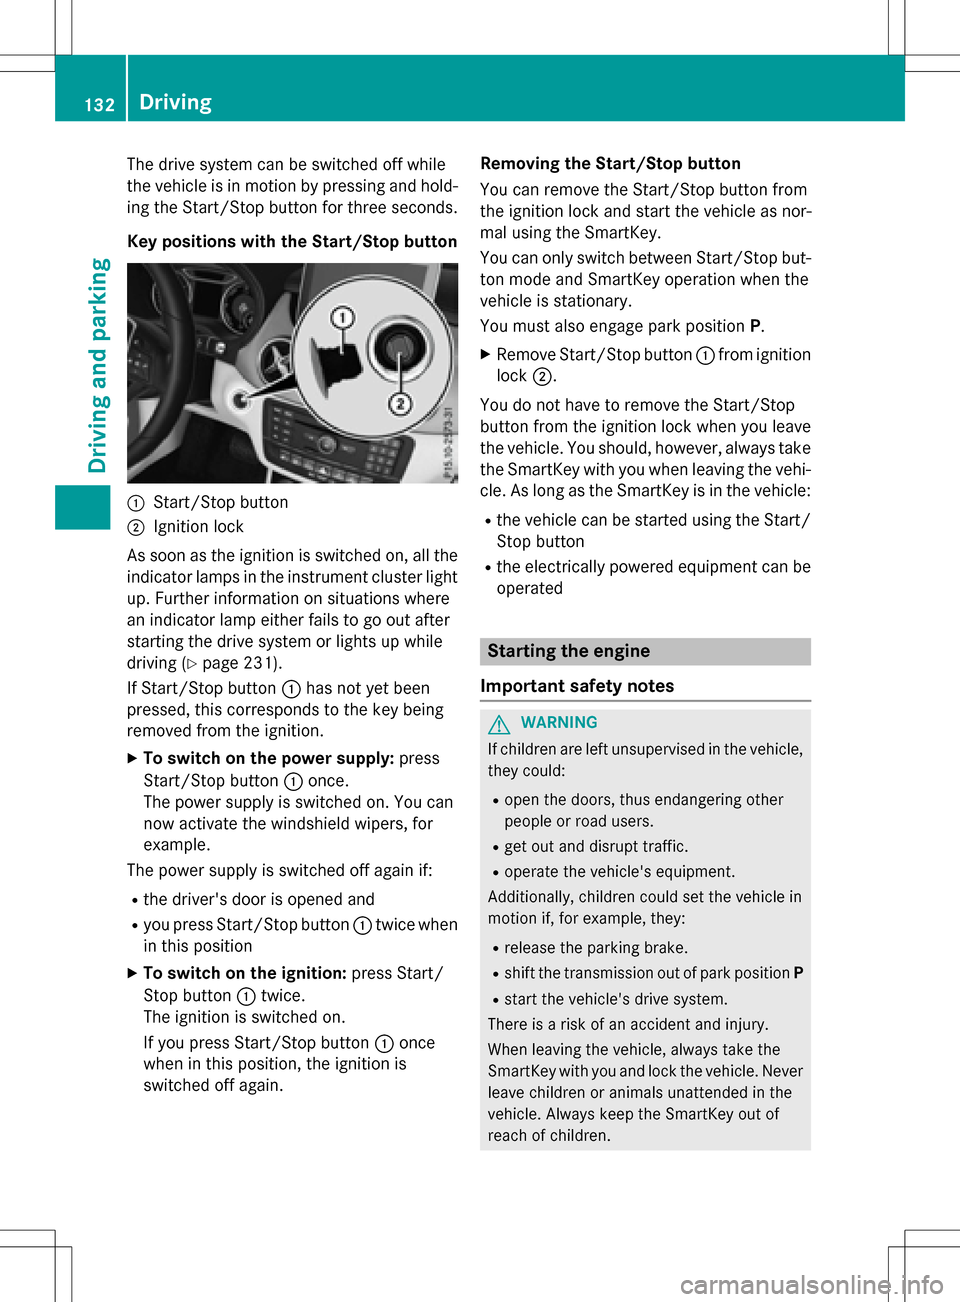
Key positions with the Start/Stop button
:Start/Stop button
;Ignition lock
As soon as the ignition is switched on, all the
indicator lamps in the instrument cluster light
up. Further information on situations where
an indicator lamp either fails to go out after
starting the drive system or lights up while
driving (
Ypage 231).
If Start/Stop button :has not yet been
pressed, this corresponds to the key being
removed from the ignition.
XTo switch on the power supply: press
Start/Stop button :once.
The power supply is switched on. You can
now activate the windshield wipers, for
example.
The power supply is switched off again if:
Rthe driver's door is opened and
Ryou press Start/Stop button :twice when
in this position
XTo switch on the ignition: press Start/
Stop button :twice.
The ignition is switched on.
If you press Start/Stop button :once
when in this position, the ignition is
switched off again. Removing the Start/Stop button
You can remove the Start/Stop button from
the ignition lock and start the vehicle as nor-
mal using the SmartKey.
You can only switch between Start/Stop but-
ton mode and SmartKey operation when the
vehicle is stationary.
You must also engage park position P.
XRemove Start/Stop button:from ignition
lock ;.
You do not have to remove the Start/Stop
button from the ignition lock when you leave
the vehicle. You should, however, always take
the SmartKey with you when leaving the vehi-
cle. As long as the SmartKey is in the vehicle:
Rthe vehicle can be started using the Start/ Stop button
Rthe electrically powered equipment can be
operated
Starting the engine
Important safety notes
GWARNING
If children are left unsupervised in the vehicle,
they could:
Ropen the doors, thus endangering other
people or road users.
Rget out and disrupt traffic.
Roperate the vehicle's equipment.
Additionally, children could set the vehicle in
motion if, for example, they:
Rrelease the parking brake.
Rshift the transmission out of park position P
Rstart the vehicle's drive system.
There is a risk of an accident and injury.
When leaving the vehicle, always take the
SmartKey with you and lock the vehicle. Never
leave children or animals unattended in the
vehicle. Always keep the SmartKey out of
reach of children.
132Driving
Driving and parking
Page 136 of 342
Hill start assist
Hill start assist will aid you when pulling away
on a hill. It holds the vehicle for a short time
after you have removed your foot from the
brake pedal. This gives you enough time to
move your foot from the brake pedal to the
accelerator pedal and depress it before the
vehicle begins to roll.
GWARNING
After a short time, hill start assist will no lon-
ger brake your vehicle and it could roll away.
There is a risk of an accident and injury.
Therefore, quickly move your foot from the
brake pedal to the accelerator pedal. Never
leave the vehicle when it is held by hill start
assist.
Hill start assist is not active if:
Ryou are pulling away on a level road or on a downhill gradient.
Rthe DIRECT SELECT lever is in position N.
Rthe electric parking brake is applied.
RESP®is malfunctioning.
Further information on holding the vehicle
stationary on uphill gradients (
Ypage 137).
Transmission
Important safety notes
Shift the DIRECT SELECT lever to position P
when the drive system is switched off and the vehicle is stationary. Park position Pis
engaged and the electric parking brake is
applied automatically:
If the DIRECT SELECT lever cannot be
engaged in park position P, the parking brake
is engaged automatically.
Observe the important safety notes on
switching ESP
®on and off (Ypage 67).
DIRECT SELECT lever
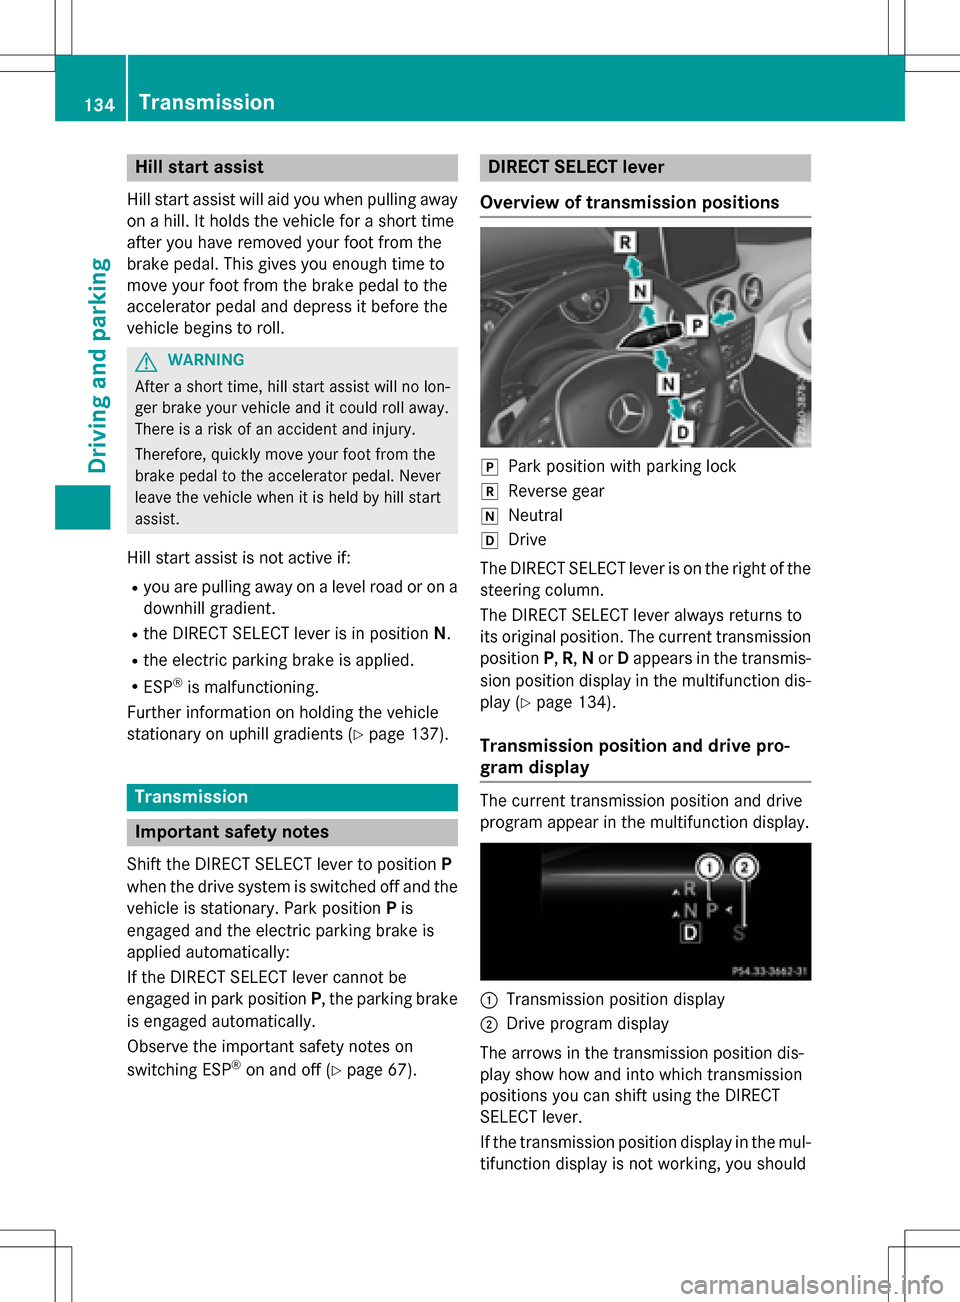
Overview of transmission positions
jPark position with parking lock
kReverse gear
iNeutral
hDrive
The DIRECT SELECT lever is on the right of the
steering column.
The DIRECT SELECT lever always returns to
its original position. The current transmission
position P,R, Nor Dappears in the transmis-
sion position display in the multifunction dis-
play (
Ypage 134).
Transmission position and drive pro-
gram display
The current transmission position and drive
program appear in the multifunction display.
:Transmission position display
;Drive program display
The arrows in the transmission position dis-
play show how and into which transmission
positions you can shift using the DIRECT
SELECT lever.
If the transmission position display in the mul-
tifunction display is not working, you should
134Transmission
Driving and parking
Page 138 of 342
XIf the transmission is in positionDor R:
push the DIRECT SELECT lever up or down to the first point of resistance.
XIf the transmission is in position P: depress
the brake pedal and push the DIRECT
SELECT lever up or down to the first point of resistance.
When the drive system is switched off, the
transmission shifts to Nautomatically.
With the SmartKey: if you then open the
driver's door or the front-passenger door or
remove the SmartKey from the ignition, the
transmission automatically shifts to P.
With the Start/Stop button: if you then
open the driver's door or the front-passenger
door, the transmission automatically shifts to
P.
If you want the transmission to remain in neu-
tral N, e.g. when having the vehicle cleaned in
an automatic car wash with a towing system:
Using the SmartKey:
XSwitch on the ignition.
XDepress the brake pedal and keep it
depressed.
XShift to neutral N.
XRelease the brake pedal.
XRelease the electric parking brake.
XSwitch off the ignition and leave the Smart-
Key in the ignition lock.
With the Start/Stop button:
XRemove the Start/Stop button from the
ignition lock.
XInsert the SmartKey into the ignition lock.
XSwitch on the ignition.
XDepress the brake pedal and keep it
depressed.
XShift to neutral N.
XRelease the brake pedal.
XRelease the electric parking brake.
XSwitch off the ignition and leave the Smart-
Key in the ignition lock.
Engaging drive position D
XIf the transmission is in position Ror N:
push the DIRECT SELECT lever down past
the first point of resistance.
XIf the transmission is in position P: depress
the brake pedal and push the DIRECT
SELECT lever down past the first point of
resistance.
Transmission positions
BPark position
This prevents the vehicle from roll-
ing away when stopped. Only move
the DIRECT SELECT lever to Pwhen
the vehicle is stationary.
The SmartKey can only be removed
when the DIRECT SELECT lever is in
position P. When there is no Smart-
Key in the ignition lock, the DIRECT
SELECT lever is locked in position
P.
CReverse gear
Only move the DIRECT SELECT
lever to Rwhen the vehicle is sta-
tionary.
ANeutral
No power is transmitted from the
drive system to the drive wheels.
Releasing the brakes will allow you
to move the vehicle freely.
If ESP
®is faulty: only move the
DIRECT SELECT lever to Nif the
vehicle is in danger of skidding, e.g.
on icy roads.
7Drive
For driving forwards
136Transmission
Driving and parking
Page 140 of 342
Drive program S (Sport)
Drive programSis characterized by the fol-
lowing:
Rth e vehicle exhibits sporty driving charac-
teristics .
Rthe entire power output can be utilized by
depressing the accelerator pedal.
E+ Economy Plus
Drive program E+is characterized by the fol-
lowing:
Rreduced torque and significantly reduced
power. This supports an especially efficient
and even driving style and results in a
reduction in speed to approximately
70 mph (110km/ h).
Rthe vehicle pulling away more gently in
forward gear unless the accelerator pedal
is depressed fully.
Rthe wheels are less likely to spin.
Rparticularly efficient overrun.
Rfull power output by using kickdown.
Rthe performance of air-conditioning system
and heating are reduced.
Steering wheel paddle shifters
Manually adjustable recuperation
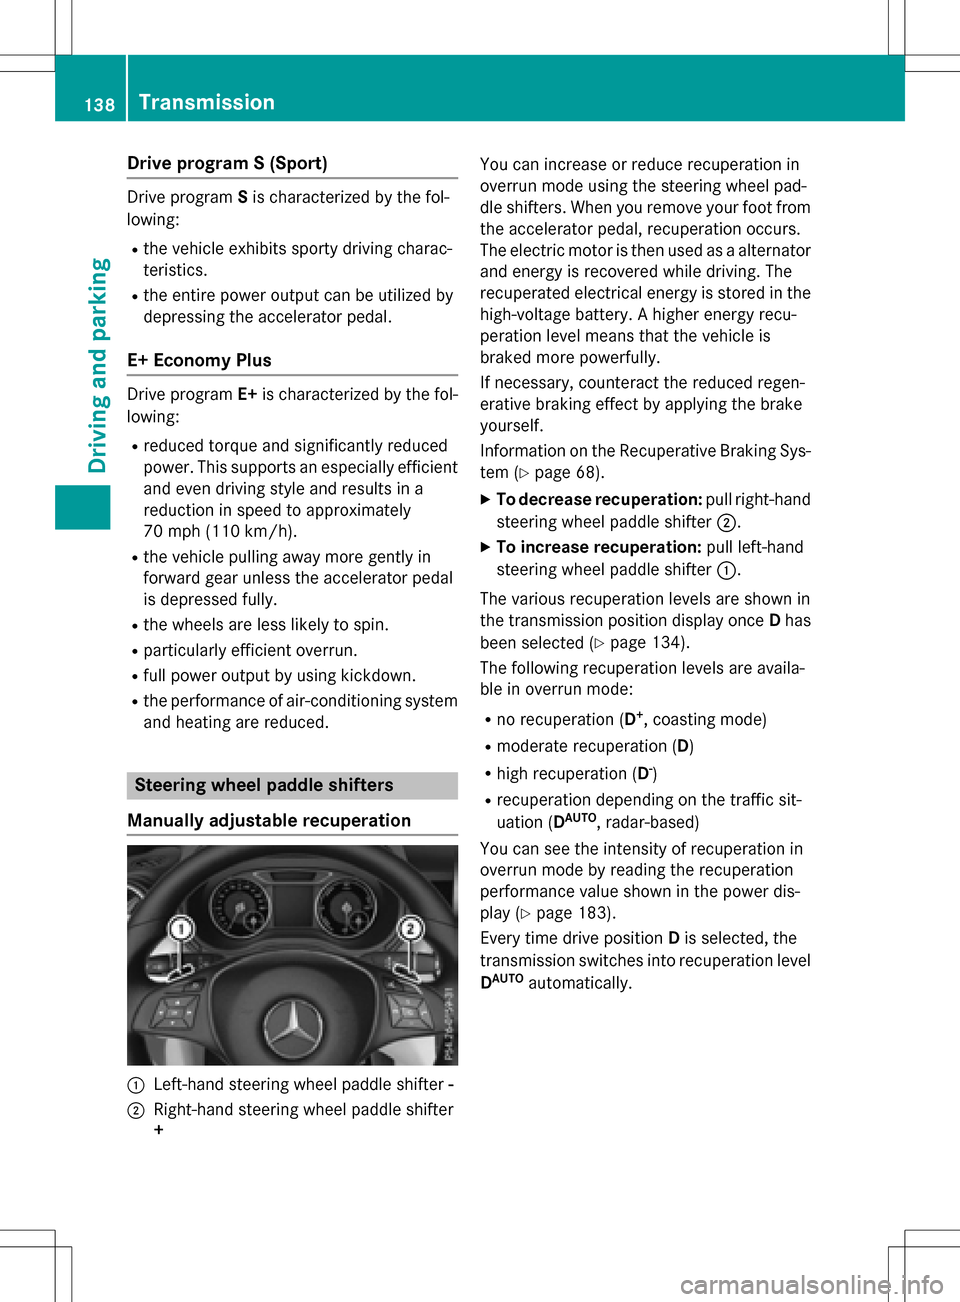
:Left-hand steering wheel paddle shifter -
;Right-hand steering wheel paddle shifter
+ You can increase or reduce recuperation in
overrun mode using the steering wheel pad-
dle shifters. When you remove your foot from
the accelerator pedal, recuperation occurs.
The electric motor is then used as a alternator
and energy is recovered while driving. The
recuperated electrical energy is stored in the
high-voltage battery. A higher energy recu-
peration level means that the vehicle is
braked more powerfully.
If necessary, counteract the reduced regen-
erative braking effect by applying the brake
yourself.
Information on the Recuperative Braking Sys-
tem (
Ypage 68).
XTo decrease recuperation:
pull right-hand
steering wheel paddle shifter ;.
XTo increase recuperation:pull left-hand
steering wheel paddle shifter :.
The various recuperation levels are shown in
the transmission position display once Dhas
been selected (
Ypage 134).
The following recuperation levels are availa-
ble in overrun mode:
Rno recuperation (D+, coasting mode)
Rmoderate recuperation (D )
Rhigh recuperation (D-)
Rrecuperation depending on the traffic sit-
uation (DAUTO, radar-based)
You can see the intensity of recuperation in
overrun mode by reading the recuperation
performance value shown in the power dis-
play (
Ypage 183).
Every time drive position Dis selected, the
transmission switches into recuperation level
D
AUTOautomatically.
138Transmission
Driving and parking
Page 141 of 342

The various different levels are to be used
under the following conditions:
D+Driving without much braking
and without the presence of
obstacles or sharp bends
The vehicle retains the maxi-
mum possible amount of kinetic
energy.
DNormal driving
D-Sporty driving or driving on a
downhill gradient
The brake pedal does not need
to be used as often because the
extent of the deceleration is
greater than inD.
Energy use when decelerating is
considerably higher than when
the vehicle is braked with the
brake pedal.
DAUTO
(radar-
based)
The intensity of recuperation is
automatically adjusted to the
current traffic situation.
Default setting
In levels Dand D-, deceleration can be con-
trolled in an infinitely variable manner using
the accelerator pedal.
The braking performance of the electric
motor using recuperative braking is, in some
operating modes, either reduced or not effec-
tive:
Rwhen the condition of charge of the high-
voltage battery increases
Rif the high-voltage battery is not yet at a
normal operating temperature
Rwhen driving close to the maximum design
speed
Rwhen the vehicle is almost stationary
Rin transmission position N
Rduring and after ESP stability control
If you do not make an additional effort to
apply the brake yourself, the braking effect may not be sufficient. If necessary, counter-
act the reduced regenerative braking effect
by applying the brake yourself.
Radar-based recuperation
The vehicle uses the sensors of COLLISION
PREVENTION ASSIST PLUS during radar-
based recuperation (D
AUTO). The sensors
detect the distance to the vehicle ahead and
its speed. The intensity of recuperation is
then automatically adjusted to the current
traffic situation.
The range can then be increased by storing
energy efficiently. Adjustment is infinitely var-
iable from overrun mode (no recuperation) to
maximum recuperation.
Maintain sufficient distance to the vehicle in
front. Mercedes-Benz recommends that you
activate COLLISION PREVENTION ASSIST
PLUS as a visual and acoustic aid.
Examples of radar-based recuperation:
RApproaching a slower vehicle, a decelerat-
ing vehicle or when following a vehicle
downhill. Your vehicle decelerates slightly
and increases recuperation.
RDriving when no vehicle is detected in front
or when a vehicle is detected in the far dis- tance or an accelerating vehicle is detec-
ted. Your vehicle switches to overrun mode
at higher speeds.
RDriving on a steep downhill slope. Acceler-
ation downhill is reduced and recuperation
is increased. This is comparable with shift-
ing down when driving downhill.
XTo activate radar-based recuperation:
pull steering wheel paddle shifter :or;
towards you and hold for about one second.
XTo deactivate radar-based recupera-
tion: briefly pull steering wheel paddle
shifter :or; towards you.
Transmission139
Driving and parking
Z
Page 147 of 342
(Ypage 187) trip computer in theTrip
menu.
Displaying energy consumption and recu-
perated electric energy:
XSwitch on Audio 20/COMAND (see the
separate operating instructions).
XTo select Vehiclefrom the main function
bar: turn and press the controller.
The vehicle menu is displayed.
XTo select Consumption: turn and press the
controller.
Energy consumption :and recuperated
electric energy ;for the last 15 minutes of
the journey are shown.
Exiting the vehicle settings:
XPress the %button on the controller.
or
XTo select %: slide 6and press the
controller.
To reset values: the values are reset along
with the From Start
trip computer
(
Ypage 189).
Displaying range on the map
(COMAND/Audio 20)
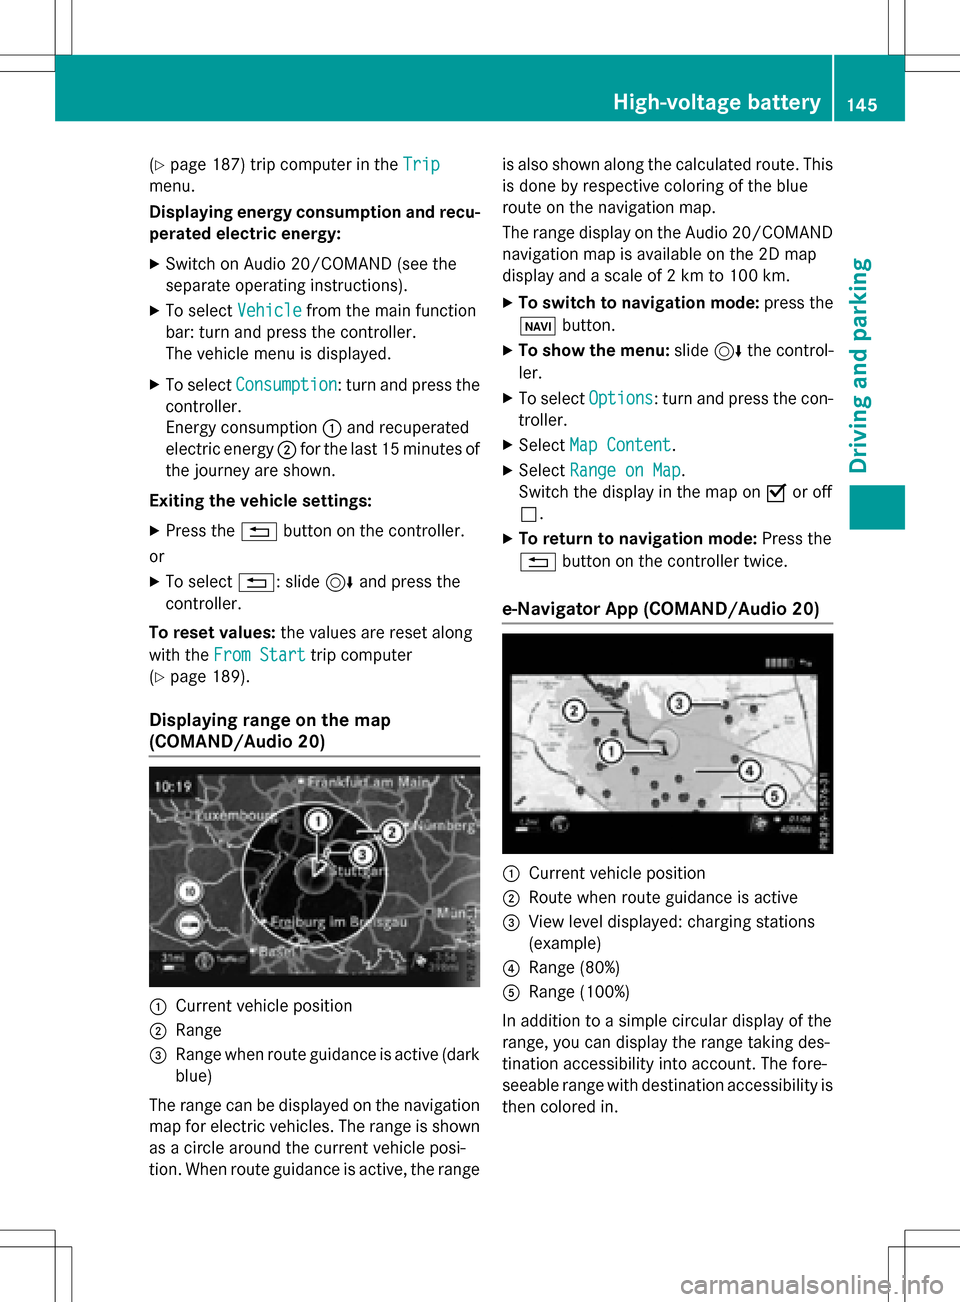
:Current vehicle position
;Range
=Range when route guidance is active (dark
blue)
The range can be displayed on the navigation
map for electric vehicles. The range is shown
as a circle around the current vehicle posi-
tion. When route guidance is active, the range is also shown along the calculated route. This
is done by respective coloring of the blue
route on the navigation map.
The range display on the Audio 20/COMAND
navigation map is available on the 2D map
display and a scale of 2 km to 100 km.
XTo switch to navigation mode:
press the
ß button.
XTo show the menu: slide6the control-
ler.
XTo select Options: turn and press the con-
troller.
XSelect Map Content.
XSelectRange on Map.
Switch the display in the map on Oor off
ª.
XTo return to navigation mode: Press the
% button on the controller twice.
e-Navigator App (COMAND/Audio 20)
:Current vehicle position
;Route when route guidance is active
=View level displayed: charging stations
(example)
?Range (80%)
ARange (100%)
In addition to a simple circular display of the
range, you can display the range taking des-
tination accessibility into account. The fore-
seeable range with destination accessibility is
then colored in.
High-voltage battery145
Driving and parking
Z
Page 150 of 342
charge current. If necessary, lower the set
charge current or use another power
socket.
You can set a limit for the values of the charge
current used in charging the high-voltage bat-
tery. This acts as a means of preventing the
power supply from overloading. You can set
this limit by using the controls on the charging
cable or in the on-board computer's menu.
Only set the maximum charge current in the
on-board computer menu if there are no
charge current settings on the charging
cable.
The default standard value is the minimum
charge current setting. This corresponds to
the minimum available charge current from
the power supply.
iThe value of the maximum setting and the
relevant adjustment values may vary
depending on the country.
Before charging the high-voltage battery,
have the maximum permissible charge cur-
rent for the relevant power socket checked by
an electrician.
XTo adjust the setting: press button?
repeatedly until the desired setting is selec-
ted in display =.
RTwo LEDs are flashing: minimum setting
RAll LEDs are flashing: maximum setting
Information about the charging time
(
Ypage 338)
If, after the charging process, the charging
cable is:
Rleft connected to the power socket, the
currently selected values will be used for
the next charging process.
Rremoved from the power socket, the values
will be reset to the minimum setting for the
next charging process. You may then need
to reset the values of the maximum charge
current.
If the charge current values that have been
set on the charging cable and the on-board computer are different, the high-voltage bat-
tery is charged using the lower value.
If the vehicle requires more time than usual to
charge the high-voltage battery, check:
Rthe settings of the maximum charge cur-
rent on the controls of the charging cable
Rthe settings of the maximum charge cur-
rent in the menu of the on-board computer
Connecting the charging cable
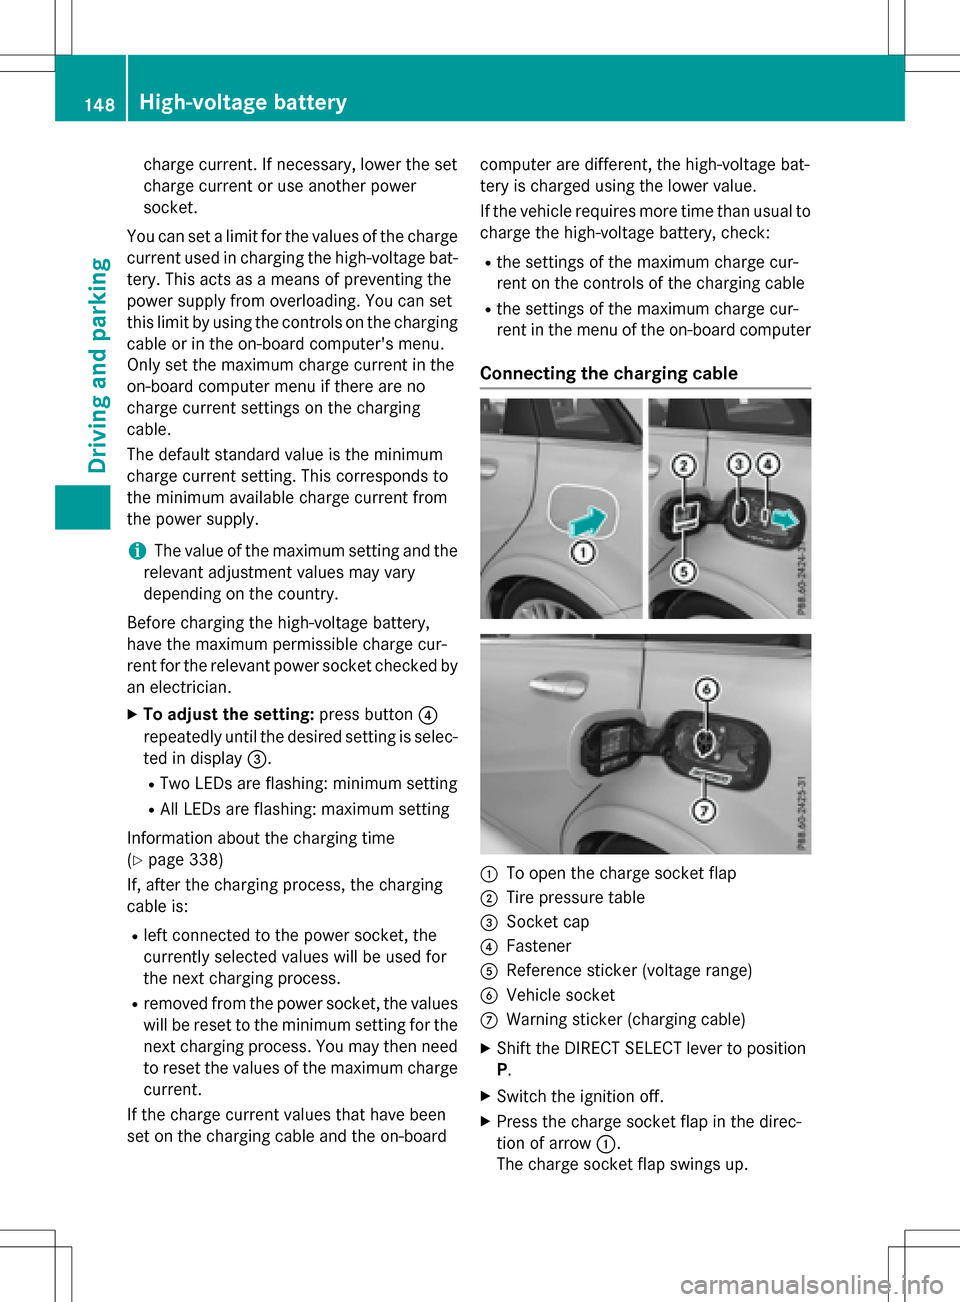
:To open the charge socket flap
;Tire pressure table
=Socket cap
?Fastener
AReference sticker (voltage range)
BVehicle socket
CWarning sticker (charging cable)
XShift the DIRECT SELECT lever to position
P.
XSwitch the ignition off.
XPress the charge socket flap in the direc-
tion of arrow
:.
The charge socket flap swings up.
148High-voltage battery
Driving and parking