2016 MERCEDES-BENZ B-Class ELECTRIC heating
[x] Cancel search: heatingPage 97 of 342
Mirrors
Rear-view mirror
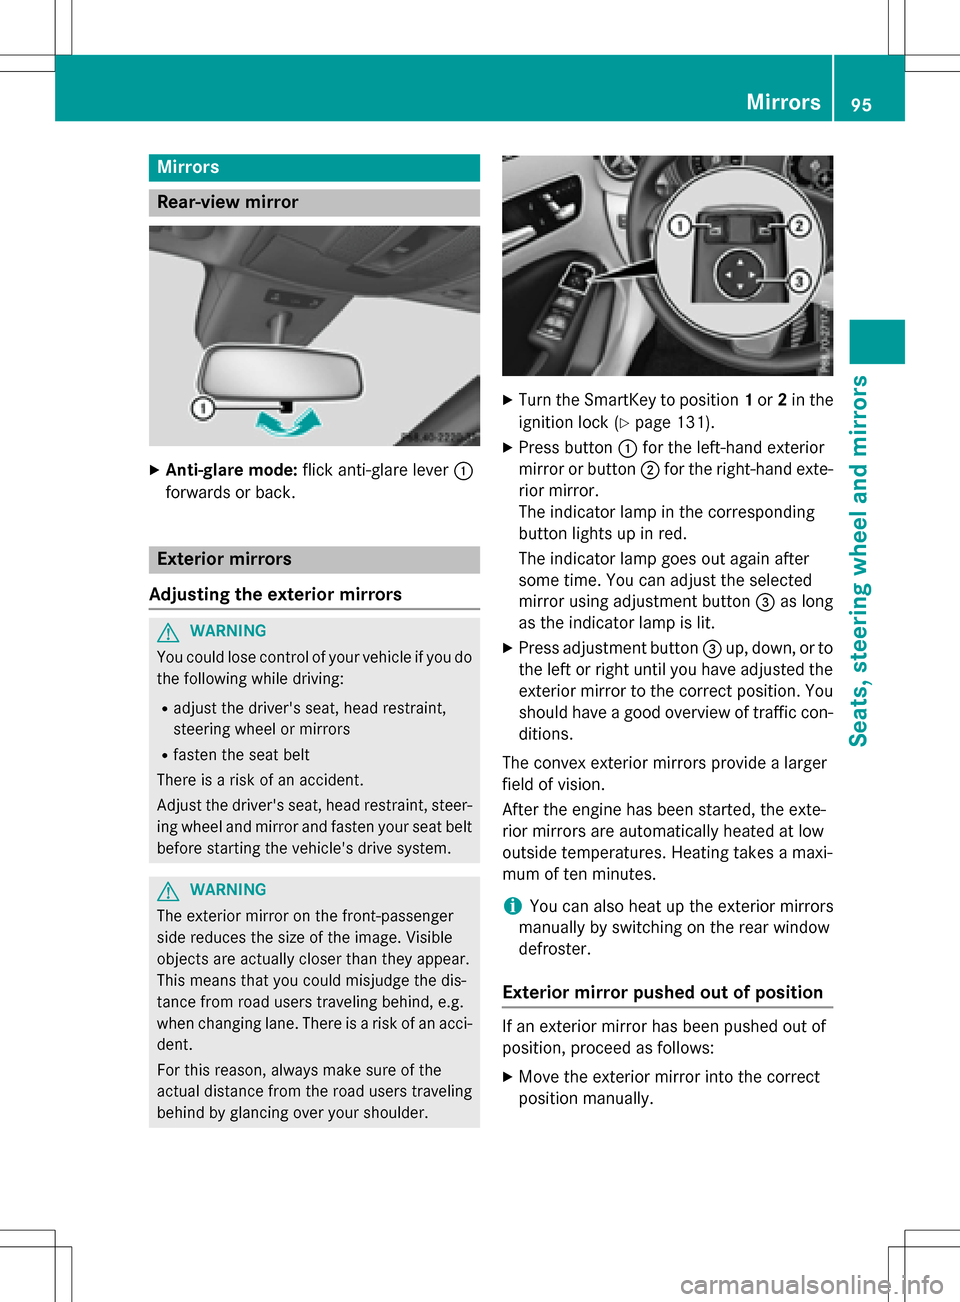
XAnti-glare mode:flick anti-glare lever :
forwards or back.
Exterior mirrors
Adjusting the exterior mirrors
GWARNING
You could lose control of your vehicle if you do the following while driving:
Radjust the driver's seat, head restraint,
steering wheel or mirrors
Rfasten the seat belt
There is a risk of an accident.
Adjust the driver's seat, head restraint, steer-
ing wheel and mirror and fasten your seat belt before starting the vehicle's drive system.
GWARNING
The exterior mirror on the front-passenger
side reduces the size of the image. Visible
objects are actually closer than they appear.
This means that you could misjudge the dis-
tance from road users traveling behind, e.g.
when changing lane. There is a risk of an acci-
dent.
For this reason, always make sure of the
actual distance from the road users traveling
behind by glancing over your shoulder.
XTurn the SmartKey to position 1or 2in the
ignition lock (
Ypage 131).
XPress button :for the left-hand exterior
mirror or button ;for the right-hand exte-
rior mirror.
The indicator lamp in the corresponding
button lights up in red.
The indicator lamp goes out again after
some time. You can adjust the selected
mirror using adjustment button =as long
as the indicator lamp is lit.
XPress adjustment button =up, down, or to
the left or right until you have adjusted the
exterior mirror to the correct position. You
should have a good overview of traffic con-
ditions.
The convex exterior mirrors provide a larger
field of vision.
After the engine has been started, the exte-
rior mirrors are automatically heated at low
outside temperatures. Heating takes a maxi-
mum of ten minutes.
iYou can also heat up the exterior mirrors
manually by switching on the rear window
defroster.
Exterior mirror pushed out of position
If an exterior mirror has been pushed out of
position, proceed as follows:
XMove the exterior mirror into the correct
position manually.
Mirrors95
Seats, steering wheel and mirrors
Z
Page 120 of 342

the front-passenger side as well. The indi-
cator lamp in theábutton goes out.
RIf you change the settings of the climate
control system, the climate status display
appears for approximately three seconds
at the bottom of the screen in the Audio/
COMAND display (see separate operating
instructions). You will see the current set-
tings of the various climate control func-
tions.
You can choose between various drive pro-
grams with the program selector button
(
Ypage 137).
If you have selected drive program E+:
Rthe cooling output is reduced when cooling
Rheat output is reduced when heating
Rthe time for which the rear window
defroster will run is reduced
If you have selected drive program Eor S, the
current climate settings are maintained.
Operating the climate control sys-
tems
Activating/deactivating climate con-
trol
General notes
When the climate control is switched off, the
air supply and air circulation are also
switched off. The windows could fog up.
Therefore, switch off climate control only
briefly
Dual-zone automatic climate control
XTurn the SmartKey to position 2in the igni-
tion lock (
Ypage 131).
XTo activate: press theÃbutton.
The indicator lamp in the Ãbutton lights
up. Airflow and air distribution are set to
automatic mode.
or
XPress the ^button.
The indicator lamp in the ^button goes
out. The previously selected settings are
restored.
XTo deactivate: press the^button.
The indicator lamp in the ^button lights
up.
iActivate climate control primarily using
the à button.
Switching cooling with air dehumidi-
fication on/off
General notes
If you deactivate the "Cooling with air-dehu-
midification" function, the air inside the vehi- cle will not be cooled. The air inside the vehi-
cle will also not be dehumidified. The win-
dows can fog up more quickly. Therefore, only
deactivate the "Cooling with air-dehumidifi-
cation" function briefly.
The "Cooling with air-dehumidification" func-
tion is operational when the vehicle is ready
to drive. The air inside the vehicle is cooled
and dehumidified according to the tempera-
ture selected.
Condensation may drip from the underside of
the vehicle when it is in cooling mode. This is
normal and not a sign that there is a malfunc- tion.
118Operating the climate control systems
Climate control
Page 123 of 342

bDirects air through the defroster, cen-
ter and side air vents
a Directs air through the defroster and
footwell vents
_ Directs air through the defroster, cen-
ter, side and footwell vents
iRegardless of the air distribution setting,
airflow is always directed through the side
air vents. The side air vents can only be
closed if the adjusters are turned clockwise until they engage.
Setting the air distribution
XTurn the SmartKey to position 2in the igni-
tion lock (
Ypage 131).
XPress the ÉorË button repeatedly
until the desired symbol appears in the dis-
play.
Setting the airflow
XTurn the SmartKey to position 2in the igni-
tion lock (
Ypage 131).
XTo increase/reduce: press theKor
I button.
Switching the ZONE function on/off
XTo activate: press theábutton.
The indicator lamp in the ábutton lights
up.
The temperature setting for the driver's
side is not adopted for the front-passenger
side.
XTo deactivate: press theábutton.
The indicator lamp in the ábutton goes
out.
The temperature setting for the driver's
side is adopted for the front-passenger
side.
Defrosting the windshield
General notes
You can use this function to defrost the wind-
shield or to defrost the inside of the wind-
shield and the side windows.
iYou should only select the "Windshield
defrosting" function until the windshield is
clear again.
Activating/deactivating the defrosting
function for the windshield
XTurn the SmartKey to position 2in the igni-
tion lock (
Ypage 131).
XTo activate: press the¬button.
The indicator lamp in the ¬button lights
up.
The climate control system switches to the
following functions:
Rhigh airflow
Rhigh temperature
Rair distribution to the windshield and
front side windows
Rair-recirculation mode off
Vehicles with windshield heating: the
windshield heating is switched on using the "Windshield defrosting" function.
iThe "Windshield defrosting" function
automatically sets the blower output to the optimum defrosting effect. As a result, the
airflow may increase or decrease automat-
ically after the ¬button is pressed.
iYou can adjust the blower output man-
ually while the "Windshield defrosting"
function is in operation:
Press the óorô button.
XTo deactivate: press the¬button.
The indicator lamp in the ¬button goes
out. The previously selected settings are
restored. Air-recirculation mode remains
deactivated.
or
Operating the climate control systems121
Climate control
Page 125 of 342
Problems with the rear window defroster
ProblemPossible causes/consequences andMSolutions
The rear window
defroster has deactiva-
ted prematurely or can-
not be activated.The battery has not been sufficiently charged.
XSwitch off any consumers that are not required, e.g. reading
lamps, interior lighting or the seat heating.
When the battery is sufficiently charged, the rear window
defroster can be activated again.
Switching air-recirculation mode
on/off
General notes
You can deactivate the flow of fresh air if
unpleasant odors are entering the vehicle
from outside. The air already inside the vehi-
cle will then be recirculated.
If you switch on air-recirculation mode, the
windows can fog up more quickly, in particu-
lar at low temperatures. Only use air-recircu-
lation mode briefly to prevent the windows
from fogging up.
Switching on/off
XTurn the SmartKey to position 2in the igni-
tion lock (
Ypage 131).
XTo activate: press theebutton.
The indicator lamp in the ebutton lights
up.
Air-recirculation mode switches on automat-
ically:
Rat high outside temperatures
Rat high levels of pollution
When air-recirculation mode is activated
automatically, the indicator lamp in the e
button is not lit. Outside air is added after
about 30 minutes.
XTo deactivate: press theebutton.
The indicator lamp in the ebutton goes
out.
iAir-recirculation mode deactivates auto-
matically:
Rafter approximately five minutes at out-
side temperatures below approximately
45 ‡ (7 †)
Rafter approximately five minutes if the
"Cooling with air dehumidification" func-
tion is deactivated
Rafter approximately 30 minutes at out-
side temperatures above approximately
45 ‡ (7 †) if the cooling with air dehu-
midification function is activated
Convenience opening or closing using
the air-recirculation button
GWARNING
When using the convenience closing feature,
parts of the body could be trapped in the clos-
ing area when a side window is being closed.
There is a risk of injury.
Observe the complete closing procedure
when the convenience closing feature is oper-
ating. Make sure that no body parts are in
close proximity during the closing procedure.
GWARNING
During convenience opening parts of the body could be drawn in or become trapped
between the side window and window frame.
There is a risk of injury.
Make sure that nobody touches the side win-
dow during the opening procedure. If some-
one becomes trapped, immediately press
Operating the climate control systems123
Climate control
Z
Page 126 of 342
theW switch in the door to stop the move-
ment of the side windows. To continue closing
the side window, pull on the Wswitch.
XConvenience closing feature: press and
hold the ebutton until the side win-
dows are closed.
The indicator lamp in the ebutton lights
up. Air-recirculation mode is activated.
If parts of the body are in the closing area
during convenience closing, proceed as fol-
lows:
XPress the Wbutton for opening/closing
the side windows.
The side window stops.
XTo then open the side windows, press the
W button again.
or
XPress the ebutton for longer than two
seconds.
The side windows move in the opposite
direction.
XConvenience opening feature: press and
hold the ebutton until the side win-
dows are opened. The side windows move
back to their original positions.
The indicator lamp in the ebutton goes
out. Air-recirculation mode is deactivated.
Notes on the automatic reversing feature for
the side windows (
Ypage 83).
If you open the side windows manually after
closing them with the convenience closing
feature, they will remain in this position when
opened using the convenie nce opening fea-
ture.
Pre-entry climate control via Smart-
Key
Before getting in, the vehicle interior can be
briefly warmed or ventilated in advance. In
addition, the air from the air vent can be pre-
cooled. The high-voltage battery must be sufficiently
charged before the "Pre-entry climate control
via key" function can be activated.
Activating/deactivating the pre-entry cli-
mate control (via key)
When the vehicle is unlocked using the Smart-
Key or KEYLESS-GO, the climate control func-
tions are activated.
The pre-cooling and pre-heating climate con-
trol functions last 5 minutes.
When the vehicle is pre-cooled, the following functions are activated as necessary:
RClimate control system
RCooling with air dehumidification
RBlower
When the vehicle is pre-heated, the following
functions are activated as necessary:
RClimate control system
RBlower
RSeat heating
RWindshield heating
RRear window defroster
Pre-entry climate control is automatically
switched off when operational readiness
mode is requested.
Activating/deactivating pre-entry cli-
mate control (via key)
You can activate and deactivate the pre-entry
climate control (via key) function using the
on-board comp uter in theE-CELL
submenu
(
Ypage 196).
iIf the condition of charge of the high-volt-
age battery is below the specified minimum
condition of charge, pre-entry climate con-
trol will not be activated even if it has been
set.
124Operating the climate control systems
Climate control
Page 127 of 342

Pre-entry climate control at departure
time and immediate pre-entry climatecontrol
Important safety notes
GWARNING
If persons, particularly children are subjected to prolonged exposure to extreme heat or
cold, there is a risk of injury, possibly even
fatal. Never leave children unattended in the
vehicle.
General notes
Using the "Pre-entry climate control at depar-
ture time" function, you can cool or heat the
vehicle interior prior to the desired departure
time.
When using the "Pre-entry climate control at
departure time" function, the condition of
charge of the high-voltage battery must be
higher than the specified minimum condition
of charge.
The running time of the climate control may
be reduced if:
Rthe vehicle is not connected to an electric
power supply
Rthe high-voltage battery is not fully charged
With active "Pre-entry climate control at
departure time" the condition of charge of the
high-voltage battery can be reduced, even if
the charge cable connector is connected.
In certain situations, the desired interior tem-
perature cannot be reached.
When the vehicle is cooled, the following
functions are activated as necessary:
RClimate control system
RCooling with air dehumidification
RBlower
When the vehicle is heated, the following
functions are activated as necessary:
RClimate control system
RBlower
RSeat heating
RWindshield heating
RRear window defroster
"Immediate pre-entry climate control" is auto-
matically switched off when operational read- iness mode is requested.
Setting the departure time
You can set a departure time for the "Pre-
entry climate control at departure time". Your
vehicle will then be cooled or heated until the
desired temperature is reached in time for the
set departure time. "Pre-entry climate control
at departure time" will be activated a maxi-
mum of 35 minutes before departure. If the
departure is delayed, the vehicle will be
heated or cooled for a further five minutes.
You can set the desired departure time in the
E-CELL
submenu on the on-board computer
(
Ypage 195).
Activating immediate pre-entry climate
control
You can activate "Immediate pre-entry cli-
mate control" even if the vehicle interior is
already at the desired temperature. This
means that the vehicle interior continues to
be cooled or heated, e.g. if the journey is
interrupted for up to 50 minutes, and the inte-
rior temperature is kept constant. You can
only set the desired temperature using the
climate control unit. If you do not pre-select a
temperature, the last temperature set will be
automatically adopted.
Operating the climate control systems125
Climate control
Z
Page 140 of 342
Drive program S (Sport)
Drive programSis characterized by the fol-
lowing:
Rth e vehicle exhibits sporty driving charac-
teristics .
Rthe entire power output can be utilized by
depressing the accelerator pedal.
E+ Economy Plus
Drive program E+is characterized by the fol-
lowing:
Rreduced torque and significantly reduced
power. This supports an especially efficient
and even driving style and results in a
reduction in speed to approximately
70 mph (110km/ h).
Rthe vehicle pulling away more gently in
forward gear unless the accelerator pedal
is depressed fully.
Rthe wheels are less likely to spin.
Rparticularly efficient overrun.
Rfull power output by using kickdown.
Rthe performance of air-conditioning system
and heating are reduced.
Steering wheel paddle shifters
Manually adjustable recuperation
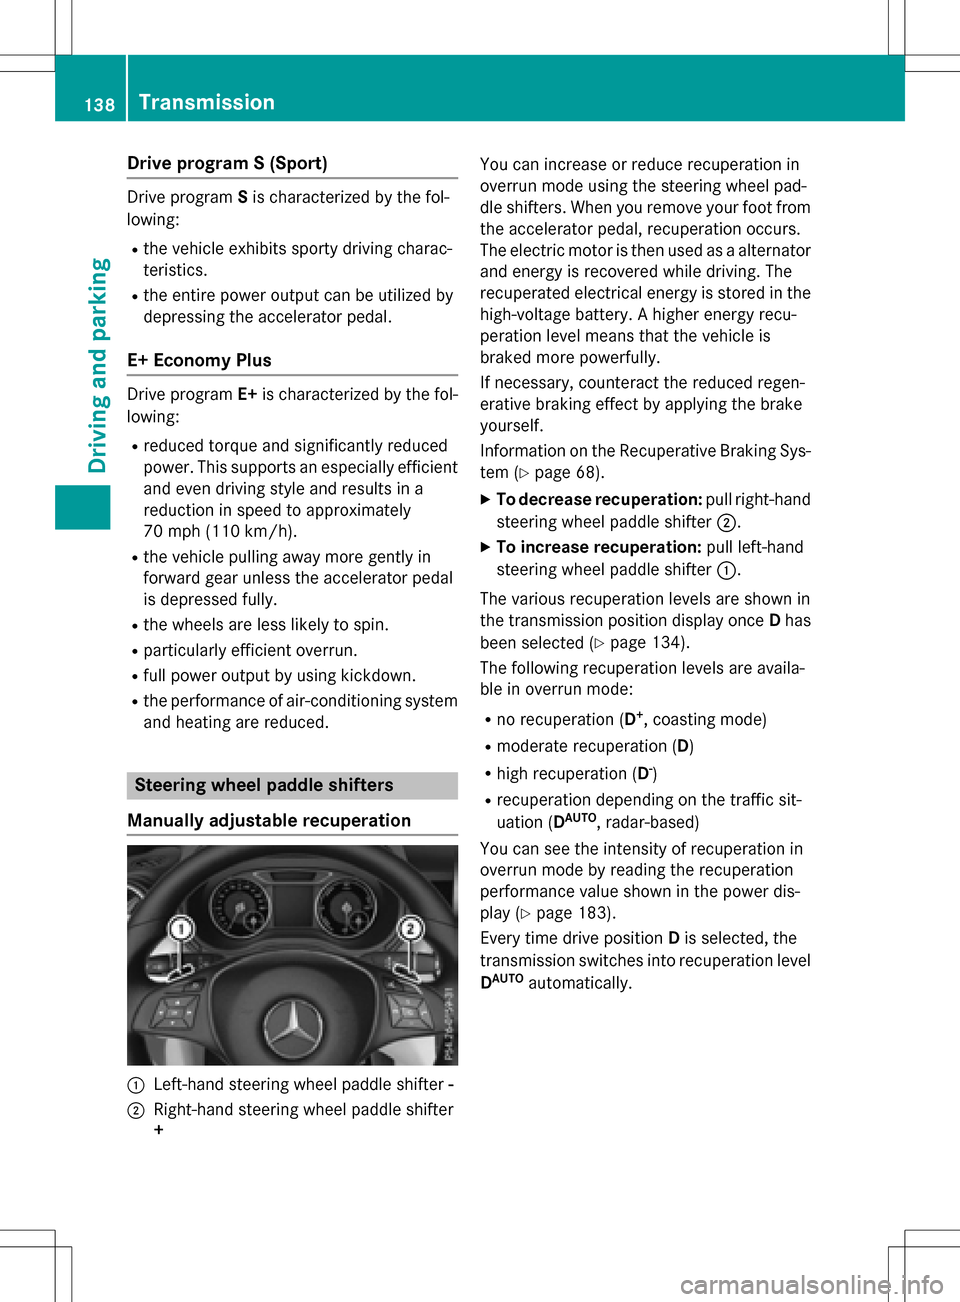
:Left-hand steering wheel paddle shifter -
;Right-hand steering wheel paddle shifter
+ You can increase or reduce recuperation in
overrun mode using the steering wheel pad-
dle shifters. When you remove your foot from
the accelerator pedal, recuperation occurs.
The electric motor is then used as a alternator
and energy is recovered while driving. The
recuperated electrical energy is stored in the
high-voltage battery. A higher energy recu-
peration level means that the vehicle is
braked more powerfully.
If necessary, counteract the reduced regen-
erative braking effect by applying the brake
yourself.
Information on the Recuperative Braking Sys-
tem (
Ypage 68).
XTo decrease recuperation:
pull right-hand
steering wheel paddle shifter ;.
XTo increase recuperation:pull left-hand
steering wheel paddle shifter :.
The various recuperation levels are shown in
the transmission position display once Dhas
been selected (
Ypage 134).
The following recuperation levels are availa-
ble in overrun mode:
Rno recuperation (D+, coasting mode)
Rmoderate recuperation (D )
Rhigh recuperation (D-)
Rrecuperation depending on the traffic sit-
uation (DAUTO, radar-based)
You can see the intensity of recuperation in
overrun mode by reading the recuperation
performance value shown in the power dis-
play (
Ypage 183).
Every time drive position Dis selected, the
transmission switches into recuperation level
D
AUTOautomatically.
138Transmission
Driving and parking
Page 144 of 342
To ensure that the brackets within the charg-
ing cable controls are not subjected to incor-
rect loads, observe the following:
RNever lift or carry the controls by the charg-ing cable connector or the mains plug.
RTo transport the charging cable, the coiled
part can be:
-wrapped around the controls or
-secured to the housing of the controls
Heat generated by the charging cable
and charging cable connector
Pay attention to the important safety notes
(
Ypage 140).
During the charging process, the charging
cable and charging cable connector may heat
up.
The charging cable and charging cable con-
nector will only heat up within the permissible
limiting values, provided that:
Rthe power supply and the charging cable
are not damaged
Rthe instructions for handling the charging
cable and controls on the charging cable
are observed
Should the permissible heating temperature
limits be exceeded, have the mains power
supply checked.
Protection device against overvoltage
!Voltage surges in the mains supply can
damage the vehicle. The vehicle is there-
fore equipped with a device which protects
it from voltage surges in the mains supply.
This device may be triggered during severe
thunderstorms, for example, and may lead
to the building's fuse being tripped and an
interruption in the power supply. These
functions protect the vehicle. After the
building fuse is switched on again, the
charging process resumes automatically.
Following an interruption in the power sup- ply without tripping of the building's fuse, it may take up to 15 minutes for charging to
resume automatically.
Switch on the building's fuse again after the
protection device against overvoltage has
been triggered. Otherwise, the charging proc-
ess cannot be continued. The high-voltage
battery will not be charged and you may not
be able to drive the vehicle.
If other devices are protected by the same
protective device, these are switched off as
well when the protective device is triggered.
Ensure that these other devices are still
operational after reactivating the protection
device.
Influences on the charging behavior
and the charge state of the high-volt-
age battery
Terms of use
Observe the following notes:
Rinformation on exceptions and limitations
in warranty documentation and in the rela-
ted Maintenance Booklet
Rmaintenance notes for the high-voltage
battery in the Maintenance Booklet
Method of operation
The vehicle is equipped with a high-voltage
battery for driving. The high-voltage battery
stores the energy needed to operate the elec-
tric motor and releases it again.
The electric motor uses energy that has been
stored in the high-voltage battery when pull-
ing away, accelerating and during the jour-
ney.
In overrun mode (except D+), kinetic energy
is converted by means of energy recuperation
into electrical energy and stored in the high-
voltage battery.
142High-voltage battery
Driving and parking