2016 MERCEDES-BENZ B-Class ELECTRIC bulb
[x] Cancel search: bulbPage 17 of 342

Side windowsCleaning ......................................... 276
Convenience closing feature ............ 84
Convenience opening feature ......... .84
Important safety information ........... 83
Opening/closing .............................. 83
Problem (malfunction) .................... .86
Resetting ........................................ .85
Reversing feature ............................ .83
SmartKey
Changing the battery ....................... 75
Changing the programming ............ .74
Checking the battery ...................... .75
Convenience closing feature ............ 84
Convenience opening feature .......... 84
Display message ............................ 228
Door central locking/unlocking .......7 2
Important safety notes .................... 72
KEYLESS-GO start function .............. 74
Loss ................................................ .77
Mechanical key ................................ 74
Positions (ignition lock) ................. 131
Problem (malfunction) ..................... 77
SmartKey positions (ignition lock) .. 131
Snow chains ...................................... 305
Sockets
Center console .............................. 254
General notes ................................ 254
Luggage compartment .................. .255
Rear compartment ......................... 255
Special seat belt retractor .................. 57
Specialist workshop ............................ 26
Speed, controlling
see Cruise control
Speedometer
Activating/deactivating the addi-
tional speedometer ........................ 197
Digital ............................................ 189
In the Instrument cluster ................. 31
Selecting the display unit .............. .197
Standing lamps
Changing bulbs .............................. 107
Display message ............................ 216
Switching on/off ........................... 101
Start/Stop button
Removing ....................................... 132
Starting the drive system .............. .133 Starting (vehicle)
............................... 132
STEER CONTROL .................................. 68
Steering
Display message ............................ 227
Steering assistant STEER CON-
TROL
see STEER CONTROL
Steering wheel
Adjusting (manually) ........................ 94
Button overview ............................... 33
Buttons (on-board computer) ......... 184
Cleaning ......................................... 278
Important safety notes .................... 94
Paddle shifters ............................... 138
Steering wheel paddle shifters ........ 138
Stowage compartments
Armrest (front) ............................... 243
Armrest (under) ............................. 244
Center console .............................. 243
Center console (rear) ..................... 244
Cup holders ................................... 251
Eyeglasses compartment ............... 243
Glove box ....................................... 243
Important safety information ......... 242
Map pockets .................................. 245
Stowage net ................................... 245
Under driver's seat/front-
passenger seat .............................. 244
Stowage net ....................................... 245
Summer tires ..................................... 304
Sun visor ............................................ 253
Switching air-recirculation mode
on/off ................................................. 123
T
Tail lamps
see Lights
Tailgate
Display message ............................ 226
Emergency unlocking ....................... 82
Important safety notes .................... 81
Opening dimensions ...................... 338
Opening/closing (from outside) ....... 82
Technical data
Capacities ...................................... 335
Information .................................... 332
Tires/wheels ................................. 327
Index15
Page 19 of 342

Tire bead (definition) ...................... 322
Tire pressure (definition) ................ 322
Tire pressures (recommended) ...... 321
Tire size (data) ............................... 327
Tire size designation, load-bearing
capacity, speed rating .................... 317
Tire tread ....................................... 303
Tire tread (definition) ..................... 322
Total load limit (definition) ............. 323
Traction ......................................... 316
Traction (definition) ....................... 322
Tread wear ..................................... 316
Uniform Tire Quality Grading
Standards ...................................... 315
Uniform Tire Quality Grading
Standards (definition) .................... 321
Wear indicator (definition) ............. 322
Wheel and tire combination ........... 329
Wheel rim (definition) .................... 321
see Flat tire
Top Tether ............................................ 59
Towing away
Important safety guidelines ........... 294
Installing the towing eye ................ 296
Removing the towing eye ............... 296
Transporting the vehicle ................ 297
With both axles on the ground ....... 296
With front axle raised ..................... 297
With the rear axle raised ................ 297
Towing eye ......................................... 282
Trailer hitch ......................................... 25
Trailer tow hitch .................................. 25
Transmission
DIRECT SELECT lever ..................... 134
Drive program ................................ 137
Driving tips .................................... 137
Engaging the drive position ............ 136
Engaging the park position ............ 135
Holding the vehicle stationary on
uphill gradients .............................. 137
Kickdown ....................................... 137
Overview ........................................ 134
Program selector button ................ 137
Shifting to neutral .......................... 135
Transmission position display ......... 134
Transmission position display
(DIRECT SELECT lever) ...................... 134Transmission positions
....................136
Transporting the vehicle .................. 297
Trim pieces (cleaning instruc-
tions) .................................................. 278
Trip computer (on-board com-
puter) .................................................. 187
Trip odometer
Calling up ....................................... 187
Resetting (on-board computer) ...... 189
Trunk lid
see Tailgate
Trunk load (maximum) ...................... 338
Turn signals
Changing bulbs (front) ................... 107
Display message ............................ 215
Switching on/off ........................... 102
Two-way radio
Frequencies ................................... 332
Installation ..................................... 332
Transmission output (maximum) .... 332
Type identification plate
see Vehicle identification plate
U
UnlockingEmergency unlocking ....................... 80
From inside the vehicle (central
unlocking button) ............................. 80
V
Vanity mirror (in the sun visor) ........ 253
Vehicle
Correct use ...................................... 26
Data acquisition ............................... 27
Display message ............................ 225
Equipment ....................................... 21
Individual settings .......................... 195
Limited Warranty ............................. 27
Loading .......................................... 312
Locking (in an emergency) ............... 81
Locking (SmartKey) .......................... 72
Lowering ........................................ 326
Maintenance .................................... 22
Parking for a long period ................ 156
Raising ........................................... 324
Reporting problems ......................... 26
Index17
Page 26 of 342

the vehicle's high-voltage electrical system
checked by a qualified specialist workshop.
All of the vehicle's high-voltage electrical sys-
tem components are marked with yellow
warning stickers which warn you about high
voltages. The cables of the vehicle's high-
voltage electrical system are orange.
When towing a vehicle after an accident, be
sure to observe the following sections:
RTransporting the vehicle (Ypage 297)
RTowing the vehicle with the front axle raised
(
Ypage 297)
RTowing a vehicle with both axles on the
ground (
Ypage 296)
Read the important safety instructions on
towing away (
Ypage 294).
The ignition must be switched off when car-
rying out general tasks, such as changing
bulbs or checking the coolant level.
Automatic switching off of the vehicle's high-voltage electrical system
If the restraint systems are activated during
an accident, the vehicle's high-voltage elec-
trical system is automatically deactivated.
This is to ensure that you do not come into
contact with high voltage.
Automatic protection from switching
on of the vehicle's high-voltage electri-
cal system
The vehicle's high-voltage electrical system is
not activated when the vehicle is started if:
Ra serious electrical insulation malfunction
is detected in the vehicle's high-voltage
electrical system.
Ran electrical connection in the vehicle's
high-voltage electrical system is discon-
nected.
Automatic switching off of the charging
process
The charging process is deactivated automat-
ically if:
Rthe high-voltage battery is fully charged
The charging process is interrupted automat-
ically if:
Ra serious electrical insulation malfunction
is detected in the vehicle's high-voltage
electrical system.
Ran electrical connection in the vehicle's
high-voltage electrical system is discon-
nected.
High-voltage switch-off device
!The high-voltage system must only be
switched off at vehicle standstill by spe-
cially trained service engineers. Otherwise
the high-voltage system may be damaged.
Your vehicle is equipped with a high-voltage
switch-off device :which can be used to
24Introduction
Page 101 of 342
Useful information............................100
Exterior lighting ................................ 100
Interior lighting ................................. 103
Replacing bulbs ................................. 104
Windshield wipers ............................109
99
Lights and windshield wipers
Page 106 of 342
Interior lighting control
General notes
In order to prevent the vehicle's battery from discharging, the interior lighting functions are
automatically deactivated after some time
except when the key is in position 2in the
ignition lock.
The color and brightness for the ambient
lighting may be set using COMAND or Audio
20 (see the separate operating instructions).
Automatic interior lighting control
XTo switch on: set the switch to center
position B.
XTo switch off: set the switch to the |
position.
The interior lighting automatically swit ches
on if you:
Runlock the vehicle
Ropen a door
RRemove the Sm artKey from the ignition
lock.
The interior light is activated for a short while
when the SmartKey is removed from the igni-
tion lock. This delayed switch-off can be
adjusted using COMAND or Audio 20 (see the separate Operator's Manual).
Manual interior lighting control
XTo switch the front interior lighting on:
set the switch to the cposition.
XTo switch the front interior lighting off:
set the switch to the |position or (if the
door is closed) to the center position.
XTo switch the rear interior ligh ting on or
off: press the ubutton.
XTo switch the reading lamp on or off:
press the pbutton.
Crash-responsive emergency lighting
The interior lighting is activated automatically
if the vehicle is involved in an accident.
XTo switch off the crash-responsive
eme rgency lighti ng:press the hazard
warning lamp button.
or
XLock and then unlock the vehicle using the Sm artKey.
Replacing bulbs
Important safety notes
Xenon bulbs
GDANGER
Xenon bulbs carry a high voltage. You can get an electric shock if you remove the cover of
th e Xenon bulb and touch the electrical con-
tacts . There is a risk of fatal injury.
Never touch the parts or the electrical con-
tacts of th e Xenon bulb. Always have work on
th e Xenon bulbs carried out at a qualified spe-
cialist workshop.
If your vehicle is equipped with Xenon bulbs,
you can recognize th is by the following: the
cone of light from the Xenon bulbs moves
from the top to the bottom and back again
when you start the drive system. For this tobe
observed, the lights must be switched on
before the drive system is started.
Bulbs and lamps are an important aspect of
vehicle safety. You must therefore make sure
that these function correctly at all times.
Have the headlamp setting checked regularly.
Other bulbs
GWARNING
Bulbs, lamps and connectors can get very hot
when operating. If you changeabulb, you
could burn yourself on these components.
There is a risk of injury.
Allow these component s to cool down before
changing a bulb.
104Replacing bulbs
Lights and windshield wipers
Page 107 of 342
Do not use a bulb that has been dropped or if
its glass tube has been scratched.
The bulb may explode if:
Ryou touch it
Rit is hot
Ryou drop it
Ryou scratch it
Only operate bulbs in enclosed lamps
designed for that purpose. Only install spare
bulbs of the same type and the specified volt- age.
Marks on the glass tube reduce the service
life of the bulbs. Do not touch the glass tube
with your bare hands. If necessary, clean the
glass tube when cold with alcohol or spirit and
rub it off with a lint-free cloth.
Protect bulbs from moisture during opera-
tion. Do not allow bulbs to come into contact
with liquids.
There are bulbs other than the Xenon bulbs
that you cannot replace. Only replace the
bulbs listed (
Ypage 105). Have the bulbs that
you cannot replace yourself changed at a
qualified specialist workshop.
If you require assistance replacing bulbs, con-
sult a qualified specialist workshop.
If the new bulb still does not light up, consult
a qualified specialist workshop.
Bulbs and lamps are an important aspect of
vehicle sa fety. You must therefore make sure
that these function correctly at all times.
Have the headlamp setting checked regularly.
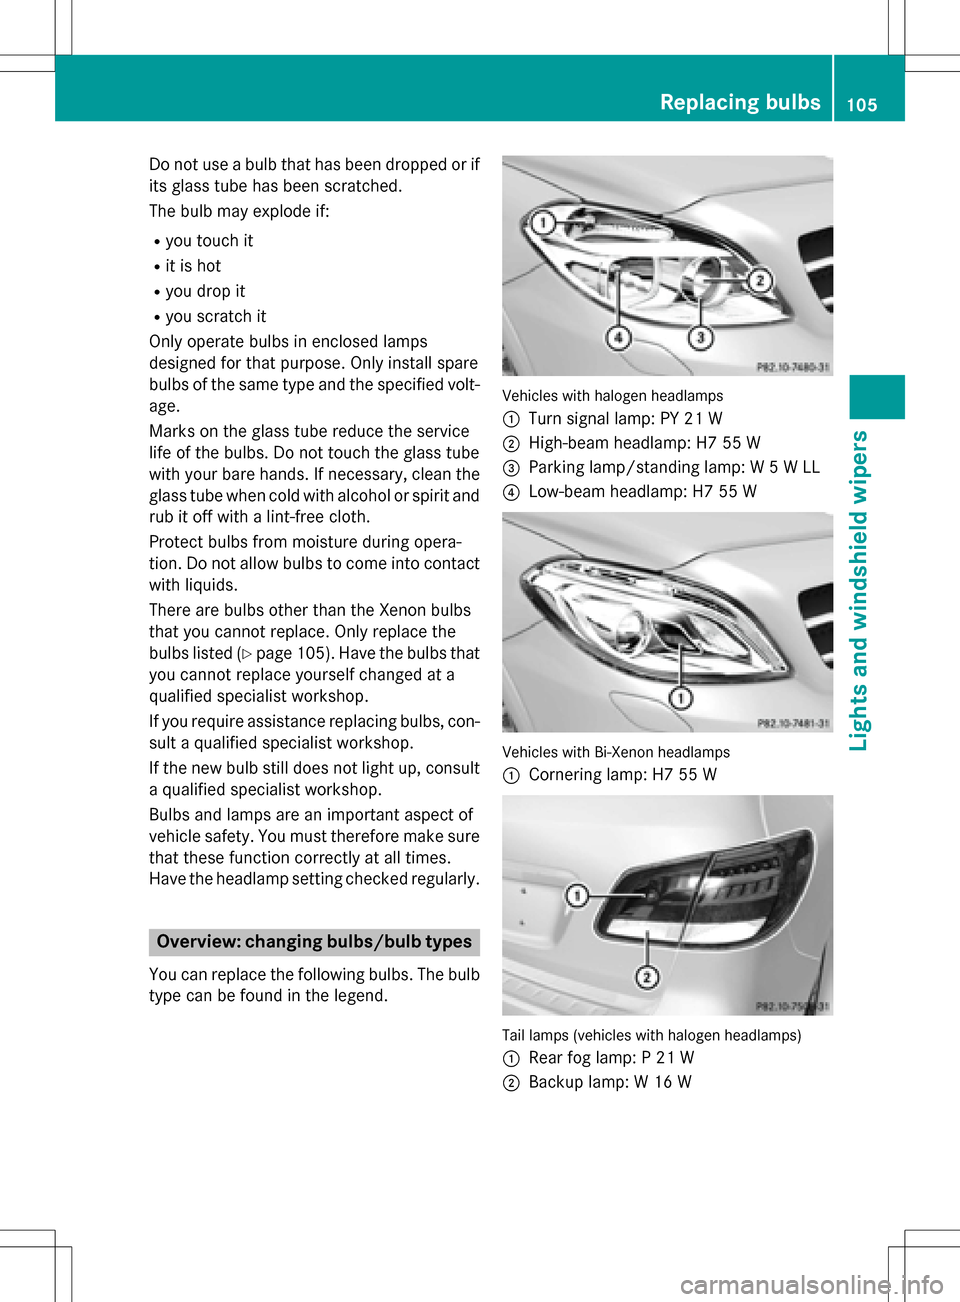
Overview: changing bulbs/bulb types
You can replace the following bulbs. The bulb
type can be found in the legend.
Vehicles with halogen headlamps
:
Turn signal lamp: PY 21 W
;High-beam headlamp: H7 55 W
=Parking lamp/standing lamp: W 5 W LL
?Low-beam headlamp: H7 55 W
Vehicles with Bi-Xenon headlamps
:
Cornering lamp: H7 55 W
Tail lamps (vehicles with halogen headlamps)
:
Rear fog lamp: P 21 W
;Backup lamp: W 16 W
Replacing bulbs105
Lights and windshield wipers
Z
Page 108 of 342
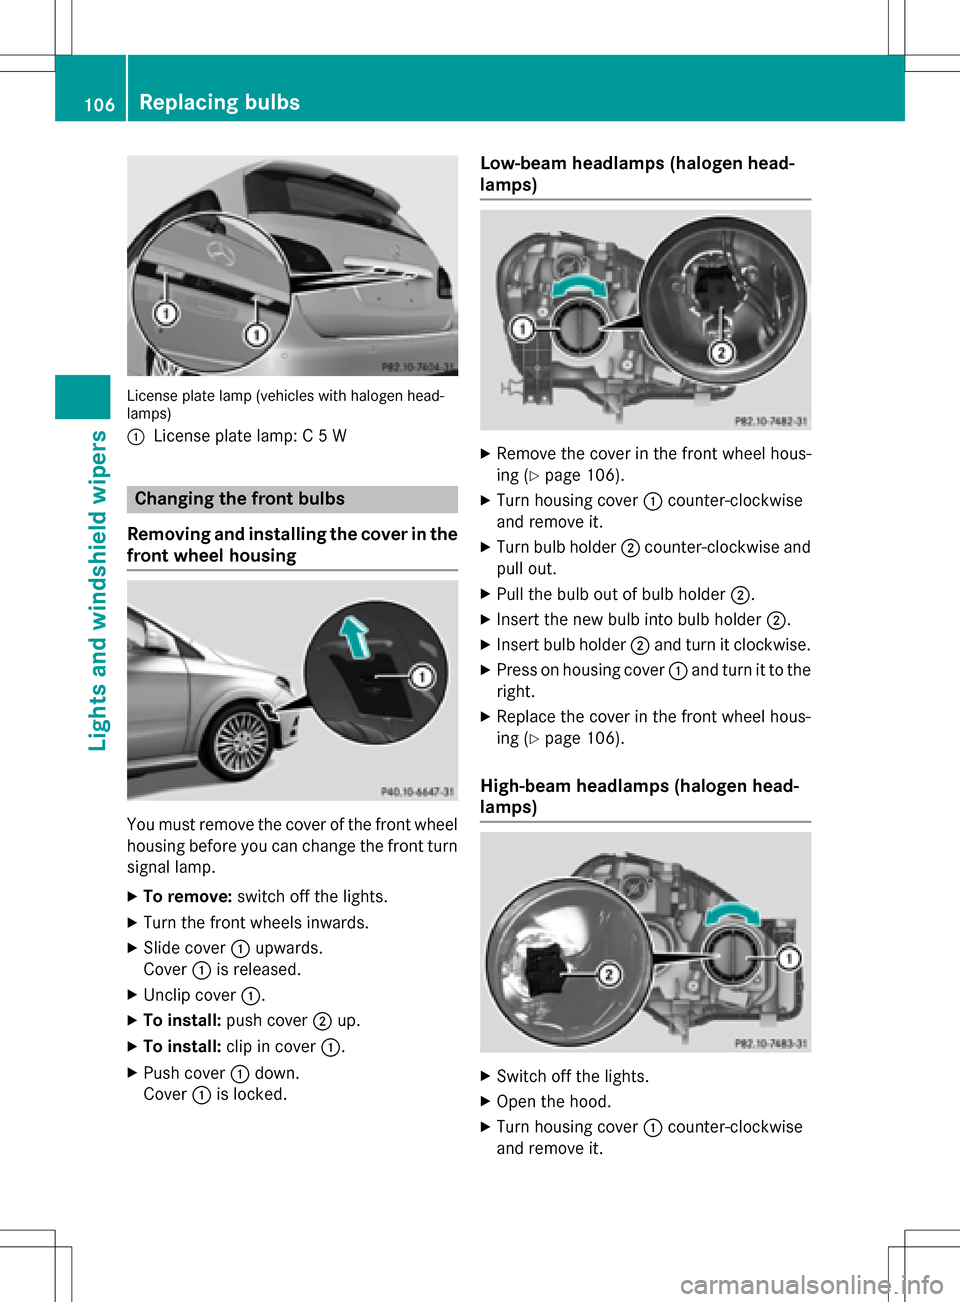
License plate lamp (vehicles with halogen head-
lamps)
:
License plate lamp: C 5 W
Changing the front bulbs
Removing and installing the cover in the
front wheel housing
You must remove the cover of the front wheel
housing before you can change the front turn signal lamp.
XTo remove: switch off the lights.
XTurn the front wheels inwards.
XSlide cover:upwards.
Cover :is released.
XUnclip cover :.
XTo install:push cover ;up.
XTo install: clip in cover :.
XPush cover:down.
Cover :is locked.
Low-beam headlamps (halogen head-
lamps)
XRemove the cover in the front wheel hous-
ing (
Ypage 106).
XTurn housing cover :counter-clockwise
and remove it.
XTurn bulb holder ;counter-clockwise and
pull out.
XPull the bulb out of bulb holder ;.
XInsert the new bulb into bulb holder ;.
XInsert bulb holder;and turn it clockwise.
XPress on housing cover :and turn it to the
right.
XReplace the cover in the front wheel hous-
ing (
Ypage 106).
High-beam headlamps (halogen head-
lamps)
XSwitch off the lights.
XOpen the hood.
XTurn housing cover :counter-clockwise
and remove it.
106Replacing bulbs
Lights and windshield wipers
Page 109 of 342
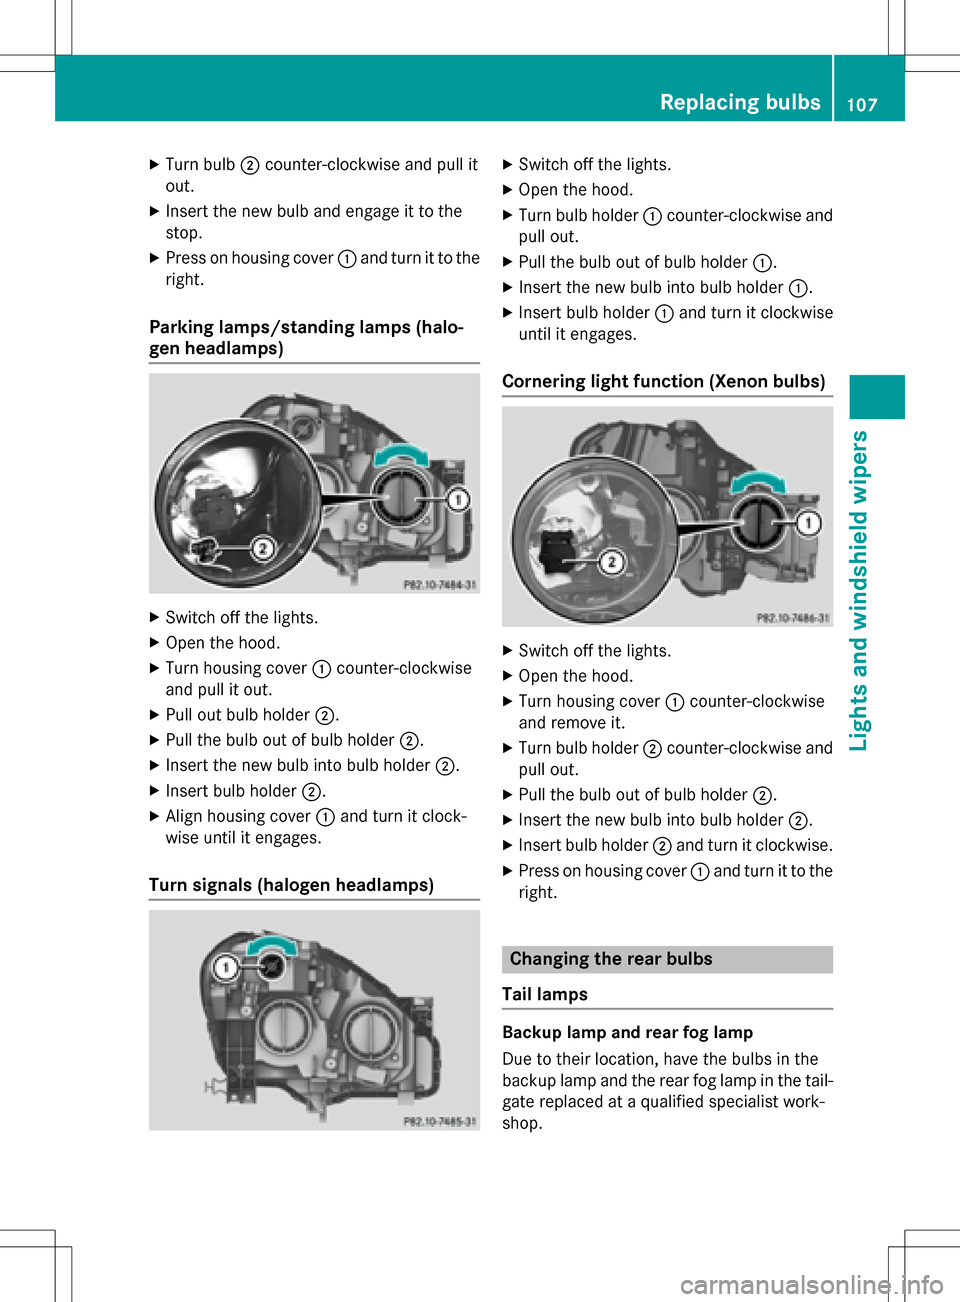
XTurn bulb;counter-clockwise and pull it
out.
XInsert the new bulb and engage it to the
stop.
XPress on housing cover :and turn it to the
right.
Parking lamps/standing lamps (halo-
gen headlamps)
XSwitch off the lights.
XOpen the hood.
XTurn housing cover :counter-clockwise
and pull it out.
XPull out bulb holder ;.
XPull the bulb out of bulb holder ;.
XInsert the new bulb into bulb holder ;.
XInsert bulb holder;.
XAlign housing cover :and turn it clock-
wise until it engages.
Turn signals (halogen headlamps)
XSwitch off the lights.
XOpen the hood.
XTurn bulb holder :counter-clockwise and
pull out.
XPull the bulb out of bulb holder :.
XInsert the new bulb into bulb holder :.
XInsert bulb holder:and turn it clockwise
until it engages.
Cornering light function (Xenon bulbs)
XSwitch off the lights.
XOpen the hood.
XTurn housing cover :counter-clockwise
and remove it.
XTurn bulb holder ;counter-clockwise and
pull out.
XPull the bulb out of bulb holder ;.
XInsert the new bulb into bulb holder ;.
XInsert bulb holder;and turn it clockwise.
XPress on housing cover :and turn it to the
right.
Changing the rear bulbs
Tail lamps
Backup lamp and rear fog lamp
Due to their location, have the bulbs in the
backup lamp and the rear fog lamp in the tail-
gate replaced at a qualified specialist work-
shop.
Replacing bulbs107
Lights and windshield wipers
Z