2016 MERCEDES-BENZ B-Class ELECTRIC warning light
[x] Cancel search: warning lightPage 255 of 342
Sun visors
Overview
GWARNING
If the mirror cover of the vanity mirror is folded
up when the vehicle is in motion, you could be
blinded by incident light. There is a risk of an
accident.
Always keep the mirror cover folded down
while driving.
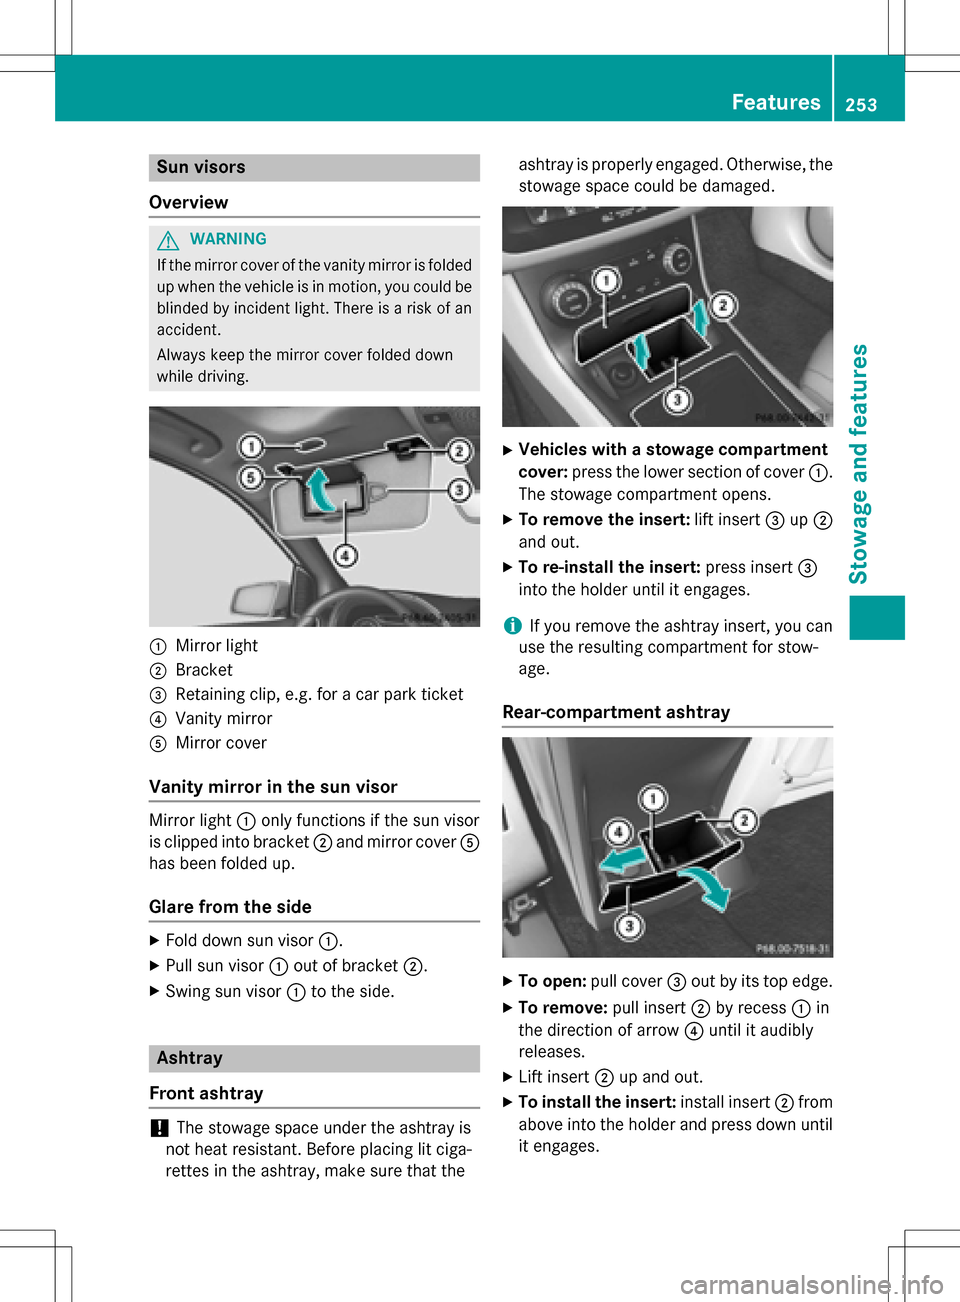
:Mirror light
;Bracket
=Retaining clip, e.g. for a car park ticket
?Vanity mirror
AMirror cover
Vanity mirror in the sun visor
Mirror light :only functions if the sun visor
is clipped into bracket ;and mirror cover A
has been folded up.
Glare from the side
XFold down sun visor :.
XPull sun visor:out of bracket ;.
XSwing sun visor :to the side.
Ashtray
Front ashtray
!The stowage space under the ashtray is
not heat resistant. Before placing lit ciga-
rettes in the ashtray, make sure that the ashtray is properly engaged. Otherwise, the
stowage space could be damaged.
XVehicles with a stowage compartment
cover:
press the lower section of cover :.
The stowage compartment opens.
XTo remove the insert: lift insert=up;
and out.
XTo re-install the insert: press insert=
into the holder until it engages.
iIf you remove the ashtray insert, you can
use the resulting compartment for stow-
age.
Rear-compartment ashtray
XTo open: pull cover =out by its top edge.
XTo remove: pull insert;by recess :in
the direction of arrow ?until it audibly
releases.
XLift insert ;up and out.
XTo install the insert: install insert;from
above into the holder and press down until
it engages.
Features253
Stowage and features
Z
Page 256 of 342
Cigarette lighter
GWARNING
You can burn yourself if you touch the hot
heating element or the socket of the cigarette lighter.
In addition, flammable materials can ignite if:
Rthe hot cigarette lighter falls
Ra child holds the hot cigarette lighter to
objects, for example
There is a risk of fire and injury.
Always hold the cigarette lighter by the knob.
Always make sure that the cigarette lighter is
out of reach of children. Never leave children
unsupervised in the vehicle.
Your attention must always be focused on the
traffic conditions. Only use the cigarette
lighter when road and traffic conditions per-
mit.
XTurn the SmartKey to position 2in the igni-
tion lock (
Ypage 131).
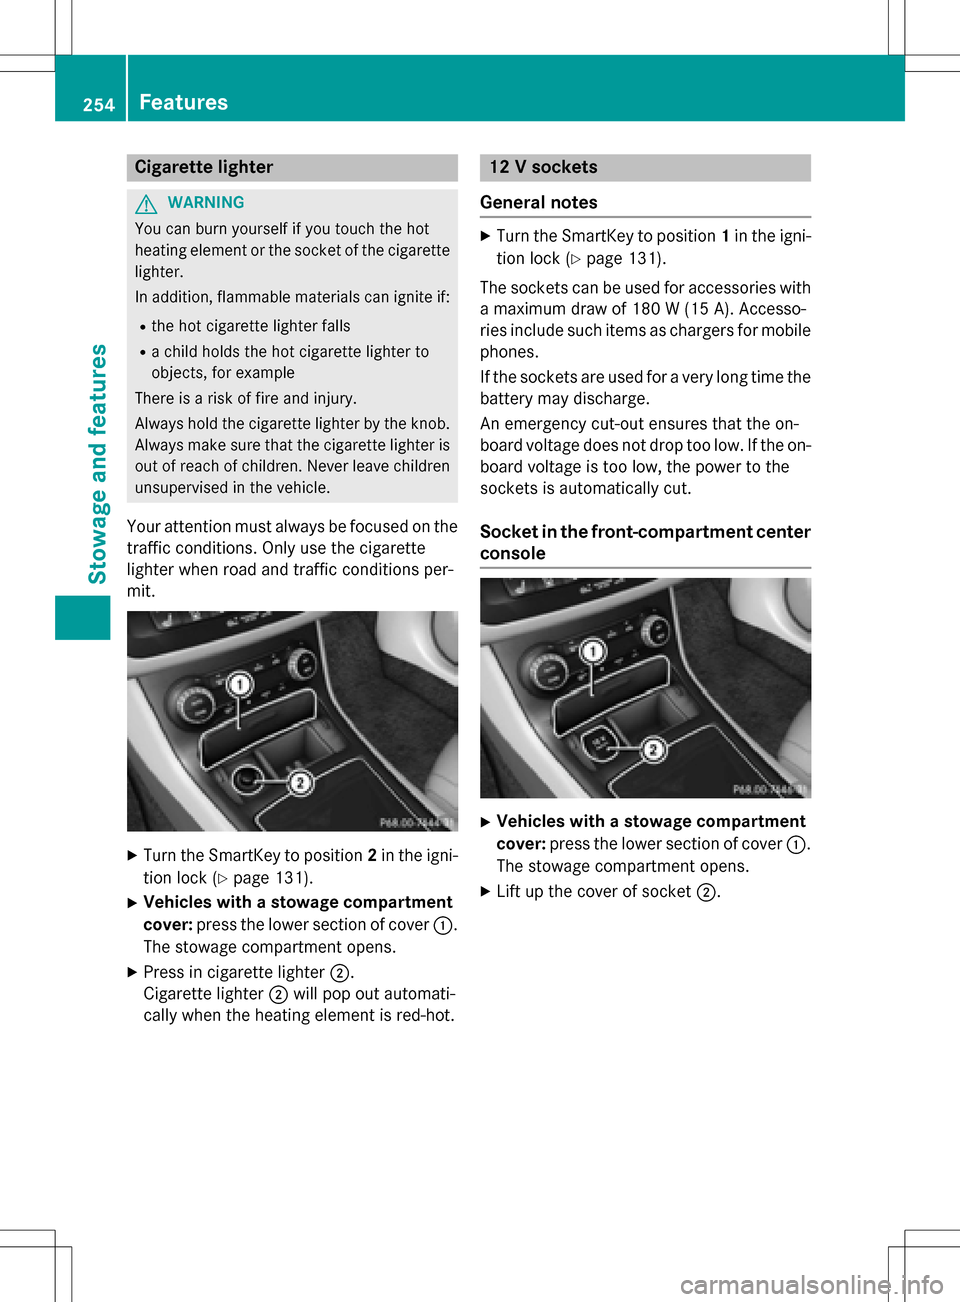
XVehicles with a stowage compartment
cover: press the lower section of cover :.
The stowage compartment opens.
XPress in cigarette lighter ;.
Cigarette lighter ;will pop out automati-
cally when the heating element is red-hot.
12 V sockets
General notes
XTurn the SmartKey to position 1in the igni-
tion lock (
Ypage 131).
The sockets can be used for accessories with a maximum draw of 180 W (15A). Accesso-
ries include such items as chargers for mobile
phones.
If th e sockets are used foravery long time the
battery may discharge.
An emergency cut-out ensures that the on-
board voltage does not drop too low. If the on-
board voltage is too low, the power to the
sockets is automatically cut.
Socket in the front-compartment center
console
XVehicles with a stowage compartment
cover: press the lower section of cover :.
The stowage compartment opens.
XLift up the cover of socket ;.
254Features
Stowageand features
Page 258 of 342

A malfunction in the system has been detec-
ted if one of the following occurs:
RThe indicator lamp in the SOS button doesnot come on during the system self-test.
RThe indicator lamp in the FRoadside
Assistance button does not light up during
self-diagnosis of the system.
RThe indicator lamp in the ïMB Info call
button does not light up during self-diag-
nosis of the system.
RThe indicator lamp in one or more of the
following buttons continues to light up red
after the system self-diagnosis:
-SOS button
-F Roadside Assistance call button
-ïMB Info call button
RTheInoperativeor the Service Not
Activatedmessage appears in the multi-
function display after the system self-diag-
nosis.
If a malfunction is indicated as outlined
above, the system may not operate as expec-
ted. In the event of an emergency, help will
have to be summoned by other means.
Have the system checked at the nearest
authorized Mercedes-Benz Center or contact the following service hotlines:
Mercedes-Benz Customer Assistance Center
at 1-800-FOR-MERCedes (1-800-367-6372)
or 1-866-990-9007
Emergency call
Important safety notes
GWARNING
It can be dangerous to remain in the vehicle,
even if you have pressed the SOS button in an emergency if:
Ryou see smoke inside or outside of the vehi-
cle, e.g. if there is a fire after an accident
Rthe vehicle is on a dangerous section of
road
Rthe vehicle is not visible or cannot easily beseen by other road users, particularly when
dark or in poor visibility conditions
There is a risk of an accident and injury.
Leave the vehicle immediately in this or simi-
lar situations as soon as it is safe to do so.
Move to a safe location along with other vehi-
cle occupants. In such situations, secure the
vehicle in accordance with national regula-
tions, e. g. with a warning triangle.
General notes
Observe the notes on system activation
(
Ypage 255).
An emergency call is dialed automatically if an
air bag or Emergency Tensioning Device is
triggered. You cannot end an automatically
triggered emergency call yourself.
An emergency call can also be initiated man-
ually.
As soon as the emergency call has been ini-
tiated, the indicator lamp in the SOS button
flashes. The Connecting Call
message
appears in the multifunction display.
The audio output is muted.
Once the connection has been made, the
Call Connected
message appears in the
multifunction display.
256Features
Stowage and features
Page 265 of 342
The data you receive contains the following
information:
Rthe location where the speed limit was
exceeded
Rthe time at which the speed limit was
exceeded
Rthe selected speed limit which was excee-
ded
Geo fencing
Geo fencing allows you to select areas which
the vehicle should not enter or leave. You will
be informed if the vehicle crosses the boun-
daries of the selected areas. You can select
the way in which you receive this information beforehand. Possible options include text
message, e-mail or an automated call.
The area can be determined as either a circle
or a polygon with a maximum of ten corners.
You can specify up to ten areas simultane-
ously. Different settings are possible for each area.
These settings can be called up under "Own-
ers Online" at http://www.mbusa.com.
Alternatively, you can trigger an MB Info call
and inform the customer service representa-
tive that you wish to activate geo fencing.
Currently inactive areas can be activated by
text message.
Triggering the vehicle alarm
With this function, you can trigger the vehi-
cle's panic alarm via text message. An alarm
sounds and the exterior lighting flashes.
Depending on the setting, the panic alarm
lasts five or ten seconds. Afterwards, the
alarm switches off.
Garage door opener
General notes
The HomeLink®garage door opener integra-
ted in the rear-view mirror allows you to oper- ate up to three different door and gate sys-
tems.
Use the integrated garage door opener only
on garage doors that:
Rhave safety stop and reverse features and
Rmeet current U.S. federal safety standards
Once programed, the integrated garage door
opener in the rear-view mirror will assume the
function of the garage door system's remote
control. Please also read the operating
instructions for the garage door system.
When programming a garage door opener,
park the vehicle outside the garage. Do not
run the engine while programming.
Certain garage door drives are incompatible
with the integrated garage door opener. If you
have difficulty programing the integrated
garage door opener, contact an authorized
Mercedes-Benz Center.
Alternatively, you can call the following tele-
phone assistance services:
RUSA: Mercedes-Benz Customer Assistance
Center at 1-800-FOR-MERCedes
RCanada: Customer Service at
1-800-387-0100
RHomeLink®hotline 1-800-355-3515 (free
of charge)
More information on HomeLink
®and/or
compatible products is also available online
at http://www.homelink.com.
Notes on the declaration of conformity
(
Ypage 25).
USA: FCC ID: CB2HMIHL4
Canada: IC: 279B-HMIHL4
Important safety notes
GWARNING
When you operate or program the garage door
with the integrated garage door opener, per-
sons in the range of movement of the garage
door can become trapped or struck by the
garage door. There is a risk of injury.
Features263
Stowage and features
Z
Page 273 of 342
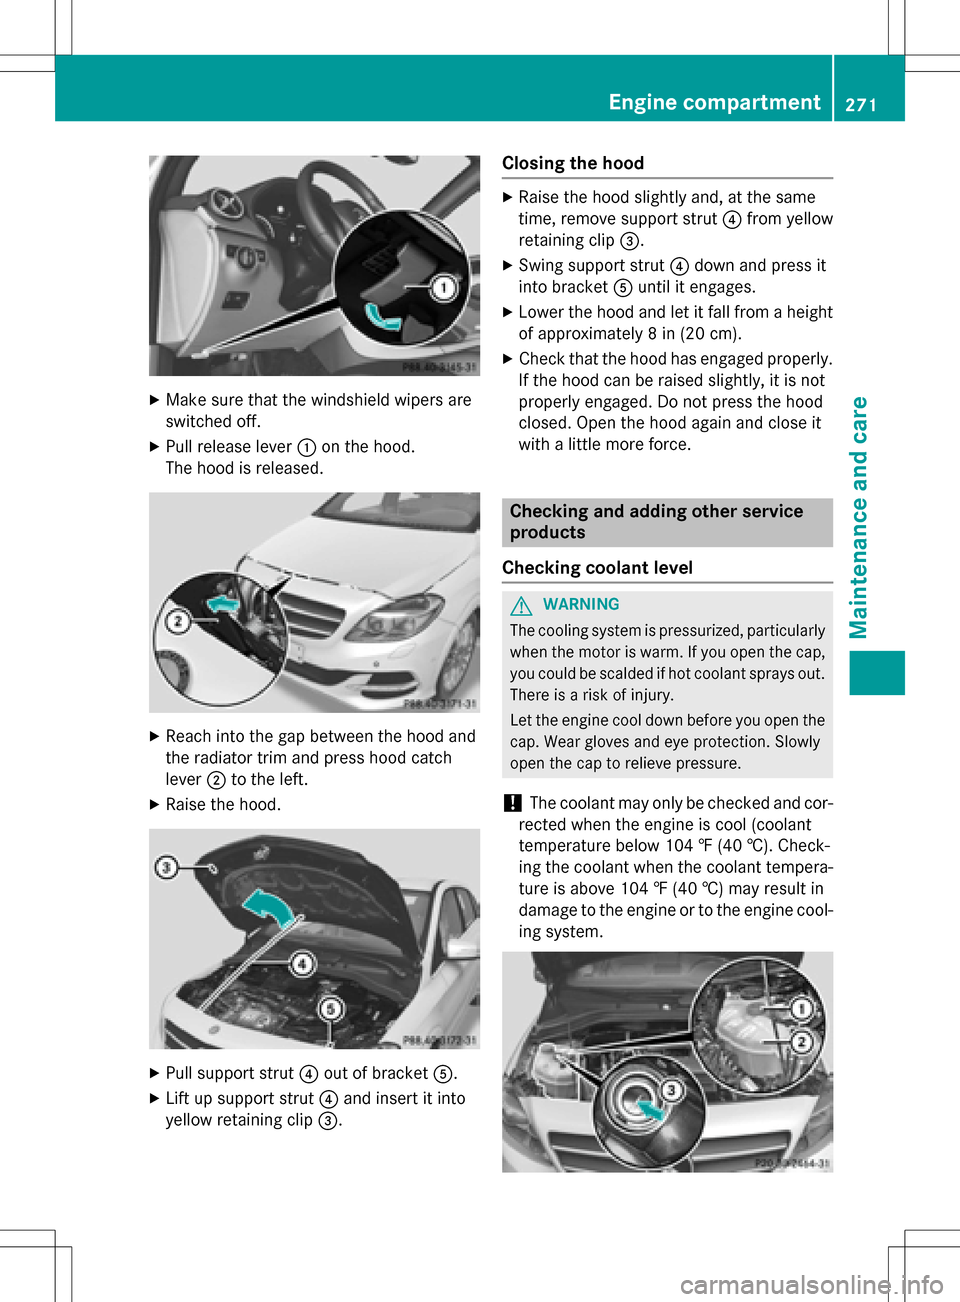
XMake sure that the windshield wipers are
switched off.
XPull release lever:on the hood.
The hood is released.
XReach into the gap between the hood and
the radiator trim and press hood catch
lever ;to the left.
XRaise the hood.
XPull support strut ?out of bracket A.
XLift up support strut ?and insert it into
yellow retaining clip =.
Closing the hood
XRaise the hood slightly and, at the same
time, remove support strut ?from yellow
retaining clip =.
XSwing support strut ?down and press it
into bracket Auntil it engages.
XLower the hood and let it fall from a height
of approximately 8 in (20 cm).
XCheck that the hood has engaged properly.
If the hood can be raised slightly, it is not
properly engaged. Do not press the hood
closed. Open the hood again and close it
with a little more force.
Checking and adding other service
products
Checking coolant level
GWARNING
The cooling system is pressurized, particularly
when the motor is warm. If you open the cap,
you could be scalded if hot coolant sprays out.
There is a risk of injury.
Let the engine cool down before you open the
cap. Wear gloves and eye protection. Slowly
open the cap to relieve pressure.
!The coolant may only be checked and cor-
rected when the engine is cool (coolant
temperature below 104 ‡ (40 †). Check-
ing the coolant when the coolant tempera-
ture is above 104 ‡ (40 †) may result in
damage to the engine or to the engine cool-
ing system.
Engine compartment271
Maintenance and care
Z
Page 276 of 342

Rsolvents
Rcleaning agents containing solvents
Do not scrub.
Do not touch the surfaces or protective
films with hard objects, e.g. a ring or ice
scraper. You could otherwise scratch or
damage the surfaces and protective film.
!Do not park the vehicle for an extended
period straight after cleaning it, particularly
after having cleaned the wheels with wheel
cleaner. Wheel cleaners could cause
increased corrosion of the brake discs and
brake pads/linings. For this reason, you
should drive for a few minutes after clean-
ing. Braking heats the brake discs and the
brake pads/linings, thus drying them. The
vehicle can then be parked.
Regular care of your vehicle is a condition for
retaining the quality in the long term.
Use care products and cleaning agents rec-
ommended and approved by Mercedes-Benz.
Washing the vehicle and cleaning the
paintwork
Automatic car wash
GWARNING
Braking efficiency is reduced after washing
the vehicle. There is a risk of an accident.
After the vehicle has been washed, brake
carefully while paying attention to the traffic
conditions until full braking power is restored.
!If the HOLD function is activated, the vehi-
cle brakes automatically in certain situa-
tions.
To prevent damage to the vehicle, deacti-
vate the HOLD function in the following or
other similar situations:
Rwhen towing the vehicle
Rin the car wash
!Never clean your vehicle in a Touchless
Automatic Car Wash as these use special cleaning agents. These cleaning agents can
damage the paintwork or plastic parts.
!When washing your vehicle in a tow-
through car wash, make sure that the selec- tor lever is in position N, otherwise the
vehicle could be damaged.
!Make sure that:
Rthe side windows are fully closed.
Rthe ventilation/heating is switched off
(the OFF button has been pressed/the
airflow control is set to position 0).
Rthe windshield wiper switch is at position
0.
The vehicle may otherwise be damaged.
You can wash the vehicle in an automatic car
wash from the very start.
If the vehicle is very dirty, pre-wash it before
cleaning it in an automatic car wash.
After using an automatic car wash, wipe off
wax from the windshield and the wiper
blades. This will prevent smears and reduce
wiping noises caused by residue on the wind-
shield.
Washing by hand
In some countries, washing by hand is only
allowed at specially equipped washing bays.
Observe the legal requirements in each coun- try.
XDo not use hot water and do not wash the
vehicle in direct sunlight.
XUse a soft sponge to clean.
XUse a mild cleaning agent, such as a car
shampoo approved by Mercedes-Benz.
XThoroughly hose down the vehicle with a
gentle jet of water.
XDo not point the water jet directly towardsthe air inlet.
XUse plenty of water and rinse out the
sponge frequently.
274Care
Maintenance and care
Page 277 of 342
XRinse the vehicle with clean water and dry
thoroughly withachamois.
XDo not let the cleaning agent dry on the
paintwork.
Carefully remove all deposits of road salt as
soon as possible when driving in winter.
Power washers
GWARNING
The water jet froma circular jet nozzle (dirt
blasters) can cause invisible exterior damage
to th e tires or chassis components. Compo-
nent s damaged in this way may fail unexpect-
edly. There is a risk of an accident.
Do no t use power washers with circular jet
nozzles to clean th e vehicle. Have damaged
tires or chassis components replaced imme-
diately.
!Always maintainadistance of at least
11.8 in (30 cm)betwee n thevehicl e and the
power washer nozzle. Information about
the correct distance is available from the
equipment manufacturer.
Move the power washer nozzle around
when cleaning your vehicle.
Do not aim directly at any of the following:
Rtires
Rdoor gaps, roof gaps, joints, etc.
Relectrical components
Rbattery
Rconnectors
Rlights
Rseals
Rtrim
Rventilation slots
Damaged seals or electrical components
can lead to leaks or failures.
Cleaning the paintwork
!Do not affix:
Rstickers
Rfilms
Rmagnetic plates or similar items
to painted surfaces. You could otherwise
damage the paintwork.
Scratches, corrosive deposits, areas affected
by corrosion and damage caused by inade-
quate care cannot always be completely
repaired. In such cases, visit a qualified spe-
cialist workshop.
XRemove dirt immediately, where possible,
while avoiding rubbing too hard.
XSoak insect remains with insect remover
and rinse off the treated areas afterwards.
XSoak bird droppings with water and rinse
off the treated areas afterwards.
XRemove coolant, brake fluid, tree resin,
oils, fuels and greases by rubbing gently
with a cloth soaked in petroleum ether or
lighter fluid.
XUse tar remover to remove tar stains.
XUse silicone remover to remove wax.
If water no longer forms "beads" on the paint surface, use the paint care products recom-
mended and approved by Mercedes-Benz.
This is the case approximately every three to
five months, depending on the climate con-
ditions and the care product used.
If dirt has penetrated the paint surface or if
the paint has become dull, the paint cleaner
recommended and approved by Mercedes-
Benz should be used.
Do not use these care products in the sun or
on the hood while the hood is hot.
XUse a suitable touch-up stick, e.g. MB
Touch-Up Stick, to repair slight damage to
the paintwork quickly and provisionally.
Care275
Maintenance and care
Z
Page 278 of 342
Matte finish care
!Never polish the vehicle or the light alloy
wheels. Polishing causes the finish to
shine.
!The following may cause the paint to
become shiny and thus reduce the matte
effect:
Rstrong rubbing of the paintwork with
unsuitable materials
Rfrequent use of automatic car washes
Rwashing the vehicle in direct sunlight
!Never use paint cleaner, buffing or pol-
ishing products, or gloss preserver, e.g.
wax. These products are only suitable for
high-gloss surfaces. Their use on vehicles
with matte finish leads to considerable sur-
face damage (shiny, spotted areas).
Always have paintwork repairs carried out
at a qualified specialist workshop.
!Do not use wash programs with a hot wax
treatment under any circumstances.
Observe these notes if your vehicle has a
clear matte finish. This will help you to avoid
damage to the paintwork due to incorrect
treatment.
These notes also apply to light alloy wheels
with a clear matte finish.
The vehicle should preferably be washed by
hand using a soft sponge, car shampoo and
plenty of water.
Use only insect remover and car shampoo
from the range of approved Mercedes-Benz
care products.
Cleaning the vehicle parts
Cleaning the wheels
GWARNING
The water jet from a circular jet nozzle (dirt
blasters) can cause invisible exterior damage
to the tires or chassis components. Compo-
nents damaged in this way may fail unexpect-
edly. There is a risk of an accident.
Do not use power washers with circular jet
nozzles to clean the vehicle. Have damaged
tires or chassis components replaced imme-
diately.
!Do not use acidic wheel cleaning products
to remove brake dust. This could damage
wheel bolts and brake components.
!Do not park the vehicle for an extended
period straight after cleaning it, particularly
after having cleaned the wheels with wheel
cleaner. Wheel cleaners could cause
increased corrosion of the brake discs and
brake pads/linings. For this reason, you
should drive for a few minutes after clean-
ing. Braking heats the brake discs and the
brake pads/linings, thus drying them. The
vehicle can then be parked.
Cleaning the windows
GWARNING
You could become trapped by the windshield wipers if they start moving while cleaning the
windshield or wiper blades. There is a risk of
injury.
Always switch off the windshield wipers and
the ignition before cleaning the windshield or
wiper blades.
!Only fold the windshield wipers away from
the windshield when vertical. Otherwise,
you will damage the hood.
!Do not use dry cloths, abrasive products,
solvents or cleaning agents containing sol-
vents to clean the inside of the windows. Do
not touch the insides of the windows with
hard objects, e.g. an ice scraper or ring.
There is otherwise a risk of damaging the
windows.
!Clean the water drainage channels of the
windshield and the rear window at regular
intervals. Deposits such as leaves, petals
and pollen may under certain circumstan-
276Care
Maintenance and care