2016 MERCEDES-BENZ B-Class ELECTRIC high beam
[x] Cancel search: high beamPage 8 of 342

Installing/removing ....................... 248
Notes/how to use .........................248
Cargo compartment enlargement ... 246
Cargo compartment floor
Height adjustment ......................... 250
Important safety notes .................. 249
Opening/closing ............................ 250
Stowage well (under) ..................... 249
Cargo net
Attaching ....................................... 249
Important safety information ......... 249
Cargo tie down rings ......................... 247
CD player (on-board computer) ........191
Center console
Lower section .................................. 36
Upper section .................................. 35
Central locking
Automatic locking (on-board com-
puter) ............................................. 198
Locking/unlocking (SmartKey) ....... .72
Changing bulbs
Cornering light function ................ .107
High-beam headlamps ................... 106
License plate lighting ..................... 109
Low-beam headlamps .................... 106
Parking lamps ................................ 107
Rear fog lamp ................................ 107
Reversing lamps ............................ 107
Standing lamps (front) ................... 107
Turn signals (front) ......................... 107
Charge level display .......................... 184
Charging
with RANGE PLUS .......................... 195
see Charging the high-voltage battery
Charging cable
Connecting ....................................1 48
Controls ......................................... 147
Important safety notes .................. 146
Removing ....................................... 149
Storing ...........................................1 47
Warming up ................................... 142
Charging the high-voltage battery
(important safety notes) ................... 140
Child
Restraint system .............................. 57
Child seat
Forward-facing restraint system ...... 60 LATCH-type (ISOFIX) child seat
anchors ............................................ 58
On the
front-passenger seat ............ 60
Rearward-facing restraint system .... 60
Top Tether ....................................... 59
Child-proof locks
Important safety notes .................... 61
Rear doors ....................................... 61
Children
Special seat belt retractor ............... 57
Cigarette lighter ................................ 254
Cleaning
Mirror turn signal ........................... 277
Climate control
Automatic climate control (dual-
zone) .............................................. 117
Auxiliary climate control (on-
board computer) ............................ 196
Controlling automatically ............... 120
Convenience opening/closing
(air-recirculation mode) ................. 123
Cooling with air dehumidification .. 118
Defrosting the windows ................. 122
Defrosting the windshield .............. 121
General notes ................................ 116
Immediate pre-entry climate con-
trol ................................................. 125
Indicator lamp ................................ 120
Information about using auto-
matic climate control ..................... 117
Maximum cooling .......................... 122
Overview of systems ...................... 116
Pre-entry climate control at
departure time ............................... 125
Pre-entry climate control at time
of departure (on-board computer) .. 196
Pre-entry climate control via key ... 124
Pre-entry climate control via key
(on-board computer) ...................... 196
Problem with the rear window
defroster ........................................ 123
Problems with cooling with air
dehumidification ............................ 120
Refrigerant ..................................... 337
Refrigerant filling capacity ............. 337
Setting the air distribution ............. 120
Setting the air vents ...................... 126
Setting the airflow ......................... 121
6Index
Page 11 of 342

Emergency releaseDriver's door .................................... 80
Vehicle ............................................ .80
Emergency Tensioning Devices
Activation ........................................ .54
Emergency unlocking
Tailgate ............................................ 82
Energy
Driving tips .................................... 157
Energy flow display ...........................187
ESP
®(Electronic Stability Pro-
gram)
Activating/deactivating (on-
board computer) ............................ 193
Characteristics ................................. 67
Deactivating/activating (notes) ....... 67
Display message ............................ 201
Function/notes ................................ 66
General notes .................................. 66
Important safety information ........... 66
Warning lamp ................................. 235
ETS/4ETS (Electronic Traction Sys-
tem) ...................................................... 66
Exhaustive discharging (high-volt-
age battery) ....................................... 290
Exterior lighting
Cleaning ......................................... 277
see Lights
Exterior mirrors
Adjusting ......................................... 95
Dipping (automatic) ......................... 96
Out of position (troubleshooting) ..... 95
Storing settings (memory func-
tion) ................................................. 98
Storing the parking position ............. 96
Eyeglasses compartment ................. 243
F
Flat tire
MOExtended tires .......................... 283
Preparing the vehicle ..................... 282
TIREFIT kit ...................................... 284
Floormats .......................................... .267
Folding table ...................................... 244
Frequencies
Mobile phone ................................. 332
Two-way radio ................................ 332 Front-passenger seat
Folding the backrest forward/
back ............................................... 245
Fuses
Allocation chart ............................ .299
Before changing ............................ .298
Fuse box in the engine compart-
ment .............................................. 298
Fuse box in the front-passenger
footwell .......................................... 299
Important safety notes .................. 298
G
Garage door opener
Clearing the memory ..................... 266
General notes ................................ 263
Important safety notes .................. 263
Opening/closing the garage door .. 266
Programming (button in the rear-
view mirror) ................................... 264
Synchronizing the rolling code ....... 264
Generated electrical energy (Audio
20) ...................................................... 144
Genuine parts ...................................... 20
Glove box .......................................... .243
H
Handbrake
see Parking brake
Hazard warning lamps
Display message ............................ 227
Switching on/off ........................... 102
Head restraints
Adjusting ......................................... 91
Adjusting (manually) ........................ 91
Adjusting (rear) ................................ 92
Headlamps
Fogging up ..................................... 103
see Automatic headlamp mode
Heating
see Climate control
High beam flasher .............................102
High voltage
see Safety notes
High-beam headlamps
Changing bulbs .............................. 106
Index9
Page 13 of 342
LightsAutomatic headlamp mode ............ 100
Cornering light function ................ .103
Fogged up headlamps .................... 103
Hazard warning lamps ................... 102
High beam flasher .......................... 102
High-beam headlamps ................... 102
Light switch ................................... 100
Low-beam headlamps .................... 101
Parking lamps ................................ 101
Rear fog lamp ................................ 101
Setting exterior lighting ................. 100
Standing lamps .............................. 101
Switching the daytime running
lamps on/off (on-board com-
puter) ............................................. 198
Turn signals ................................... 102
Loading guidelines ............................ 242
Locking
see Central locking
Locking (doors)
Automatic ........................................ 80
Emergency locking ........................... 81
From inside (central locking but-
ton) ................................................. .80
Locking centrally
see Central locking
Locking verification signal (on-
board computer) .............................. .198
Low-beam headlamps
Changing bulbs .............................. 106
Display message ............................ 214
Switching on/off ........................... 101
Lumbar support
Adjusting the 4-way lumbar sup-
port ................................................. .92
M
M+S tires ............................................ 304
Malfunction message
see Display messages
Map (navigation)
Switching the range on the map
on/off ............................................ 145
Matte finish (cleaning instruc-
tions) .................................................. 276 Maximum charge current
Setting (charging cable) ................. 147
mbrace
Call priority ................................... .259
Display message ............................ 209
Downloading destinations
(COMAND) ..................................... 259
Downloading routes ....................... 262
Emergency call .............................. 256
General notes ................................ 255
Geo fencing ................................... 263
Locating a stolen vehicle .............. .261
MB info call button ........................ 258
Remote fault diagnosis .................. 261
Remote vehicle locking .................. 261
Roadside Assistance button .......... 257
Search & Send ............................... 260
Self-test ......................................... 255
Speed alert .................................... 262
System .......................................... 255
Triggering the vehicle alarm ........... 263
Vehicle remote unlocking .............. 260
Mechanical key
Function/notes ................................ 74
Inserting .......................................... 75
Locking vehicle ................................ 81
Removing ......................................... 75
Unlocking the driver's door .............. 80
Memory card (audio) ......................... 191
Memory function ................................. 97
Message memory (on-board com-
puter) .................................................. 200
Messages
see Display messages
Mirror turn signal
Cleaning ......................................... 277
Mirrors
see Exterior mirrors
see Rear-view mirror
see Vanity mirror (in the sun visor)
Mobile phone
Frequencies ................................... 332
Installation ..................................... 332
Menu (on-board computer) ............ 192
Transmission output (maximum) .... 332
Modifying the programming
(SmartKey) ........................................... 74
Index11
Page 34 of 342

Warning and indicator lamps
FunctionPage
:LLow-beam head-
lamps
101
;T Parking lamps101
=KHigh-beam head-
lamps
102
?÷ ESP®235
AFElectric parking brake
(red)
238
B! Electric parking brake
(yellow)
238
C· Distance warning239
D#! Turn signals102
E6Restraint system238
FunctionPage
FüSeat belt229
GéRBS (Recuperative
Brake System)
231
HR Rear fog lamp101
I;Drive system218
Jh Tire pressure monitor240
KÝ High-voltage battery
reserve
219
Lå ESP®OFF235
M!ABS232
N$Brakes (red)231
32Instrument cluster
At a glance
Page 102 of 342
Useful information
i
This Operator's Manual describes all
models and all standard and optional equip-
ment of your vehicle available at the time of
publication of the Operator's Manual.
Country-specific differences are possible.
Please note that your vehicle may not be
equipped with all features described. This
also applies to safety-related systems and
functions.
iRead the information on qualified special-
ist workshops (
Ypage 26).
Exterior lighting
General notes
For reasons of safety, Mercedes-Benz recom-
mends that you drive with the lights switched
on even during the daytime. In some coun-
tries, operation of the headlamps varies due
to legal requirements and self-imposed obli-
gations.
Setting the exterior lighting
Setting options
Exterior lighting can be set using the:
Rlight switch
Rcombination switch (Ypage 102)
Ron-board computer (Ypage 198)
Light switch
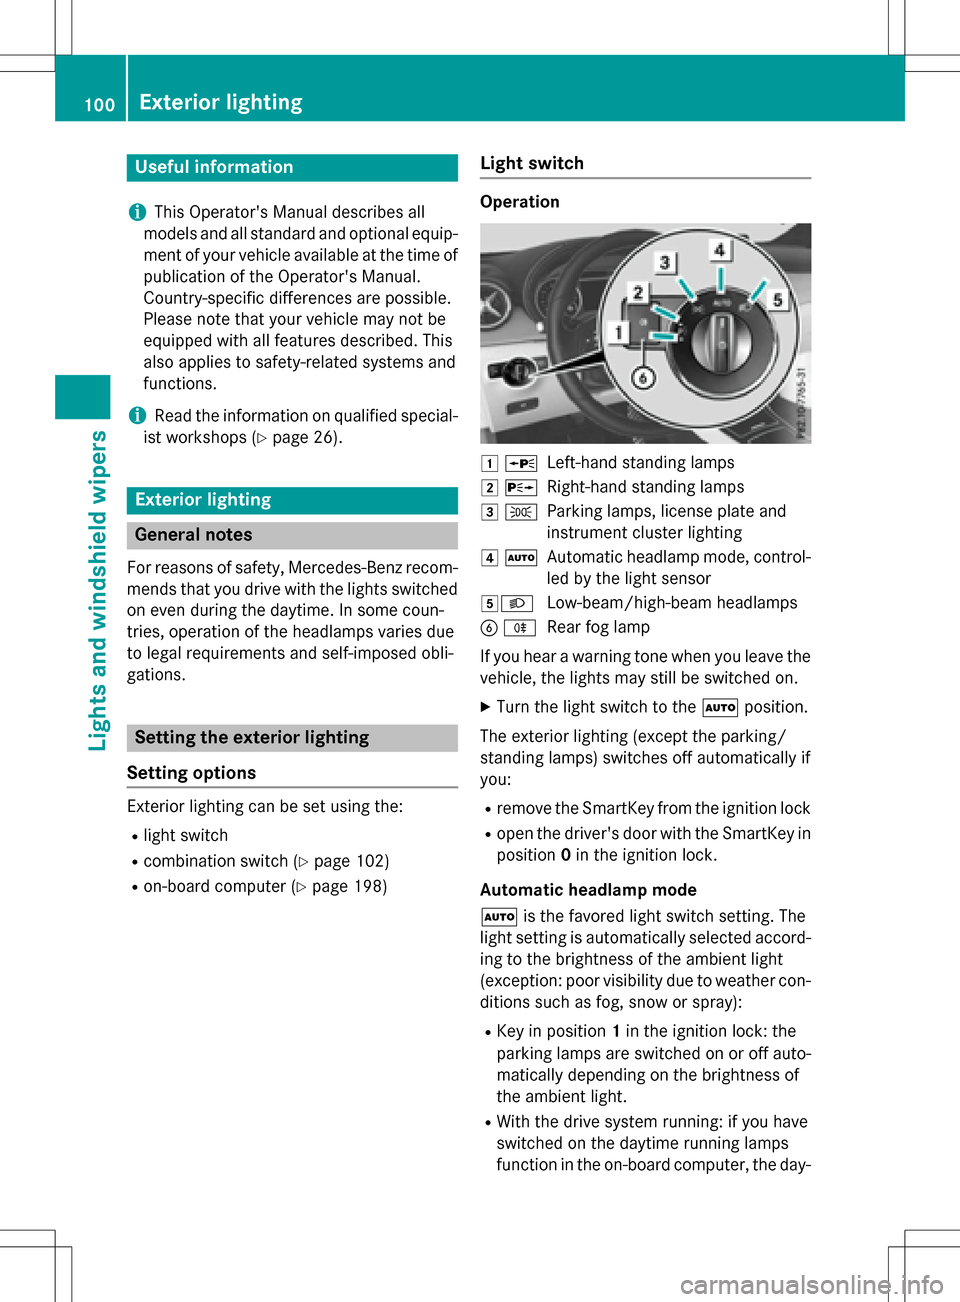
Operation
1 WLeft-hand standing lamps
2XRight-hand standing lamps
3TParking lamps, license plate and
instrument cluster lighting
4ÃAutomatic headlamp mode, control-
led by the light sensor
5LLow-beam/high-beam headlamps
BRRear fog lamp
If you hear a warning tone when you leave the
vehicle, the lights may still be switched on.
XTurn the light switch to the Ãposition.
The exterior lighting (except the parking/
standing lamps) switches off automatically if
you:
Rremove the SmartKey from the ignition lock
Ropen the driver's door with the SmartKey in
position 0in the ignition lock.
Automatic headlamp mode
à is the favored light switch setting. The
light setting is automatically selected accord-
ing to the brightness of the ambient light
(exception: poor visibility due to weather con-
ditions such as fog, snow or spray):
RKey in position 1in the ignition lock: the
parking lamps are switched on or off auto-
matically depending on the brightness of
the ambient light.
RWith the drive system running: if you have
switched on the daytime running lamps
function in the on-board computer, the day-
100Exterior lighting
Lights and windshield wipers
Page 104 of 342
Combination switch
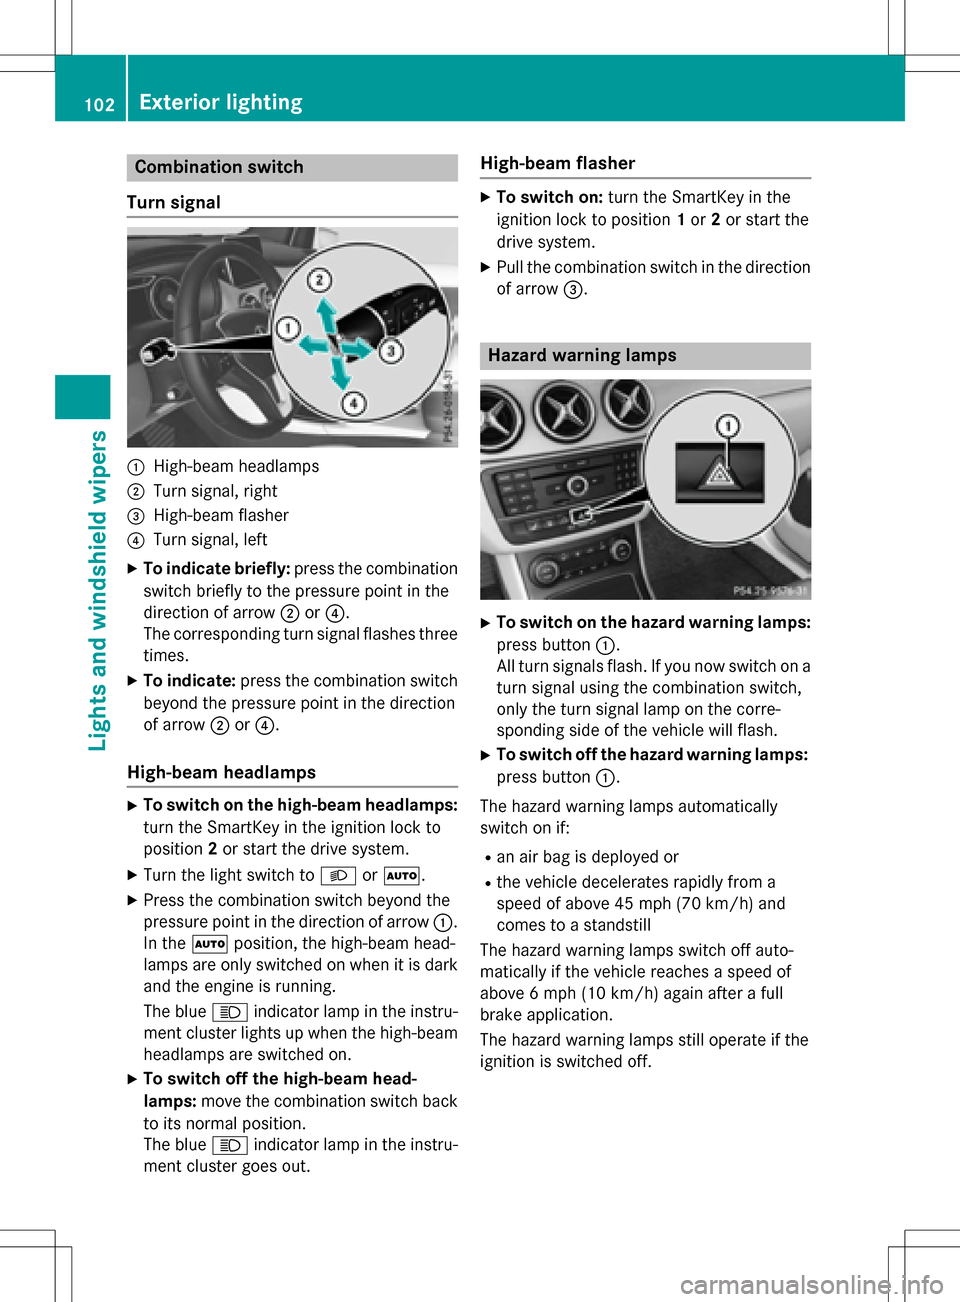
Turn signal
:High-beam headlamps
;Turn signal, right
=High-beam flasher
?Turn signal, left
XTo indicate briefly: press the combination
switch briefly to the pressure point in the
direction of arrow ;or?.
The corresponding turn signal flashes three
times.
XTo indicate: press the combination switch
beyond the pressure point in the direction
of arrow ;or?.
High-beam headlamps
XTo switch on the high-beam headlamps:
turn the SmartKey in the ignition lock to
position 2or start the drive system.
XTurn the light switch to LorÃ.
XPress the combination switch beyond the
pressure point in the direction of arrow :.
In the Ãposition, the high-beam head-
lamps are only switched on when it is dark
and the engine is running.
The blue Kindicator lamp in the instru-
ment cluster lights up when the high-beam
headlamps are switched on.
XTo switch off the high-beam head-
lamps: move the combination switch back
to its normal position.
The blue Kindicator lamp in the instru-
ment cluster goes out.
High-beam flasher
XTo switch on: turn the SmartKey in the
ignition lock to position 1or 2or start the
drive system.
XPull the combination switch in the direction of arrow =.
Hazard warning lamps
XTo switch on the hazard warning lamps:
press button :.
All turn signals flash. If you now switch on a
turn signal using the combination switch,
only the turn signal lamp on the corre-
sponding side of the vehicle will flash.
XTo switch off the hazard warning lamps:
press button :.
The hazard warning lamps automatically
switch on if:
Ran air bag is deployed or
Rthe vehicle decelerates rapidly from a
speed of above 45 mph (70 km/h) and
comes to a standstill
The hazard warning lamps switch off auto-
matically if the vehicle reaches a speed of
above 6 mph (10 km/h)again after a full
brake application.
The hazard warning lamps still operate if the
ignition is switched off.
102Exterior lighting
Lights and windshield wipers
Page 107 of 342
Do not use a bulb that has been dropped or if
its glass tube has been scratched.
The bulb may explode if:
Ryou touch it
Rit is hot
Ryou drop it
Ryou scratch it
Only operate bulbs in enclosed lamps
designed for that purpose. Only install spare
bulbs of the same type and the specified volt- age.
Marks on the glass tube reduce the service
life of the bulbs. Do not touch the glass tube
with your bare hands. If necessary, clean the
glass tube when cold with alcohol or spirit and
rub it off with a lint-free cloth.
Protect bulbs from moisture during opera-
tion. Do not allow bulbs to come into contact
with liquids.
There are bulbs other than the Xenon bulbs
that you cannot replace. Only replace the
bulbs listed (
Ypage 105). Have the bulbs that
you cannot replace yourself changed at a
qualified specialist workshop.
If you require assistance replacing bulbs, con-
sult a qualified specialist workshop.
If the new bulb still does not light up, consult
a qualified specialist workshop.
Bulbs and lamps are an important aspect of
vehicle sa fety. You must therefore make sure
that these function correctly at all times.
Have the headlamp setting checked regularly.
Overview: changing bulbs/bulb types
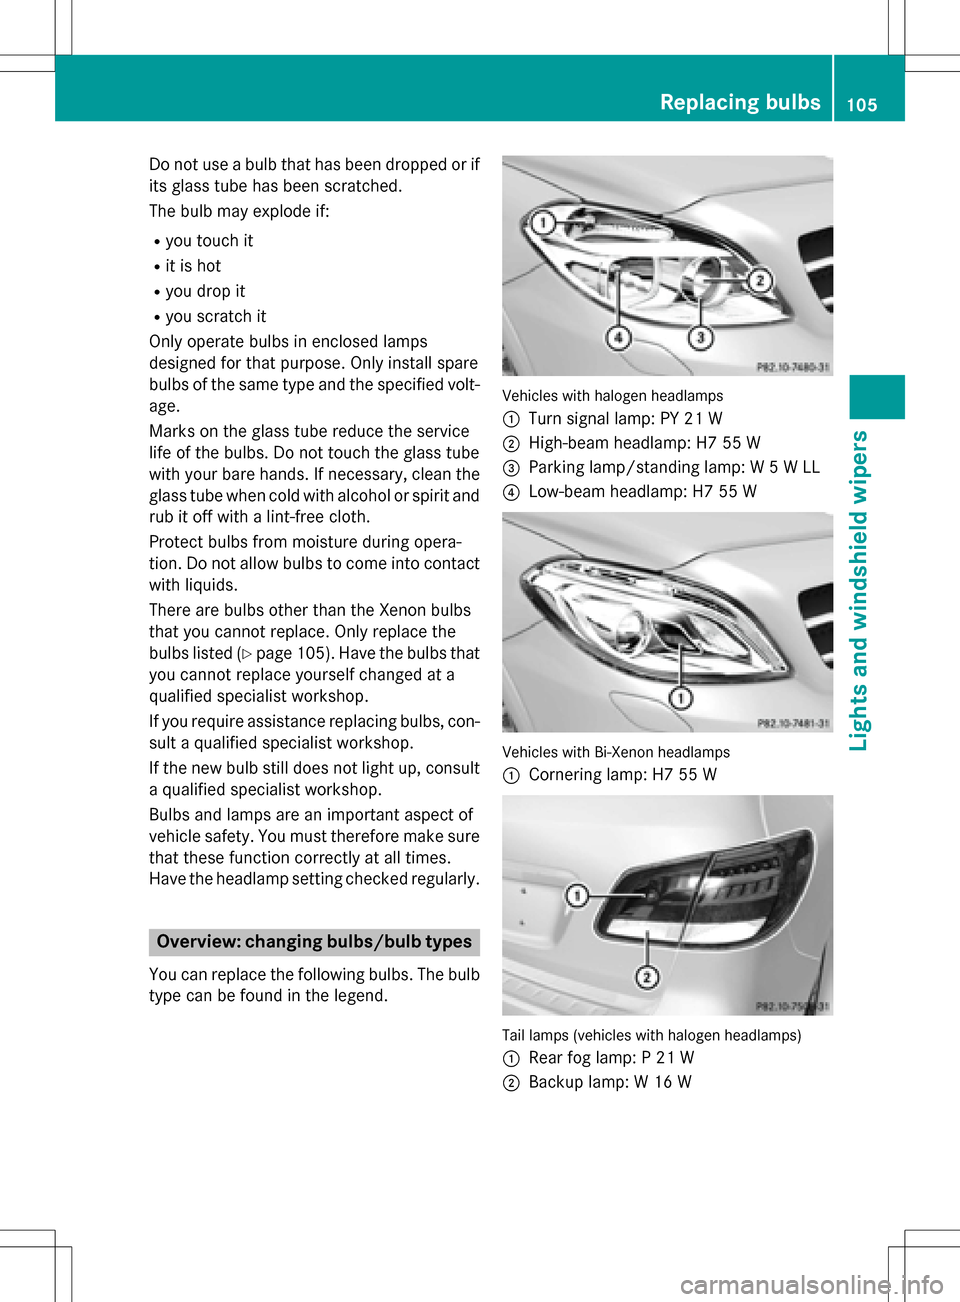
You can replace the following bulbs. The bulb
type can be found in the legend.
Vehicles with halogen headlamps
:
Turn signal lamp: PY 21 W
;High-beam headlamp: H7 55 W
=Parking lamp/standing lamp: W 5 W LL
?Low-beam headlamp: H7 55 W
Vehicles with Bi-Xenon headlamps
:
Cornering lamp: H7 55 W
Tail lamps (vehicles with halogen headlamps)
:
Rear fog lamp: P 21 W
;Backup lamp: W 16 W
Replacing bulbs105
Lights and windshield wipers
Z
Page 108 of 342
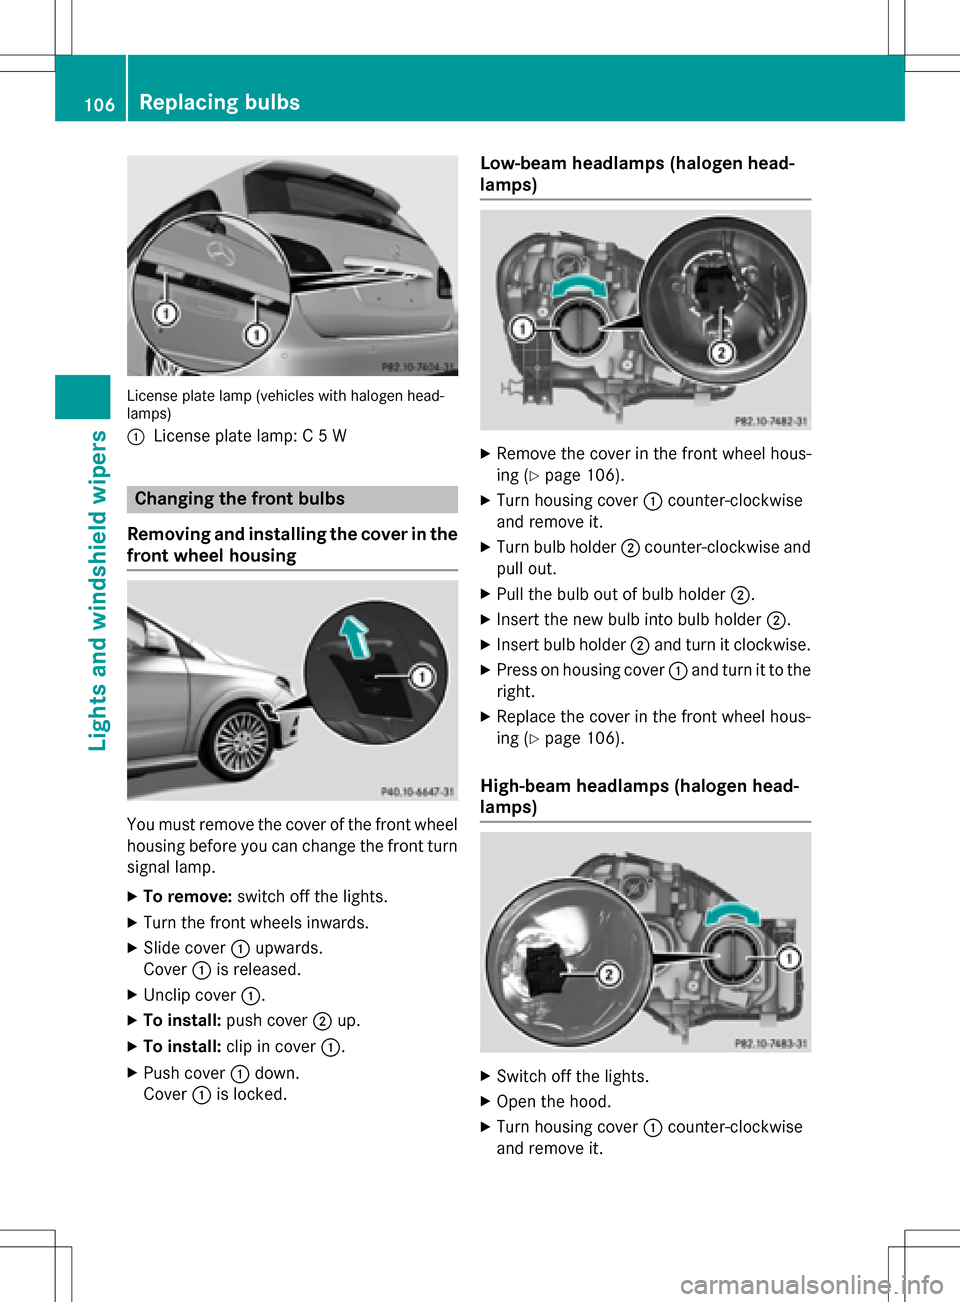
License plate lamp (vehicles with halogen head-
lamps)
:
License plate lamp: C 5 W
Changing the front bulbs
Removing and installing the cover in the
front wheel housing
You must remove the cover of the front wheel
housing before you can change the front turn signal lamp.
XTo remove: switch off the lights.
XTurn the front wheels inwards.
XSlide cover:upwards.
Cover :is released.
XUnclip cover :.
XTo install:push cover ;up.
XTo install: clip in cover :.
XPush cover:down.
Cover :is locked.
Low-beam headlamps (halogen head-
lamps)
XRemove the cover in the front wheel hous-
ing (
Ypage 106).
XTurn housing cover :counter-clockwise
and remove it.
XTurn bulb holder ;counter-clockwise and
pull out.
XPull the bulb out of bulb holder ;.
XInsert the new bulb into bulb holder ;.
XInsert bulb holder;and turn it clockwise.
XPress on housing cover :and turn it to the
right.
XReplace the cover in the front wheel hous-
ing (
Ypage 106).
High-beam headlamps (halogen head-
lamps)
XSwitch off the lights.
XOpen the hood.
XTurn housing cover :counter-clockwise
and remove it.
106Replacing bulbs
Lights and windshield wipers