2016 MERCEDES-BENZ AMG GT S start stop button
[x] Cancel search: start stop buttonPage 161 of 290

Accepting a call
If someonecall syou when you are in th eTele‐phonemenu, adisplay message appear sin th e
multifunction display.
You can accept acall at any time, eve nif you are
no tin th eTelephone
menu.
XPress th e6 buttonon th esteering whee l
to accept an incoming call .
Rejectingorending a call
You can en dor rejec t acall at any time eve nif
you are no tin th eTelephonemenu.
XPress th e~ buttonon th esteering whee l
to rejec tor en d acall.
Selecting an entry in the phonebook
XPressòon thesteering whee lto open th e
men ulist .
XPress :or9 on thesteering whee lto
select th eTelephonemenu.
XConfir mby pressing aon thesteering
wheel.
XPress th e:, 9ora buttonto
switch to th ephone book .
XPress:or9 to select th enames on e
after th eother .
or
XTo star trapid scrolling: press and hold:
or 9 for longer than on esecond.
The names in th ephone book are displayed
quickl yon eafter th eother .
If you press and hold th e: or9 button
for longer than fiv eseconds, th enam e
appear swit hth enext or previous lette rinitial
lette rin th ealphabet .
Rapid scrollin gstops when you release th e
butto nor reac hth een dof th elist .
XIf only one telephone number is store dfor
a name: press th e6 ora buttonto
start dialing.
or
XIf there is mor ethan one number for a
particular name: press the6 ora
butto nto display th enumbers.
XPress th e: or9 buttonto select th e
number you want to dial.
XPress th e6 ora buttonto start dialing. or
XTo exit th
etelephone book :press th e~
or % button.
Redialing
The on-board computer saves th elast names or
number sdialed in th eredial memory.
XPress òon thesteering whee lto open th e
men ulist .
XPress :or9 on thesteering whee lto
select th eTelephonemenu.
XConfir mby pressing aon thesteering
wheel.
XPress th e6 buttonto switch to th eredial
memory.
XPress th e: or9 buttonto select th e
desired nam eor number .
XPress the6 ora buttonto start dialing.
or
XTo exit th eredial memory :press th e~
or % button.
Assistance graphic menu
XUseò on thesteering whee lto call up th e
list of menus.
XPress th e: or9 buttonon th esteering
whee lto select th eAssistanc eGraphi c
menu.
XConfirmby pressing aon thesteering
wheel.
The multifunction display shows th e
DISTRONI CPLU Sdistanc edisplay in th e
assistanc egraphic .
The assistanc egraphic displays th estatus of
and information from th efollowin gdrivin g
systems or drivin gsafet ysystems :
Menus and submenus159
On-board computer and displays
Z
Page 166 of 290

RACETIMER
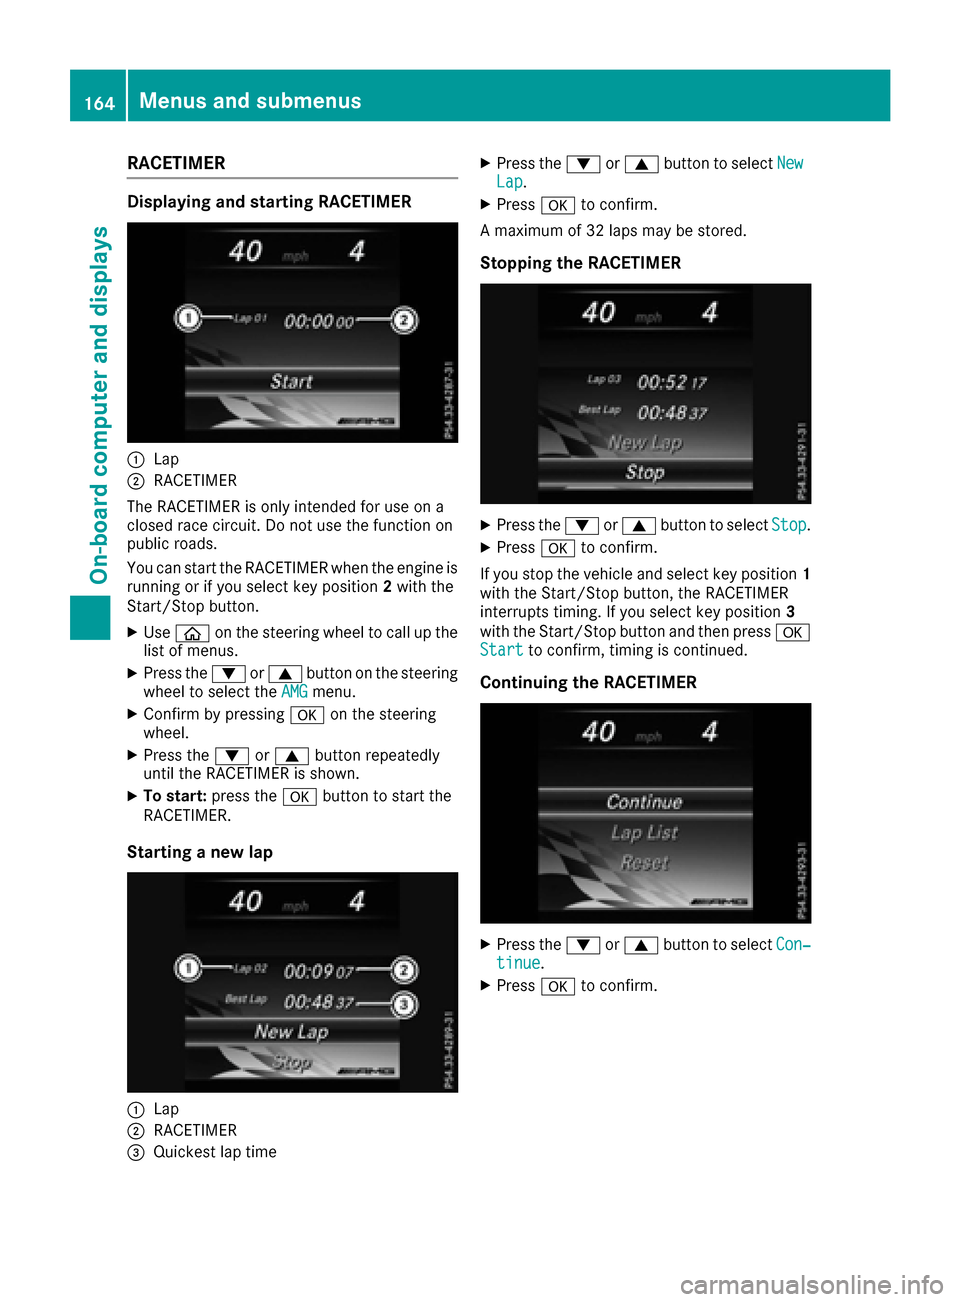
Displaying and starting RACETIMER
:Lap
;RACETIMER
The RACETIMER is only intended for use on a
closed race circuit. Do not use the function on
public roads.
You can start the RACETIMER when the engine is
running or if you select key position 2with the
Start/Stop button.
XUse ò on the steering wheel to call up the
list of menus.
XPress the :or9 button on the steering
wheel to select the AMGmenu.
XConfirm by pressing aon the steering
wheel.
XPress the :or9 button repeatedly
until the RACETIMER is shown.
XTo start: press the abutton to start the
RACETIMER.
Starting a new lap
:Lap
;RACETIMER
=Quickest lap time
XPress the :or9 button to select NewLap.
XPressato confirm.
A maximum of 32 laps may be stored.
Stopping the RACETIMER
XPress the :or9 button to select Stop.
XPressato confirm.
If you stop the vehicle and select key position 1
with the Start/Stop button, the RACETIMER
interrupts timing. If you select key position 3
with the Start/Stop button and then press a
Start
to confirm, timing is continued.
Continuing the RACETIMER
XPress the :or9 button to select Con‐tinue.
XPressato confirm.
164Menus and submenus
On-board computer and displays
Page 216 of 290

You can place insert?into the cup holder on
the left-hand or right-hand side.
XSlide cover :forwards until it engages.
XTo open: lift up lid;.
XTo close: press lid;downwards.
XTo remove: pull ashtray=up and out of
insert ?.
XTo insert: place ashtray =into insert ?.
Remove insert ?to be able to use the entire
cup holder. Store removed insert ?and ashtray
= in a suitable place. Observe the loading
guidelines (
Ypage 209).
Cigarette lighter
GWARNING
You can burn yourself if you touch the hot
heating element or the socket of the cigarette lighter.
In addition, flammable materials can ignite if:
Rthe hot cigarette lighter falls
Ra child holds the hot cigarette lighter to
objects, for example
There is a risk of fire and injury.
Always hold the cigarette lighter by the knob.
Always make sure that the cigarette lighter is
out of reach of children. Never leave children
unsupervised in the vehicle.
Your attention must always be focused on the
traffic conditions. Only use the cigarette lighter when road and traffic conditions permit.
XSelect key position 2with the Start/Stop but-
ton (Ypage 103).
XTo open: slide cover :forwards until it
engages.
XPress in cigarette lighter ;.
Cigarette lighter ;will pop out automatically
when the heating element is red-hot.
XTo close: briefly press cover :at the front.
12 V sockets
General notes
XSelect key position 1using the Start/Stop
button (Ypage 103).
The sockets can be used for accessories with a
maximum draw of 180 W (15 A). Accessories
include such items as chargers for mobile
phones.
If you use the sockets for long periods when the
engine is switched off, the battery may dis-
charge.
An emergency cut-out ensures that the on-
board voltage does not drop too low. If the on-
board voltage is too low, the power to the sock-
ets is automatically cut. This ensures that there
is sufficient power to start the engine.
214Features
Stowage and features
Page 224 of 290

Rear spoiler
Overview
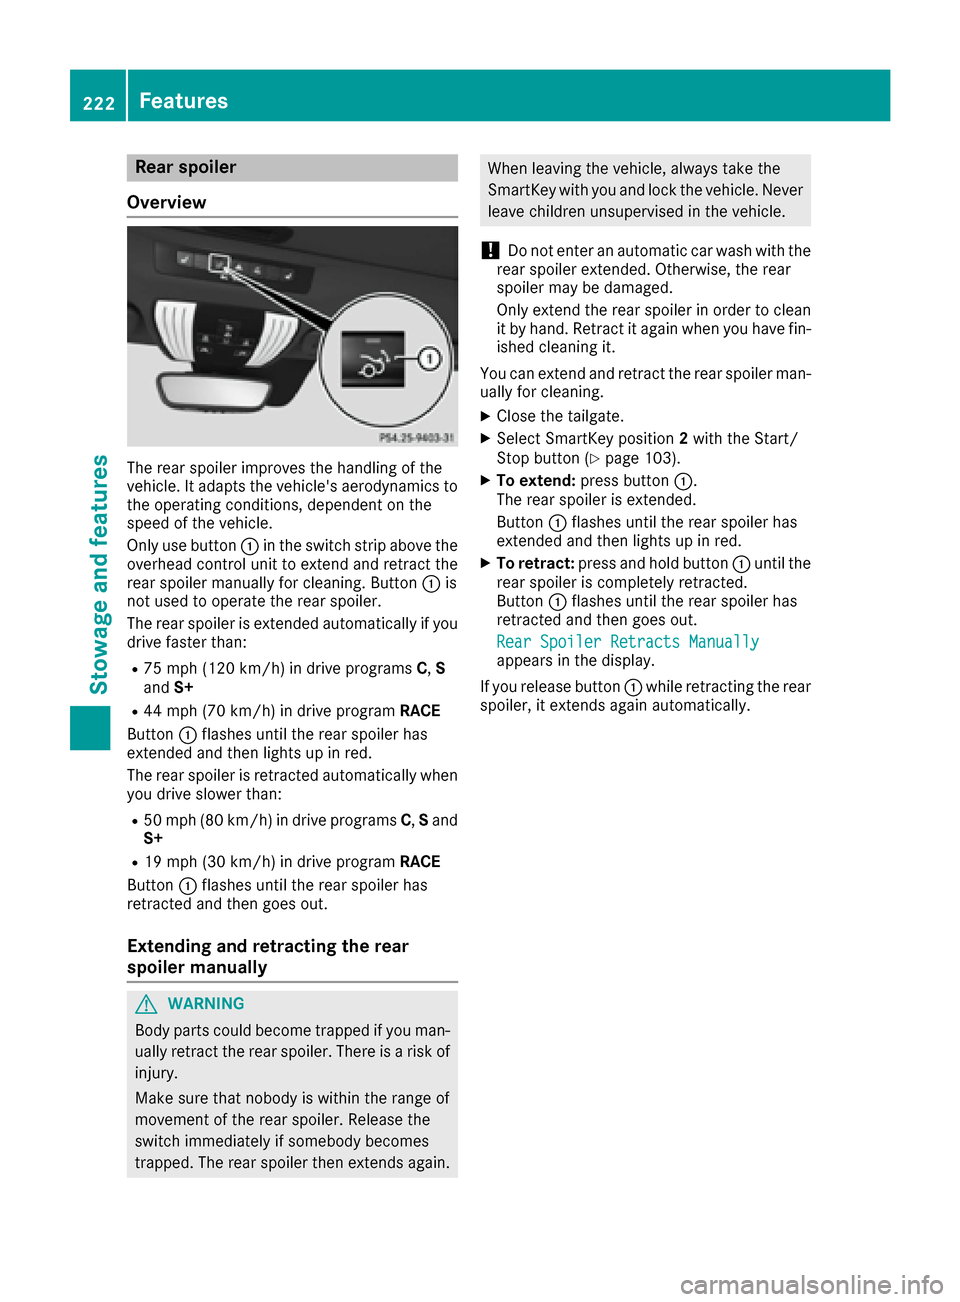
The rear spoiler improves the handling of the
vehicle. It adapts the vehicle's aerodynamics to the operating conditions, dependent on the
speed of the vehicle.
Only use button :in the switch strip above the
overhead control unit to extend and retract the
rear spoiler manually for cleaning. Button :is
not used to operate the rear spoiler.
The rear spoiler is extended automatically if you
drive faster than:
R75 mph (120 km/h) in drive programs C,S
and S+
R44 mph (70 km/h) in drive program RACE
Button :flashes until the rear spoiler has
extended and then lights up in red.
The rear spoiler is retracted automatically when you drive slower than:
R50 mph (80 km/h) in drive programs C,S and
S+
R19 mph (30 km/h) in drive program RACE
Button :flashes until the rear spoiler has
retracted and then goes out.
Extending and retracting the rear
spoiler manually
GWARNING
Body parts could become trapped if you man-
ually retract the rear spoiler. There is a risk of
injury.
Make sure that nobody is within the range of
movement of the rear spoiler. Release the
switch immediately if somebody becomes
trapped. The rear spoiler then extends again.
When leaving the vehicle, always take the
SmartKey with you and lock the vehicle. Never
leave children unsupervised in the vehicle.
!Do not enter an automatic car wash with the
rear spoiler extended. Otherwise, the rear
spoiler may be damaged.
Only extend the rear spoiler in order to clean
it by hand. Retract it again when you have fin-
ished cleaning it.
You can extend and retract the rear spoiler man- ually for cleaning.
XClose the tailgate.
XSelect SmartKey position 2with the Start/
Stop button (Ypage 103).
XTo extend: press button :.
The rear spoiler is extended.
Button :flashes until the rear spoiler has
extended and then lights up in red.
XTo retract: press and hold button :until the
rear spoiler is completely retracted.
Button :flashes until the rear spoiler has
retracted and then goes out.
Rear Spoiler Retracts Manually
appears in the display.
If you release button :while retracting the rear
spoiler, it extends again automatically.
222Features
Stowage and features
Page 226 of 290

within the range of movement of the garage
door.
GWARNING
Combustion engines emit poisonous exhaust
gases such as carbon monoxide. Inhaling
these exhaust gases leads to poisoning. There
is a risk of fatal injury. Therefore never leave
the engine running in enclosed spaces with-
out sufficient ventilation.
Programming
Programming buttons
Pay attention to the "Important safety notes"
(Ypage 223).
Garage door remote control Ais not included
with the integrated garage door opener.
XSelect SmartKey position 2with the Start/
Stop button (Ypage 103).
XSelect one of buttons ;to? to use to con-
trol the garage door drive.
XTo start programming mode: press and
hold one of buttons ;to? on the integrated
garage door opener.
The garage door opener is now in program-
ming mode. After a short time, indicator
lamp :lights up yellow.
Indicator lamp :lights up yellow as soon as
button ;,=or? is stored for the first time.
If the selected button has already been pro-
grammed, indicator lamp :will only light up
yellow after ten seconds have elapsed.
XRelease button ;,=or?. Indicator
lamp :flashes yellow.
XTo program the remote control: point
garage door remote control Atowards but- tons
;to? on the rear-view mirror at a dis-
tance of 2 to 8 in (5 to 20 cm).
XPress and hold button Bon remote control
A until indicator lamp :lights up green.
When indicator lamp :lights up green: pro-
gramming is finished.
When indicator lamp :flashes green: pro-
gramming was successful. The next step is to synchronize the rolling code (
Ypage 224).
XRelease button Bon remote control Afor
the garage door drive system.
If indicator lamp :lights up red: repeat the
programing procedure for the corresponding
button on the rear-view mirror. When doing
so, vary the distan
ce between remote control
A and the rear-view mirror.
The required distance between remote con-
trol Aand the integrated garage door opener
depends on the garage door drive system.
Several attempts might be necessary. You
should test every position for at least
25 seconds before trying another position.
Synchronizing the rolling code
Pay attention to the "Important safety notes"
(Ypage 223).
If the garage door system uses a rolling code,
you will also have to synchronize the garage
door system with the integrated garage door
opener in the rear-view mirror. To do this you will
need to use the programming button on the door
drive control panel. The programming button
may be located in different places depending on
the manufacturer. It is usually located on the
door drive unit on the garage ceiling.
Familiarize yourself with the garage door drive
operating instructions, e.g. under "Program-
ming additional remote controls", before carry-
ing out the following steps.
Your vehicle must be within reach of the garage
door or gate opener drive. Make sure that nei-
ther your vehicle nor any persons/objects are
present within the sweep of the door or gate.
XSelect SmartKey position 2with the Start/
Stop button (Ypage 103).
XGet out of the vehicle.
XPress the programming button on the door
drive unit.
Usually, you now have 30 seconds to initiate
the next step.
224Features
Stowage and features
Page 228 of 290

XSelect SmartKey position2with the Start/
Stop button (Ypage 103).
XPress button ;,=or? which you have
programmed to operate the garage door.
Garage door system with a fixed code: indi-
cator lamp :lights up green.
Garage door system with a rolling code: indi-
cator lamp :flashes green.
The transmitter will transmit a signal as long
as the button is pressed. The transmission is
halted after a maximum of ten seconds and
indicator lamp :lights up yellow.
XPress button ;,=or? again if necessary.
Clearing the memory
Make sure that you clear the memory of the
integrated garage door opener before selling the
vehicle.
XSelect SmartKey position 2with the Start/
Stop button (Ypage 103).
XPress and hold buttons ;and ?.
The indicator lamp initially lights up yellow
and then green.
XRelease buttons ;and ?.
The memory of the integrated garage door
opener in the rear-view mirror is cleared.
Floormats
GWARNING
Objects in the driver's footwell can restrict the pedal travel or obstruct a depressed pedal.
The operating and road safety of the vehicle is
jeopardized. There is a risk of an accident.
Make sure that all objects in the vehicle are
stowed correctly, and that they cannot enter
the driver's footwell. Install the floormats
securely and as specified in order to ensure
sufficient clearance for the pedals. Do not use
loose floormats and do not place floormats on
top of one another.
XSlide the driver's seat backwards.
XTo install: place the floormat in position.
XPress studs :onto retainers ;.
XTo remove:pull the floormat off retainers ;.
XRemove the floormat.
226Features
Stowage and features
Page 232 of 290

Checking the oil level using the on-board computer
XSelect key position2with the Start/Stop button.
XUse ò on the steering wheel to call up the list of menus.
XPress the :or9 button on the steering wheel to select the Servicemenu.
XConfirm by pressingaon the steering wheel.
XUse: or9 to select the Engine Oil Levelsubmenu.
XPressato confirm the selection.
The Measuring Engine Oil Level Accurate Only When Vehicle Is Levelmessage
appears in the multifunction display.
The measurement takes a few seconds. You will see one of the following messages in the multi-
function display:
Display messagesPossible causes/consequences and MSolutions
Engine Oil Level OKThe oil level is correct.
Check Engine OilLevel (Add 1 Liter)
The oil level is too low.
XAdd 1.1 US qt (1.0 liter) of engine oil.
Reduce Engine OilLevel
The engine oil level is too high.
XHave excess engine oil siphoned off.
For Engine OilLevelIgnitionMustBe On
The ignition is switched off.
XSelect key position2with the Start/Stop button.
Need More Time toCheck Engine OilLevel
The required waiting period was not observed.
XThe engine must be at regular operating temperature.
It is only possible to make a correct measurement within the first 4
minutes after the engine has been switched off.
Engine Oil LevelNotMeasurablewithEngine Running
The engine is running; oil level measurement is not possible.
XSwitch off the engine.
XRepeat the measurement. Observe the required waiting period.
Engine Oil LevelCorrectMeasurementOnly if Vehicle Ison Level Ground
The vehicle is not parked on a level surface.
XPark the vehicle on a level surface.
Engine oil levelcannot be measured.
The oil level measurement with the oil dipstick is possible. The meas-
uring system is malfunctioning.
XVisit a qualified specialist workshop.
Adding engine oil
GWARNING
Certain components in the engine compart-
ment, such as the engine, radiator and parts
of the exhaust system, can become very hot.
Working in the engine compartment poses a
risk of injury.
Where possible, let the engine cool down and touch only the components described in the
following.
230Engine compartment
Maintenance and care
Page 234 of 290

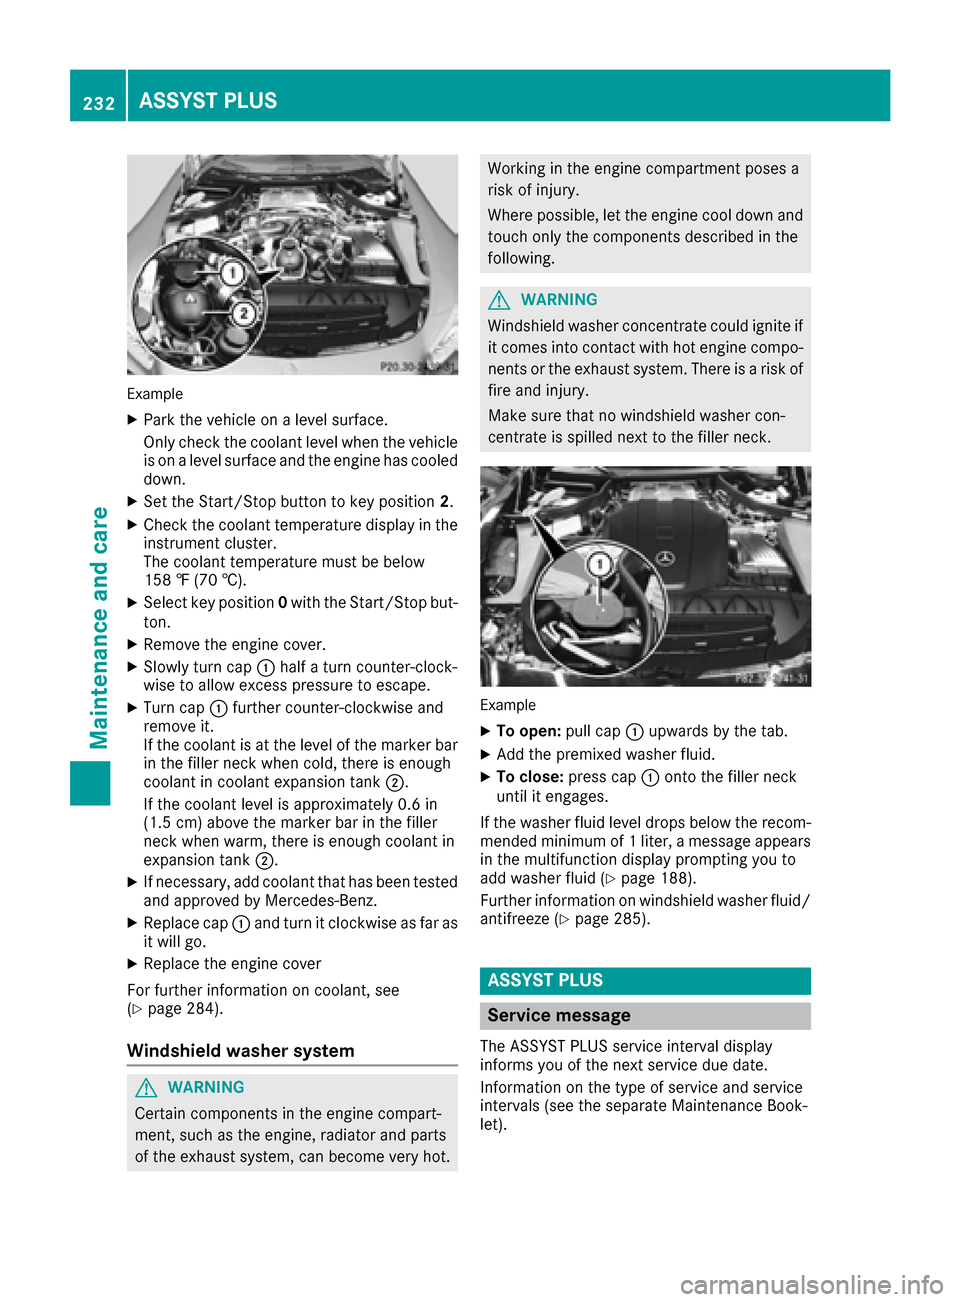
Example
XPark the vehicle on a level surface.
Only check the coolant level when the vehicle
is on a level surface and the engine has cooled
down.
XSet the Start/Stop button to key position2.
XCheck the coolant temperature display in the
instrument cluster.
The coolant temperature must be below
158 ‡ (70 †).
XSelect key position 0with the Start/Stop but-
ton.
XRemove the engine cover.
XSlowly turn cap :half a turn counter-clock-
wise to allow excess pressure to escape.
XTurn cap :further counter-clockwise and
remove it.
If the coolant is at the level of the marker bar
in the filler neck when cold, there is enough
coolant in coolant expansion tank ;.
If the coolant level is approximately 0.6 in
(1.5 cm) above the marker bar in the filler
neck when warm, there is enough coolant in
expansion tank ;.
XIf necessary, add coolant that has been tested
and approved by Mercedes-Benz.
XReplace cap:and turn it clockwise as far as
it will go.
XReplace the engine cover
For further information on coolant, see
(
Ypage 284).
Windshield washer system
GWARNING
Certain components in the engine compart-
ment, such as the engine, radiator and parts
of the exhaust system, can become very hot.
Working in the engine compartment poses a
risk of injury.
Where possible, let the engine cool down and touch only the components described in the
following.
GWARNING
Windshield washer concentrate could ignite if it comes into contact with hot engine compo-
nents or the exhaust system. There is a risk of
fire and injury.
Make sure that no windshield washer con-
centrate is spilled next to the filler neck.
Example
XTo open: pull cap:upwards by the tab.
XAdd the premixed washer fluid.
XTo close: press cap :onto the filler neck
until it engages.
If the washer fluid level drops below the recom-
mended minimum of 1 liter, a message appears
in the multifunction display prompting you to
add washer fluid (
Ypage 188).
Further information on windshield washer fluid/
antifreeze (
Ypage 285).
ASSYST PLUS
Service message
The ASSYST PLUS service interval display
informs you of the next service due date.
Information on the type of service and service
intervals (see the separate Maintenance Book-
let).
232ASSYST PLUS
Maintenance and care