2016 MERCEDES-BENZ AMG GT S door lock
[x] Cancel search: door lockPage 237 of 290

!Use the E‑SELECT lever to shift the trans-
mission to Nbefore switching the engine off.
If you open the driver's or front-passenger
door, the transmission remains in this posi-
tion for up to 30 minutes if the SmartKey is in
the ignition, even if the engine is switched off.
If you do not shift the transmission to Nusing
the E‑SELECT lever beforehand, it shifts auto-
matically to parking position Pand locks the
wheels if the driver's or front-passenger door is opened and the engine is switched off. This
may damage the vehicle, the transmission or
the car wash.
You can wash the vehicle in an automatic car
wash from the very start.
If the vehicle is very dirty, pre-wash it before
cleaning it in an automatic car wash.
After using an automatic car wash, wipe off wax
from the windshield and the wiper blades. This
will prevent smears and reduce wiping noises
caused by residue on the windshield.
Washing by hand
In some countries, washing by hand is only
allowed at specially equipped washing bays.
Observe the legal requirements in each country.
XDo not use hot water and do not wash the
vehicle in direct sunlight.
XUse a soft sponge to clean.
XUse a mild cleaning agent, such as a car
shampoo approved by Mercedes-Benz.
XThoroughly hose down the vehicle with a gen-
tle jet of water.
XDo not point the water jet directly towards the
air inlet.
XUse plenty of water and rinse out the sponge
frequently.
XRinse the vehicle with clean water and dry
thoroughly with a chamois.
XDo not let the cleaning agent dry on the paint- work.
Carefully remove all deposits of road salt as
soon as possible when driving in winter.
Power washers
GWARNING
The water jet from a circular jet nozzle (dirt
blasters) can cause invisible exterior damage
to the tires or chassis components. Compo-
nents damaged in this way may fail unexpect-
edly. There is a risk of an accident.
Do not use power washers with circular jet
nozzles to clean the vehicle. Have damaged
tires or chassis components replaced imme-
diately.
!Always maintain a distance of at least
11.8 in (30 cm) between the vehicle and the
power washer nozzle. Information about the
correct distance is available from the equip-
ment manufacturer.
Move the power washer nozzle around when
cleaning your vehicle.
Do not aim directly at any of the following:
Rtires
Rdoor gaps, roof gaps, joints, etc.
Relectrical components
Rbattery
Rconnectors
Rlights
Rseals
Rtrim
Rventilation slots
Damaged seals or electrical components can
lead to leaks or failures.
!If the SmartKey is within the rear detection
range of KEYLESS-GO, the following situa-
tions, for example, could lead to the uninten-
tional opening of the tailgate:
Rusing a car wash
Rusing a power washer
Make sure that the SmartKey is at least 10 ft
(3 m) away from the vehicle.
Cleaning the paintwork
!Do not affix:
Rstickers
Rfilms
Rmagnetic plates or similar items
to painted surfaces. You could otherwise
damage the paintwork.
Scratches, corrosive deposits, areas affected by
corrosion and damage caused by inadequate
care cannot always be completely repaired. In
such cases, visit a qualified specialist workshop.
Care235
Maintenance and care
Z
Page 244 of 290

Flat tire
Preparing the vehicle
Your vehiclemay be equipped with:
RaTIREFI Tkit (Ypage 241)
Information on changing and mounting wheels
(
Ypage 272).
XStop th evehicl eon solid, non-slippery and
leve lground ,as far away as possible from
traffic.
XSwitc hon th ehazard warning lamps.
XSecur eth evehicl eagainst rollin gaway
(Ypage 119).
XIf possible ,brin gth efron twheels int oth e
straight-ahead position .
XSwitchoff th eengine.
XWit hKEYLESS-G Ostar tfunction or vehi-
cles with KEYLESS-GO: open thedriver' s
door .
The on-board electronics no whave status 0.
This is th esam eas th eSmartKey having been
removed.
or
XRemove th eSmartKey from th eignition lock.
XMak esure that th epassenger sare no tendan -
gered as they do so. Mak esure that no on eis
near th edanger area while awhee lis bein g
changed. Anyon ewho is no tdirectly assisting
in th ewhee lchang eshould, for example ,
stand behind th ebarrier.
XGet out of th evehicle. Pay attention to traffic
condition swhen doin gso.
XClose th edriver' sdoor .
TIREFIT kit
Important safety notes
TIREFI Tis atire sealant.
You can use TIREFI Tto seal punctures of up to
0.16 in (4 mm), particularl ythose in th etire
tread. You can use TIREFI Tat outside tempera-
tures down to Ò4 ‡ (Ò20†).
GWARNING
In th efollowin gsituations, th etire sealant is
unable to provid esufficien tbreakdown assis-
tance ,as it is unable to seal th etire properly:
Rthere are cut sor punctures in th etire larger
than those mentioned above.
Rth ewhee lrim is damaged.
Ryou hav edriven at ver ylow tire pressures or
on aflat tire.
There is aris kof an accident.
Do no tdrive th evehicle. Contac t aqualified
specialist workshop .
GWARNING
The tire sealant is harmful and causes irrita-
tion .It mus tno tcome into contact wit hyour
skin ,eyes or clothin gor be swallowed .Do no t
inhale TIREFI Tfumes. Kee ptire sealant away
from children .There is aris kof injury.
If you come into contact wit hth etire sealant ,
observ eth efollowing:
RRinse off th etire sealant from your skin
immediately wit hwater.
RIf th etire sealant comes into contact wit h
your eyes ,immediately rinse them thor-
oughly wit hclean water.
RIf tire sealant is swallowed ,immediately
rinse your mout hout thoroughl yand drink
plenty of water. Do no tinduc evomiting,
and see kmedica lattention immediately.
RImmediately chang eout of clothin gwhic h
has come into contact wit htire sealant .
RIf an allergic reaction occurs, see kmedica l
attention immediately.
!Do no toperate th etire inflation compressor
for longer than te nminute sat atime without
a break. It may otherwise overheat.
The tire inflation compressor can be operate d
again once it has cooled down .
Comply wit hth emanufacturer' ssafet yinstruc -
tion son th etire inflation compressor label and
on th etire sealant bottle.
242Flat tire
Breakdown assis tance
Page 252 of 290
Towing and tow-starting
Important safety notes
GWARNING
The rear axle locks when:
Rthe engine is not running
Rthe engine stalls while the vehicle is being
towed
Rthere is a malfunction in the power supply
or the vehicle's electrical system
There is a risk of an accident.
In the event of a breakdown, you should
always have the vehicle transported.
GWARNING
If the brake system or power steering is mal-
functioning and your vehicle is then towed
away, significantly more effort may be
required to steer and brake than is normally
required. There is a risk of an accident.
In such cases, use a tow bar. Before towing,
make sure that the steering moves freely.
GWARNING
When towing or tow-starting another vehicle
and its weight is greater than the permissible
gross weight of your vehicle, the:
Rthe towing eye could detach itself
Rthe vehicle/trailer combination could roll-
over.
There is a risk of an accident.
When towing or tow-starting another vehicle,
its weight should not be greater than the per- missible gross weight of your vehicle.
Details on the permissible gross vehicle weight
of your vehicle can be found on the vehicle iden-
tification plate (
Ypage 280).
!Use the SmartKey instead of the Start/Stop
button when towing the vehicle.
Start the engine and keep it running. Turn the
SmartKey to position 2in the ignition. Set the
transmission to Nusing the E-SELECT lever.
Make sure that you then leave the SmartKey
in position 2. Check the transmission position in the instru-
ment cluster.
!Make sure that the electric parking brake is
released. If the electric parking brake is faulty,
visit a qualified specialist workshop.
!Secure the tow rope or tow bar to the towing
eye only. Otherwise, the vehicle could
become damaged.
!When COLLISION PREVENTION ASSIST
PLUS, DISTRONIC PLUS or the HOLD function
i
s activated, the vehicle brakes automatically
in certain situations.
To avoid damage to the vehicle, deactivate
these systems in the following or similar sit-
uations:
Rwhen towing the vehicle
Rin the car wash
!Do not use the towing eyes for recovery pur-
poses as this could damage the vehicle. If in
doubt, recover the vehicle with a crane.
!When towing, pull away slowly and
smoothly. If the tractive power is too high, the vehicles could be damaged.
!Shift the automatic transmission to Nand
do not open the driver's or front passenger's
door during towing. The automatic transmis-
sion may otherwise shift to position P, which
could damage both vehicles.
!Do not tow with sling-type equipment. This
could damage the vehicle.
!The vehicle can be towed a maximum of
30 miles (50km). The towing speed of 30 mph
(50 km/h) must not be exceeded.
If the vehicle has to be towed more than
30 miles (50km), the entire vehicle must be
raised and transported.
!Observe the transmission fluid temperature
(AMG menu) in the on-board computer when
towing. The transmission fluid temperature
must not exceed 250 ‡ (120 †). If this
occurs, you must stop to
wing immediately.
!Tow-starting the vehicle is not permitted.
The transmission may otherwise be damaged.
250Towing and tow-starting
Breakdown assistance
Page 253 of 290
Also observe the following notes:
RIf the engine does not start, try jump-starting
it (Ypage 248). Tow-starting the vehicle is not
permitted.
RIf it is not possible to jump-start the vehicle,
have it transported to the nearest qualified
specialist workshop, e.g. an authorized
Mercedes-Benz Center.
If the vehicle can no longer be driven because of
an accident or breakdown, you have the follow-
ing options:
Rtransporting the vehicle
As a rule, you should have the vehicle trans-
ported.
Rtowing the vehicle with a tow rope or tow bar
Only tow the vehicle in exceptional cases. The
engine must be running if you tow the vehicle
with a tow rope or tow bar.
If the vehicle has suffered transmission damage,
have it transported on a transporter or trailer.
Observe the display messages in the instrument
cluster.
The battery must be connected and charged.
Otherwise, you:
Rwill not be able to switch on the ignition with
the Start/Stop button
Rcannot start the engine
Rcannot release the electric parking brake
Rcannot shift the automatic transmission to
position N
Disarm the automatic locking feature before the
vehicle is towed (
Ypage 67). You could other-
wise be locked out when pushing or towing the
ve
hicle.
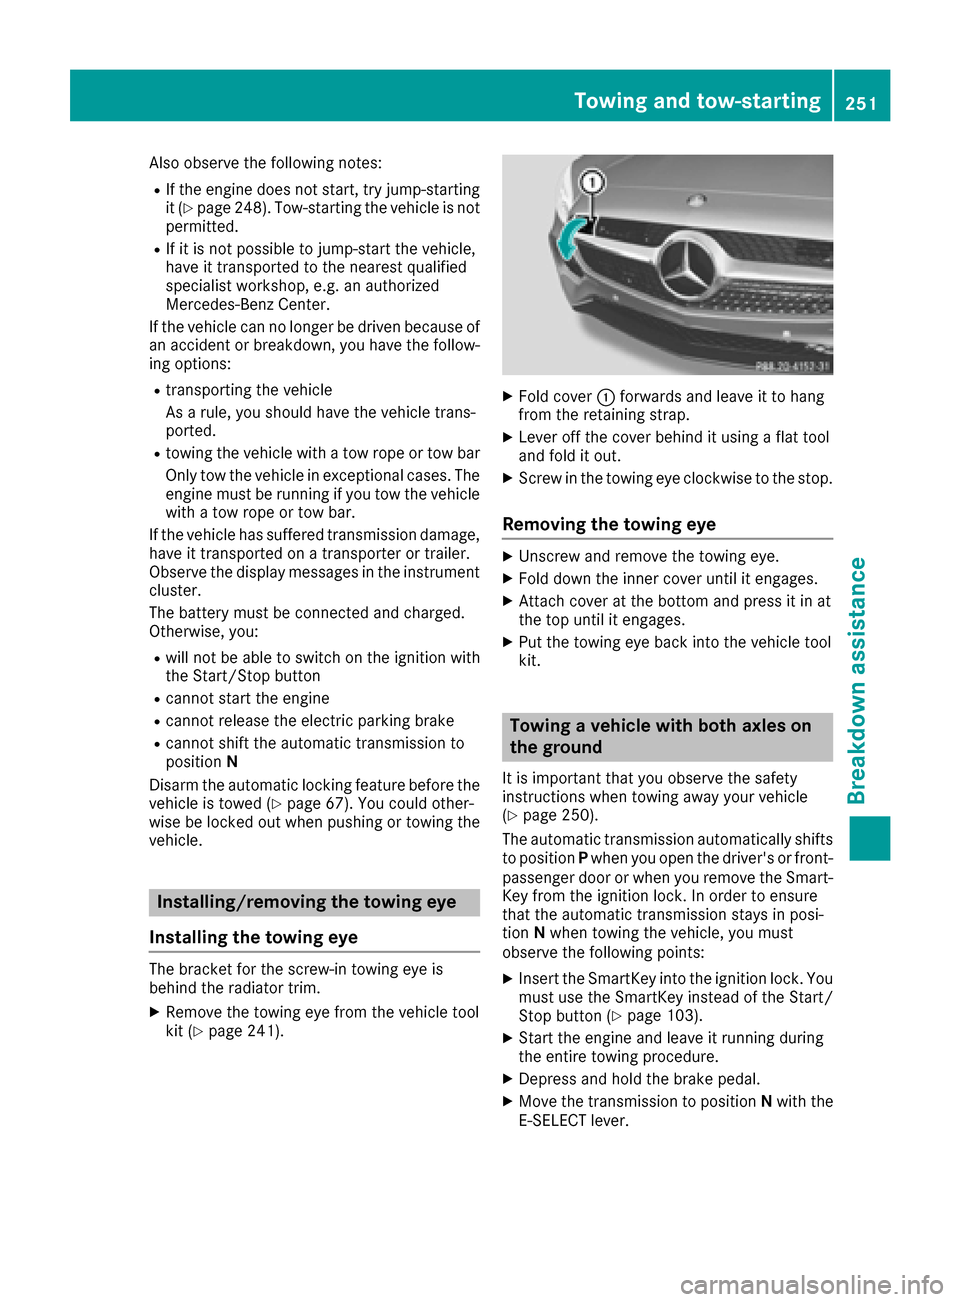
Installing/removing the towing eye
Installing the towing eye
The bracket for the screw-in towing eye is
behind the radiator trim.
XRemove the towing eye from the vehicle tool
kit (Ypage 241).
XFold cover :forwards and leave it to hang
from the retaining strap.
XLever off the cover behind it using a flat tool
and fold it out.
XScrew in the towing eye clockwise to the stop.
Removing the towing eye
XUnscrew and remove the towing eye.
XFold down the inner cover until it engages.
XAttach cover at the bottom and press it in at
the top until it engages.
XPut the towing eye back into the vehicle tool
kit.
Towing a vehicle with both axles on
the ground
It is important that you observe the safety
instructions when towing away your vehicle
(
Ypage 250).
The automatic transmission automatically shifts
to position Pwhen you open the driver's or front-
passenger door or when you remove the Smart-
Key from the ignition lock. In order to ensure
that the automatic transmission stays in posi-
tion Nwhen towing the vehicle, you must
observe the following points:
XInsert the SmartKey into the ignition lock. You
must use the SmartKey instead of the Start/
Stop button (
Ypage 103).
XStart the engine and leave it running during
the entire towing procedure.
XDepress and hold the brake pedal.
XMove the transmission to position Nwith the
E-SELECT lever.
Towing and tow-starting251
Breakdo wn assis tance
Z
Page 255 of 290

correct fuse rating for the system concerned.
Otherwise, components or systems could be
damaged.
!Make sure that no moisture can enter the
fuse box when the cover is open.
!When closing the cover, make sure that it is
lying correctly on the fuse box. Moisture seep-
ing in or dirt could otherwise impair the oper-
ation of the fuses.
The fuses in your vehicle serve to close down
faulty circuits. If a fuse blows, all the compo-
nents on the circuit and their functions stop
operating.
Before changing a fuse
XSwitch off the engine.
XSwitch off all electrical consumers.
XOpen the driver's door.
The on-board electronics now have status 0.
This is the same as the SmartKey having been
removed.
or, if the SmartKey is inserted in the ignition
lock:
XRemove the SmartKey from the ignition lock.
XSecure the vehicle against rolling away
(Ypage 119).
All indicator lamps in the instrument cluster
must be off.
Fuse box in the front-passenger foot-
well
!
The floor panel must be installed properly,
otherwise moisture or dirt could impair the
function of the fuses.
XOpen the front-passenger door.
XTo open: remove the carpet over the footrest.
XLoosen screws :on the floor panel using a
suitable tool.
XRemove the floor panel.
XTo close: install the floor panel again.
XScrew in and tighten screws :.
XPut in the carpet and press to secure.
Fuse box in the cargo compartment
XOpen the tailgate.
XTo open:turn fastener ;on the service flap
to the left.
XOpen service flap :.
iThe fuse allocation chart is located in a
recess at the side of the fuse box. You can find
the corresponding fuse rating and fuse type
on the fuse allocation chart.
Fuses253
Breakdown assistance
Z
Page 275 of 290

Only have tires changed at a qualified spe-
cialist workshop.
Always observe the instructions and safety
notes in the "Mounting a wheel" section
(
Ypage 273).
The wear patterns on the front and rear tires
differ, depending on the operating conditions.
Rotate the wheels before a clear wear pattern
has formed on the tires. Front tires typically
wear more on the shoulders and the rear tires in the center.
On vehicles that have the same size front and
rear wheels, you can rotate the wheels accord-
ing to the intervals in the tire manufacturer's
warranty book in your vehicle documents. If no
warranty book is available, the tires should be
rotated every 3,000 to 6,000 miles (5,000 to
10,000 km). Depending on tire wear, this may
be required earlier. Do not change the direction
of wheel rotation.
Clean the contact surfaces of the wheel and the
brake disc thoroughly every time a wheel is rota-
ted. Check the tire pressure and reactivate the
tire pressure monitor if necessary.
Direction of rotation
Tires with a specified direction of rotation have
additional benefits, e.g. if there is a risk of hydro-
planing. These advantages can only be gained if
the tires are installed corresponding to the
direction of rotation.
An arrow on the sidewall of the tire indicates its
correct direction of rotation.
Storing wheels
Store wheels that are not being used in a cool,
dry and preferably dark place. Protect the tires
from oil, grease, gasoline and diesel.
Mounting a wheel
Preparing the vehicle
XStop the vehicle on solid, non-slippery and
level ground.
XApply the electric parking brake manually.
XBring the front wheels into the straight-ahead position.
XShift the transmission to position P.
XSwitch off the engine.
XWith KEYLESS-GO start function or vehi-
cles with KEYLESS-GO:open the driver's
door.
The on-board electronics now have status 0.
This is the same as the SmartKey having been
removed.
or
XRemove the SmartKey from the ignition lock.
XIf included in the vehicle equipment, remove
the tire-change tool kit from the vehicle.
XSafeguard the vehicle against rolling away.
Securing the vehicle to prevent it from
rolling away
If your vehicle is equipped with a wheel chock, it
can be found in the tire-change tool kit
(
Ypage 241).
The folding wheel chock is an additional safety
measure to prevent the vehicle from rolling
away, for example when changing a wheel.
XFold both plates upwards :.
XFold out lower plate;.
XGuide the lugs on the lower plate fully into the
openings in base plate =.
Changing a wheel273
Wheels and tires
Z
Page 276 of 290

XPlace chocks or other suitable items under
the front and rear of the wheel that is diago-
nally opposite the wheel you wish to change.
Raising the vehicle
GWARNING
If you do not position the jack correctly at the
appropriate jacking point of the vehicle, the
jack could tip over with the vehicle raised.
There is a risk of injury.
Only position the jack at the appropriate jack-
ing point of the vehicle. The base of the jack
must be positioned vertically, directly under
the jacking point of the vehicle.
!The jack is designed exclusively for jacking
up the vehicle at the jacking points. Other-
wise, your vehicle could be damaged.
Observe the following when raising the vehi-
cle:
RTo raise the vehicle, only use the vehicle-spe-
cific jack that has been tested and approved
by Mercedes-Benz. If used incorrectly, the
jack could tip over with the vehicle raised.
RThe jack is designed only to raise and hold the
vehicle for a short time while a wheel is being
changed. It must not be used for performing
maintenance work under the vehicle.
RAvoid changing the wheel on uphill and down-
hill slopes.
RBefore raising the vehicle, secure it from roll-
ing away by applying the parking brake and
inserting wheel chocks. Do not disengage the
parking brake while the vehicle is raised.
RThe jack must be placed on a firm, flat and
non-slip surface. On a loose surface, a large,
flat, load-bearing underlay must be used. On a
slippery surface, a non-slip underlay must be
used, e.g. rubber mats.
RDo not use wooden blocks or similar objects
as a jack underlay. Otherwise, the jack will not be able to achieve its load-bearing capacity
due to the restricted height.
RMake sure that the distance between the
underside of the tires and the ground does not
exceed 1.2 in (3 cm).
RNever place your hands and feet under the
raised vehicle.
RDo not lie under the vehicle.
RDo not start the engine when the vehicle is
raised.
RNever open or close a door or the tailgate
when the vehicle is raised.
RMake sure that no persons are present in the
vehicle when the vehicle is raised.
Vehicles with hub caps: the hub cap covers
the wheel bolts. Before you can unscrew the
wheel bolts, you must remove the hub cap.
XTo remove: take socket;and lug wrench
= from the vehicle tool kit (Ypage 241).
XPosition socket ;on hub cap :.
XPosition lug wrench =on socket ;.
XUsing lug wrench =, turn hub cap:coun-
ter-clockwise and remove it.
XTo install: before installing, check hub cap :
and the wheel area for soiling and clean if
necessary.
XPut hub cap :in position and turn until it is in
the right position.
XPosition socket ;on hub cap :.
XAttach lug wrench =to socket ;and
tighten hub cap :.
The tightening torque must be
18 lb-ft (25 Nm).
iNote that the hub cap should be tightened
to the specified torque of 18 lb-ft (25 Nm).
Mercedes-Benz recommends that you have
the hub cap installed at a qualified specialist
workshop.
274Changing a wheel
Wheels and tires