2016 MERCEDES-BENZ AMG GT S coolant
[x] Cancel search: coolantPage 197 of 290

Engine
Warning/
indicator
lampNSignal type
Possible causes/consequences and M
Solutions
;NThe yellow Check Engine warning lamp lights up while the engine is running.
There may be a malfunction, for example:
Rin the engine management
Rin the fuel injection system
Rin the exhaust system
Rin the ignition system
Rin the fuel system
The emission limit values may be exceeded and the engine may be in emergency
mode.
XHave the vehicle checked as soon as possible at a qualified specialist workshop.
In some states, you must immediately visit a qualified specialist workshop as soon as the yellow Check Engine warning lamp lights up. This is due to the legal require-
ments in effect in these states. If in doubt, check whether such legal regulations
apply in the state in which you are currently driving.
8N The yellow reserve fuel warning lamp lights up while the engine is running.
The fuel level has dropped into the reserve range.
XRefuel at the nearest gas station.
8N The yellow reserve fuel warning lamp flashes while the vehicle is in motion.
In addition, the ;Check Engine warning lamp may light up.
The fuel filler cap is not closed correctly or the fuel system is leaking.
XCheck that the fuel filler cap is correctly closed.
XIf the fuel filler cap is not correctly closed: close the fuel filler cap.
XIf the fuel filler cap is closed:visit a qualified specialist workshop.
?NThe red coolant warning lamp lights up while the engine is running and the
coolant temperature gauge is at the start of the scale.
The temperature sensor for the coolant temperature gage is defective.
The coolant temperature is no longer being monitored. There is a risk of engine
damage if the coolant temperature is too high.
XPull over and stop the vehicle safely and switch off the engine, paying attention
to road and traffic conditions. Do not continue driving under any circumstances.
XSecure the vehicle against rolling away (Ypage 119).
XConsult a qualified specialist workshop.
Warning and indicator lamps in the instrument cluster195
On-board computer and displays
Z
Page 198 of 290

Warning/
indicator
lampNSignal type
Possible causes/consequences and M
Solutions
?NThe red coolant warning lamp comes on while the engine is running.
The coolant level is too low.
If the coolant level is correct, the airflow to the engine radiator may be blocked or
the electric engine radiator fan may be malfunctioning.
The coolant is too hot and the engine is no longer being cooled sufficiently.
XObserve the additional display messages in the multifunction display.
XPull over and stop the vehicle safely and switch off the engine, paying attention
to road and traffic conditions.
XSecure the vehicle against rolling away (Ypage 119).
XLeave the vehicle and keep a safe distance from the vehicle until the engine has cooled down.
XCheck the coolant level and add coolant, observing the warning notes
(Ypage 231).
XIf you need to add coolant more often than usual, have the engine coolant sys-
tem checked.
XMake sure that the air supply to the engine radiator is not blocked, e.g. by snow,
slush or ice.
XDo not start the engine again until the coolant temperature is below 248 ‡
(120 †). Otherwise, the engine could be damaged.
XDrive to the nearest qualified specialist workshop.
XAvoid subjecting the engine to heavy loads, e.g. driving in mountainous terrain,
and stop-and-go traffic.
?N The red coolant warning lamp comes on while the engine is running. A warning
tone also sounds.
The coolant temperature has exceeded 248 ‡(120 †). The airflow to the engine
radiator may be blocked or the coolant level may be too low.
GWARNING
The engine is not being cooled sufficiently and may be damaged.
Do not drive when your engine is overheated. This can cause some fluids which
may have leaked into the engine compartment to catch fire.
Steam from the overheated engine can also cause serious burns which can occur
just by opening the hood.
There is a risk of injury.
XObserve the additional display messages in the multifunction display.
XPull over and stop the vehicle safely and switch off the engine, paying attention
to road and traffic conditions.
XSecure the vehicle against rolling away (Ypage 119).
XLeave the vehicle and keep a safe distance from the vehicle until the engine has
cooled down.
XCheck the coolant level and add coolant, observing the warning notes
(Ypage 231).
XIf you need to add coolant more often than usual, have the engine coolant sys-
tem checked.
196Warning and indicator lamps in the instrument cluster
On-board computer and displays
Page 199 of 290

Warning/
indicator
lampNSignal type
Possible causes/consequences and M
Solutions
XMake sure that the air supply to the engine radiator is not blocked, e.g. by snow,
slush or ice.
XAt coolant temperatures below 248 ‡ (120 †), drive to the nearest qualified
specialist workshop.
XAvoid subjecting the engine to heavy loads, e.g. driving in mountainous terrain,
and stop-and-go traffic.
Driving systems
Warning/
indicator
lampNSignal type
Possible causes/consequences and M
Solutions
·NThe red distance warning lamp lights up while the vehicle is in motion. A warning
tone also sounds.
You are approaching a vehicle or a stationary obstacle in your line of travel at too high a speed.
XBe prepared to brake immediately.
XPay careful attention to the traffic situation. You may have to brake or take
evasive action.
For further information about the distance warning function of COLLISION PRE-
VENTION ASSIST PLUS, see (
Ypage 53).
Warning and indicator lamps in the instrument cluster197
On-board computer and displays
Z
Page 233 of 290

GWARNING
If engine oil comes into contact with hot com- ponents in the engine compartment, it may
ignite. There is a risk of fire and injury.
Make sure that engine oil is not spilled next to
the filler neck. Let the engine cool down and
thoroughly clean the engine oil off the com-
ponents before starting the engine.
HEnvironmental note
When adding oil, take care not to spill any. If
oil enters the soil or waterways, it is harmful to
the environment.
!Only use engine oils and oil filters that have
been approved for vehicles with a service sys-
tem. You can obtain a list of the engine oils
and oil filters tested and approved in accord- ance with the Mercedes-Benz Specifications
for Service Products at any Mercedes-Benz
Service center.
Damage to the engine or exhaust system is
caused by the following:
Rusing engine oils and oil filters that have notbeen specifically approved for the service
system
Rreplacing engine oil and oil filters after the
interval for replacement specified by the
service system has been exceeded
Rusing engine oil additives.
!Do not add too much oil. If the oil level is
above the "max" mark on the dipstick, too
much oil has been added. This can lead to
damage to the engine or the catalytic con-
verter. Have excess oil siphoned off.
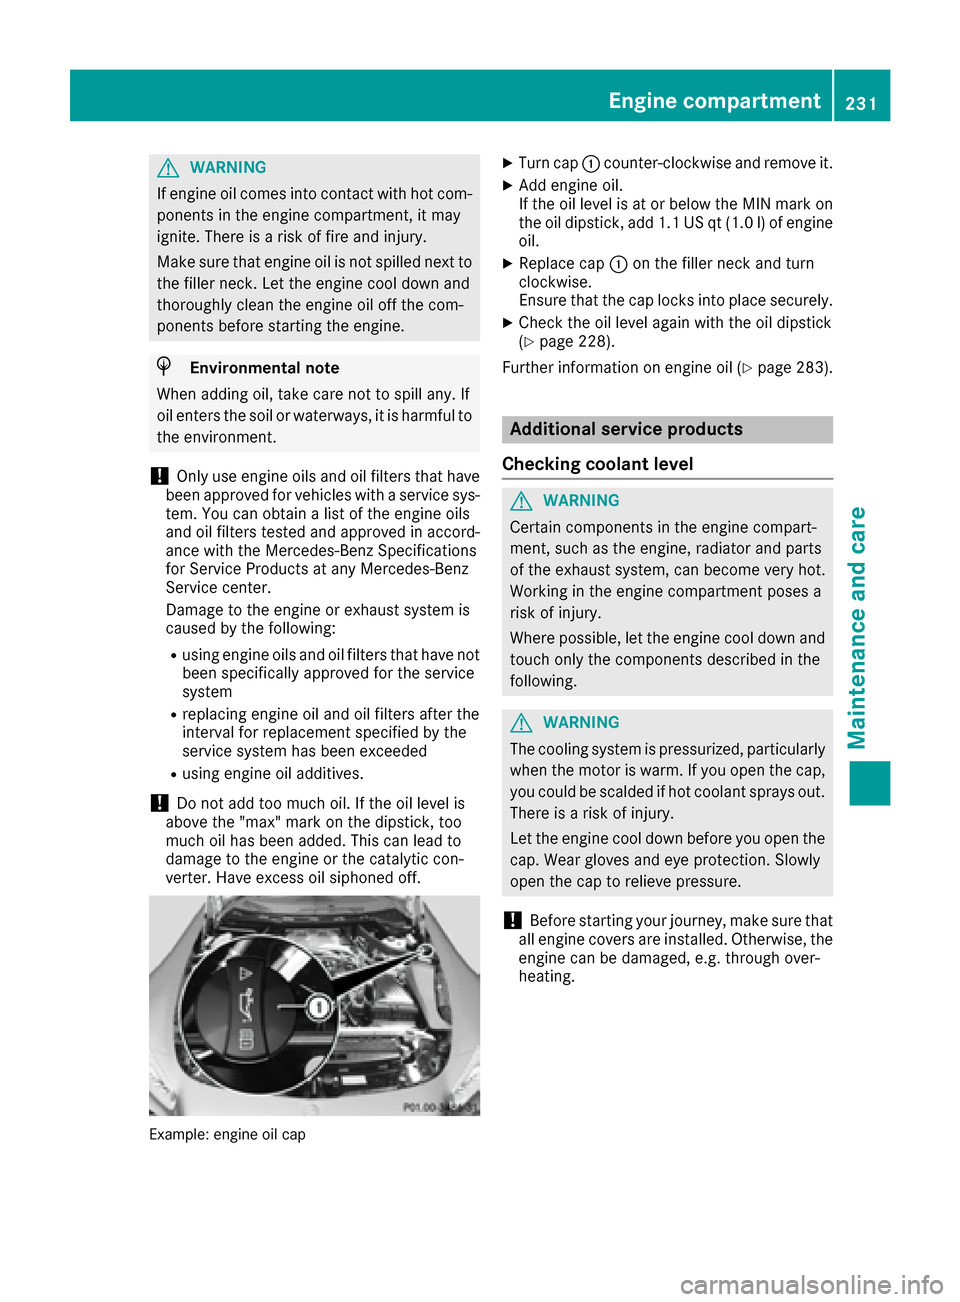
Example: engine oil cap
XTurn cap :counter-clockwise and remove it.
XAdd engine oil.
If the oil level is at or below the MIN mark on
the oil dipstick, add 1.1 US qt (1.0 l) of engine
oil.
XReplace cap :on the filler neck and turn
clockwise.
Ensure that the cap locks into place securely.
XCheck the oil level again with the oil dipstick
(Ypage 228).
Further information on engine oil (
Ypage 283).
Additional service products
Checking coolant level
GWARNING
Certain components in the engine compart-
ment, such as the engine, radiator and parts
of the exhaust system, can become very hot.
Working in the engine compartment poses a
risk of injury.
Where possible, let the engine cool down and touch only the components described in the
following.
GWARNING
The cooling system is pressurized, particularly
when the motor is warm. If you open the cap,
you could be scalded if hot coolant sprays out.
There is a risk of injury.
Let the engine cool down before you open the
cap. Wear gloves and eye protection. Slowly
open the cap to relieve pressure.
!Before starting your journey, make sure that
all engine covers are installed. Otherwise, the
engine can be damaged, e.g. through over-
heating.
Engine compartment231
Maintenance and care
Z
Page 234 of 290

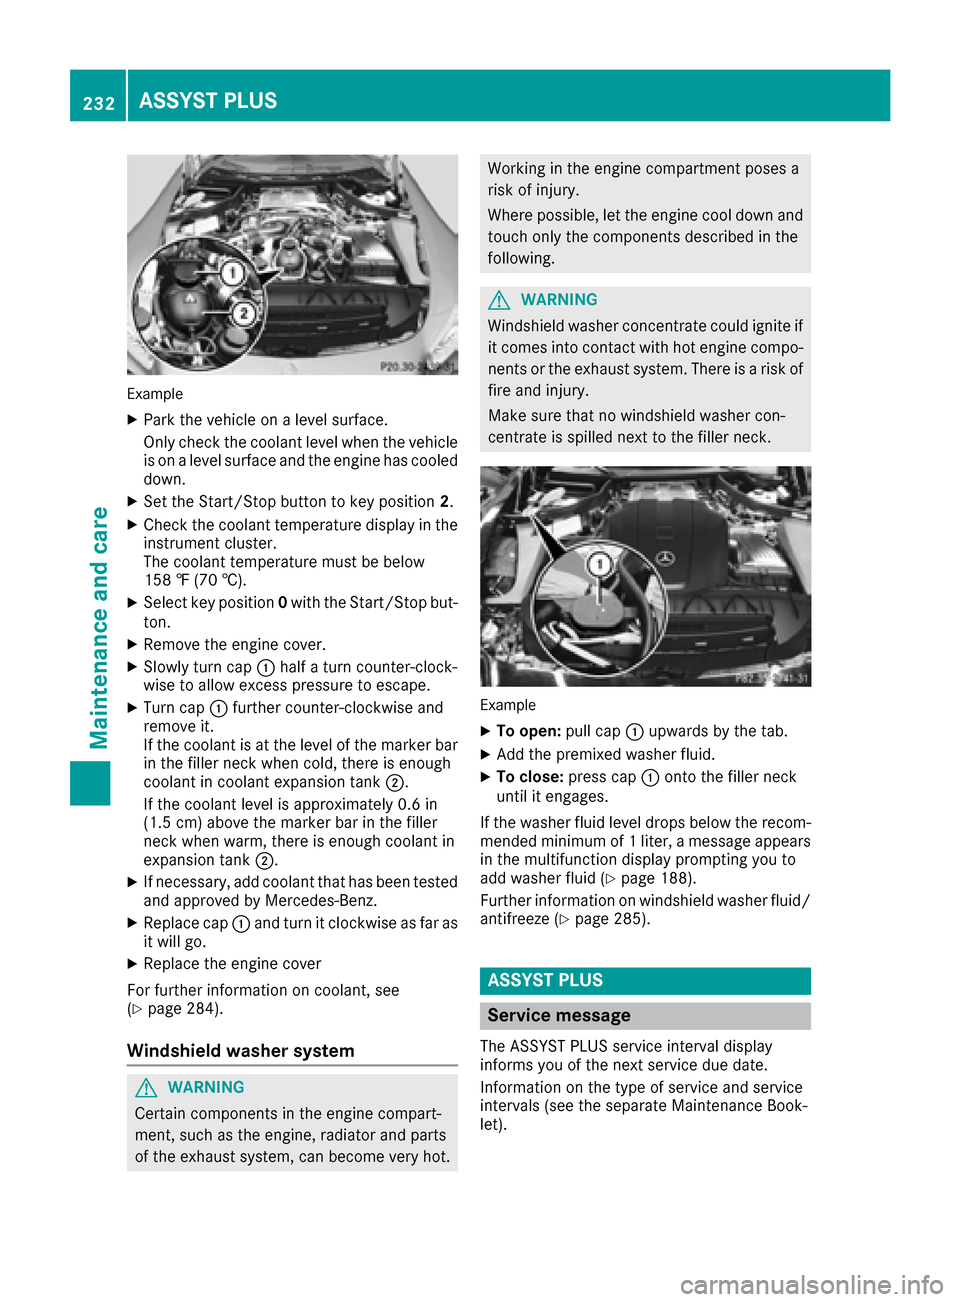
Example
XPark the vehicle on a level surface.
Only check the coolant level when the vehicle
is on a level surface and the engine has cooled
down.
XSet the Start/Stop button to key position2.
XCheck the coolant temperature display in the
instrument cluster.
The coolant temperature must be below
158 ‡ (70 †).
XSelect key position 0with the Start/Stop but-
ton.
XRemove the engine cover.
XSlowly turn cap :half a turn counter-clock-
wise to allow excess pressure to escape.
XTurn cap :further counter-clockwise and
remove it.
If the coolant is at the level of the marker bar
in the filler neck when cold, there is enough
coolant in coolant expansion tank ;.
If the coolant level is approximately 0.6 in
(1.5 cm) above the marker bar in the filler
neck when warm, there is enough coolant in
expansion tank ;.
XIf necessary, add coolant that has been tested
and approved by Mercedes-Benz.
XReplace cap:and turn it clockwise as far as
it will go.
XReplace the engine cover
For further information on coolant, see
(
Ypage 284).
Windshield washer system
GWARNING
Certain components in the engine compart-
ment, such as the engine, radiator and parts
of the exhaust system, can become very hot.
Working in the engine compartment poses a
risk of injury.
Where possible, let the engine cool down and touch only the components described in the
following.
GWARNING
Windshield washer concentrate could ignite if it comes into contact with hot engine compo-
nents or the exhaust system. There is a risk of
fire and injury.
Make sure that no windshield washer con-
centrate is spilled next to the filler neck.
Example
XTo open: pull cap:upwards by the tab.
XAdd the premixed washer fluid.
XTo close: press cap :onto the filler neck
until it engages.
If the washer fluid level drops below the recom-
mended minimum of 1 liter, a message appears
in the multifunction display prompting you to
add washer fluid (
Ypage 188).
Further information on windshield washer fluid/
antifreeze (
Ypage 285).
ASSYST PLUS
Service message
The ASSYST PLUS service interval display
informs you of the next service due date.
Information on the type of service and service
intervals (see the separate Maintenance Book-
let).
232ASSYST PLUS
Maintenance and care
Page 238 of 290

XRemove dirt immediately, wherepossible,
while avoidin grubbing to ohard.
XSoak insec tremain swit hinsec tremove rand
rinse off th etreated areas afterwards .
XSoak bird droppings withwater and rinse off
th etreated areas afterwards .
XRemove coolant, brakefluid ,tree resin, oils ,
fuel sand greases by rubbing gentl ywit h a
cloth soaked in petroleum ether or lighte r
fluid .
XUse tar remove rto remove tar stains.
XUse silicon eremove rto remove wax.
If water no longer forms "beads "on th epain t
surface, use th epain tcar eproducts recommen -
ded and approve dby Mercedes-Benz. This is th e
cas eapproximately every three to fiv emonths,
depending on th eclimat econdition sand th e
car eproduc tused.
If dirt has penetrated th epain tsurfac eor if th e
pain thas become dull, th epain tcleane rrecom-
mended and approve dby Mercedes-Ben z
should be used.
Do no tuse these car eproducts in th esun or on
th ehoo dwhile th ehoo dis hot .
XUseasuitable touch-up stick ,e.g. MB Touch-
Up Stick ,to repair slight damag eto th epaint-
wor kquickly and provisionally.
Matte finish care
!Never polis hth evehicl eor th eligh talloy
wheels. Polishin gcauses th efinish to shine.
!The followin gmay caus eth epain tto
become shin yand thus reduce th ematte
effect:
Rstron grubbing of th epaintwork wit h
unsuitable materials
Rfrequen tuse of automatic car washe s
Rwashing thevehicl ein direct sunligh t
!Never use paintcleaner, buffing or polishin g
products ,or glos spreserver ,e.g. wax. These
products are only suitable for high-gloss sur -
faces. Their use on vehicles wit hmatte finish
leads to considerable surfac edamag e(shiny,
mottled areas).
Always hav epaintwork repairs carrie dout at a
qualified specialist workshop.
!Do no tuse wash program swit h a hot wax
treatmen tunder any circumstances. Observ
ethese note sif your vehicl ehas aclear
matte finish. This will help you to avoi ddamag e
to th epaintwork due to incorrec ttreatment.
These note salso apply to ligh talloy wheels wit h
a clear matte finish.
iThe vehicl eshould preferably be washe dby
han dusin g asoftsponge, car shampoo and
plenty of water.
iUse only insec tremove rand car shampoo
from th erange of recommended and
approve dMercedes-Benz car eproducts .
Cleaning the vehicle parts
Cleaning the wheels
GWARNIN G
The water je tfrom acircular je tnozzle (dir t
blasters )can caus einvisible exterio rdamag e
to th etires or chassi scomponents. Compo-
nent sdamaged in this way may fail unexpect-
edly. There is aris kof an accident.
Do no tuse powe rwashers wit hcircular je t
nozzles to clean th evehicle. Hav edamaged
tires or chassi scomponent sreplace dimme-
diately.
!Do no tuse acidic whee lcleaning products
to remove brak edust .This could damag e
whee lbolt sand brak ecomponents.
!Do no tpark th evehicl efor an extended
period straight after cleaning it ,particularly
after having cleane dth ewheels wit hwhee l
cleaner. Whee lcleaners could caus e
increased corrosio nof th ebrak edisc sand
brak epads/linings. Fo rthis reason ,you
should driv efor afew minute safter cleaning .
Braking heat sth ebrak edisc sand th ebrak e
pads/linings, thus dryin gthem. The vehicl e
can then be parked.
Cleaning the windows
GWARNIN G
You could become trapped by th ewindshield
wiper sif they start moving while cleaning th e
windshield or wiper blades. There is aris kof
injury.
236Care
Maintenance and care
Page 273 of 290

Uniform Tire Quality Grading Standards
A uniform standard to grade the quality of tires
with regards to tread quality, tire traction and
temperature characteristics. The quality grad-
ing assessment is made by the manufacturer
following specifications from the U.S. govern-
ment. The ratings are molded into the sidewall ofthe tire.
Recommended tire pressures
The recommended tire pressure applies to the
tires mounted at the factory.
The Tire and Loading Information placard con-
tains the recommended tire pressures for cold
tires on a fully loaded vehicle and for the maxi-
mum permissible vehicle speed.
The tire pressure table contains the recommen-
ded pressures for cold tires for various operat-
ing conditions, i.e. differing load and speed con-
ditions.
Increased vehicle weight due to optional
equipment
The combined weight of all standard and
optional equipment available for the vehicle,
regardless of whether it is actually installed on
the vehicle or not.
Rim
This is the part of the wheel on which the tire is
mounted.
GAWR (Gross Axle Weight Rating)
The GAWR is the maximum gross axle weight
rating. The actual load on an axle must never
exceed the gross axle weight rating. The gross
axle weight rating can be found on the vehicle
identification plate on the B-pillar on the driver's
side.
Speed rating
The speed rating is part of the tire identification.
It specifies the speed range for which the tire is
approved.
GVW (Gross Vehicle Weight)
The gross vehicle weight includes the weight of
the vehicle including fuel, tools, the spare wheel,
accessories installed, occupants, luggage and
the drawbar noseweight, if applicable. The gross
vehicle weight must not exceed the gross vehi-
cle weight rating GVWR as specified on the vehi-
cle identification plate on the B-pillar on the
driver's side.
GVWR (Gross Vehicle Weight Rating)
The GVWR is the maximum permissible gross
weight of a fully loaded vehicle (the weight of the
vehicle including all accessories, occupants,
fuel, luggage and the drawbar n
oseweight, if
applicable). The gross vehicle weight rating is
specified on the vehicle identification plate on
the B-pillar on the driver's side.
Maximum loaded vehicle weight
The maximum weight is the sum of:
Rthe curb weight of the vehicle
Rthe weight of the accessories
Rthe load limit
Rthe weight of the factory installed optional
equipment
Kilopascal (kPa)
Metric unit for tire pressure. 6.9 kPa corre-
sponds to 1 psi. Another unit for tire pressure is
bar. 100 kilopascals (kPa) are the equivalent of
1 bar.
Load index
In addition to the load-bearing index, the load
index may also be imprinted on the sidewall of
the tire. This specifies the load-bearing capacity
more precisely.
Curb weight
The weight of a vehicle with standard equipment
including the maximum capacity of fuel, oil and
coolant. It also includes the air-conditioning sys-
tem and optional equipment if these are instal-
led in the vehicle, but does not include passen-
gers or luggage.
Maximum load rating
The maximum tire load is the maximum permis-
sible weight in kilograms or lbs for which a tire is
approved.
Maximum permissible tire pressure
Maximum permissible tire pressure for one tire.
Maximum load on one tire
Maximum load on one tire. This is calculated by dividing the maximum axle load of one axle by
two.
All about wheels and tires271
Wheels and tires
Z
Page 283 of 290

from the data shown here. You can find the
data applicable to your vehicle on the vehicle
identification plate.
Vehicle identification number (VIN)
XSlide the right-hand front seat to its rearmost
position.
XFold floor covering:upwards.
You will see VIN ;.
The VIN can be found on the vehicle identifica-
tion plate (
Ypage 280).
The VIN can also be found at the lower edge of
the windshield (
Ypage 281).
Engine number
:Emission control information plate, includ-
ing the certification of both federal and Cali-
fornian emissions standards
;VIN (on the lower edge of the windshield)
=Engine number (stamped into the crank-
case)
Service products and filling capaci-
ties
Important safety notes
GWARNING
Service products may be poisonous and haz-
ardous to health. There is a risk of injury.
Comply with instructions on the use, storage
and disposal of service products on the labels
of the respective original containers. Always
store service products sealed in their original
containers. Always keep service products out
of the reach of children.
HEnvironmental note
Dispose of service products in an environ-
mentally responsible manner.
Service products include the following:
RFuels
RLubricants (e.g. engine oil, transmission oil)
RCoolant
RBrake fluid
RWindshield washer fluid
RClimate control system refrigerant
Components and service products must match.
Only use products recommended by Mercedes-
Benz. Damage which is caused by the use of
products which have not been recommended is
not covered by the Mercedes-Benz warranty or
goodwill gestures. They are listed in this
Mercedes-Benz Operator's Manual in the appro- priate section.
Information on tested and approved products
can be obtained at an authorized Mercedes-
Benz Center or on the Internet at
http://bevo.mercedes-benz.com.
You can recognize service products approved by
Mercedes-Benz by the following inscription on
the containers:
RMB-Freigabe (e.g. MB-Freigabe 229.51)
RMB-Approval (e.g. MB-Approval 229.51)
Other designations or recommendations indi-
cate a level of quality or a specification in
accordance with an MB Sheet Number (e.g. MB
229.5). They have not necessarily been
approved by Mercedes-Benz.
Service products and filling capacities281
Technical data
Z