2016 MERCEDES-BENZ AMG GT ROADSTER oil dipstick
[x] Cancel search: oil dipstickPage 13 of 289

Checking the oil level using the
dipstick .......................................... 233
Checking the oil level using the
on-board computer ........................ 234
Display message ............................ 184
Filling capacity .............................. .279
Notes about oil grades ................... 279
Notes on oil level/consumption .... 233
Temperature (on-board com-
puter) ............................................. 167
Topping up ..................................... 234
Entering an address
See also Digital Owner's Manual ... 205
Environmental protection
Returning an end-of-life vehicle ....... 22
ESP ®
(Electronic Stability Pro-
gram)
AMG menu (on-board computer) ... 168
Characteristics ................................. 58
Deactivating/activating ................... 58
Display message ............................ 172
Function/notes ................................ 57
General notes .................................. 57
Important safety guidelines ............. 58
Warning lamp ................................. 197
ETS/4ETS (Electronic Traction Sys-
tem) ...................................................... 58
Exhaust pipe (cleaning instruc-
tions) ................................................. .242
Exterior lighting
Cleaning ......................................... 241
see Lights
Exterior mirrors
Adjusting ......................................... 84
Anti-dazzle mode (automatic) .......... 85
Folding in/out (automatically) ......... 85
Folding in/out (electrically) ............. 85
Out of position (troubleshooting) ..... 85
Parking position ............................... 86
Resetting ......................................... 85
Storing settings (memory func-
tion) ................................................. 87 F
Fault message see Display messages Favourites
Overview ........................................ 208
Features ............................................. 220
Filler cap
see Fuel filler flap
Fire extinguisher ............................... 245
First-aid kit ......................................... 245
Fitting a wheel
Fitting a wheel ............................... 271
Lowering the vehicle ...................... 272
Preparing the vehicle ..................... 268
Raising the vehicle ......................... 269
Removing a whee l.......................... 270
Securing the vehicle against roll-
ing away ........................................ 268
Flat tyre
Changing a wheel/fitting the
spare whee l................................... 267
Preparing the vehicle ..................... 247
TIREFIT kit ...................................... 247
see Emergency spare wheel
Floormat ............................................. 230
Frequencies
Garage door opener ....................... 228
Mobile phone ................................. 275
Two-way radio ................................ 275
Front-passenger front airbag deac-
tivation system
Operation ......................................... 42
Problems ......................................... 45
System self-test ............................... 44
Fuel
Additives ........................................ 279
Consumption statistics .................. 158
Displaying the current consump-
tion ................................................ 158
Displaying the range ...................... 158
Driving tip s.................................... 123
E10 ................................................ 278
Fuel gauge ....................................... 29
Grade (petrol) ................................ 278
Important safety notes .................. 277
Problem (malfunction) ................... 119
Refuelling ....................................... 117
Tank content/reserve fue l............. 278
Fuel filler flap
Closing ........................................... 118
General information ....................... 118 10
Index
Page 236 of 289

X
Make sure that the windscreen wipers are
switched off.
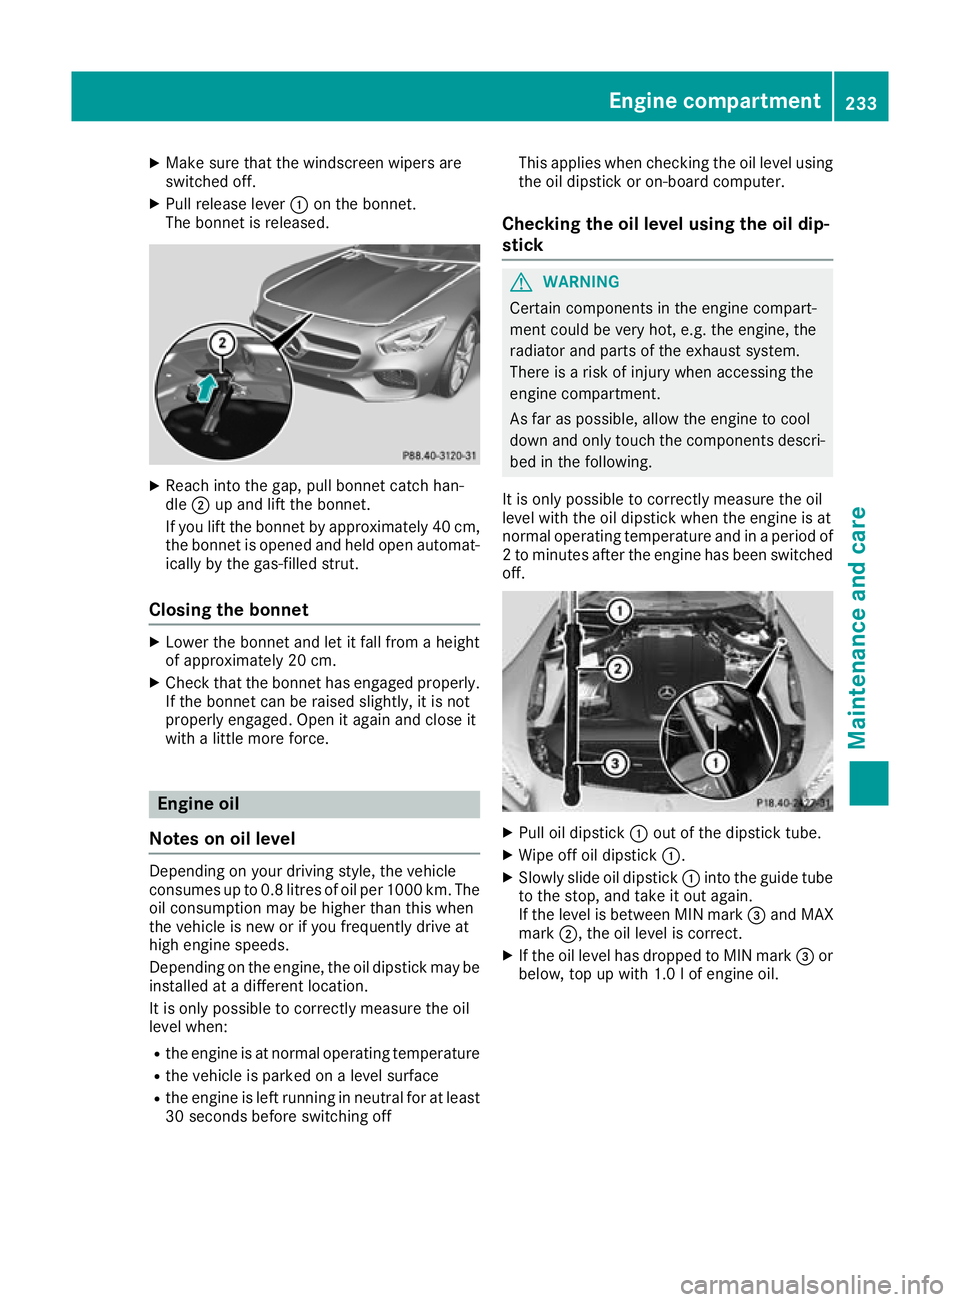
X Pull release lever :on the bonnet.
The bonnet is released. X
Reach into the gap, pull bonnet catch han-
dle ;up and lift the bonnet.
If you lift the bonnet by approximately 40 cm, the bonnet is opened and held open automat-
ically by the gas-filled strut.
Closing the bonnet X
Lower the bonnet and let it fall from a height
of approximately 20 cm.
X Check that the bonnet has engaged properly.
If the bonnet can be raised slightly, it is not
properly engaged. Open it again and close it
with a little more force. Engine oil
Notes on oil level Depending on your driving style, the vehicle
consumes up to 0.8 litres of oil per 1000 km. The
oil consumption may be higher than this when
the vehicle is new or if you frequently drive at
high engine speeds.
Depending on the engine, the oil dipstick may be installed at a different location.
It is only possible to correctly measure the oil
level when:
R the engine is at normal operating temperature
R the vehicle is parked on a level surface
R the engine is left running in neutral for at least
30 seconds before switching off This applies when checking the oil level using
the oil dipstick or on-board computer.
Checking the oil level using the oil dip-
stick G
WARNING
Certain components in the engine compart-
ment could be very hot, e.g. the engine, the
radiator and parts of the exhaust system.
There is a risk of injury when accessing the
engine compartment.
As far as possible, allow the engine to cool
down and only touch the components descri- bed in the following.
It is only possible to correctly measure the oil
level with the oil dipstick when the engine is at
normal operating temperature and in a period of 2 to minutes after the engine has been switchedoff. X
Pull oil dipstick :out of the dipstick tube.
X Wipe off oil dipstick :.
X Slowly slide oil dipstick :into the guide tube
to the stop, and take it out again.
If the level is between MIN mark =and MAX
mark ;, the oil level is correct.
X If the oil level has dropped to MIN mark =or
below, top up with 1.0 lof engine oil. Engine compartment
233Maintenance and care Z
Page 237 of 289

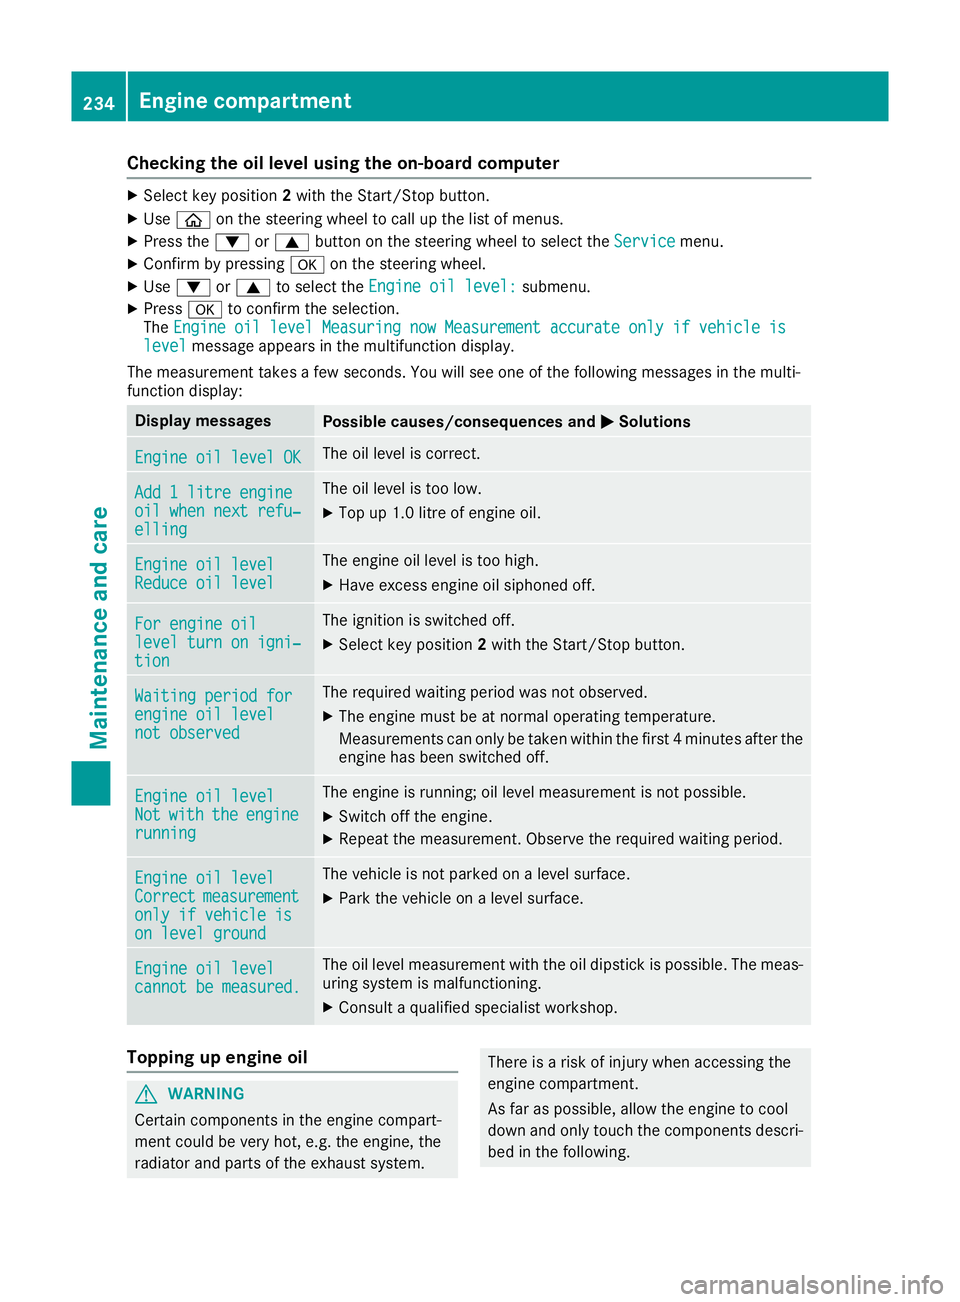
Checking the oil level using the on-board computer
X
Select key position 2with the Start/Stop button.
X Use ò on the steering wheel to call up the list of menus.
X Press the :or9 button on the steering wheel to select the Service
Servicemenu.
X Confirm by pressing aon the steering wheel.
X Use : or9 to select the Engine oil level:
Engine oil level: submenu.
X Press ato confirm the selection.
The Engine oil level Measuring now Measurement accurate only if vehicle is
Engine oil level Measuring now Measurement accurate only if vehicle is
level
level message appears in the multifunction display.
The measurement takes a few seconds. You will see one of the following messages in the multi-
function display: Display messages
Possible causes/consequences and
M
MSolutions Engine oil level OK
Engine oil level OK The oil level is correct.
Add 1 litre engine
Add 1 litre engine
oil when next refu‐ oil when next refu‐
elling elling The oil level is too low.
X Top up 1.0 litre of engine oil. Engine oil level
Engine oil level
Reduce oil level Reduce oil level The engine oil level is too high.
X Have excess engine oil siphoned off. For engine oil
For engine oil
level turn on igni‐ level turn on igni‐
tion tion The ignition is switched off.
X Select key position 2with the Start/Stop button. Waiting period for
Waiting period for
engine oil level engine oil level
not observed not observed The required waiting period was not observed.
X The engine must be at normal operating temperature.
Measurements can only be taken within the first 4 minutes after the
engine has been switched off. Engine oil level Engine oil level
Not Not
with
with the
theengine
engine
running
running The engine is running; oil level measurement is not possible.
X Switch off the engine.
X Repeat the measurement. Observe the required waiting period. Engine oil level
Engine oil level
Correct Correct
measurement
measurement
only if vehicle is
only if vehicle is
on level ground on level ground The vehicle is not parked on a level surface.
X Park the vehicle on a level surface. Engine oil level
Engine oil level
cannot be measured. cannot be measured. The oil level measurement with the oil dipstick is possible. The meas-
uring system is malfunctioning.
X Consult a qualified specialist workshop. Topping up engine oil
G
WARNING
Certain components in the engine compart-
ment could be very hot, e.g. the engine, the
radiator and parts of the exhaust system. There is a risk of injury when accessing the
engine compartment.
As far as possible, allow the engine to cool
down and only touch the components descri- bed in the following. 234
Engine compartmentMaintenance and care
Page 238 of 289

G
WARNING
If engine oil comes into contact with hot com- ponents in the engine compartment, it may
ignite. There is a risk of fire and injury.
Make sure that engine oil does not spill out
over the filler neck. Allow the engine to cool
down and thoroughly clean the components
that have come into contact with engine oil
before you start the engine. H
Environmental note
When topping up the oil, take care not to spill
any. If oil enters the soil or waterways, it is
harmful to the environment.
! Use only engine oils and oil filters that are
approved for vehicles with a service system. A
list of the engine oils and oil filters that have
been tested and approved in accordance with Mercedes-Benz Specifications for Service
Products is available at any Mercedes-Benz
Service Centre.
The following cause engine failure or damage
to the exhaust system:
R Use of engine oils and oil filters that have
not been expressly approved for the service system
R Replacement of engine oil and oil filter after
the replacement interval specified by the
service system has expired
R Use of engine oil additives
! Do not add too much oil. If the oil level is
above the "max" mark on the dipstick, too
much oil has been added. This can lead to
damage to the engine or the catalytic con-
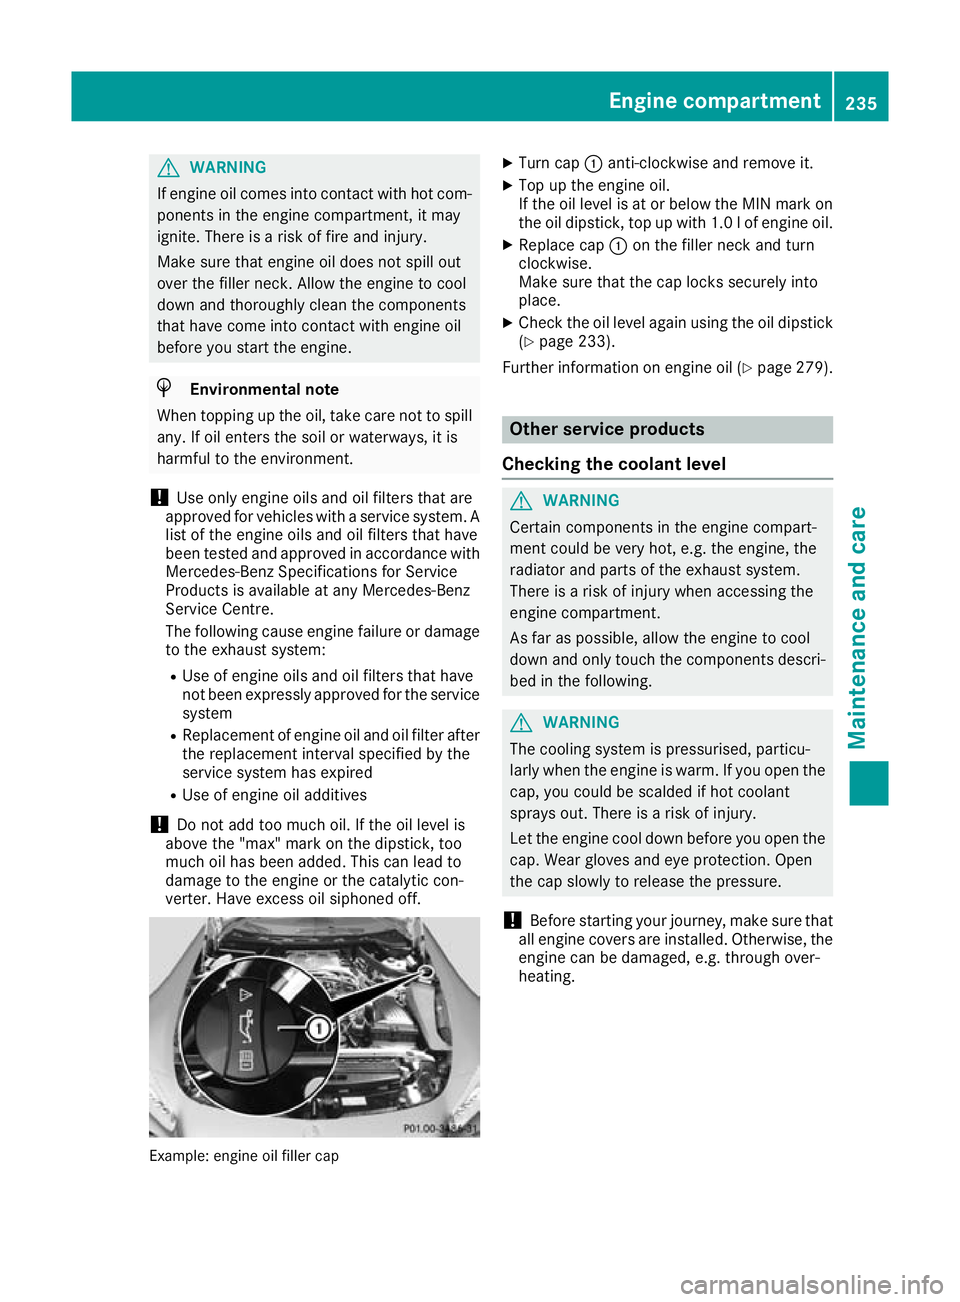
verter. Have excess oil siphoned off. Example: engine oil filler cap X
Turn cap :anti-clockwise and remove it.
X Top up the engine oil.
If the oil level is at or below the MIN mark on
the oil dipstick, top up with 1.0 lof engine oil.
X Replace cap :on the filler neck and turn
clockwise.
Make sure that the cap locks securely into
place.
X Check the oil level again using the oil dipstick
(Y page 233).
Further information on engine oil (Y page 279). Other service products
Checking the coolant level G
WARNING
Certain components in the engine compart-
ment could be very hot, e.g. the engine, the
radiator and parts of the exhaust system.
There is a risk of injury when accessing the
engine compartment.
As far as possible, allow the engine to cool
down and only touch the components descri- bed in the following. G
WARNING
The cooling system is pressurised, particu-
larly when the engine is warm. If you open the cap, you could be scalded if hot coolant
sprays out. There is a risk of injury.
Let the engine cool down before you open the
cap. Wear gloves and eye protection. Open
the cap slowly to release the pressure.
! Before starting your journey, make sure that
all engine covers are installed. Otherwise, the engine can be damaged, e.g. through over-
heating. Engine compartment
235Maintenance and care Z