2016 MERCEDES-BENZ AMG GT ROADSTER ECO mode
[x] Cancel search: ECO modePage 143 of 289
i
If the activation conditions are no longer ful-
filled, RACE START is cancelled. The RACE
RACE
START not possible See Owner's Man‐
START not possible See Owner's Man‐
ual
ual message appears in the multifunction
display.
X To cancel: pull the left steering wheel shift
paddle (Y page 113).
or X To confirm: pull the right steering wheel shift
paddle (Y page 113).
The RACE START available Depress
RACE START available Depress
accelerator
accelerator message appears in the multi-
function display.
i If you do not depress the accelerator pedal
within a few seconds, RACE START is cancel-
led. The RACE START cancelled
RACE START cancelled message
appears in the multifunction display.
X Fully depress the accelerator pedal.
The engine speed increases.
The RACE
RACE START START Release
Release brake
braketo
tostart
start
message appears in the multifunction display.
i If the brake pedal is not released after a
short while, RACE START is cancelled. The
RACE RACE START
START cancelled
cancelled message appears in
the multifunction display.
X Take your foot off the brake, but keep the
accelerator pedal depressed.
The vehicle pulls away at maximum acceler-
ation.
The RACE
RACE START START active
active message appears in
the multifunction display.
RACE START is deactivated when the vehicle
reaches a speed of approximately 50 km/h.
RACE START is deactivated immediately if you
release the accelerator pedal during RACE
START or if any of the activation conditions are
no longer fulfilled. The RACE START not pos‐
RACE START not pos‐
sible See Owner's Manual
sible See Owner's Manual orRACE START RACE START
cancelled
cancelled message appears in the multifunc-
tion display.
i After using it several times in short succes-
sion, RACE START will be unavailable until a
certain distance has been driven. AMG RIDE CONTROL
General notes The electronically controlled damping system
works continuously. This improves driving
safety and ride comfort.
The damping is tuned individually to each wheel
and depends on:
R your driving style, e.g. sporty
R the road surface condition, e.g. bumps
R your individual selection of Sport, Sport + or
Comfort
The suspension setting is adjusted using the
corresponding button in the centre console.
i The mode can also be set using the
DYNAMIC SELECT controller (Y page 108).
If the ignition is switched off for less than four
hours, the previously selected drive program is
activated when the engine is next started. If the ignition is switched off for more than four hours,
Comfort mode is activated when the engine is
next started.
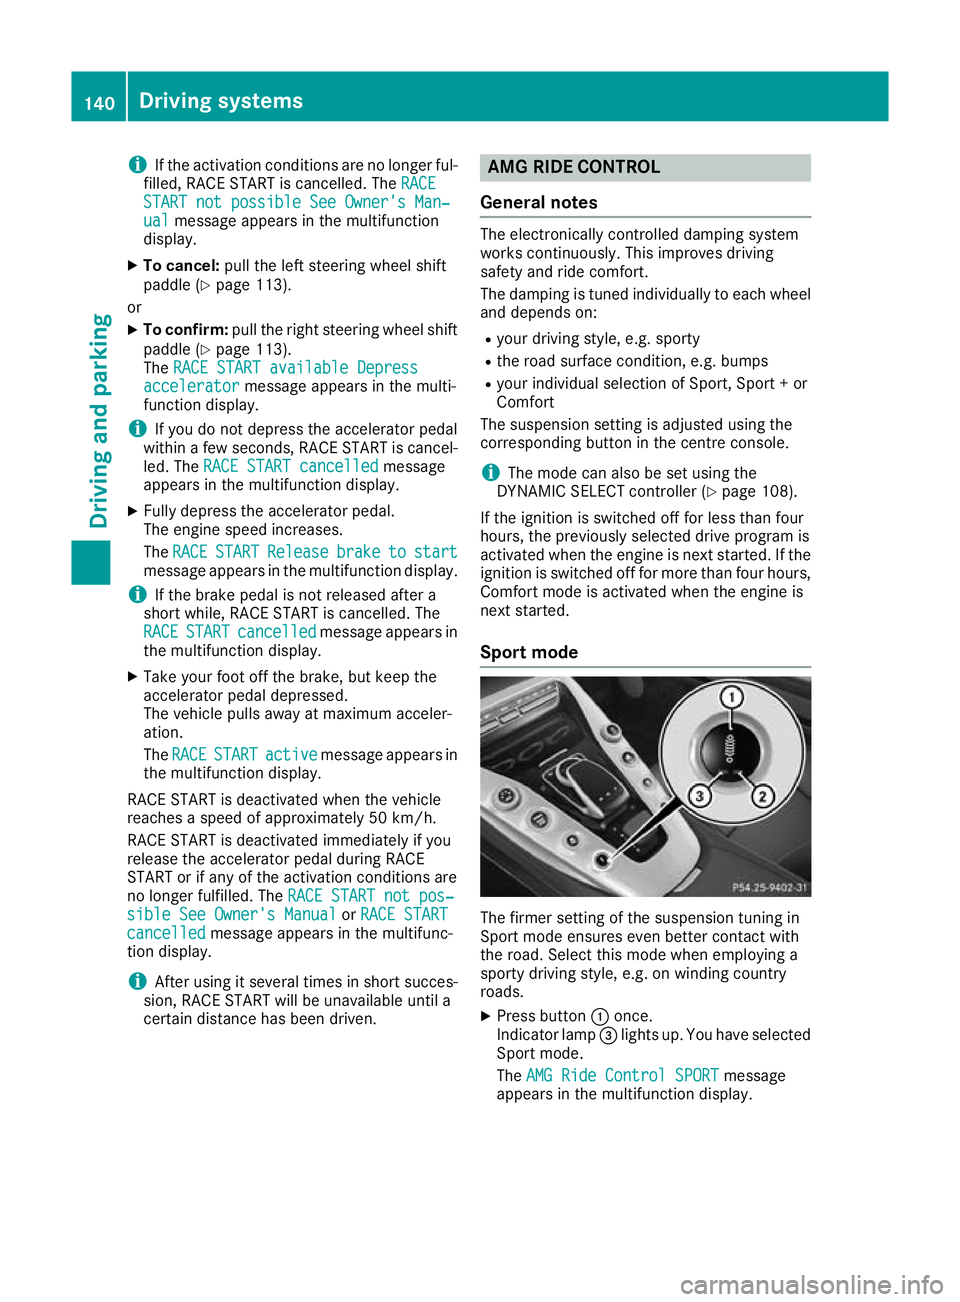
Sport mode The firmer setting of the suspension tuning in
Sport mode ensures even better contact with
the road. Select this mode when employing a
sporty driving style, e.g. on winding country
roads.
X Press button :once.
Indicator lamp =lights up. You have selected
Sport mode.
The AMG Ride Control SPORT AMG Ride Control SPORT message
appears in the multifunction display. 140
Driving systemsDriving and parking
Page 144 of 289
Sport + mode
The very firm setting of the suspension setting in
Sport + mode ensures the best possible contact
with the road. Select this mode only when driv-
ing on race circuits.
If indicator lamps ;and =are off:
X Press button :twice.
Indicator lamps ;and =light up. You have
selected Sport + mode.
The AMG Ride Control SPORT +
AMG Ride Control SPORT + message
appears in the multifunction display.
If indicator lamp =lights up:
X Press button :once.
Second indicator lamp ;lights up. You have
selected Sport + mode.
The AMG Ride Control SPORT +
AMG Ride Control SPORT + message
appears in the multifunction display.
Comfort mode In Comfort mode, the driving characteristics of
your vehicle are more comfortable. Select this
mode if you prefer a more comfortable driving
style, but also when driving fast on straight
roads, e.g. motorways.
X Press button :repeatedly until indicator
lamps ;and =go out.
You have selected Comfort mode.
The AMG Ride Control COMFORT
AMG Ride Control COMFORT message
appears in the multifunction display. PARKTRONIC
Important safety notes PARKTRONIC is an electronic parking aid with
ultrasound. It monitors the area around your
vehicle using six sensors in the front bumper
and four sensors in the rear bumper.
PARKTRONIC visually and audibly indicates the
distance between your vehicle and an object.
PARKTRONIC is only an aid. It is not a substitute
for your attention to the immediate surround-
ings. The responsibility for safe manoeuvring
and parking remains with you. Make sure that
there are no persons, animals or objects in
range while manoeuvring and parking.
! When parking, pay particular attention to
objects above or below the sensors, such as
flower pots or trailer drawbars. PARKTRONIC does not detect such objects when they are in
the immediate vicinity of the vehicle. You
could damage the vehicle or the objects.
The sensors may not detect snow and objects which absorb ultrasonic sources.
Ultrasonic sources, such as an automatic car
wash, a lorry's compressed-air brakes or a
pneumatic drill, could cause PARKTRONIC to
malfunction.
PARKTRONIC may not function correctly on
uneven terrain.
PARKTRONIC is activated automatically when
you: R switch on the ignition
R shift the transmission to position D,Ror N
PARKTRONIC is deactivated at speeds above
18 km/h. It is reactivated at lower speeds.
Range of the sensors General notes
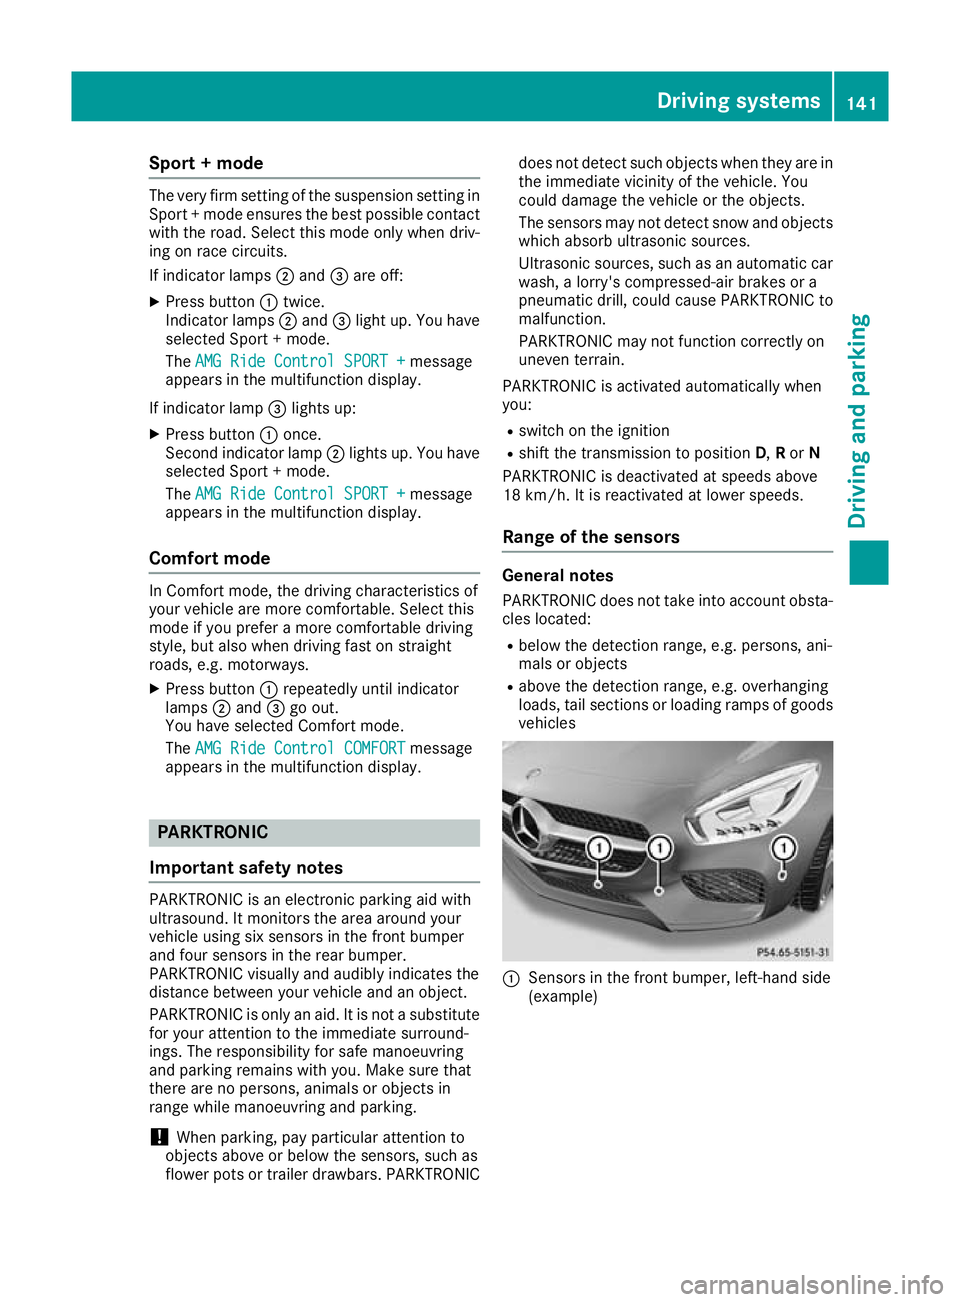
PARKTRONIC does not take into account obsta-
cles located:
R below the detection range, e.g. persons, ani-
mals or objects
R above the detection range, e.g. overhanging
loads, tail sections or loading ramps of goods
vehicles :
Sensors in the front bumper, left-hand side
(example) Driving systems
141Driving and parking Z
Page 209 of 289
The display must be switched off and have
cooled down before you start cleaning. Do not
apply pressure to the display surface when
cleaning it, as this could cause irreversible dam- age to the display.
Switching the multimedia system
on/off X
Press the Äcontrol knob on the centre
console to the right of the controller.
Adjusting the volume X
Turn the Äcontrol knob on the centre
console to the right of the controller.
The volume changes:
R for the currently set media source
R during a traffic announcement or navigation
message
R in hands-free mode during an active call
Switching the sound on/off X
Press the 8button on the multifunction
steering wheel.
If the audio output is switched off, the status
line will show the 8symbol. If you switch
the media source or change the volume, the
sound is automatically switched on.
i You will hear navigation messages even
when the sound is muted (COMAND Online).
Functions The multimedia system has the following func-
tions:
R Radio mode
R Media mode with media search
R Sound systems
R Navigation system (COMAND Online)
R Communication functions
R Vehicle functions with system settings
R Favourites functions
Controller The controller in the centre console lets you:
R select menu items on the display
R enter characters R
select a destination on the map
R save entries
The controller can be:
R turned 3
R slid left or right 1
R slid forwards or back 4
R slid diagonally 2
R pressed briefly or pressed and held 7
Back button You can use the
%button to exit a menu or to
call up the basic display of the current operating mode.
X To exit the menu: briefly press the%
button.
The multimedia system changes to the next
higher menu level in the current operating
mode.
X To call up the basic display: press the%
button for longer than two seconds.
The multimedia system changes to the basic
display of the current operating mode. Touchpad
Switching the touchpad on/off Multimedia system:
X Select Vehicle VehicleQSystem set‐ System set‐
tings
tingsQTouchpad TouchpadQActivate touch‐ Activate touch‐
pad pad.
Touchpad is activated Oor deactivated ª.
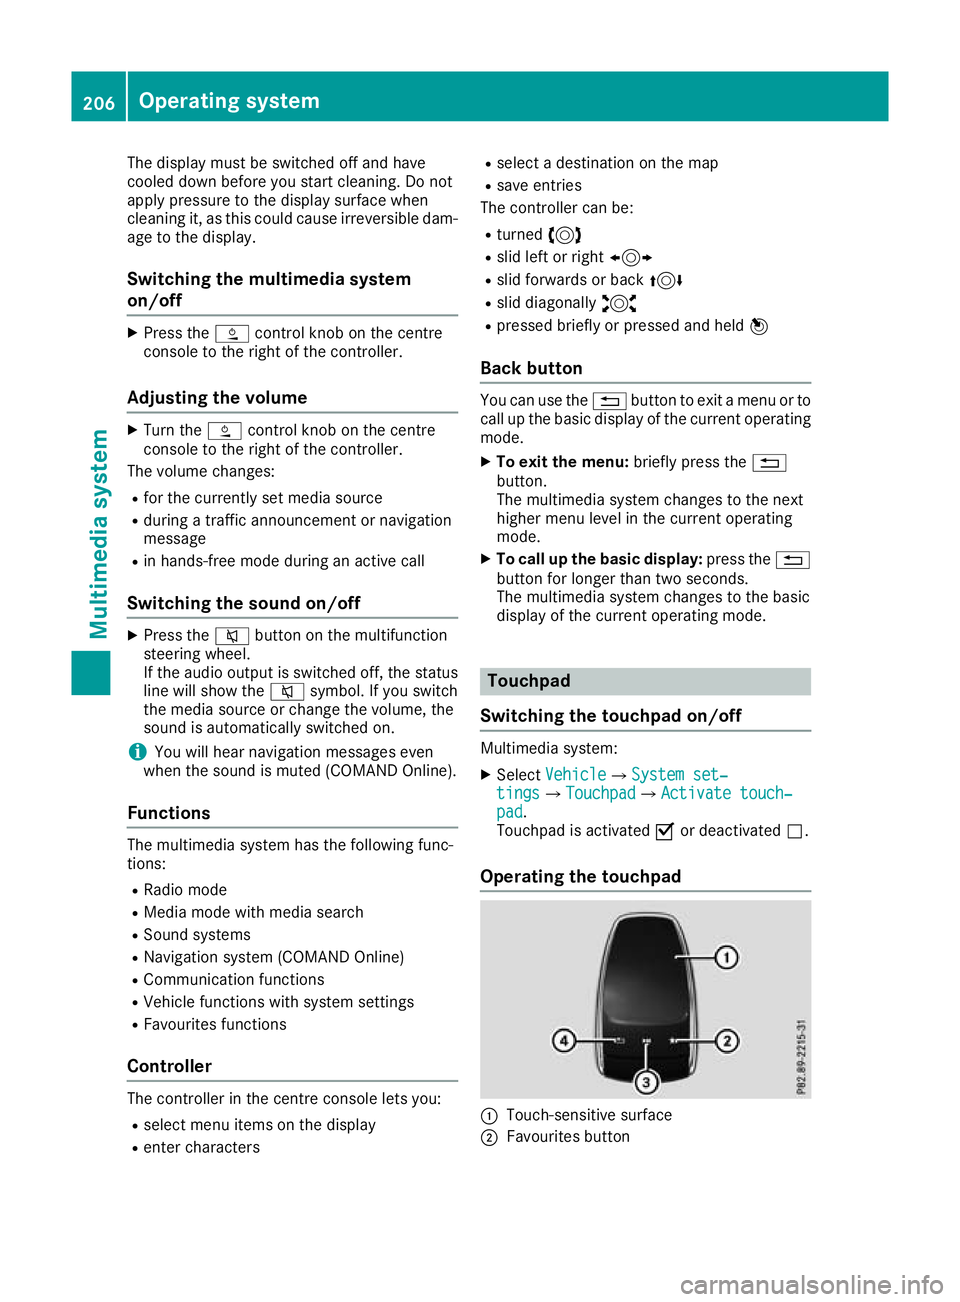
Operating the touchpad :
Touch-sensitive surface
; Favourites button 206
Operating systemMultimedia system
Page 213 of 289
Synchronising the climate control set-
tings
Use O
O Sync.
Sync. (synchronisation) to select the
climate control setting for all zones together O
or separately ª.
X Call up the climate control menu
(Y page 209).
X Slide 6the controller repeatedly until the
bottom bar is activated.
X To select O OSync.
Sync.: turn and press the con-
troller.
X Switch the synchronisation function on Oor
off ª.
For further information on synchronising cli-
mate control settings, see (Y page 98).Navigation mode
Important safety notes G
WARNING
Operating the integrated information systems and communications equipment in the vehicle
while driving will distract you from traffic con-
ditions. You could then lose control of the
vehicle. There is a risk of an accident.
Only operate these devices if road traffic con-
ditions permit. If you are unsure about the
surrounding conditions, pull over to a safe
location and make entries only while the vehi-
cle is stationary.
You must observe the legal requirements for the country in which you are currently driving whenoperating the navigation system.
General notes Correct functioning of the navigation system
depends, amongst other things, on GPS recep-
tion. In certain situations, GPS reception may be
impaired, there may be interference or there
may be no reception at all, e.g. in tunnels or
multi-storey car parks.
The following descriptions apply to navigation
with COMAND Online. Further information can
be found in the Digital Owner's Manual. Selecting a route type and route options Multimedia system:
X Select Navi NaviQNavigation Navigation.
X Select Options
OptionsQRoute settings Route settings.
i If route guidance is active, first slide
6the
controller and show the menu.
X Select a route type.
Notes for route types:
R Eco route
Eco route
Calculates an economical route.
R Dynamic route Dynamic route
Traffic reports on the route for the route guid-
ance are taken into account.
R Calculate alternative routes Calculate alternative routes
Different routes are being calculated. Instead
of Start Start, select the Continue
Continuemenu item.
X To avoid/use route options: selectAvoid
Avoid
options
options.
X Select a route option.
Notes for route options:
R Use toll roads
Use toll roads
The route calculation includes roads which
require you to pay a usage fee (toll).
R Use vignette roads Use vignette roads (not available in all
countries)
The route calculation includes roads which
require you to pay a time-based fee (vignette).
A vignette allows temporary use of the route
network, e. g. 10 days or 1 year.
Entering an address Multimedia system:
X Select Navi NaviQNavigation Navigation.
X Select Destination
DestinationQAddress entry Address entry.
i If route guidance is active, first slide
6the
controller and show the menu.
Enter an address, e.g. as follows:
R town or postcode, street, house number
R country, town or postcode
R town or postcode, centre
R street, town or postcode, junction
X Select Town
Town.
The town in which the vehicle is currently
located (current vehicle position) is at the top.
Below this, you will see locations for which
route guidance has already been carried out. 210
Operating systemMultimedia system
Page 226 of 289
Mercedes-Benz emergency call sys-
tem
Information on these requirements can be found in the separate multimedia system operating
instructions. X
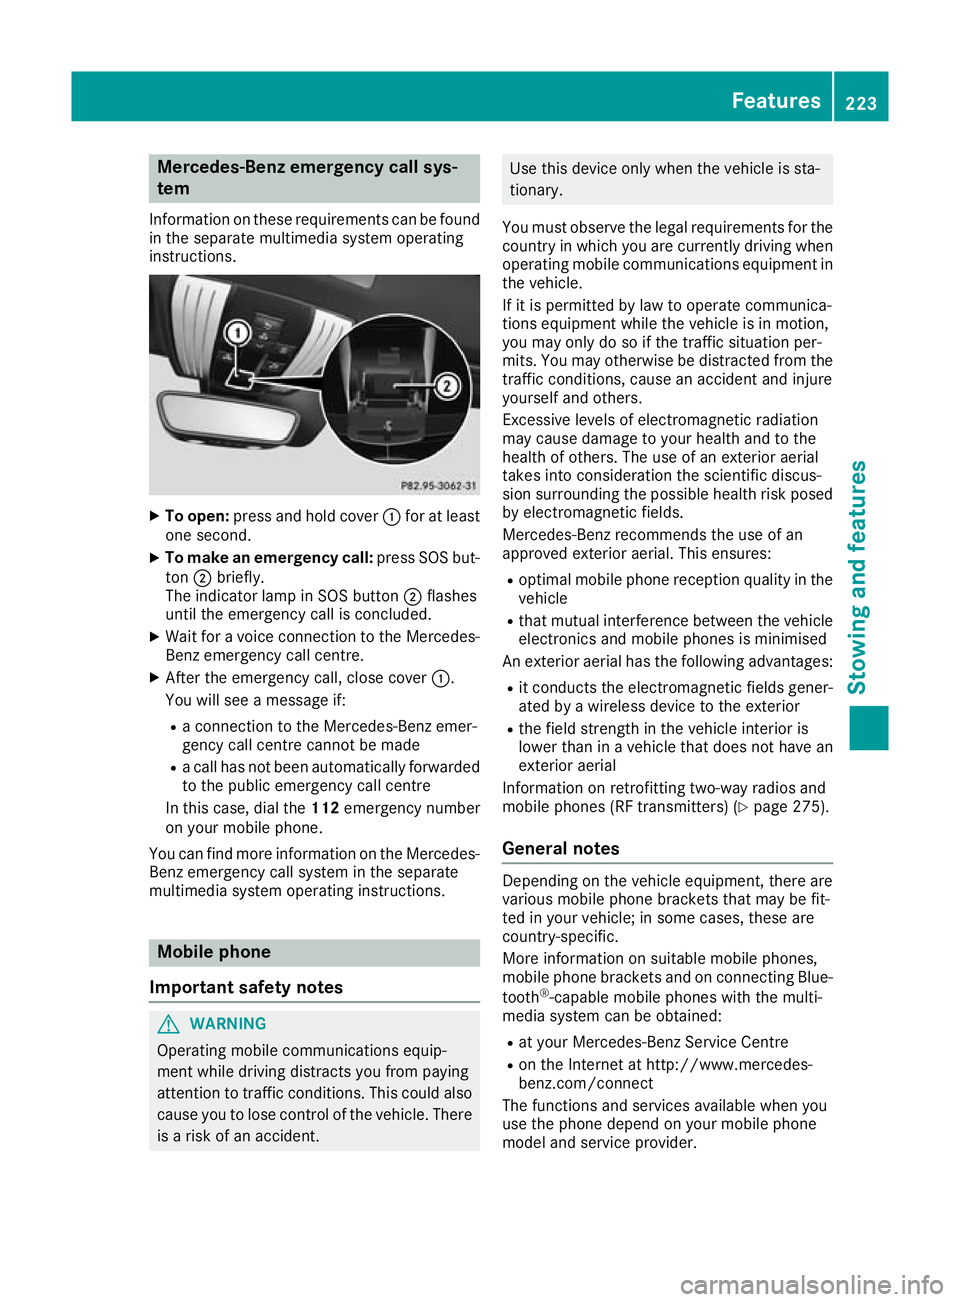
To open: press and hold cover :for at least
one second.
X To make an emergency call: press SOS but-
ton ;briefly.
The indicator lamp in SOS button ;flashes
until the emergency call is concluded.
X Wait for a voice connection to the Mercedes-
Benz emergency call centre.
X After the emergency call, close cover :.
You will see a message if:
R a connection to the Mercedes-Benz emer-
gency call centre cannot be made
R a call has not been automatically forwarded
to the public emergency call centre
In this case, dial the 112emergency number
on your mobile phone.
You can find more information on the Mercedes- Benz emergency call system in the separate
multimedia system operating instructions. Mobile phone
Important safety notes G
WARNING
Operating mobile communications equip-
ment while driving distracts you from paying
attention to traffic conditions. This could also cause you to lose control of the vehicle. There
is a risk of an accident. Use this device only when the vehicle is sta-
tionary.
You must observe the legal requirements for the country in which you are currently driving whenoperating mobile communications equipment in
the vehicle.
If it is permitted by law to operate communica-
tions equipment while the vehicle is in motion,
you may only do so if the traffic situation per-
mits. You may otherwise be distracted from the traffic conditions, cause an accident and injure
yourself and others.
Excessive levels of electromagnetic radiation
may cause damage to your health and to the
health of others. The use of an exterior aerial
takes into consideration the scientific discus-
sion surrounding the possible health risk posed
by electromagnetic fields.
Mercedes-Benz recommends the use of an
approved exterior aerial. This ensures:
R optimal mobile phone reception quality in the
vehicle
R that mutual interference between the vehicle
electronics and mobile phones is minimised
An exterior aerial has the following advantages:
R it conducts the electromagnetic fields gener-
ated by a wireless device to the exterior
R the field strength in the vehicle interior is
lower than in a vehicle that does not have an
exterior aerial
Information on retrofitting two-way radios and
mobile phones (RF transmitters) (Y page 275).
General notes Depending on the vehicle equipment, there are
various mobile phone brackets that may be fit-
ted in your vehicle; in some cases, these are
country-specific.
More information on suitable mobile phones,
mobile phone brackets and on connecting Blue-
tooth ®
-capable mobile phones with the multi-
media system can be obtained:
R at your Mercedes-Benz Service Centre
R on the Internet at http://www.mercedes-
benz.com/connect
The functions and services available when you
use the phone depend on your mobile phone
model and service provider. Features
223Stowing and features Z
Page 229 of 289
The HomeLink
®
garage door opener is compat-
ible with most European garage and gate opener
drives.
More information on HomeLink ®
and/or com-
patible products is available:
R at a qualified specialist workshop
R via the HomeLink ®
hotline
(0) 08000 466 354 65 or alternatively
+49 (0) 6838 907-277
R on the Internet at http://www.homelink.com
Important safety notes G
WARNING
When you operate or program the garage door with the integrated garage door opener, per-
sons in the range of movement of the garage
door can become trapped or struck by the
garage door. There is a risk of injury.
When using the integrated garage door
opener, always make sure that nobody is
within the range of movement of the garage
door. G
WARNING
Combustion engines emit poisonous exhaust
gases such as carbon monoxide. Inhaling
these exhaust gases leads to poisoning. There is a risk of fatal injury. Therefore never leave
the engine running in enclosed spaces with-
out sufficient ventilation.
Programming Programming buttons
Observe the "Important safety notes"
(Y page 226). Garage door drive remote control
Ais not
included with the integrated garage door
opener.
X Select key position 2with the Start/Stop but-
ton (Y page 103).
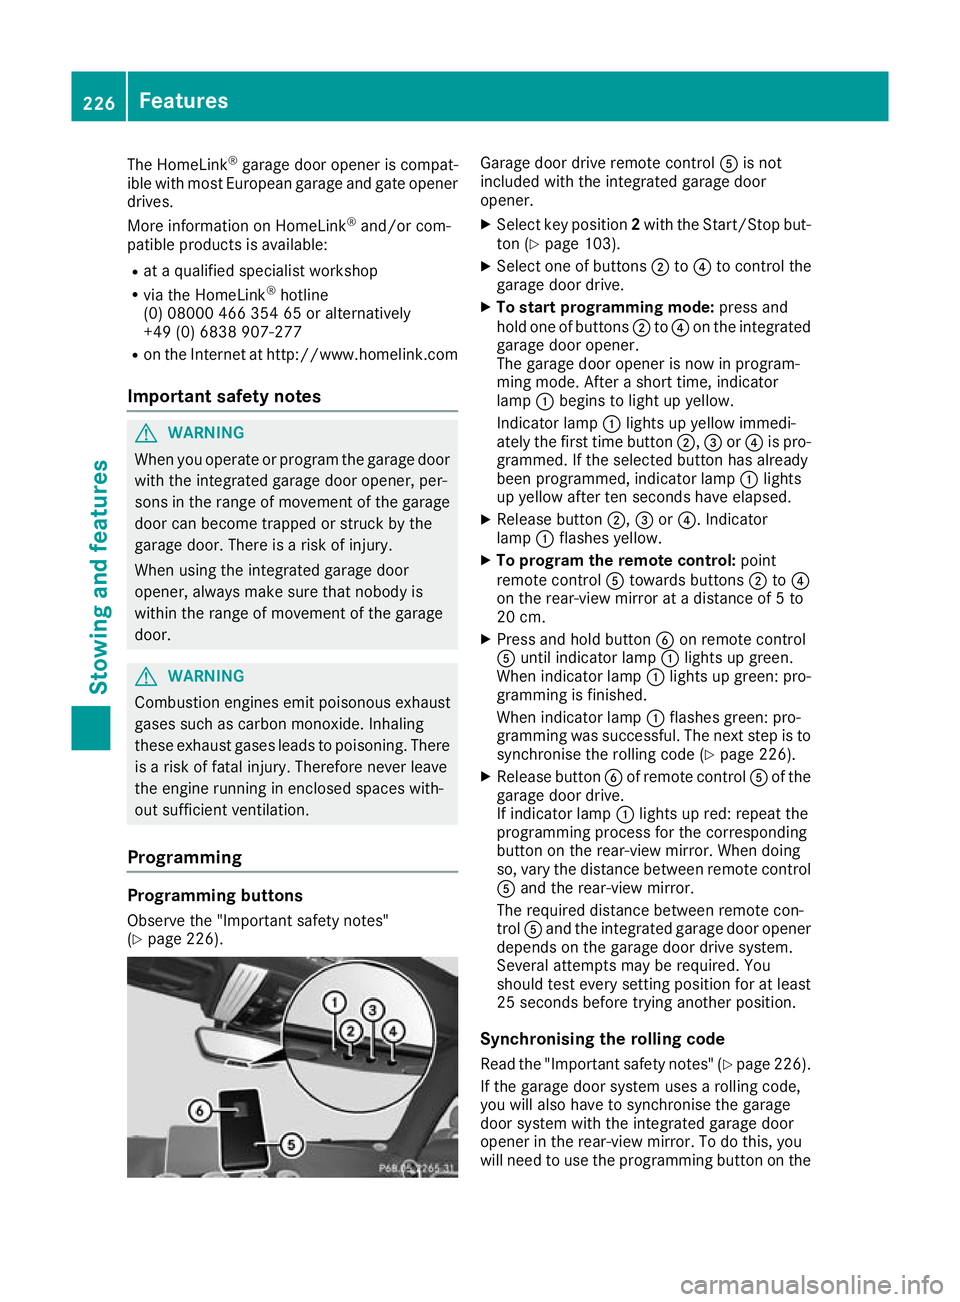
X Select one of buttons ;to? to control the
garage door drive.
X To start programming mode: press and
hold one of buttons ;to? on the integrated
garage door opener.
The garage door opener is now in program-
ming mode. After a short time, indicator
lamp :begins to light up yellow.
Indicator lamp :lights up yellow immedi-
ately the first time button ;,=or? is pro-
grammed. If the selected button has already
been programmed, indicator lamp :lights
up yellow after ten seconds have elapsed.
X Release button ;,=or?. Indicator
lamp :flashes yellow.
X To program the remote control: point
remote control Atowards buttons ;to?
on the rear-view mirror at a distance of 5 to
20 cm.
X Press and hold button Bon remote control
A until indicator lamp :lights up green.
When indicator lamp :lights up green: pro-
gramming is finished.
When indicator lamp :flashes green: pro-
gramming was successful. The next step is to
synchronise the rolling code (Y page 226).
X Release button Bof remote control Aof the
garage door drive.
If indicator lamp :lights up red: repeat the
programming process for the corresponding
button on the rear-view mirror. When doing
so, vary the distance between remote control A and the rear-view mirror.
The required distance between remote con-
trol Aand the integrated garage door opener
depends on the garage door drive system.
Several attempts may be required. You
should test every setting position for at least
25 seconds before trying another position.
Synchronising the rolling code
Read the "Important safety notes" (Y page 226).
If the garage door system uses a rolling code,
you will also have to synchronise the garage
door system with the integrated garage door
opener in the rear-view mirror. To do this, you
will need to use the programming button on the 226
FeaturesStowing and features
Page 281 of 289
G
WARNING
Fuels are poisonous and hazardous to health. There is a danger of injury.
Do not swallow fuel or let it come into contact
with skin, eyes or clothing. Do not inhale fuel
vapours. Keep fuels out of the reach of chil-
dren.
If you or others come into contact with fuel,
observe the following:
R Wash the fuel off any affected areas of skin
with water and soap immediately.
R If you get fuel in your eyes, rinse them thor-
oughly with clean water immediately. Seek immediate medical attention.
R If fuel is swallowed, seek immediate medi-
cal attention. Do not induce vomiting.
R Change any clothing that has come into
contact with fuel immediately.
Tank capacity Model Total capacity
All models
65.0 l
Model Of which
reserve fuel All models
10.0 l
Petrol
Fuel grade
! Do not use diesel to refuel vehicles with a
petrol engine. Do not switch on the ignition if
you accidentally refuel with the wrong fuel.
Otherwise, the fuel will enter the fuel system. Even small amounts of the wrong fuel can
result in damage to the fuel system and the
engine. Notify a qualified specialist workshop
and have the fuel tank and fuel lines drained
completely.
! Only refuel using super unleaded petrol with
at least 98 ROZ, that conforms to European
standard EN 228 or an equivalent specifica-
tion.
You can otherwise impair engine output or
damage the engine. Fuel of this specification may contain up to
10% ethanol. Your vehicle is suitable for use
with E10 fuel. You may refuel your vehicle
using E10 fuel.
! Only use the fuel recommended. Operating
the vehicle with other fuels can lead to dam-
age to the fuel system, engine and exhaust
system.
! Do not use the following:
R E85 (petrol with 85% ethanol)
R E100 (100% ethanol)
R M15 (petrol with 15% methanol)
R M30 (petrol with 30% methanol)
R M85 (petrol with 85% methanol)
R M100 (100% methanol)
R petrol with additives containing metal
R diesel
Do not mix such fuels with the fuel recom-
mended for your vehicle.
! As a temporary measure, if the recommen-
ded fuel is not available, you may also use
unleaded petrol with an octane rating of
95 RON. This may reduce engine perform-
ance and increase fuel consumption. As much
as possible, avoid driving at full throttle.
! As a temporary measure, if the recommen-
ded fuel is not available, you may also use
unleaded petrol in emergencies with an
octane rating of 91 RON.
Doing so results in noticeably higher fuel con-
sumption, and the engine power output is
noticeably reduced. Avoid driving at full throt- tle.
If no fuel other than petrol with 91 RON or a
lower grade is available, you should have the
vehicle adapted to run on this fuel at a quali-
fied specialist workshop.
You will usually find information about the fuel
quality on the pump. If you cannot find the label
on the fuel pump, ask the filling station staff.
i In some countries, the petrol available may
not be sufficiently low in sulphur. This fuel can temporarily produce unpleasant odours,
especially on short journeys. As soon as sul-
phur-free fuel (sulphur content < 10 ppm) is
used for refuelling, the odours are reduced.
Information on refuelling (Y page 118).278
Service products and capacitiesTechnical data
Page 282 of 289
Additives
! Operating the engine with fuel additives
added later can lead to engine failure. Do not mix fuel additives with fuel. This does not
include additives for the removal and preven-
tion of residue build-up. Petrol must only be
mixed with additives recommended by
Mercedes-Benz. Observe the instructions for
use in the product description. More informa- tion about recommended additives can be
obtained from any Mercedes-Benz Service
Centre.
Mercedes-Benz recommends that you use fuel
brands that have additives.
The quality of the fuel available in some coun-
tries may not be sufficient. Residue could build
up in the fuel injection system as a result. In this
case, in consultation with a Mercedes-Benz Ser- vice Centre, the petrol may be mixed with the
cleaning additive recommended by Mercedes-
Benz. Always observe the notes and mixing
ratios specified on the container. Engine oil
General notes When handling engine oil, observe the important
safety notes on service products (Y page 277).
The quality of the engine oil is decisive for the
function and service life of an engine. After
extensive tests, Mercedes-Benz approves
engine oils that correspond to the current tech-
nical standard.
Therefore, only Mercedes-Benz-approved
engine oils may be used in Mercedes-Benz
engines. Further information on tested and approved
engine oils can be obtained from any Mercedes-
Benz Service Centre. Mercedes-Benz recom-
mends that you have the oil change carried out
at a qualified specialist workshop. Mercedes-
Benz approval is indicated on the oil container
by the inscription "MB-Freigabe" or "MB-
Approval" and the corresponding designation,
e.g. MB-Freigabe or MB-Approval 229.51.
You can call up an overview of approved engine
oils on the Internet at
http://bevo.mercedes-benz.co mby entering
the designation, e.g. 229.5.
The table shows which engine oils have been
approved for your vehicle. MB-Freigabe or
MB-Approval All models
229.5
i
If the engine oils listed on the table are not
available, you may top up with the following
engine oils until the next oil change:
R MB-Freigabe or MB-Approval 229.1 3
It may be used only once and the topping-up
quantity must not exceed 1.0 l.
Filling ca pacities The following values refer to an oil change,
including the oil filter.
Replacement
amount All models
7.0 l
Additives
!
Do not use any additives with the engine oil.
This could damage the engine. Brake fluid
G
WARNING
The brake fluid continuously absorbs mois-
ture from the air. This results in the boiling
point of the brake fluid lowering. If the boiling
point of the brake fluid is too low, vapour
3 Restriction: only use SAE 0W-40/SAE 5W-40 engine oils. Service products and capacities
279Technical data
Z