2016 MERCEDES-BENZ AMG GT ROADSTER ECO mode
[x] Cancel search: ECO modePage 61 of 289
ESP
®
assists the driver when pulling away on
wet or slippery roads. ESP ®
can also stabilise
the vehicle during braking.
ETS (Electronic Traction System) i
Observe the "Important safety notes" sec-
tion (Y page 54).
ETS traction control is part of ESP ®
.
Traction control brakes the drive wheels indi-
vidually if they spin. This enables you to pull
away and accelerate on slippery surfaces, for
example if the road surface is slippery on one
side. In addition, more drive torque is transfer-
red to the wheel or wheels with traction.
Traction control remains active if you deactivate
ESP ®
.
Important safety notes i
Observe the "Important safety notes" sec-
tion (Y page 54). G
WARNING
If ESP ®
is malfunctioning, ESP ®
is unable to
stabilise the vehicle. In addition, other driving
safety systems are switched off. This increa-
ses the risk of skidding and an accident.
Drive on carefully. Have ESP ®
checked at a
qualified specialist workshop.
When ESP ®
is deactivated, the åESP®
OFF
warning lamp lights up continuously.
When SPORT handling mode is activated, the
M warning lamp lights up in the instrument
cluster.
When the åandh warning lamps light up
continuously, ESP ®
is not available due to a mal-
function.
Observe the information on warning lamps
(Y page 197) and display messages which may
be shown in the instrument cluster
(Y page 172).
Only use wheels with the recommended tyre
sizes. Only then will ESP ®
function properly. Characteristics of ESP
® General notes
If the ÷ ESP warning lamp goes out before
beginning the journey, ESP ®
is automatically
active.
If ESP ®
intervenes, the ÷ESP®
warning lamp
flashes in the instrument cluster.
If ESP ®
intervenes:
X Do not deactivate ESP ®
under any circum-
stances.
X when pulling away, only depress the acceler-
ator pedal as far as is necessary.
X Adapt your driving style to suit the prevailing
road and weather conditions.
ECO start/stop function
The ECO start/stop function switches the
engine off automatically if the vehicle stops
moving. When pulling away again, the engine
starts automatically. ESP ®
remains in its previ-
ously selected status. Example:if ESP®
was
deactivated before the engine was switched off,
ESP ®
remains deactivated when the engine is
switched on again.
Deactivating/activating ESP ® Important safety notes
i Observe the "Important safety notes" sec-
tion (Y page 54).
You can select between the following ESP ®
sta-
tuses:
R ESP ®
is activated
R SPORT handling mode is activated
R ESP ®
is deactivated
ESP ®
is activated every time the engine is star-
ted, regardless of whether ESP ®
was deactiva-
ted before the engine was switched off. G
WARNING
If you deactivate ESP ®
, ESP ®
no longer sta-
bilises the vehicle. There is an increased risk
of skidding and an accident.
Only deactivate ESP ®
in the situations descri-
bed in the following. 58
Driving safety systemsSafety
Page 91 of 289
Exterior lighting
General notes
For reasons of safety, Mercedes-Benz recom-
mends that you drive with the lights switched on even during the daytime. In some countries,
operation of the headlamps varies due to legal
requirements and self-imposed obligations. Driving abroad
It is not necessary to switch your headlamps to symmetrical dipped beam when driving in coun-
tries where vehicles are driven on the opposite
side of the road to the country in which the vehi- cle is registered. Legal requirements are fulfilled
without switching the headlamps to symmetri-
cal dipped beam. Setting the exterior lighting
Setting options Exterior lighting can be set by:
R the light switch
R the combination switch (Y page 89)
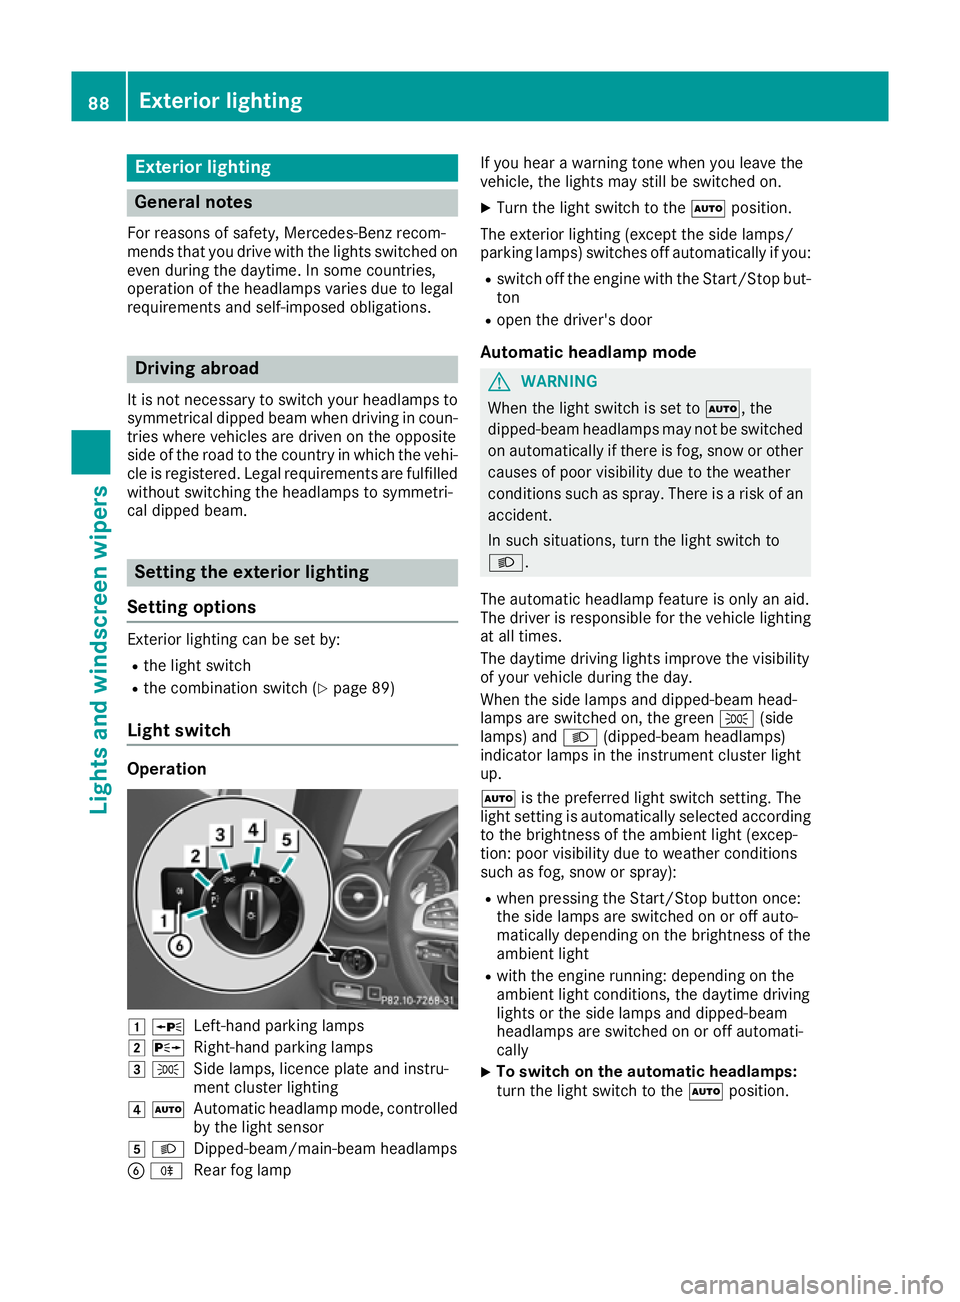
Light switch Operation
1
W
Left-hand parking lamps
2 X
Right-hand parking lamps
3 T
Side lamps, licence plate and instru-
ment cluster lighting
4 Ã
Automatic headlamp mode, controlled
by the light sensor
5 L
Dipped-beam/main-beam headlamps
B R
Rear fog lamp If you hear a warning tone when you leave the
vehicle, the lights may still be switched on.
X Turn the light switch to the Ãposition.
The exterior lighting (except the side lamps/
parking lamps) switches off automatically if you: R switch off the engine with the Start/Stop but-
ton
R open the driver's door
Automatic headlamp mode G
WARNING
When the light switch is set to Ã, the
dipped-beam headlamps may not be switched on automatically if there is fog, snow or othercauses of poor visibility due to the weather
conditions such as spray. There is a risk of an
accident.
In such situations, turn the light switch to
L.
The automatic headlamp feature is only an aid.
The driver is responsible for the vehicle lighting at all times.
The daytime driving lights improve the visibility
of your vehicle during the day.
When the side lamps and dipped-beam head-
lamps are switched on, the green T(side
lamps) and L(dipped-beam headlamps)
indicator lamps in the instrument cluster light
up.
à is the preferred light switch setting. The
light setting is automatically selected according to the brightness of the ambient light (excep-
tion: poor visibility due to weather conditions
such as fog, snow or spray):
R when pressing the Start/Stop button once:
the side lamps are switched on or off auto-
matically depending on the brightness of the
ambient light
R with the engine running: depending on the
ambient light conditions, the daytime driving
lights or the side lamps and dipped-beam
headlamps are switched on or off automati-
cally
X To switch on the automatic headlamps:
turn the light switch to the
Ãposition. 88
Exterior lightingLights and windscreen wipers
Page 98 of 289
Overview of climate control systems
General notes
Observe the settings recommended on the fol-
lowing pages. The windows could otherwise
mist up.
To prevent the windows from misting up:
R switch off climate control only briefly
R switch on air-recirculation mode only briefly
R switch on the cooling with air dehumidifica-
tion function
R switch on the windscreen demisting function
briefly, if required
Climate control regulates the temperature and
air humidity in the vehicle interior. The interior
filter cleans the air, thus improving the interior
climate.
The cooling with air dehumidification function is
only available when the engine is running. Opti- mum climate control is only achieved with the
side windows closed.
i Ventilate the vehicle for a brief period during
warm weather, e.g. using the convenience opening feature (Y
page 75). This will speed
up the cooling process and the desired inte-
rior temperature will be reached more
quickly.
i The integrated filter filters out most parti-
cles of dust and soot and completely filters
out pollen. It also reduces gaseous pollutants and odours. A clogged filter reduces the
amount of air supplied to the vehicle interior.
For this reason, you should always observe
the interval for replacing the filter, which is
specified in the Service Booklet. As this
depends on environmental conditions, e.g.
heavy air pollution, the interval may be
shorter than stated in the Service Booklet.
i It is possible that the blower may be activa-
ted automatically 60 minutes after the engine
has been switched off depending on various
factors, e.g. the outside temperature. The
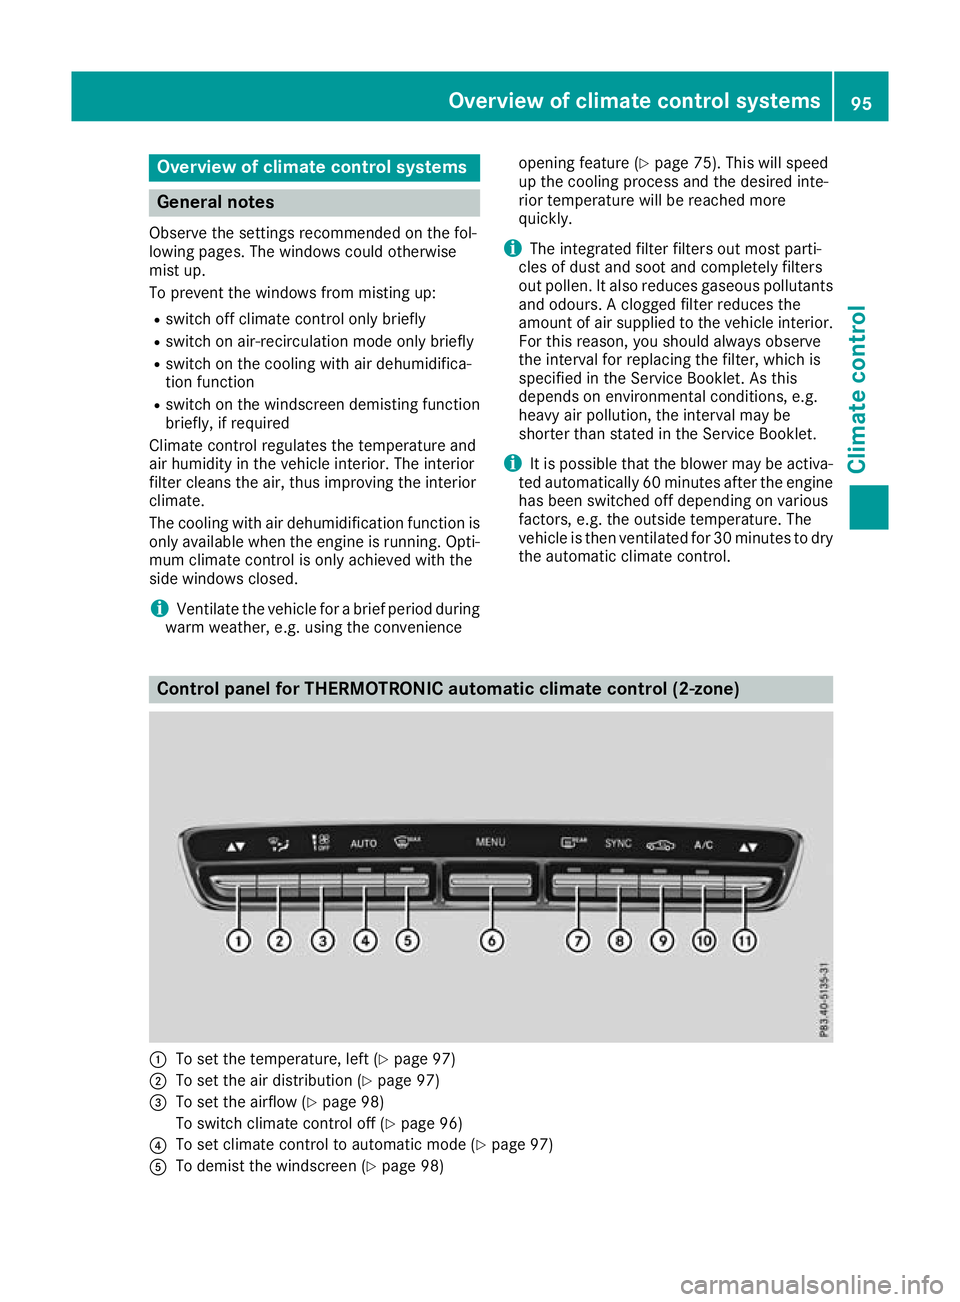
vehicle is then ventilated for 30 minutes to dry the automatic climate control. Control panel for THERMOTRONIC automatic climate control (2-zone)
:
To set the temperature, left (Y page 97)
; To set the air distribution (Y page 97)
= To set the airflow (Y page 98)
To switch climate control off (Y page 96)
? To set climate control to automatic mode (Y page 97)
A To demist the windscreen (Y page 98) Overview of climate control systems
95Climate control
Page 99 of 289
B
To call up the climate control menu of the multimedia system (Y page 209)
C To switch the rear window heating on/off (Y page 99)
D To activate or deactivate synchronisation (Y page 98)
E To activate or deactivate air-recirculation mode manually (Y page 99)
F To activate or deactivate cooling with air dehumidification (Y page 96)
G To set the temperature, right (Y page 97)Information on operating
THERMOTRONIC automatic climate
control
THERMOTRONIC automatic climate
control The following contains instructions and recom-
mendations to enable you to get the most out of
your THERMOTRONIC automatic climate con-
trol:
R Activate climate control using the Ã
rocker switch. The indicator lamp above the
à rocker switch lights up. The "Cooling
with air dehumidification" function is not acti- vated automatically in automatic mode. Acti-
vate this function as necessary (Y page 96).
R Set the temperature to 22 †.
R Use the windscreen demisting function only
briefly until the windscreen is clear again.
R Use the "Air-recirculation mode" function only
briefly, e.g. if there are unpleasant outside
odours or when in a tunnel. The windows
could otherwise mist up as no fresh air is
drawn into the vehicle in air-recirculation
mode.
ECO start/stop function During automatic engine switch-off, the climate
control operates only at a reduced capacity. If
you require the full climate control output, you
can switch off the ECO start/stop function by
pressing the ECO button (Y page 106).Operating the climate control system
Switching climate control on/off
General notes When climate control is switched off, the air
supply and air circulation are also switched off. The windows could mist up. Therefore, only
switch off climate control briefly.
Switch on climate control primarily using the
Ã
rocker switch (Y page 97).
Switching on/off X
Select key position 2with the Start/Stop but-
ton (Y page 103).
X To switch on: set the airflow to level 1 or
higher using the Hrocker switch.
X To switch off: set the airflow to level 0 using
the H rocker switch. Activating/deactivating the cooling
with air dehumidification function
General notes If you deactivate the "Cooling with air dehumid-
ification" function, the air inside the vehicle will
not be cooled. The air inside the vehicle will also
not be dehumidified. The windows can mist up
more quickly. Therefore, deactivate the "Cooling
with air dehumidification" function only briefly.
The "Cooling with air dehumidification" function
is only available when the engine is running. The air inside the vehicle is cooled and dehumidified
according to the temperature selected.
Condensation may drip from the underside of
the vehicle when cooling mode is active. This is
normal and not a sign that there is a malfunc-
tion.
Activating/deactivating X
Press the ¿rocker switch up or down.
The indicator lamp above the ¿rocker
switch lights up or goes out. 96
Operating the climate control systemClimate control
Page 102 of 289
Rear window heating
General notes The rear window heating has a high current
draw. You should therefore switch it off as soon
as the window is clear. It otherwise switches off automatically after several minutes.
If the battery voltage is too low, the rear window
heating may switch off. Switching on/off X
Select key position 2with the Start/Stop but-
ton (Y page 103).
X Press the ¤rocker switch up or down.
The indicator lamp above the ¤rocker
switch lights up or goes out.
Problems with the rear window heating Problem
Possible causes/consequences and
M MSolutions The rear window heating
has switched off prema-
turely or cannot be acti-
vated. The battery has not been sufficiently charged.
X Switch off any consumers that are not required, e.g. reading lamps,
interior lighting or the seat heating.
When the battery is sufficiently charged, the rear window heating
can be activated again. Activating/deactivating air-recircula-
tion mode
General notes You can also temporarily deactivate the flow of
fresh air manually if unpleasant odours are
entering the vehicle from outside. The air
already inside the vehicle will then be recircula-
ted.
If you activate air-recirculation mode, the win-
dows can mist up more quickly, in particular at
low temperatures. Only use air-recirculation
mode briefly to prevent the windows misting up.
Activating/deactivating X
Select key position 2with the Start/Stop but-
ton (Y page 103).
X To activate: press thegrocker switch up
or down.
The indicator lamp above the grocker
switch lights up.
Air-recirculation mode is activated automati-
cally: R at high outside temperatures
R in a tunnel (vehicles with a navigation system
only)
The indicator lamp above the grocker
switch is not lit when automatic air-recirculation mode is activated. Outside air is added after
approximately 30 minutes.
X To deactivate:press the grocker switch
up or down.
The indicator lamp above the grocker
switch goes out.
Air-recirculation mode is deactivated automati-
cally:
R after approximately five minutes at outside
temperatures below approximately 5 †
R after approximately five minutes if "Cooling
with air dehumidification" is deactivated
R after approximately 30 minutes at outside
temperatures above approximately 5 †if the
"Cooling with air dehumidification" function is activated Convenience opening/closing using
the air-recirculation button
G
WARNING
When using convenience closing, you could
become trapped within the sweep of the clos- ing window. There is a risk of injury.
Monitor the entire closing procedure when
using convenience closing. When closing, Operating the climate control system
99Climate control
Z
Page 103 of 289
make sure that no one has any parts of the
body within the closing area. G
WARNING
During convenience opening parts of the body could be drawn in or become trapped
between the side window and window frame.
There is a risk of injury.
When opening, make sure that nobody is
touching the side window. If someone
becomes trapped, immediately press
the W switch in the door to stop the move-
ment of the side windows. To continue closing
the side window, pull on the Wswitch.
X Convenience closing feature: press and
hold the grocker switch up or down until
the side windows start to close automatically. The indicator lamp above the grocker
switch lights up. Air-recirculation mode is
activated.
If you open the side windows manually after
closing them using the convenience closing
feature, they will remain in this position when
opened.
If parts of the body are in the closing area during convenience closing, proceed as follows:
X Press the Wbutton to stop the side win-
dows.
The side windows stop.
X To then open the side windows, press the
W button again.
Observe the notes on the automatic reversing
feature for the side windows (Y page 74).
X Convenience opening feature: press and
hold the grocker switch up or down until
the side windows start to open automatically.
The indicator lamp above the grocker
switch goes out. Air-recirculation mode is
deactivated. Air vents
Important safety notes
G
WARNING
Very hot or very cold air can flow from the air vents. This could result in burns or frostbite in the immediate vicinity of the air vents. There
is a risk of injury.
Make sure that all vehicle occupants always
maintain a sufficient distance to the air out-
lets. If necessary, redirect the airflow to
another area of the vehicle interior.
In order to ensure the direct flow of fresh air
through the air vents into the vehicle interior,
please observe the following notes:
R keep the air inlet between the windscreen and
the bonnet free of blockages, such as ice,
snow or leaves
R never cover the vents or ventilation grilles in
the vehicle interior Adjusting the air vents
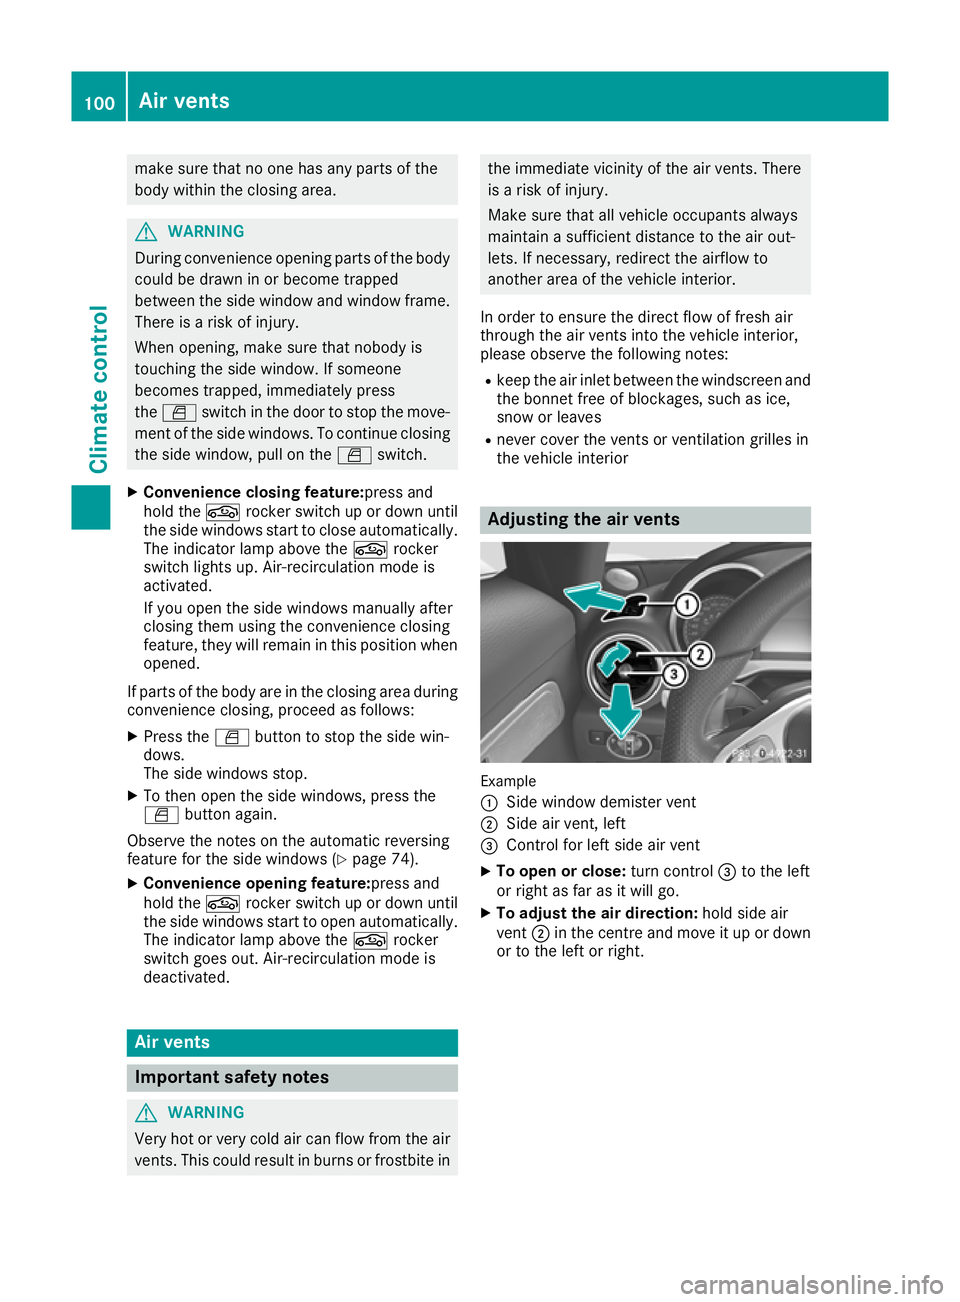
Example
:
Side window demister vent
; Side air vent, left
= Control for left side air vent
X To open or close: turn control=to the left
or right as far as it will go.
X To adjust the air direction: hold side air
vent ;in the centre and move it up or down
or to the left or right. 100
Air ventsClimate control
Page 107 of 289

General notes
The catalytic converter is preheated for up to
30 seconds after a cold start. The sound of the
engine may change during this time.
AMG SPEEDSHIFT DCT 7-speed sport
transmission X
Shift the transmission to position P
(Y page 109).
The transmission position indicator in the
multifunction display shows P(Y page 111).
You can start the engine in transmission posi-
tion Pand N.
Starting procedure using the Start/
Stop button The Start/Stop button can be used to start the
vehicle manually without inserting the key into
the ignition lock. You merely need to carry the
key on your person. This mode for starting the
engine operates independently of the ECO
start/stop automatic engine start function.
You can start the engine if a valid key is in the
vehicle. Switch off the engine and always take
the key with you when leaving the vehicle, even if you only leave it for a short time. Pay attention
to the important safety notes.
X Depress the brake pedal and keep it
depressed.
X Press the Start/Stop button once
(Y page 102).
The engine starts.
Starting procedure with the key X
Turn the key to position 3(Y page 103) in the
ignition lock and release it as soon as the
engine is running.
If the engine will not start: X Remove the key from the ignition lock.
X Reinsert the key into the ignition lock after
waiting for a short period.
X Turn the key to position 2in the ignition lock
(Y page 103).
The indicator lamps in the instrument cluster
light up (Y page 195).
X Turn the key to position 3(Y page 103)in the
ignition lock and release it as soon as the
engine is running. Pulling away
General notes G
WARNING
If the engine speed is above the idling speed
and you engage transmission position Dor R,
the vehicle could pull away suddenly. There is a risk of an accident.
When engaging transmission position Dor R,
always firmly depress the brake pedal and do not simultaneously accelerate.
Depress the accelerator carefully when pulling
away.
The vehicle locks centrally once you have pulled
away. The locking knobs in the doors drop down.
You can open the doors from the inside at any
time.
You can also deactivate the automatic locking
feature (Y page 70).
It is only possible to shift the transmission from position Pto the desired position, if:
R the engine is running and
R you depress the brake pedal
If you do not depress the brake pedal, the E-
SELECT lever can still be moved but the parking lock remains applied.
Information on automatically releasing the elec-
trical parking brake (Y page 122).
Hill start assist Hill start assist helps you when pulling away for-
wards or in reverse on an uphill gradient. It holds
the vehicle for a short time after you have
removed your foot from the brake pedal. This
gives you enough time to move your foot from
the brake pedal to the accelerator pedal and
depress it before the vehicle begins to roll. G
WARNING
After a while, hill start assist no longer holds
the vehicle and it may roll away. There is a risk of an accident and injury.
Therefore, quickly move your foot from the
brake pedal to the accelerator pedal. Never
leave the vehicle when it is held by hill start
assist. 104
DrivingDriving and parking
Page 109 of 289
starts automatically and the braking effect of
the HOLD function is deactivated.
Automatic engine start The engine is started automatically if:
R you switch off the ECO start/stop function by
pressing the ECO button
R you switch to drive program RACE
(AMG GT S), S+orS(Y page 108)
R in transmission position D, the brake pedal is
released and the HOLD function is not active
R you depress the accelerator pedal
R you engage reverse gear R
R you move the transmission out of position P
R you unfasten your seat belt or open the driv-
er's door
R the vehicle starts to roll
R the brake system requires this
R the temperature in the vehicle interior devi-
ates from the set range
R the system detects moisture on the wind-
screen when the air-conditioning system is
switched on
R the battery's charge status is too low
Shifting the transmission to position Pdoes not
start the engine.
If you shift the transmission from Rto D, the
ECO start/stop function is available again once the è ECO symbol reappears in green in the
multifunction display.
Switching the ECO start/stop function
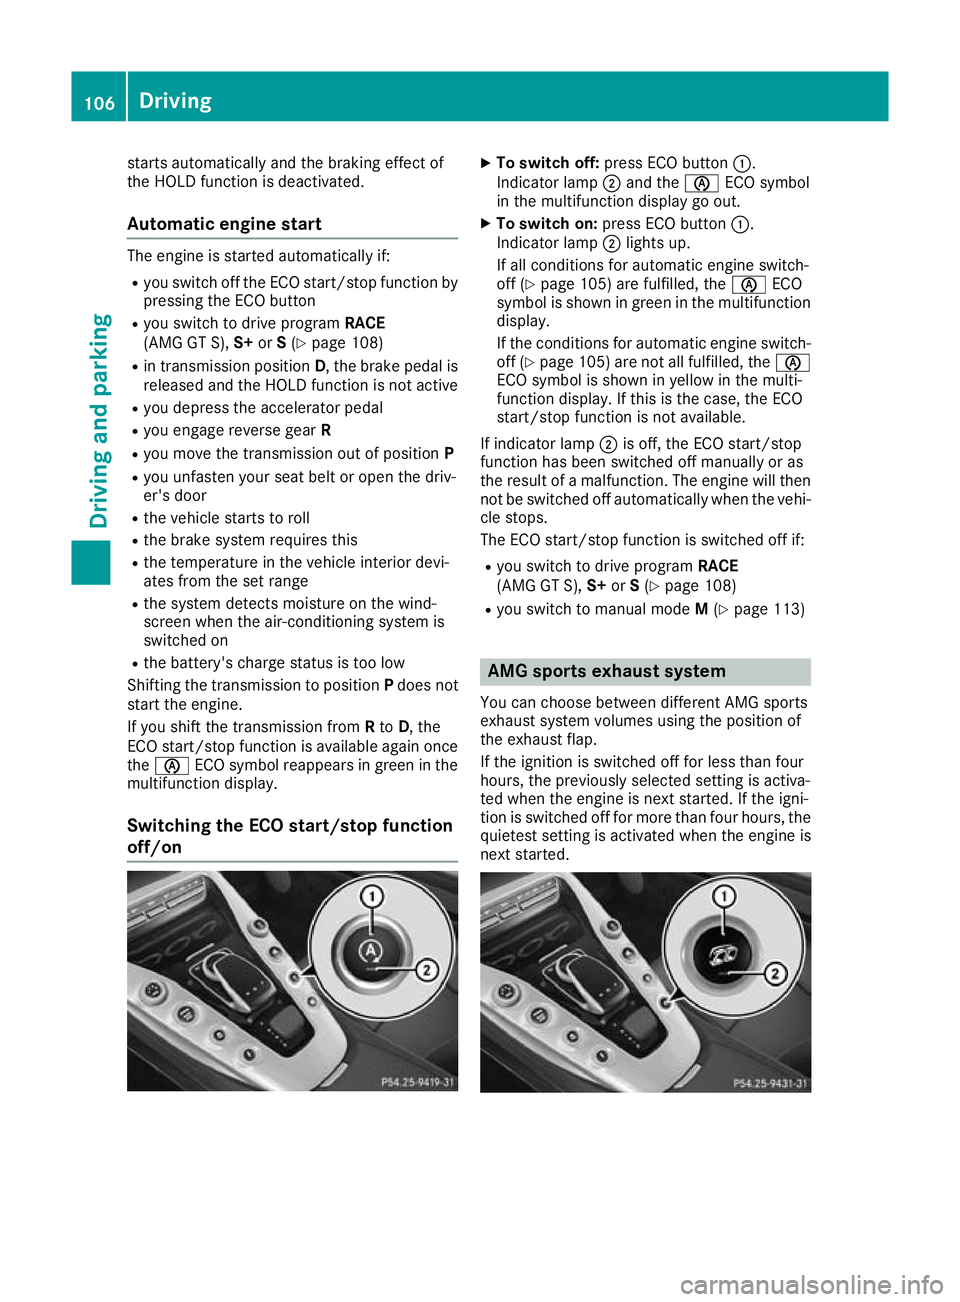
off/on X
To switch off: press ECO button :.
Indicator lamp ;and the èECO symbol
in the multifunction display go out.
X To switch on: press ECO button :.
Indicator lamp ;lights up.
If all conditions for automatic engine switch-
off (Y page 105) are fulfilled, the èECO
symbol is shown in green in the multifunction display.
If the conditions for automatic engine switch-
off (Y page 105) are not all fulfilled, the è
ECO symbol is shown in yellow in the multi-
function display. If this is the case, the ECO
start/stop function is not available.
If indicator lamp ;is off, the ECO start/stop
function has been switched off manually or as
the result of a malfunction. The engine will then
not be switched off automatically when the vehi-
cle stops.
The ECO start/stop function is switched off if:
R you switch to drive program RACE
(AMG GT S), S+orS(Y page 108)
R you switch to manual mode M(Y page 113) AMG sports exhaust system
You can choose between different AMG sports
exhaust system volumes using the position of
the exhaust flap.
If the ignition is switched off for less than four
hours, the previously selected setting is activa-
ted when the engine is next started. If the igni-
tion is switched off for more than four hours, the quietest setting is activated when the engine is
next started. 106
DrivingDriving and parking