2016 MAZDA MODEL 6 ignition
[x] Cancel search: ignitionPage 275 of 614

Black plate (275,1)
NOTE
Because this system detects slight changes in tire conditions, the timing of the warning may be faster
or slower in the following cases:
lThe size, manufacturer, or the type of tires is different from the specification.lThe size, manufacturer, or the type of a tire is different from the others, or the level of tire wear is
excessively different between them.
lA run-flat tire, studless tire, snow tire, or tire chains are used.lAn emergency tire is used (The tire pressure monitoring system warning light may flash and then
continue illuminating).
lA tire is repaired using the emergency flat tire repair kit.lThe tire pressure is excessively higher than the specified pressure, or the tire pressure is suddenly
lowered for some reason such as a tire burst during driving.
lThe vehicle speed is lower than about 15 km/h (9.3 mph) (including when the vehicle is stopped),
or the drive period is shorter than 5 minutes.
lThe vehicle is driven on an extremely rough road or a slippery, icy road.lHard steering and rapid acceleration/deceleration are repeated such as during aggressive driving
on a winding road.
lLoad on the vehicle is applied to a tire such as by loading heavy luggage to one side of the
vehicle.
lSystem initialization has not been implemented with the specified tire pressure.
qTire Pressure Monitoring System
Initialization
In the following cases, system
initialization must be performed so that
the system operates normally.
lA tire pressure is adjusted.lTire rotation is performed.lA tire or wheel is replaced.lThe battery is replaced or completely
drained.
lThe tire pressure monitoring system
warning light is illuminated.
Initialization method
1. Park the car in a safe place and firmly
apply the parking brake.2. Let the tires cool, then adjust the tire
pressure of all four (4) tires to the
specified pressure indicated on the tire
pressure label located on the door jamb
of the driver's door (door open). Refer
to Tires on page 9-7.
3. Switch the ignition ON.
When Driving
Tire Pressure Monitoring System
4-151
Mazda6_8EA2-EA-14K_Edition2 Page275
Saturday, January 10 2015 3:25 PM
Form No.8EA2-EA-14K
Page 278 of 614

Black plate (278,1)
NOTElIf water, snow, or mud is stuck on the camera lens, wipe it off using a soft cloth. If it cannot be
wiped off, use a mild detergent.
lIf the camera temperature changes rapidly (Hot to cold, cold to hot), the rear view monitor may
not operate correctly.
lWhen replacing the tires, consult an Authorized Mazda Dealer. Replacing the tires could result in
deviation of the guide lines which appear on the display.
lIf the vehicle's front, side, or rear has been involved in a collision, the alignment of the rear view
parking camera (location, installation angle) may have deviated. Always consult an Authorized
Mazda Dealer to have the vehicle inspected.
lIf“No Video Signal Available”is indicated in the display, there could be a problem with the
camera. Have your vehicle inspected at an Authorized Mazda Dealer.
qRear View Parking Camera Location
Rear View Parking Camera
qSwitching to the Rear View Monitor Display
Shift the shift lever to R with the ignition switched ON to switch the display to the rear
view monitor display.
NOTE
When the shift lever is shifted from R to another shift lever position, the screen returns to the previous
display.
4-154
When Driving
Rear View Monitor
Mazda6_8EA2-EA-14K_Edition2 Page278
Saturday, January 10 2015 3:25 PM
Form No.8EA2-EA-14K
Page 288 of 614

Black plate (288,1)
Operating Tips
lOperate the climate control system
with the engine running.
lTo prevent the battery from being
discharged, do not leave the fan control
dial on for a long period of time with
the ignition switched ON when the
engine is not running.
lClear all obstructions such as leaves,
snow and ice from the hood and the air
inlet in the cowl grille to improve the
system efficiency.
lUse the climate control system to defog
the windows and dehumidify the air.
lThe recirculate mode should be used
when driving through tunnels or while
in a traffic jam, or when you would like
to shut off outside air for quick cooling
of the interior.
lUse the outside air position for
ventilation or windshield defrosting.
lIf the vehicle has been parked in direct
sunlight during hot weather, open the
windows to let warm air escape, then
run the climate control system.
lRun the air conditioner about 10
minutes at least once a month to keep
internal parts lubricated.
lHave the air conditioner checked
before the weather gets hot. Lack of
refrigerant may make the air
conditioner less efficient.
The refrigerant specifications are
indicated on a label attached to the
inside of the engine compartment.
Check the label before refilling the
refrigerant. If the wrong type of
refrigerant is used, it could result in a
serious malfunction of the air
conditioner.
For details, consult an Authorized
Mazda Dealer.
Label
5-2
Interior Features
Climate Control System
Mazda6_8EA2-EA-14K_Edition2 Page288
Saturday, January 10 2015 3:25 PM
Form No.8EA2-EA-14K
Page 308 of 614
Black plate (308,1)
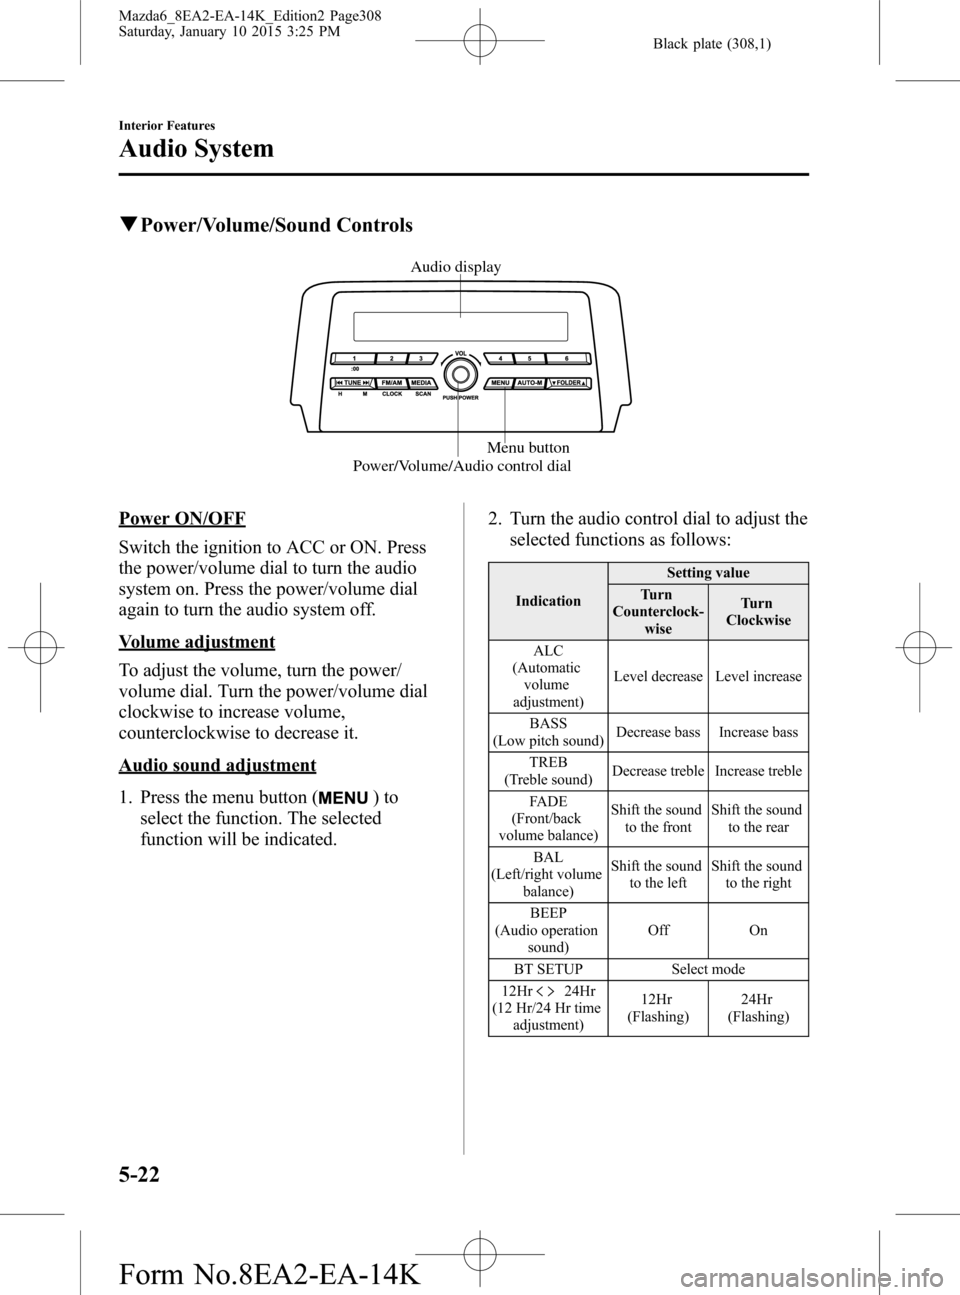
qPower/Volume/Sound Controls
Power/Volume/Audio control dialMenu button Audio display
Power ON/OFF
Switch the ignition to ACC or ON. Press
the power/volume dial to turn the audio
system on. Press the power/volume dial
again to turn the audio system off.
Volume adjustment
To adjust the volume, turn the power/
volume dial. Turn the power/volume dial
clockwise to increase volume,
counterclockwise to decrease it.
Audio sound adjustment
1. Press the menu button (
)to
select the function. The selected
function will be indicated.2. Turn the audio control dial to adjust the
selected functions as follows:
IndicationSetting value
Turn
Counterclock-
wiseTurn
Clockwise
ALC
(Automatic
volume
adjustment)Level decrease Level increase
BASS
(Low pitch sound)Decrease bass Increase bass
TREB
(Treble sound)Decrease treble Increase treble
FADE
(Front/back
volume balance)Shift the sound
to the frontShift the sound
to the rear
BAL
(Left/right volume
balance)Shift the sound
to the leftShift the sound
to the right
BEEP
(Audio operation
sound)Off On
BT SETUP Select mode
12Hr
24Hr
(12 Hr/24 Hr time
adjustment)12Hr
(Flashing)24Hr
(Flashing)
5-22
Interior Features
Audio System
Mazda6_8EA2-EA-14K_Edition2 Page308
Saturday, January 10 2015 3:25 PM
Form No.8EA2-EA-14K
Page 310 of 614
Black plate (310,1)
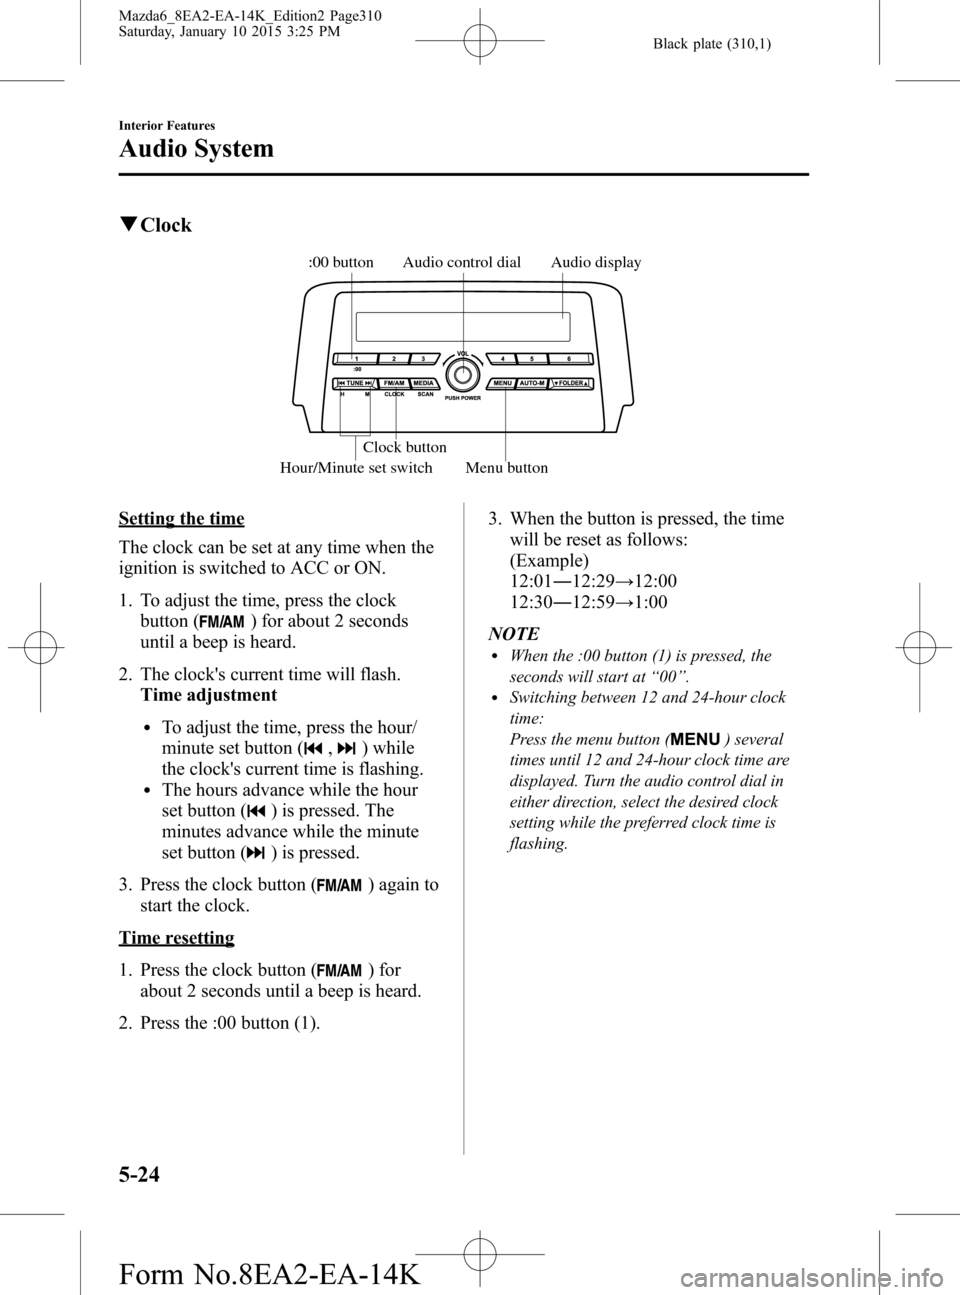
qClock
Audio display Audio control dial
Hour/Minute set switch:00 button
Menu button Clock button
Setting the time
The clock can be set at any time when the
ignition is switched to ACC or ON.
1. To adjust the time, press the clock
button (
) for about 2 seconds
until a beep is heard.
2. The clock's current time will flash.
Time adjustment
lTo adjust the time, press the hour/
minute set button (
,) while
the clock's current time is flashing.
lThe hours advance while the hour
set button (
) is pressed. The
minutes advance while the minute
set button (
) is pressed.
3. Press the clock button (
) again to
start the clock.
Time resetting
1. Press the clock button (
) for
about 2 seconds until a beep is heard.
2. Press the :00 button (1).3. When the button is pressed, the time
will be reset as follows:
(Example)
12:01―12:29→12:00
12:30―12:59→1:00
NOTE
lWhen the :00 button (1) is pressed, the
seconds will start at“00”.
lSwitching between 12 and 24-hour clock
time:
Press the menu button (
) several
times until 12 and 24-hour clock time are
displayed. Turn the audio control dial in
either direction, select the desired clock
setting while the preferred clock time is
flashing.
5-24
Interior Features
Audio System
Mazda6_8EA2-EA-14K_Edition2 Page310
Saturday, January 10 2015 3:25 PM
Form No.8EA2-EA-14K
Page 330 of 614
Black plate (330,1)
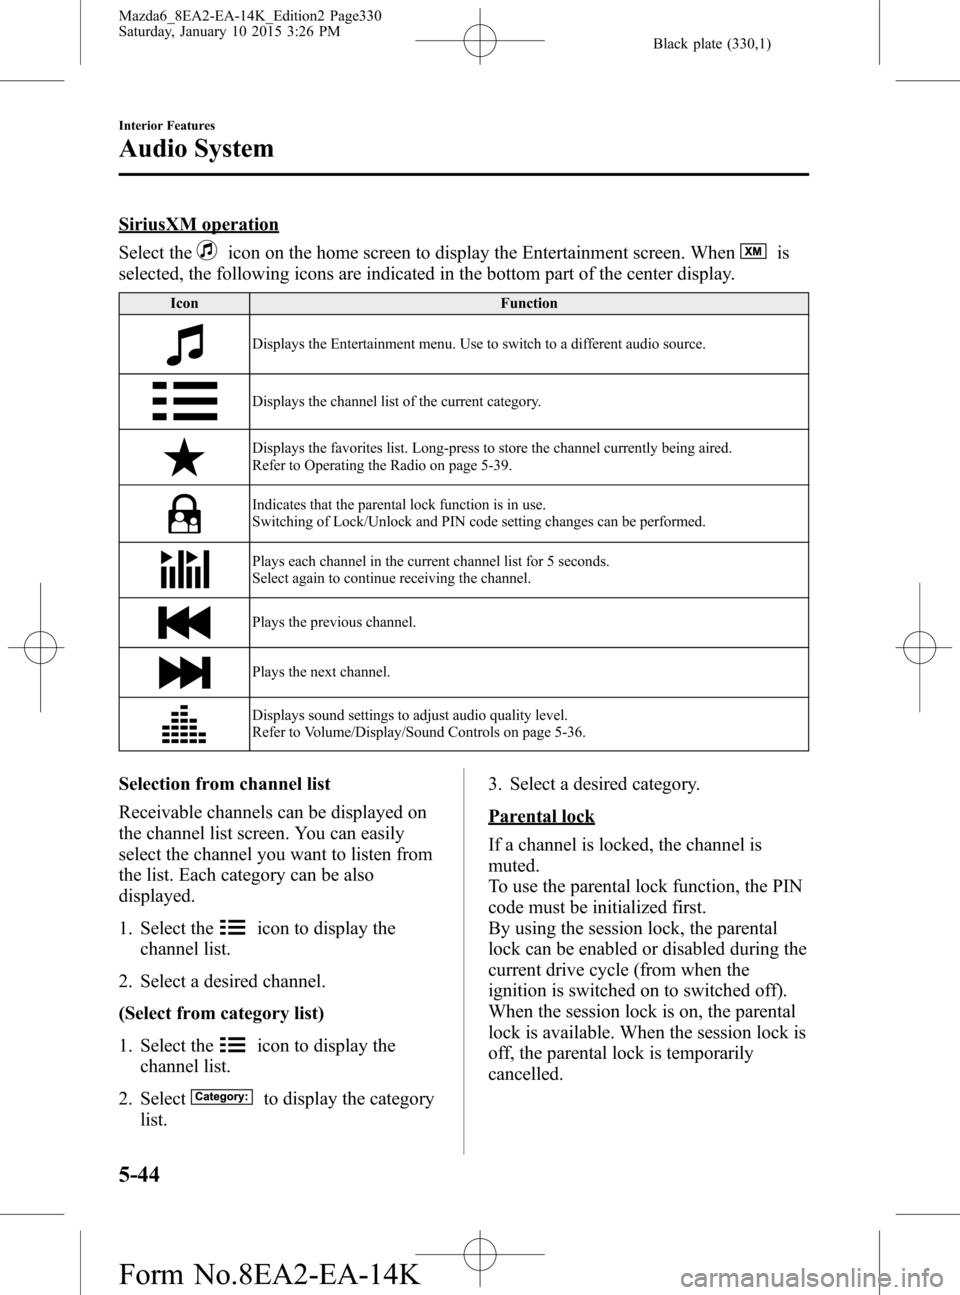
SiriusXM operation
Select the
icon on the home screen to display the Entertainment screen. Whenis
selected, the following icons are indicated in the bottom part of the center display.
Icon Function
Displays the Entertainment menu. Use to switch to a different audio source.
Displays the channel list of the current category.
Displays the favorites list. Long-press to store the channel currently being aired.
Refer to Operating the Radio on page 5-39.
Indicates that the parental lock function is in use.
Switching of Lock/Unlock and PIN code setting changes can be performed.
Plays each channel in the current channel list for 5 seconds.
Select again to continue receiving the channel.
Plays the previous channel.
Plays the next channel.
Displays sound settings to adjust audio quality level.
Refer to Volume/Display/Sound Controls on page 5-36.
Selection from channel list
Receivable channels can be displayed on
the channel list screen. You can easily
select the channel you want to listen from
the list. Each category can be also
displayed.
1. Select the
icon to display the
channel list.
2. Select a desired channel.
(Select from category list)
1. Select the
icon to display the
channel list.
2. Select
to display the category
list.3. Select a desired category.
Parental lock
If a channel is locked, the channel is
muted.
To use the parental lock function, the PIN
code must be initialized first.
By using the session lock, the parental
lock can be enabled or disabled during the
current drive cycle (from when the
ignition is switched on to switched off).
When the session lock is on, the parental
lock is available. When the session lock is
off, the parental lock is temporarily
cancelled.
5-44
Interior Features
Audio System
Mazda6_8EA2-EA-14K_Edition2 Page330
Saturday, January 10 2015 3:26 PM
Form No.8EA2-EA-14K
Page 340 of 614
Black plate (340,1)
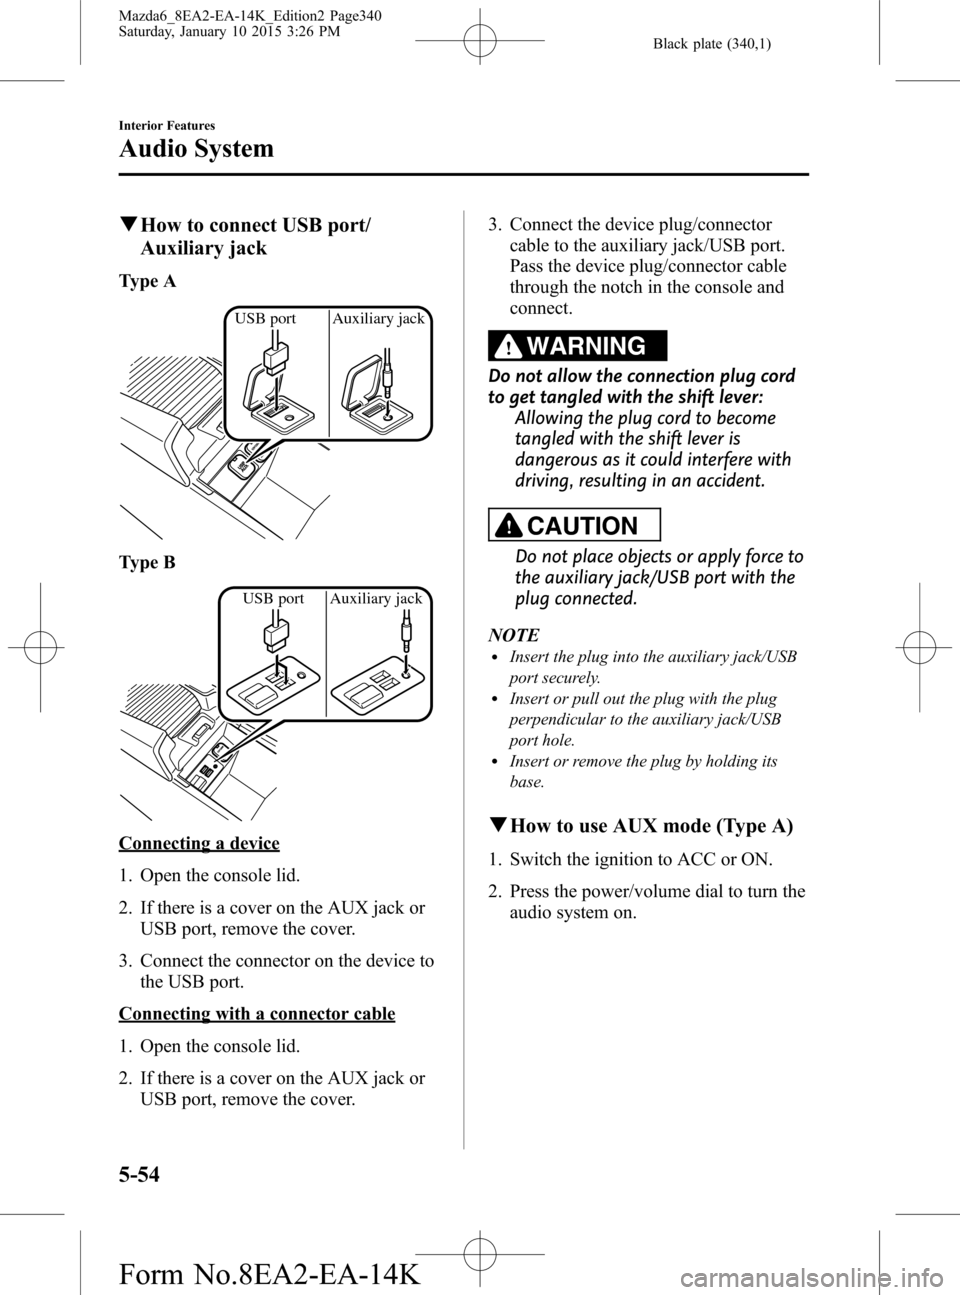
qHow to connect USB port/
Auxiliary jack
Type A
USB port Auxiliary jack
Type B
USB port Auxiliary jack
Connecting a device
1. Open the console lid.
2. If there is a cover on the AUX jack or
USB port, remove the cover.
3. Connect the connector on the device to
the USB port.
Connecting with a connector cable
1. Open the console lid.
2. If there is a cover on the AUX jack or
USB port, remove the cover.3. Connect the device plug/connector
cable to the auxiliary jack/USB port.
Pass the device plug/connector cable
through the notch in the console and
connect.
WARNING
Do not allow the connection plug cord
to get tangled with the shift lever:
Allowing the plug cord to become
tangled with the shift lever is
dangerous as it could interfere with
driving, resulting in an accident.
CAUTION
Do not place objects or apply force to
the auxiliary jack/USB port with the
plug connected.
NOTE
lInsert the plug into the auxiliary jack/USB
port securely.
lInsert or pull out the plug with the plug
perpendicular to the auxiliary jack/USB
port hole.
lInsert or remove the plug by holding its
base.
qHow to use AUX mode (Type A)
1. Switch the ignition to ACC or ON.
2. Press the power/volume dial to turn the
audio system on.
5-54
Interior Features
Audio System
Mazda6_8EA2-EA-14K_Edition2 Page340
Saturday, January 10 2015 3:26 PM
Form No.8EA2-EA-14K
Page 342 of 614
Black plate (342,1)
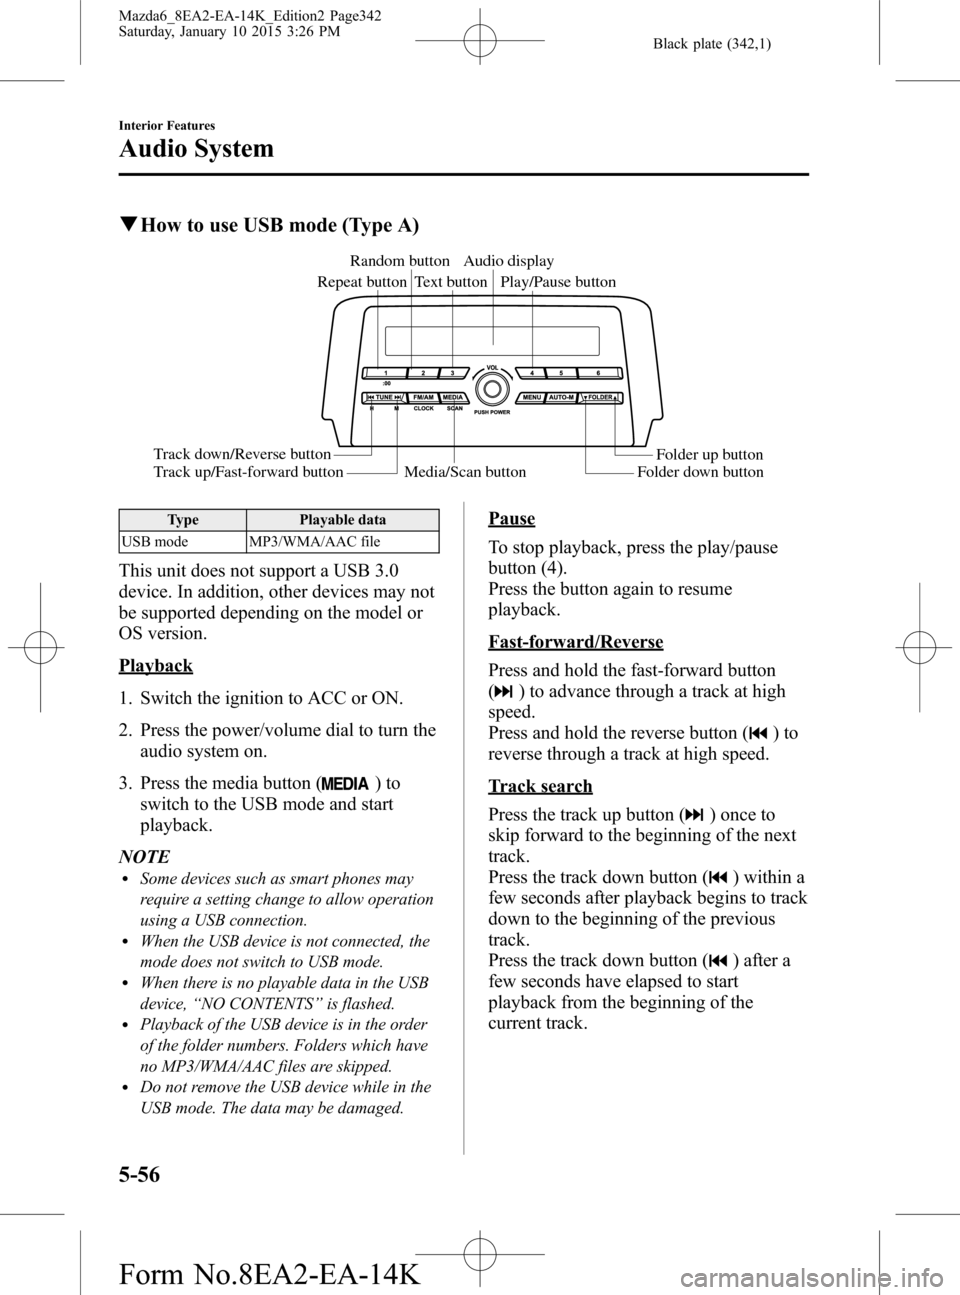
qHow to use USB mode (Type A)
Media/Scan button Folder down buttonFolder up button Play/Pause button Random button
Repeat buttonAudio display
Text button
Track down/Reverse button
Track up/Fast-forward button
Type Playable data
USB mode MP3/WMA/AAC file
This unit does not support a USB 3.0
device. In addition, other devices may not
be supported depending on the model or
OS version.
Playback
1. Switch the ignition to ACC or ON.
2. Press the power/volume dial to turn the
audio system on.
3. Press the media button (
)to
switch to the USB mode and start
playback.
NOTE
lSome devices such as smart phones may
require a setting change to allow operation
using a USB connection.
lWhen the USB device is not connected, the
mode does not switch to USB mode.
lWhen there is no playable data in the USB
device,“NO CONTENTS”is flashed.
lPlayback of the USB device is in the order
of the folder numbers. Folders which have
no MP3/WMA/AAC files are skipped.
lDo not remove the USB device while in the
USB mode. The data may be damaged.
Pause
To stop playback, press the play/pause
button (4).
Press the button again to resume
playback.
Fast-forward/Reverse
Press and hold the fast-forward button
(
) to advance through a track at high
speed.
Press and hold the reverse button (
)to
reverse through a track at high speed.
Track search
Press the track up button (
) once to
skip forward to the beginning of the next
track.
Press the track down button (
) within a
few seconds after playback begins to track
down to the beginning of the previous
track.
Press the track down button (
) after a
few seconds have elapsed to start
playback from the beginning of the
current track.
5-56
Interior Features
Audio System
Mazda6_8EA2-EA-14K_Edition2 Page342
Saturday, January 10 2015 3:26 PM
Form No.8EA2-EA-14K