Page 342 of 544
342
GS450h_OM_OM30E99U_(U)
6-2. Maintenance
Vehicle interior
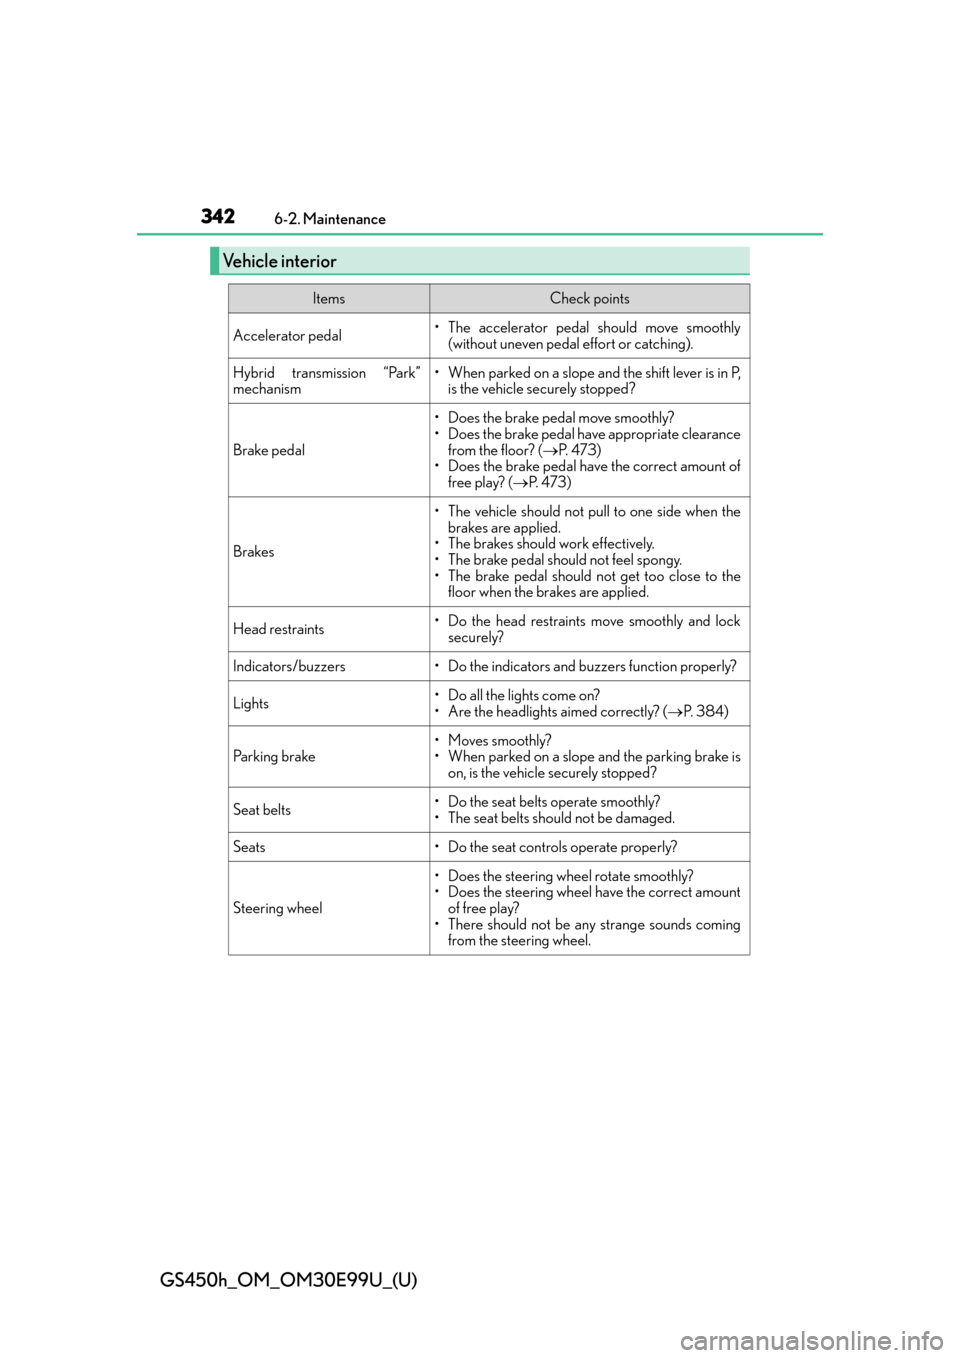
ItemsCheck points
Accelerator pedal• The accelerator pedal should move smoothly(without uneven pedal effort or catching).
Hybrid transmission “Park”
mechanism• When parked on a slope and the shift lever is in P,is the vehicle securely stopped?
Brake pedal
• Does the brake pedal move smoothly?
• Does the brake pedal have appropriate clearance
from the floor? ( P. 4 7 3 )
• Does the brake pedal have the correct amount of
free play? ( P. 4 7 3 )
Brakes
• The vehicle should not pull to one side when the
brakes are applied.
• The brakes should work effectively.
• The brake pedal should not feel spongy.
• The brake pedal should not get too close to the floor when the brakes are applied.
Head restraints• Do the head restraints move smoothly and lock
securely?
Indicators/buzzers• Do the indicators and buzzers function properly?
Lights• Do all the lights come on?
• Are the headlights aimed correctly? ( P. 3 8 4 )
Parking brake• Moves smoothly?
• When parked on a slope and the parking brake is
on, is the vehicle securely stopped?
Seat belts•Do the seat belt s operate smoothly?
• The seat belts should not be damaged.
Seats• Do the seat controls operate properly?
Steering wheel
• Does the steering wheel rotate smoothly?
• Does the steering wheel have the correct amount of free play?
• There should not be an y strange sounds coming
from the steering wheel.
Page 386 of 544
386
GS450h_OM_OM30E99U_(U)
6-3. Do-it-yourself maintenance
Light bulbs
Check the wattage of the light bulb to be replaced. (P. 4 7 7 )
P. 3 5 0
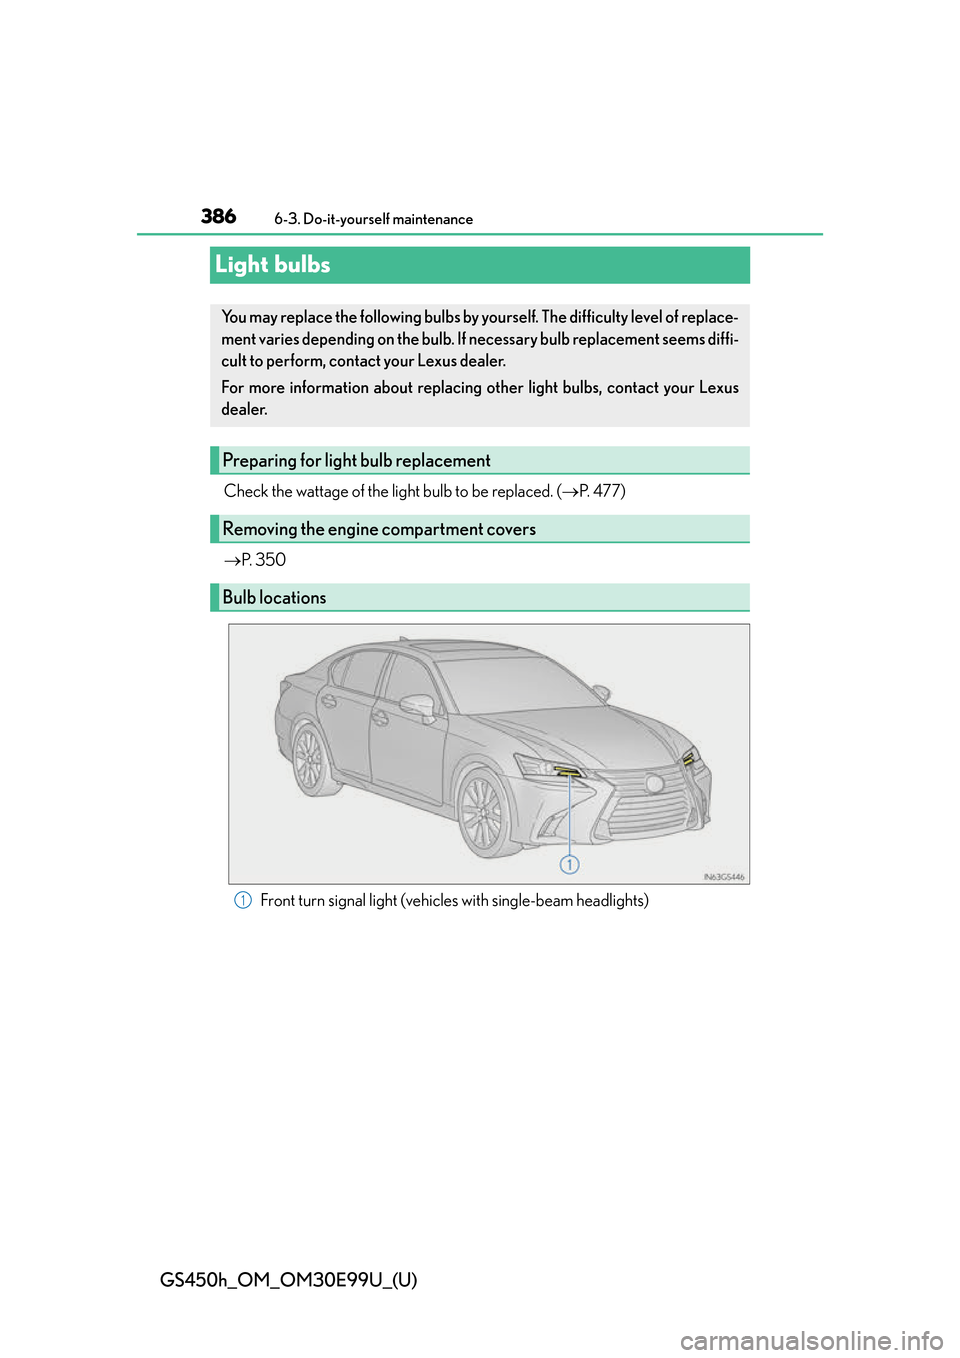
Front turn signal light (vehicles with single-beam headlights)
You may replace the following bulbs by yourself. The difficulty level of replace-
ment varies depending on the bulb. If necessary bulb replacement seems diffi-
cult to perform, contact your Lexus dealer.
For more information about replacing other light bulbs, contact your Lexus
dealer.
Preparing for light bulb replacement
Removing the engine compartment covers
Bulb locations
1
Page 387 of 544
GS450h_OM_OM30E99U_(U)
3876-3. Do-it-yourself maintenance
6
Maintenance and care
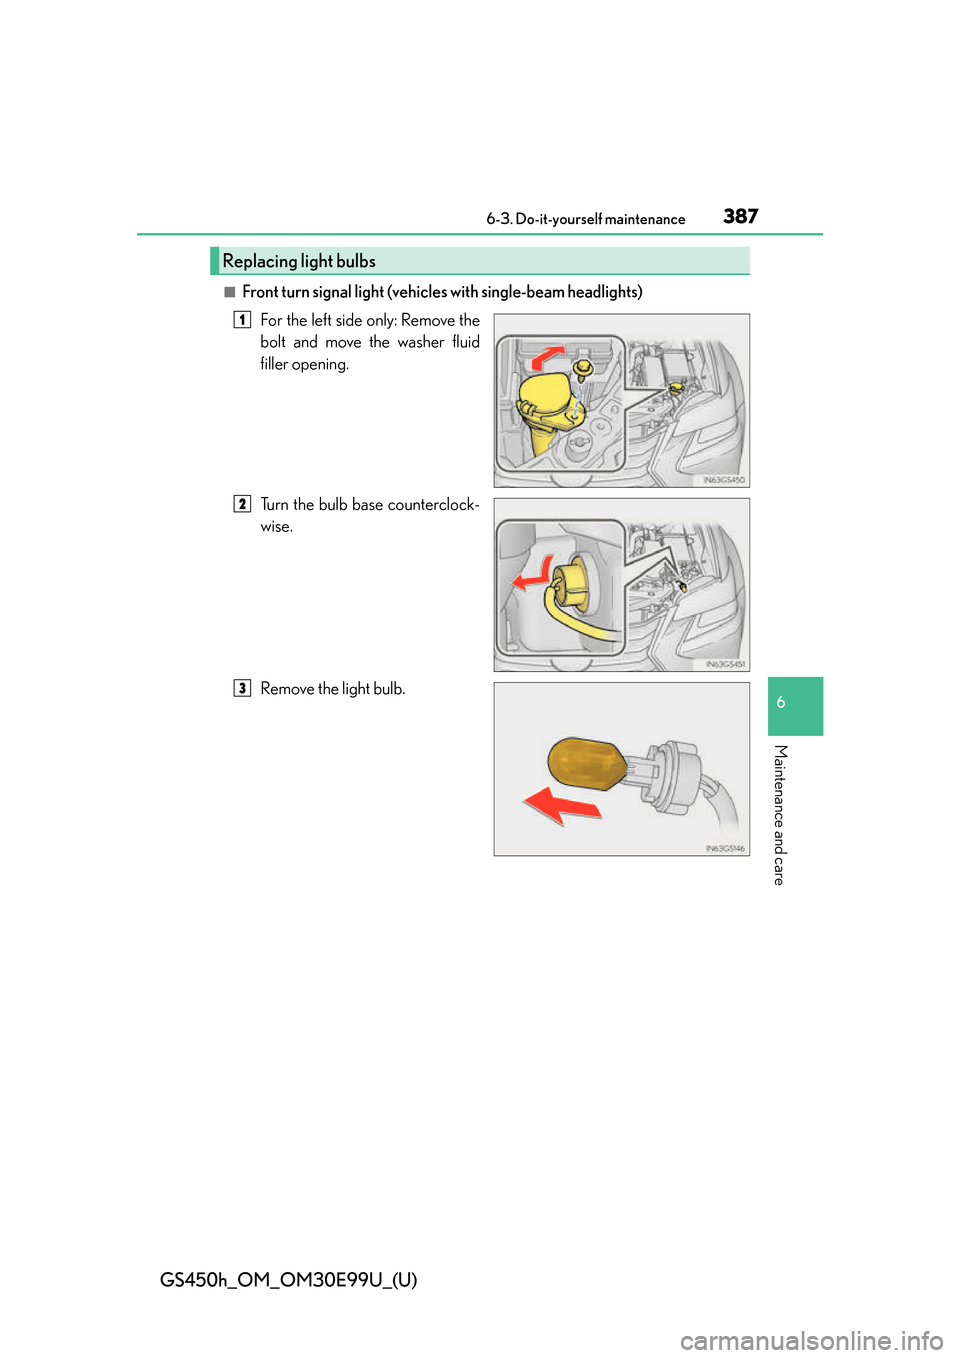
■Front turn signal light (vehicles with single-beam headlights)For the left side only: Remove the
bolt and move the washer fluid
filler opening.
Turn the bulb base counterclock-
wise.
Remove the light bulb.
Replacing light bulbs
1
2
3
Page 388 of 544
388
GS450h_OM_OM30E99U_(U)
6-3. Do-it-yourself maintenance
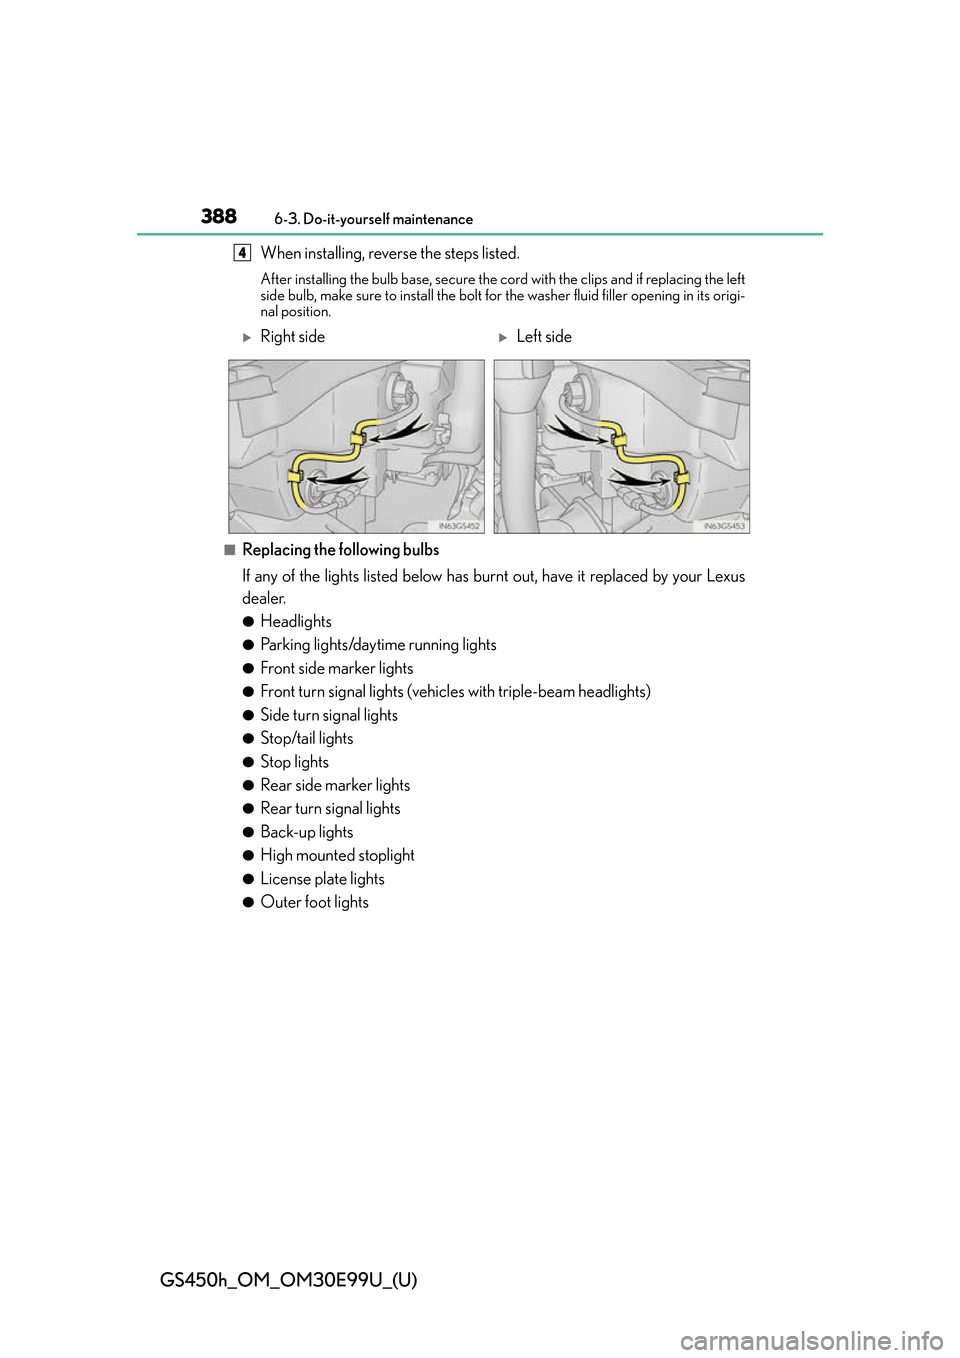
When installing, reverse the steps listed.
After installing the bulb base, secure the cord with the clips and if replacing the left
side bulb, make sure to install the bolt for the washer fluid filler opening in its origi-
nal position.
■Replacing the following bulbs
If any of the lights listed below has burnt out, have it replaced by your Lexus
dealer.
●Headlights
●Parking lights/daytime running lights
●Front side marker lights
●Front turn signal lights (vehic les with triple-beam headlights)
●Side turn signal lights
●Stop/tail lights
●Stop lights
●Rear side marker lights
●Rear turn signal lights
●Back-up lights
●High mounted stoplight
●License plate lights
●Outer foot lights
4
Right sideLeft side
Page 389 of 544
GS450h_OM_OM30E99U_(U)
3896-3. Do-it-yourself maintenance
6
Maintenance and care
■LED Lights
The lights other than the front turn signal light (vehicles with single-beam headlights) and
outer foot lights each consist of a number of LEDs. If any of the LEDs burn out, take your
vehicle to your Lexus dealer to have the light replaced.
■Condensation build-up on the inside of the lens
Temporary condensation build-up on the inside of the headlight lens does not indicate a
malfunction. Contact your Lexus dealer for mo re information in the following situations:
●Large drops of water have built up on the inside of the lens.
●Wa t e r h a s b u i l t u p i nside the headlight.
■When replacing light bulbs
P. 3 8 3
WA R N I N G
■Replacing light bulbs
●Turn off the lights. Do not attempt to replace the bulb immediately after turning off the
lights.
The bulbs become very hot and may cause burns.
●Do not touch the glass portion of the light bulb with bare hands. When it is unavoid-
able to hold the glass portion, use and ho ld with a clean dry cloth to avoid getting
moisture and oils on the bulb.
Also, if the bulb is scratched or dropped, it may blow out or crack.
●Fully install light bulbs and any parts used to secure them. Failure to do so may result
in heat damage, fire, or water entering the headlight unit. This may damage the head-
lights or cause condensation to build up on the lens.
■To prevent damage or fire
●Make sure bulbs are fully seated and locked.
●Check the wattage of the bulb before installin g to prevent heat damage.
Page 427 of 544
4277-2. Steps to take in an emergency
GS450h_OM_OM30E99U_(U)
7
When trouble arises
*: Refer to the separate “Scheduled Maintenance” or “Owner’s Manual Supplement”
for the maintenance interval applicable to your vehicle.
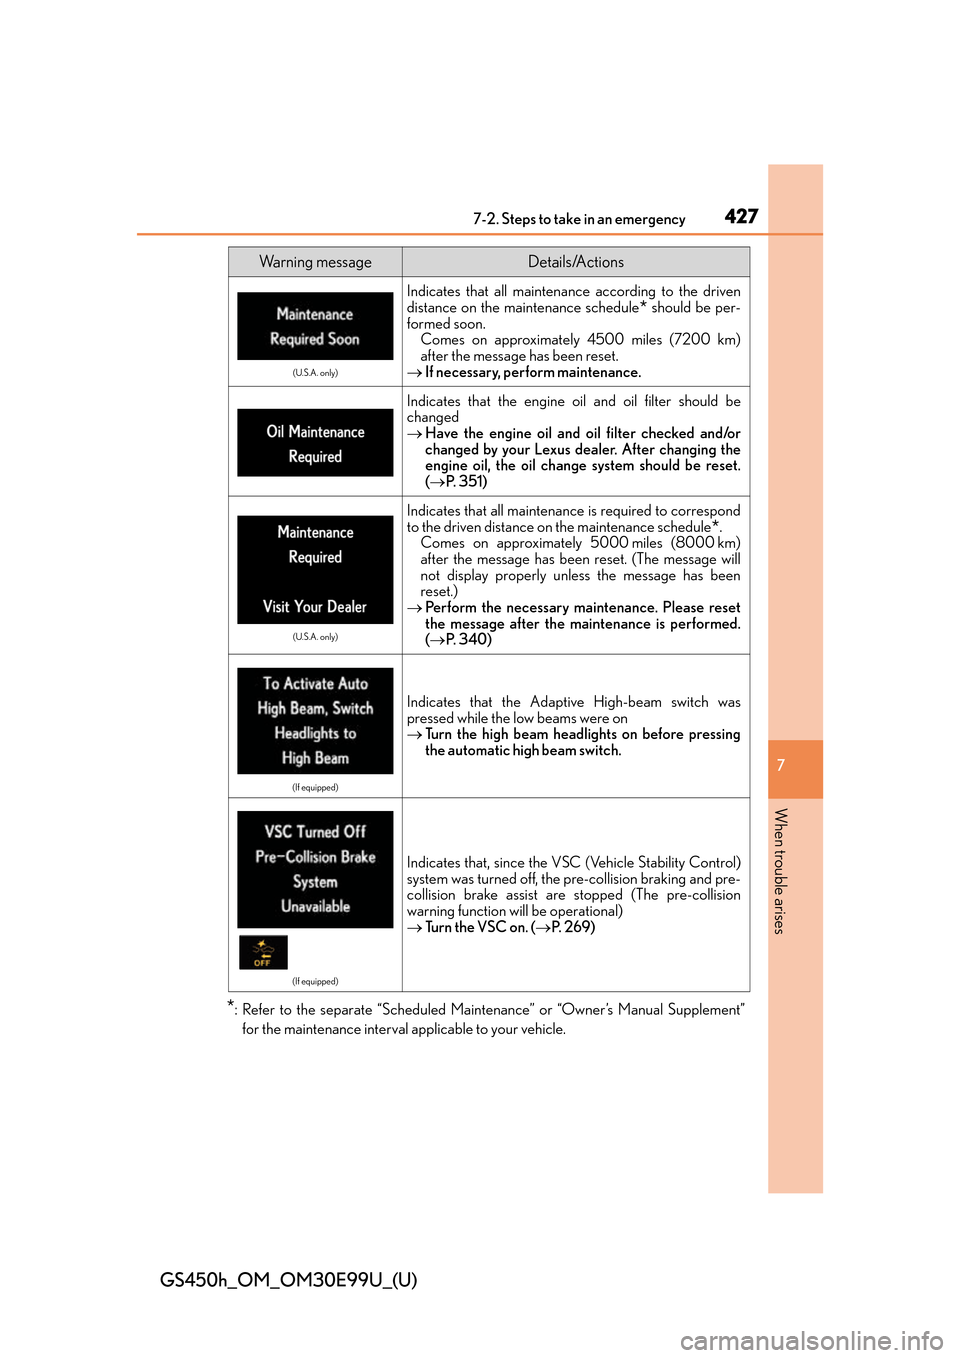
(U.S.A. only)
Indicates that all maintenance according to the driven
distance on the maintenance schedule
* should be per-
formed soon.
Comes on approximately 4500 miles (7200 km)
after the message has been reset.
If necessary, perform maintenance.
Indicates that the engine o il and oil filter should be
changed
Have the engine oil and oil filter checked and/or
changed by your Lexus dealer. After changing the
engine oil, the oil change system should be reset.
( P. 3 5 1 )
(U.S.A. only)
Indicates that all maintenance is required to correspond
to the driven distance on the maintenance schedule
*.
Comes on approximately 5000 miles (8000 km)
after the message has been reset. (The message will
not display properly unless the message has been
reset.)
Perform the necessary maintenance. Please reset
the message after the maintenance is performed.
( P. 3 4 0 )
(If equipped)
Indicates that the Adaptive High-beam switch was
pressed while the low beams were on
Turn the high beam headlights on before pressing
the automatic high beam switch.
(If equipped)
Indicates that, since the VSC (Vehicle Stability Control)
system was turned off, the pre-collision braking and pre-
collision brake assist are stopped (The pre-collision
warning function will be operational)
Turn the VSC on. ( P. 2 6 9 )
Wa r n i n g m e s s a g eDetails/Actions
Page 446 of 544
446
GS450h_OM_OM30E99U_(U)
7-2. Steps to take in an emergency
If the hybrid system will not start
One of the following may be the cause of the problem:
●The electronic key may not be functioning properly. (P. 4 5 2 )
●There may not be sufficient fuel in the vehicle’s tank.
Refuel the vehicle.
●There may be a malfunction in the immobilizer system. ( P. 74 )
●There may be a malfunction in the steering lock system.
●The hybrid system may be malfunctioni ng due to an electrical problem such
as electronic key battery depletion or a blown fuse. However, depending on
the type of malfunction, an interim meas ure is available to start the hybrid sys-
tem. ( P. 4 4 7 )
One of the following may be the cause of the problem:
●The 12-volt battery may be discharged. ( P. 4 5 3 )
●The 12-volt battery terminal connections may be loose or corroded.
(P. 3 5 8 )
One of the following may be the cause of the problem:
●The 12-volt battery may be discharged. ( P. 4 5 3 )
●One or both of the 12-volt battery terminals may be disconnected. ( P. 3 5 8 )
Contact your Lexus dealer if the problem cannot be repaired, or if repair procedures
are unknown.
Reasons for the hybrid system not starting vary depending on the situation.
Check the following and perform the appropriate procedure:
The hybrid system will not start even though the correct starting proce-
dure is being followed. ( P. 1 8 0 )
The interior lights and headlights are dim, or the horn does not sound or
sounds at a low volume.
The interior lights and headlights do not turn on, or the horn does not
sound.
Page 455 of 544
4557-2. Steps to take in an emergency
GS450h_OM_OM30E99U_(U)
7
When trouble arises
Start the engine of the second vehicle. Increase the engine speed slightly and
maintain at that level for approximately 5 minutes to recharge the 12-volt bat-
tery of your vehicle.
Open and close any of the doors of your vehicle with the power switch off.
Maintain the engine speed of the second vehicle and start the hybrid system
of your vehicle by turning the power switch to ON mode.
Make sure the “READY” indicator comes on. If the indicator does not come
on, contact your Lexus dealer.
Once the hybrid system has started, remove the jumper cables in the exact
reverse order from which they were connected.
Once the hybrid system starts, have th e vehicle inspected at your Lexus dealer
as soon as possible.
■Starting the hybrid system when the 12-volt battery is discharged
The hybrid system cannot be started by push-starting.
■To prevent 12-volt battery discharge
●Turn off the headlights and the audio system while the hybrid system is off.
●Turn off any unnecessary electrical components when the vehicle is running at a low
speed for an extended period, such as in heavy traffic.
■Charging the 12-volt battery
The electricity stored in the 12-volt battery will discharge gradually even when the vehicle
is not in use, due to natural discharge and th e draining effects of certain electrical appli-
ances. If the vehicle is left for a long time, the 12-volt battery may discharge, and the
hybrid system may be unable to start. (The 12-volt battery recharges automatically while
the hybrid system is operating.)
■When recharging or replacing the 12-volt battery
●In some cases, it may not be possible to unlock the doors using the smart access system
with push-button start when the 12-volt battery is discharged. Use the wireless remote
control or the mechanical key to lock or unlock the doors.
●The hybrid system may not start on the first attempt after the 12-volt battery has
recharged but will start normally after the second attempt. This is not a malfunction.
●The power switch mode is memorized by the vehicle. When the 12-volt battery is
reconnected, the system will return to the mode it was in before the 12-volt battery was
discharged. Before disconnecting the 12-volt battery, turn the power switch off.
If you are unsure what mode the power switch was in before the 12-volt battery dis-
charged, be especially careful when reconnecting the 12-volt battery.
6
7
8
9
10