Page 9 of 524
Your vehicle at a glance
22
EXTERIOR OVERVIEW
1. Hood .....................................................4-22
2. Head lamp ...................................4-83, 7-59
3. Fog lamp .....................................4-86, 7-63
4. Wheel and tire ......................................7-34
5. Outside rearview mirror ........................4-36
6. Front windshield wiper blades .....4-87, 7-27
7. Windows ...............................................4-17
8. Parking assist system ..........................4-76
9. Charging door ...................EV Guide-21, 24
OPSE014001
■Front view
❈The actual shape may differ from the illustration.
Page 11 of 524

Your vehicle at a glance
42
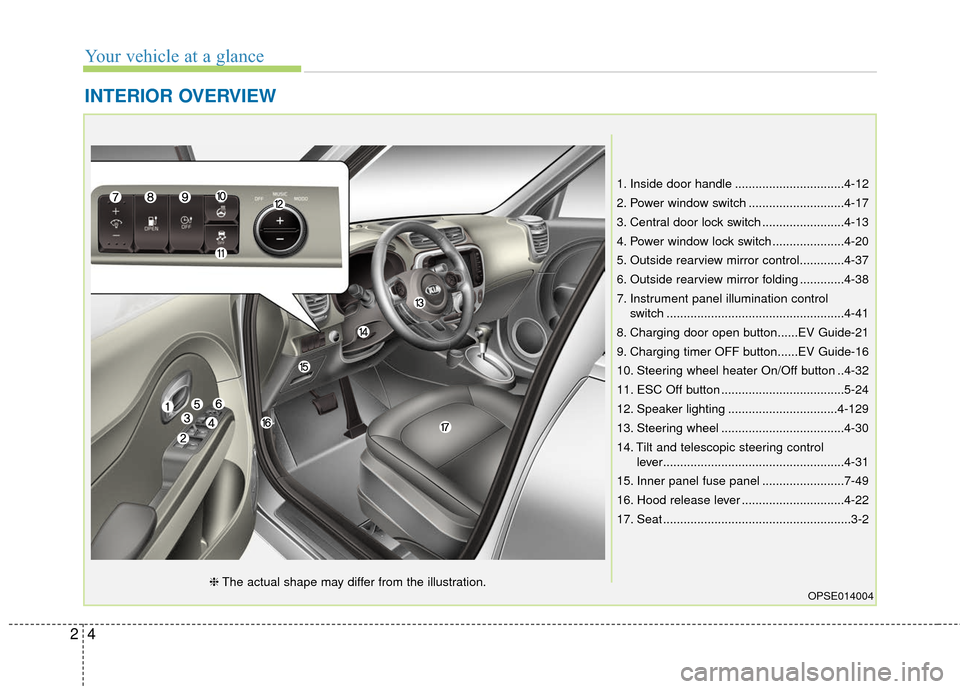
INTERIOR OVERVIEW
1. Inside door handle ................................4-12
2. Power window switch ............................4-17
3. Central door lock switch ........................4-13
4. Power window lock switch .....................4-20
5. Outside rearview mirror control.............4-37
6. Outside rearview mirror folding .............4-38
7. Instrument panel illumination controlswitch ....................................................4-41
8. Charging door open button......EV Guide-21
9. Charging timer OFF button......EV Guide-16
10. Steering wheel heater On/Off button ..4-32
11. ESC Off button ....................................5-24
12. Speaker lighting ................................4-129
13. Steering wheel ....................................4-30
14. Tilt and telescopic steering control lever.....................................................4-31
15. Inner panel fuse panel ........................7-49
16. Hood release lever ..............................4-22
17. Seat .......................................................3-2
OPSE014004❈ The actual shape may differ from the illustration.
Page 101 of 524

431
Features of your vehicle
(Continued)
• When you operate the steeringwheel in low temperature, abnor-
mal noise may occur. If tempera-
ture rises, the noise will likely dis-
appear. This is a normal condition.
• When the charging system warn- ing light comes on due to the low
voltage (When the alternator or
battery) does not operate normal-
ly or it malfunctions), the steering
wheel may require increased
steering effort.Tilt and telescopic steering
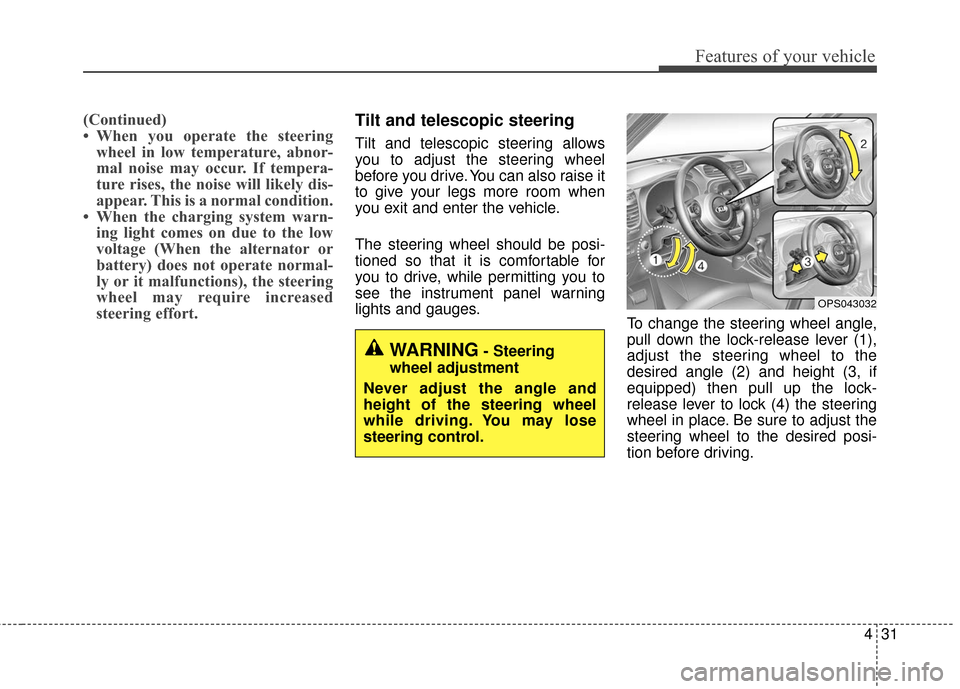
Tilt and telescopic steering allows
you to adjust the steering wheel
before you drive. You can also raise it
to give your legs more room when
you exit and enter the vehicle.
The steering wheel should be posi-
tioned so that it is comfortable for
you to drive, while permitting you to
see the instrument panel warning
lights and gauges. To change the steering wheel angle,
pull down the lock-release lever (1),
adjust the steering wheel to the
desired angle (2) and height (3, if
equipped) then pull up the lock-
release lever to lock (4) the steering
wheel in place. Be sure to adjust the
steering wheel to the desired posi-
tion before driving.
OPS043032
WARNING- Steering
wheel adjustment
Never adjust the angle and
height of the steering wheel
while driving. You may lose
steering control.
Page 112 of 524
Features of your vehicle
42
4
Gauges
Speedometer
The speedometer indicates the
speed of the vehicle and is calibrated
in miles per hour (mph) or kilometers
per hour (km/h).
Motor operation gauge
It shows the energy consumption rate
of the vehicle and the charge/dis-
charge status of the regenerative
brakes.
: It shows the energy con-
sumption rate of the
vehicle when driving
uphill or accelerating.
The more electric energy
is used, the higher the
gauge level.
: It shows the energy
consumption rate
during normal driv-
ing condition.
: It shows the charging
status of the battery
when it is being charged
by the regenerative
brakes (decelerating or
driving on a downhill
road). The more electric
energy is charged, the
lower the gauge level.OPSE044101
OPSE044102
Page 113 of 524

443
Features of your vehicle
State of charge (SOC) gauge forhigh voltage battery
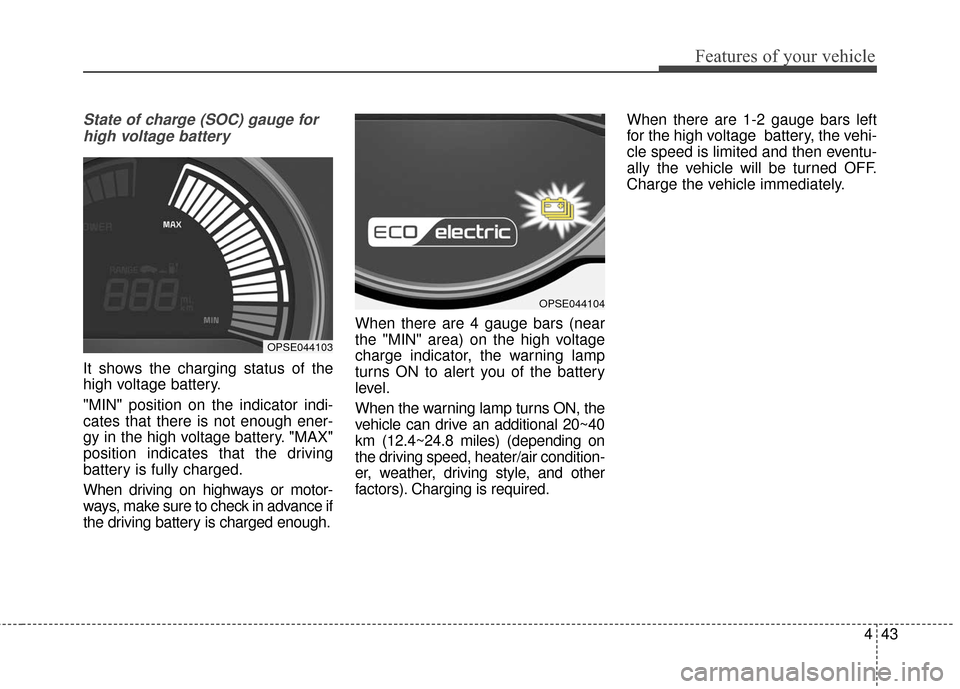
It shows the charging status of the
high voltage battery.
"MIN" position on the indicator indi-
cates that there is not enough ener-
gy in the high voltage battery. "MAX"
position indicates that the driving
battery is fully charged.
When driving on highways or motor-
ways, make sure to check in advance if
the driving battery is charged enough. When there are 4 gauge bars (near
the "MIN" area) on the high voltage
charge indicator, the warning lamp
turns ON to alert you of the battery
level.
When the warning lamp turns ON, the
vehicle can drive an additional 20~40
km (12.4~24.8 miles) (depending on
the driving speed, heater/air condition-
er, weather, driving style, and other
factors). Charging is required.When there are 1-2 gauge bars left
for the high voltage battery, the vehi-
cle speed is limited and then eventu-
ally the vehicle will be turned OFF.
Charge the vehicle immediately.
OPSE044103
OPSE044104
Page 123 of 524
453
Features of your vehicle
When this warning message is dis-
played, do not accelerate or start the
vehicle suddenly.
Charge the battery immediately
when the high voltage battery level is
not enough.Unplug vehicle to start
When the vehicle is started while the
charging connector is connected,
this warning message illuminates.
Remove the charging connector and
start the vehicle.
Charging door open
When the vehicle is started while the
charging door is opened, this warn-
ing message illuminates. Make sure
to close the charging door after
charging is complete.
OPSE044224LOPSE044223L
Page 130 of 524
Features of your vehicle
60
4
Low Washer Fluid
This warning message illuminates
on the service reminder mode if
the washer fluid level in the reser-
voir is nearly empty.
It means that you should refill the washer fluid.
Charger Error!
This message is displayed whenthe charging failed by external nor-
mal charger error.
You should change and charge with
the other external charger immedi-
ately.
Quick Charger Error!
This message is displayed when the charging failed by external
quick charger error.
You should change and charge with
the other external charger immedi-
ately.
OPSE044267LOPSE045323LOPSE045324L
Page 132 of 524

Features of your vehicle
62
4
Manual reset
To clear the average energy con-
sumption manually, press the but-
ton (MOVE) on the steering wheel for
more than 1 second when the aver-
age energy consumption is displayed.
Automatic reset
To make the average energy con-
sumption be reset automatically
whenever recharging, select the
“Auto Reset” mode in User Settings
menu of the LCD display (Refer to
“LCD Display”).
Under “Auto Reset” mode, the aver-
age energy consumption will be
cleared to zero (---) when the driving
distance exceeds 0.19 mile (300m)
after recharging more than 10%.Instant energy consumption (2)
This mode displays the instant ener- gy consumption during the last few
seconds when the vehicle speed is
more than 10 km/h (6.2 MPH).
- Instant energy consumptionrange : 0.0 ~ 8miles/kwh
Trip A/B
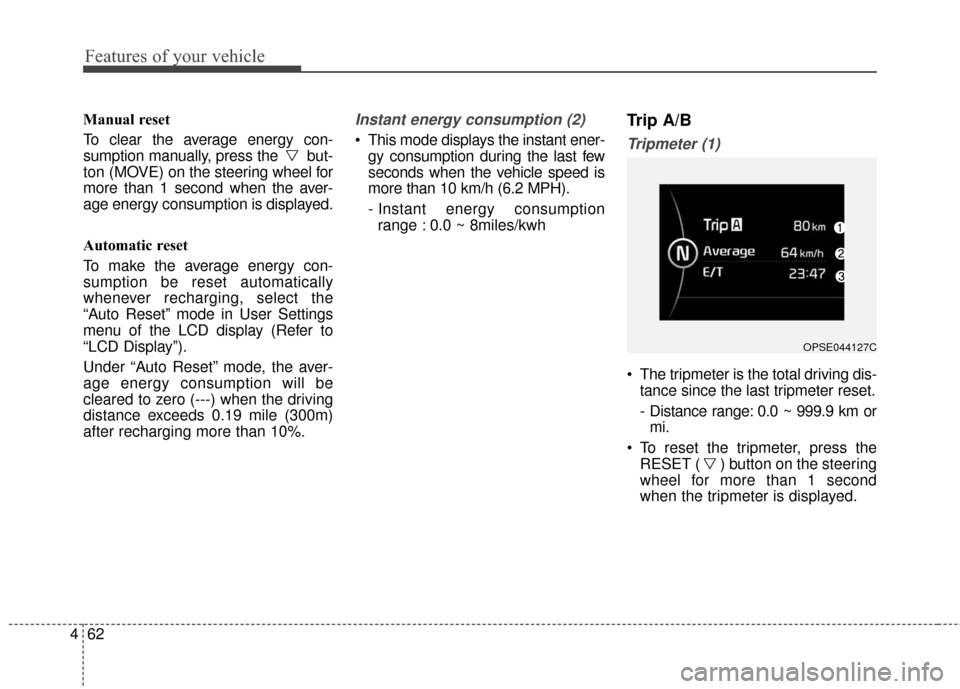
Tripmeter (1)
The tripmeter is the total driving dis- tance since the last tripmeter reset.
- Distance range: 0.0 ~ 999.9 km ormi.
To reset the tripmeter, press the RESET ( ) button on the steering
wheel for more than 1 second
when the tripmeter is displayed.
OPSE044127C