Page 33 of 50

31
Front Seat Headrest Adjustment
To adjust headrest forward: Pull headrest forward at an angle
To adjust headrest back: Pull forward at a slight angle to the farthest
position and release Then pull forward to desired position
To raise headrest: Pull headrest up
To lower headrest: Press lock
A, then press the headrest down
Driver Position Memory System*
The integrated system stores into memory the position
of the Driver’s Seat, Outside Rearview Mirrors and the
Steering Wheel
To store positions into memory, first place the Gear
Shift into P (Park) while the ENGINE START/STOP
button is in the ON position Then:
1 Adjust the Driver’s Seat, Outside Mirrors and the
Steering Wheel
2 Press the Memory button
B on the control panel
System will beep once
3 Press one of the memory buttons
C within 5
seconds The system will beep twice when memory
has been stored
M
1
2
(Buttons located on
Driver's Door Panel)
A
B
C
ALWAYS CHECK THE OWNER’S MANUAL FOR COMPLETE OPER ATING INFORMATION AND SAFET Y WARNINGS. *IF EQUIPPED
SEATING
Page 34 of 50

32
Smart Key
A Press to lock All Doors
B Press to unlock Driver’s Door Press twice in 4 seconds to unlock All Doors
C Press and hold for more than 1 second to unlock Trunk and manually open
REMINDERS:
•Trunk lid will partially open To fully open, lift up manually
•The Trunk unlocks when the Smart Key is within close proximity of the vehicle
D Press and hold more than 1 second for Panic Alarm To turn off Alarm, press any button
E Press to release Mechanical Key (Button on reverse side of fob)
REMINDERS:
•Remote button configuration may vary depending on vehicle options
• The Smart Key’s signal can be blocked by the normal operation of a cell phone or smartphone To help prevent
this, store each device separately
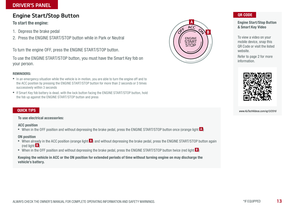
Engine Start/Stop Button
& Smart Key Video
To view a video on your
mobile device, snap this
QR Code or visit the listed
website
Refer to page 2 for more
information QR CODE
www. KuTechVideo s.c om/vg13/2016
Driver’s Door Lock/Unlock button G:
To unlock door(s):
• Press button once to unlock
Driver’s door
• Press again within 4 seconds to
unlock all doors
To lock all doors - Press again to lock all doors
If the Smart Key battery is weak or not working properly, hold the Smart Key fob up to the ENGINE
START/STOP button (Lock button side closest) and press to start engine QUICK TIP
A
B
C
D
F
E
G
UnlockLock
Mechanical Key F:
Use to unlock /lock Driver’s Door 1 Remove door handle keyhole cover with Mechanical Key
by pressing up into slot as shown
2 Insert Mechanical Key and turn right to Unlock Driver’s
Door Turn twice within 4 seconds to Unlock all doors
3 Insert Mechanical Key and turn left to Lock
Driver’s Door
4 Return keyhole cover to its original position
Use to lock glove box and to turn Child Safety Locks
CADENZA FEATURES & FUNCTIONS GUIDE
*IF EQUIPPED
OTHER KEY FEATURES
Page 35 of 50

To program non-rolling and rolling code garage door")
33
How to Sync Transmitter with HomeLink®
If programming for the first time, begin with Step 1 (repeating this step will
delete all information)
To program non-rolling and rolling code garage door openers and other devices:
1 Press and hold the left
A and center D buttons simultaneously until the
indicator light C begins to flash (to reprogram buttons, skip this step)
2 Press and hold the desired button
A, B or D and hold the button on the
transmitter while it is approximately 1 to 3 inches away from the mirror
The HomeLink
® Indicator light C will flash rapidly once the frequency
signal has been successfully programmed
To finish programming rolling code garage door openers, complete these steps:
1 Locate the “learn” or “smart” button on the garage door’s motor head
unit Press and release the button and complete Step 4 within 30 seconds
2 Firmly press and release the programmed HomeLink
® button up to three times
Operating HomeLink
®:
Press one of the programmed HomeLink
® buttons
Erasing programmed buttons:
Press and hold the left
A and center D buttons simultaneously for
approximately 20 seconds, and then release both buttons within 30 seconds
If your garage door opener was manufactured in 2011 or later, and you’re unable to program
your vehicle’s HomeLink® system, you may need to purchase a HomeLink Repeater Kit. For more
information, go to www.HomeLink.com or call (800) 355-3515.
The HomeLink® / Auto-Dimming Rearview Mirror is designed to reduce
glare from a vehicle’s headlights located in the rear and also connect up
to three electronic transmitters into one location
REMINDER: Mirror indicator light C will illuminate when automatic dimming is ON
HomeLink® with Auto-Dimming Rearview Mirror
A HomeLink® button
B HomeLink® button
C Indicator light
D HomeLink® button
E Glare detection sensor
F Automatic dimming ON/OFF
G Compass control button
•You can reprogram a single HomeLink® button by repeating Step 2
•Erasing programmed buttons will delete all trained transmitters
QUICK TIPS
ABCDEFG
ALWAYS CHECK THE OWNER’S MANUAL FOR COMPLETE OPER ATING INFORMATION AND SAFET Y WARNINGS. *IF EQUIPPED
OTHER KEY FEATURES
Page 36 of 50

34
Map/Room Lamps
Automatic turn off function*
The interior lights automatically turn off approximately 30 seconds after the ENGINE
START/STOP button is OFF
Map/Room Lamp Operation
Press the buttons
A to turn the Map Lamps ON/OFF This light produces a spot
beam for convenient use as a map lamp or as a personal lamp for the driver or the
front passenger
Room Lamp - Press the lens
B to turn the Room Lamp ON/OFF
The Map and Room Lamps turn ON when button
C is pressed any door is opened
or the ignition is turned OFF When all doors are locked or the ignition is ON, the Map
Lamp will turn OFF immediately The Map and Room Lamps turn ON for approximately
30 seconds
REMINDER: When Room Lamp lens is pressed ON it will remain ON, even when the Map Lamp switch is in the
OFF position
•When doors are unlocked by the Smart Key*, the lamp turns ON for approximately 30 seconds
•If your vehicle is equipped with the theft alarm system, the interior lights automatically turn off
approximately 3 seconds after the system is in armed stage
•Using interior lights for an extended period of time may cause battery discharge
QUICK TIPS
AA
A
BC
CADENZA FEATURES & FUNCTIONS GUIDE
*IF EQUIPPED
OTHER KEY FEATURES
Page 37 of 50

35
Sunvisor
Use the Sunvisor to shield direct light through the front or side
windows Slide the Sunvisor out and adjust as needed
REMINDERS:
•Sunvisor may not shield all direct light
•The Sunvisor may impair visibility if not adjusted properly
• Be aware of seating position when adjusting or swinging Sunvisor around to or from
the front or side windows
Panoramic Sunroof Operation*
The Sunroof and Sunshade operation is controlled through a multidirectional
switch/lever A The ignition needs to be in the ON position to operate the
sunroof/sunshade
Slide the Sunshade and Sunroof:
• Auto Open: Slide lever backward to the farthest position and release
• Auto Close: Slide the lever forward to the farthest position and release
Slide the Sunshade:
• Auto Open: Slide the lever partially backward to the first detent position
• Auto Close: Slide the lever forward to the farthest position
Slide the Sunroof (with Sunshade open):
• Open: Slide the lever backward and release
• Auto Close: Slide the lever forward to the first detent position or pull the
lever downward
Tilt the Sunroof:
• Raise: Push lever upward
• Lower: Pull lever downward
• Auto Close Sunroof and Sunshade: Slide the lever forward to the
farthest position
REMINDER: Sunshade needs to remain OPEN while Sunroof is open and vehicle is moving
To stop the Sunroof/Sunshade at any position, push or pull the Sunroof control lever
in any direction QUICK TIP
A
ALWAYS CHECK THE OWNER’S MANUAL FOR COMPLETE OPER ATING INFORMATION AND SAFET Y WARNINGS. *IF EQUIPPED
OTHER KEY FEATURES
Page 38 of 50

36
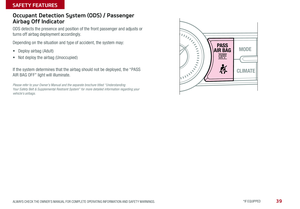
Warning! Check yo ur sur roun dings for safety
Rear-Camera Display
The Rear-Camera Display system is not a safety device It is a supplemental
system that displays the view behind the vehicle through the Navigation
screen while the vehicle is in Reverse
The Rear-Camera Display activates when the:
• ENGINE START/STOP button is in the ON position (Green Light)
• Gear Shift Lever is in the R (Reverse) position
REMINDER: While camera is active, only the volume controls on the audio system can be operated
The Rear-Camera Display is not a substitute for proper and safe backing-up procedures. The
Rear-Camera Display may not display every object behind the vehicle. Always drive safely and use
caution when backing up
Back-Up Warning System
(Rear Parking Assist System)*
The Back-Up Warning System is not a safety device The Back-Up Warning
System is a supplemental system that assists the driver by chiming if any
object is detected within the sensing area to the rear and side of the vehicle
when backing up When the ignition is ON, the system is activated
REMINDERS:
•If the vehicle is moving at speeds over 3 mph, the system may not activate correctly
• When more than two objects are sensed at the same time, the closest one will be
recognized first
• The Back-Up Warning System is not a substitute for proper and safe backing-up procedures
Always drive safely and use caution when backing up The Back-Up Warning System may not
detect every object behind the vehicle
Rear-camera
CADENZA FEATURES & FUNCTIONS GUIDE
*IF EQUIPPED
OTHER KEY FEATURES
Page 39 of 50

Fuel Cap/Mal")
37
Trunk Release Button
Located underneath the Trunk lid With Trunk unlocked, press
the Trunk Release button A and pull the Trunk lid up by the
handle to open
( Trunk Release Button)
Fuel Cap/Malfunction Indicator
(Check Engine Light)
Tighten for ONE CLICK
to prevent Malfunction
Indicator [~] from
illuminating
REMINDER: The Fuel Filler Door
Release button is located on the
driver’s button panel, left of the
Steering Wheel
One-Click Fuel Cap Video
To view a video on your
mobile device, snap this
QR Code or visit the listed
website
Refer to page 2 for more
information QR CODE
www. KuTechVideo s.c om/vg13/2016
Child Safety Locks
Located on the rear edge of the rear
passenger doors, turn the Child Safety Lock
to the lock position [~] to disable the inner
door handles from opening the rear doors
REMINDER: Child Safety Lock is located on rear
passenger’s door jamb
•The Trunk must be unlocked before it can be opened by the Trunk
Release Button
•Smart Key* - The Trunk unlocks automatically, and can then be
opened manually, when the Smart Key fob* is within close proximity
to the vehicle
QUICK TIPS
A
ALWAYS CHECK THE OWNER’S MANUAL FOR COMPLETE OPER ATING INFORMATION AND SAFET Y WARNINGS. *IF EQUIPPED
OTHER KEY FEATURES
Page 40 of 50
38
Hood Release Lever and Latch
Opening the Hood:
1 Pull the Hood Release Lever
A to unlatch the Hood
2 In the front of the vehicle, lift the Hood slightly, push the secondary Latch
B to the left inside of the Hood’s center and lift the Hood
(Lever located near floor below Driver's Panel)
A
B
Closing the Hood:
Lower the Hood about halfway and then press down to securely lock in place
CADENZA FEATURES & FUNCTIONS GUIDE
*IF EQUIPPED
OTHER KEY FEATURES