Page 617 of 745
WARNING!
•Take care to avoid the radiator cooling fan when-
ever the hood is raised. It can start anytime the
ignition switch is ON. You can be injured by
moving fan blades.
• Remove any metal jewelry such as rings, watch
bands and bracelets that could make an inadvertent
electrical contact. You could be seriously injured.
• Batteries contain sulfuric acid that can burn your
skin or eyes and generate hydrogen gas which is
flammable and explosive. Keep open flames or
sparks away from the battery.
NOTE: Be sure that the disconnected ends of the cables
do not touch while still connected to the either vehicle.
Remote Battery Posts
1 — Remote Positive (+)Post (covered with protective cap)
2 — Remote Negative (-)Post
6
WHAT TO DO IN EMERGENCIES 615
Page 618 of 745
1. Set the parking brake, shift the automatic transmissioninto PARK and turn the ignition to LOCK.
2. Turn off the heater, radio, and all unnecessary electri- cal accessories.
3. Remove the protective cover over the remote positive (+) battery post. Pull upward on the cover to remove
it.
4. If using another vehicle to jump-start the battery, park the vehicle within the jumper cables reach, set the
parking brake and make sure the ignition is OFF.
WARNING!
Do not allow vehicles to touch each other as this
could establish a ground connection and personal
injury could result.
Jump-Starting Procedure
WARNING!
Failure to follow this jump-starting procedure could
result in personal injury or property damage due to
battery explosion.
CAUTION!
Failure to follow these procedures could result in
damage to the charging system of the booster vehicle
or the discharged vehicle.
NOTE: Make sure at all times that unused ends of
jumper cables are not contacting each other or either
vehicle while making connections.
616 WHAT TO DO IN EMERGENCIES
Page 619 of 745
Connecting The Jumper Cables
1. Connect the positive(+)end of the jumper cable to the
remote positive (+)post of the discharged vehicle.
2. Connect the opposite end of the positive (+)jumper
cable to the positive (+)post of the booster battery.
3. Connect the negative end (-)of the jumper cable to the
negative (-)post of the booster battery.
4. Connect the opposite end of the negative (-)jumper
cable to the remote negative (-)post of the vehicle with
the discharged battery.WARNING!
Do not connect the jumper cable to the negative (-)
post of the discharged battery. The resulting electri-
cal spark could cause the battery to explode and
could result in personal injury. Only use the specific
ground point, do not use any other exposed metal
parts.
5. Start the engine in the vehicle that has the booster battery, let the engine idle a few minutes, and then
start the engine in the vehicle with the discharged
battery.
6
WHAT TO DO IN EMERGENCIES 617
Page 620 of 745
CAUTION!
Do not run the booster vehicle engine above 2000 rpm
since it provides no charging benefit, wastes fuel and
can damage booster vehicle engine.
6. Once the engine is started, remove the jumper cablesin the reverse sequence:
Disconnecting The Jumper Cables
1. Disconnect the negative (-)end of the jumper cable
from the remote negative (-)post of the discharged
vehicle.
2. Disconnect the opposite end of the negative (-)jumper
cable from the negative (-)post of the booster battery.
3. Disconnect the positive (+)end of the jumper cable
from the positive (+)post of the booster battery. 4. Disconnect the opposite end of the positive
(+)jumper
cable from the remote positive (+)post of the dis-
charged vehicle.
5. Reinstall the protective cover over the remote positive (+) post of the discharged vehicle.
If frequent jump-starting is required to start your vehicle
you should have the battery and charging system tested
at your authorized dealer.
CAUTION!
Accessories plugged into the vehicle power outlets
draw power from the vehicle’s battery, even when not
in use (i.e., cellular devices, etc.). Eventually, if
plugged in long enough without engine operation,
the vehicle’s battery will discharge sufficiently to
degrade battery life and/or prevent the engine from
starting.
618 WHAT TO DO IN EMERGENCIES
Page 623 of 745
WARNING!
•Do not use a chain for freeing a stuck vehicle.
Chains may break, causing serious injury or death.
• Stand clear of vehicles when pulling with tow
hooks. Tow straps may become disengaged, caus-
ing serious injury.
CAUTION!
Tow hooks are for emergency use only, to rescue a
vehicle stranded off road. Do not use tow hooks for
tow truck hookup or highway towing. You could
damage your vehicle.
(Continued)
MANUAL PARK RELEASE
WARNING!
Always secure your vehicle by fully applying the
parking brake, before activating the Manual Park
Release. Activating the Manual Park Release will
allow your vehicle to roll away if it is not secured by
the parking brake or by proper connection to a tow
vehicle. Activating the Manual Park Release on an
unsecured vehicle could lead to serious injury or
death for those in or around the vehicle.
In order to move the vehicle in cases where the transmis-
sion will not shift out of PARK (such as a dead battery),
a Manual Park Release is available.
6
WHAT TO DO IN EMERGENCIES 621
Page 628 of 745
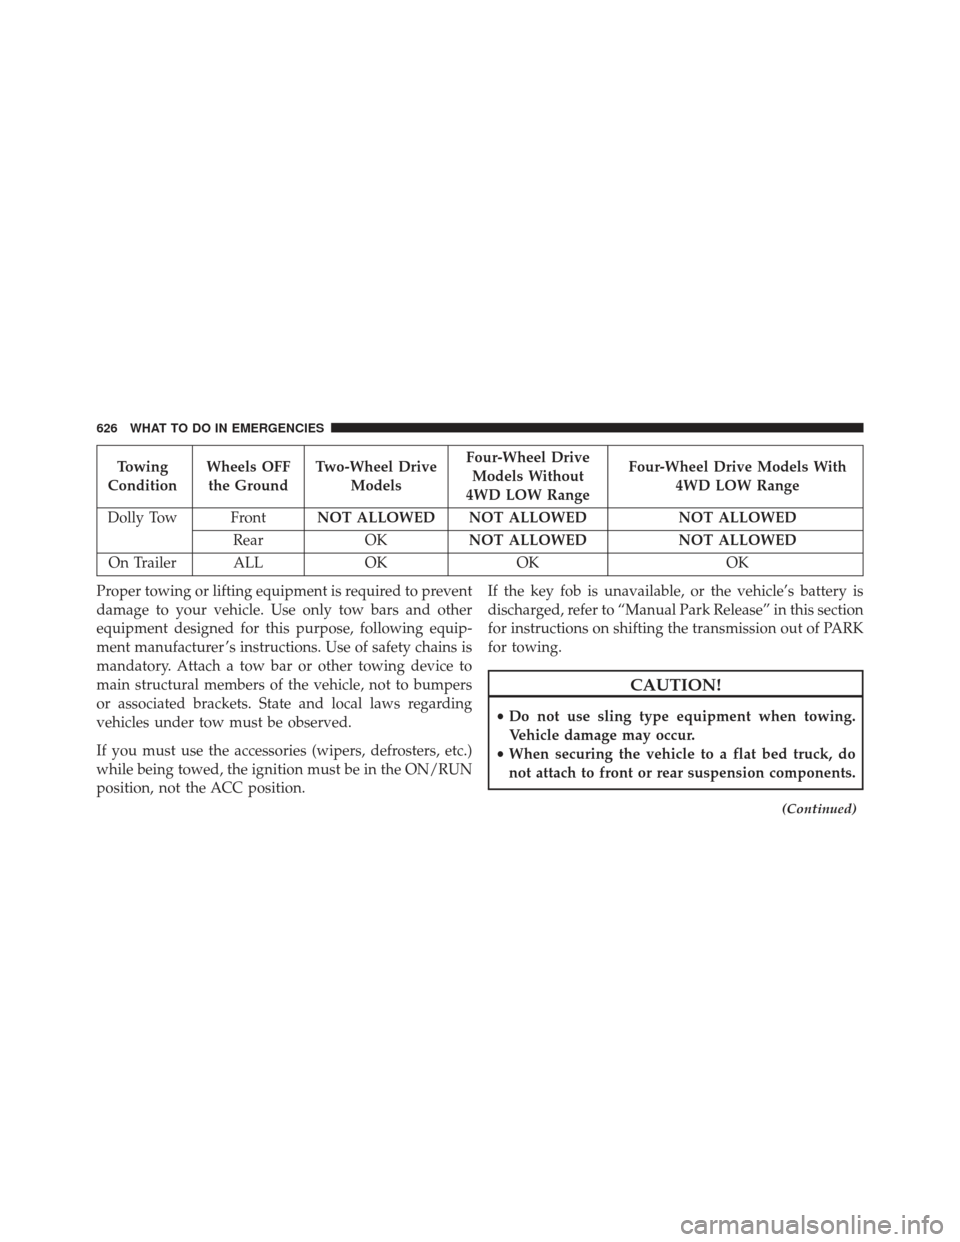
Towing
Condition Wheels OFF
the Ground Two-Wheel Drive
Models Four-Wheel Drive
Models Without
4WD LOW Range Four-Wheel Drive Models With
4WD LOW Range
Dolly Tow Front NOT ALLOWED NOT ALLOWED NOT ALLOWED
Rear OKNOT ALLOWED NOT ALLOWED
On Trailer ALL OKOK OK
Proper towing or lifting equipment is required to prevent
damage to your vehicle. Use only tow bars and other
equipment designed for this purpose, following equip-
ment manufacturer ’s instructions. Use of safety chains is
mandatory. Attach a tow bar or other towing device to
main structural members of the vehicle, not to bumpers
or associated brackets. State and local laws regarding
vehicles under tow must be observed.
If you must use the accessories (wipers, defrosters, etc.)
while being towed, the ignition must be in the ON/RUN
position, not the ACC position. If the key fob is unavailable, or the vehicle’s battery is
discharged, refer to “Manual Park Release” in this section
for instructions on shifting the transmission out of PARK
for towing.
CAUTION!
•
Do not use sling type equipment when towing.
Vehicle damage may occur.
• When securing the vehicle to a flat bed truck, do
not attach to front or rear suspension components.
(Continued)
626 WHAT TO DO IN EMERGENCIES
Page 631 of 745
MAINTAINING YOUR VEHICLE
CONTENTS
�ENGINE COMPARTMENT — 3.6L ..........631
� ENGINE COMPARTMENT — 5.7L ..........632
� ONBOARD DIAGNOSTIC SYSTEM (OBD II) . . .633
▫ Onboard Diagnostic System (OBD II)
Cybersecurity ....................... .633
� EMISSIONS INSPECTION AND
MAINTENANCE PROGRAMS .............634
� REPLACEMENT PARTS ..................636
� DEALER SERVICE ..................... .636
� MAINTENANCE PROCEDURES ...........637
▫ Engine Oil ......................... .638▫
Engine Oil Filter ..................... .641
▫ Engine Air Cleaner Filter ................641
▫ Accessory Drive Belt Inspection ...........644
▫ Maintenance-Free Battery ...............646
▫ Air Conditioner Maintenance .............647
▫ Body Lubrication .....................652
▫ Windshield Wiper Blades ...............652
▫ Adding Washer Fluid ..................659
▫ Exhaust System ..................... .660
▫ Cooling System ..................... .662
7
Page 637 of 745
Normally, the OBD II system will be ready. The OBD II
system maynotbe ready if your vehicle was recently
serviced, recently had a dead battery or a battery replace-
ment. If the OBD II system should be determined not
ready for the I/M test, your vehicle may fail the test.
Your vehicle has a simple ignition actuated test, which
you can use prior to going to the test station. To check if
your vehicle’s OBD II system is ready, you must do the
following:
1. Cycle the ignition switch to the ON position, but do not crank or start the engine.
NOTE: If you crank or start the engine, you will have to
start this test over.
2. As soon as you cycle the ignition switch to the ON position, you will see the “Malfunction Indicator Light
(MIL)” symbol come on as part of a normal bulb
check. 3. Approximately 15 seconds later, one of two things will
happen:
• The MIL will flash for about 10 seconds and then
return to being fully illuminated until you turn OFF
the ignition or start the engine. This means that your
vehicle’s OBD II system is not readyand you should
not proceed to the I/M station.
• The MIL will not flash at all and will remain fully
illuminated until you place the ignition in the off
position or start the engine. This means that your
vehicle’s OBD II system is readyand you can proceed
to the I/M station.
If your OBD II system is not ready,you should see your
authorized dealer or repair facility. If your vehicle was
recently serviced or had a battery failure or replacement,
you may need to do nothing more than drive your
7
MAINTAINING YOUR VEHICLE 635