2016 INFINITI QX80 climate settings
[x] Cancel search: climate settingsPage 4 of 32

2
Around View® Monitor with Moving Object Detection (MOD)
MOD operates only with the Around View®
Monitor activated.
• To temporarily turn the system on or off, select
the “MOD” key on the bottom of the control
panel display.
When the CAMERA button is pressed and the vehicle
speed is less than 6 mph (10 km/h) or the shift lever
is moved to the R (REVERSE) position, the display
screen will automatically change to view the area surrounding the vehicl\
e.
With the Around View® Monitor displayed, the corner sonar system can detect objects
near the vehicle and warn the driver by sounding a tone and showing an i\
ndicator on
the display screen.
For more information, refer to the “Monitor, climate, audio, phone and voice recognition systems (secti\
on 4)” of your
Owner’s Manual.
Blind Spot Warning (BSW) and Blind Spot Intervention® (BSI)
(if so equipped)
The BSW system alerts the driver when another
vehicle moves into the vehicle’s detection zone.
An indicator light located near the outside mirrors 1
will illuminate if the radar sensors detect a vehicle in
the detection zone.
Push the warning systems switch 2 to temporarily
turn the system off. When the system is off, the
indicator light
3 on the switch is off.
The indicator light 3 will also be off if all of the
warning systems are deactivated using the
Settings menu.
The indicator light 3 will illuminate after the
ignition switch is placed in the ON position and the BSW system is enabl\
ed.
For more information, refer to the “Starting and driving (section 5)” of your Owner’s Manual.
1
2
3
new system features
Page 7 of 32

5
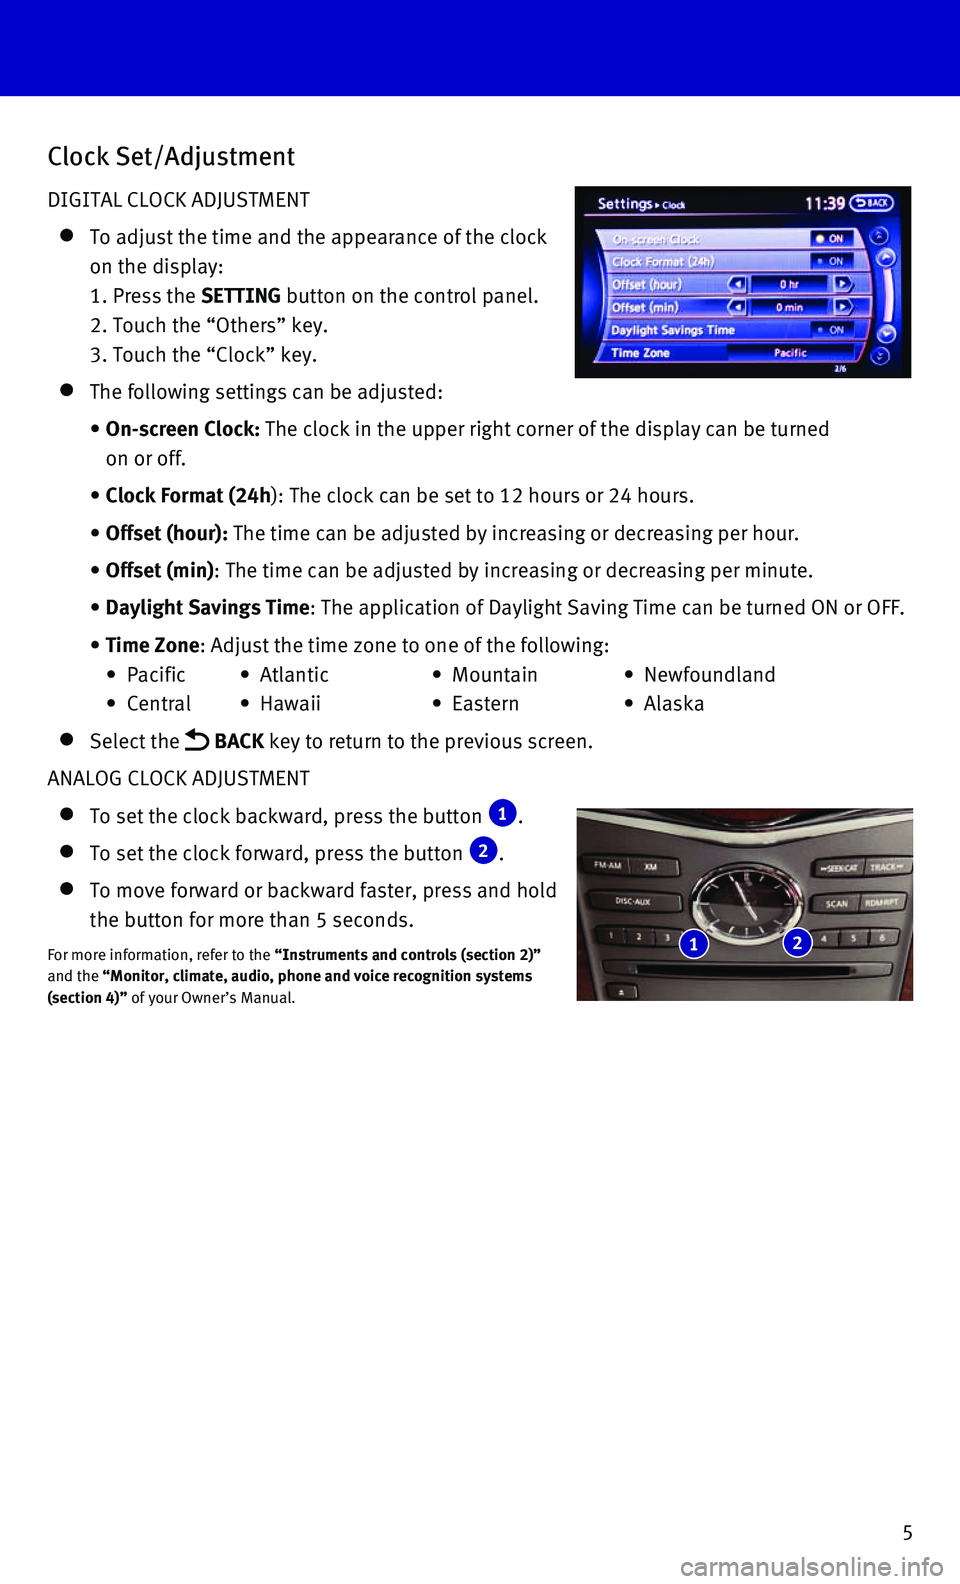
Clock Set/Adjustment
DIGITAL CLOCK ADJUSTMENT
To adjust the time and the appearance of the clock
on the display:
1. Press the SETTING button on the control panel.
2. Touch the “Others” key.
3. Touch the “Clock” key.
The following settings can be adjusted:
• On-screen Clock: The clock in the upper right corner of the display can be turned
on or off.
• Clock Format (24h): The clock can be set to 12 hours or 24 hours.
• Offset (hour): The time can be adjusted by increasing or decreasing per hour.
• Offset (min): The time can be adjusted by increasing or decreasing per minute.
• Daylight Savings Time: The application of Daylight Saving Time can be turned ON or OFF.
• Time Zone: Adjust the time zone to one of the following:
• Pacific • Atlantic • Mountain • Newfoundland
• Central • Hawaii • Eastern • Alaska
Select the BACK key to return to the previous screen.
ANALOG CLOCK ADJUSTMENT
To set the clock backward, press the button 1.
To set the clock forward, press the button 2.
To move forward or backward faster, press and hold
the button for more than 5 seconds.
For more information, refer to the “Instruments and controls (section 2)”
and the “Monitor, climate, audio, phone and voice recognition systems
(section 4)” of your Owner’s Manual. 1 2
Page 11 of 32

9
INFINITI Intelligent Key System
The INFINITI Intelligent Key system allows you to lock
or unlock your vehicle, open your liftgate and start the
engine. It is important to make sure the Intelligent Key
is with you (that is, in your pocket or purse).
LOCKING AND UNLOCKING YOUR VEHICLE
The operating range of the Intelligent Key is within
31.5 in (80 cm) from each request switch.
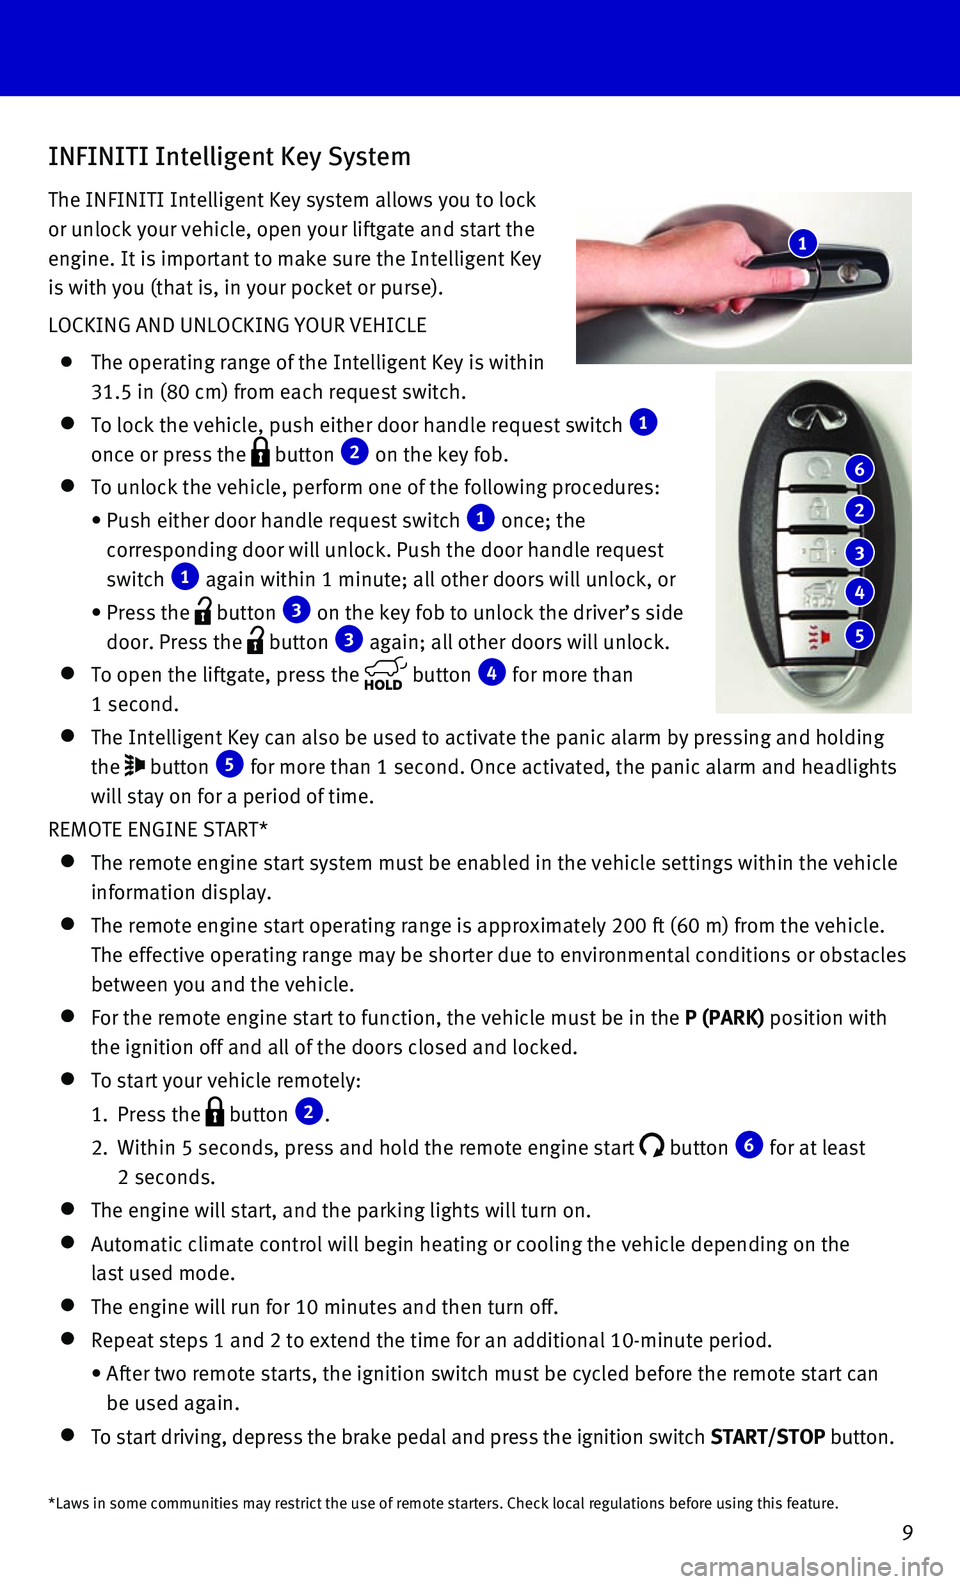
To lock the vehicle, push either door handle request switch 1
once or press the button 2 on the key fob.
To unlock the vehicle, perform one of the following procedures:
• Push either door handle request switch 1 once; the
corresponding door will unlock. Push the door handle request
switch 1 again within 1 minute; all other doors will unlock, or
• Press the button 3 on the key fob to unlock the driver’s side
door. Press the button 3 again; all other doors will unlock.
To open the liftgate, press the button 4 for more than
1 second.
The Intelligent Key can also be used to activate the panic alarm by pres\
sing and holding
the button 5 for more than 1 second. Once activated, the panic alarm and headlights \
will stay on for a period of time.
REMOTE ENGINE START*
The remote engine start system must be enabled in the vehicle settings w\
i thin the vehicle
information display.
The remote engine start operating range is approximately 200 ft (60 m)\
fro m the vehicle.
The effective operating range may be shorter due to environmental condit\
ions or obstacles
between you and the vehicle.
For the remote engine start to function, the vehicle must be in the P (PARK) position with
the ignition off and all of the doors closed and locked.
To start your vehicle remotely:
1. Press the button 2.
2. Within 5 seconds, press and hold the remote engine start button 6 for at least
2 seconds.
The engine will start, and the parking lights will turn on.
Automatic climate control will begin heating or cooling the vehicle depe\
nd ing on the
last used mode.
The engine will run for 10 minutes and then turn off.
Repeat steps 1 and 2 to extend the time for an additional 10-minute peri\
od .
• After two remote starts, the ignition switch must be cycled before the r\
emote start can
be used again.
To start driving, depress the brake pedal and press the ignition switch \
START/STOP button.
1
6
2
3
4
5
*Laws in some communities may restrict the use of remote starters. Check\
local regulations before using this feature.
Page 22 of 32

20
first drive features
Conventional (Fixed Speed) Cruise Control (if so equipped)
The cruise control system enables you to set a
constant cruising speed once the vehicle has
reached 25 mph (40 km/h).
The system will automatically maintain the set
speed until you tap the brake pedal, accelerate,
cancel or turn the system off.
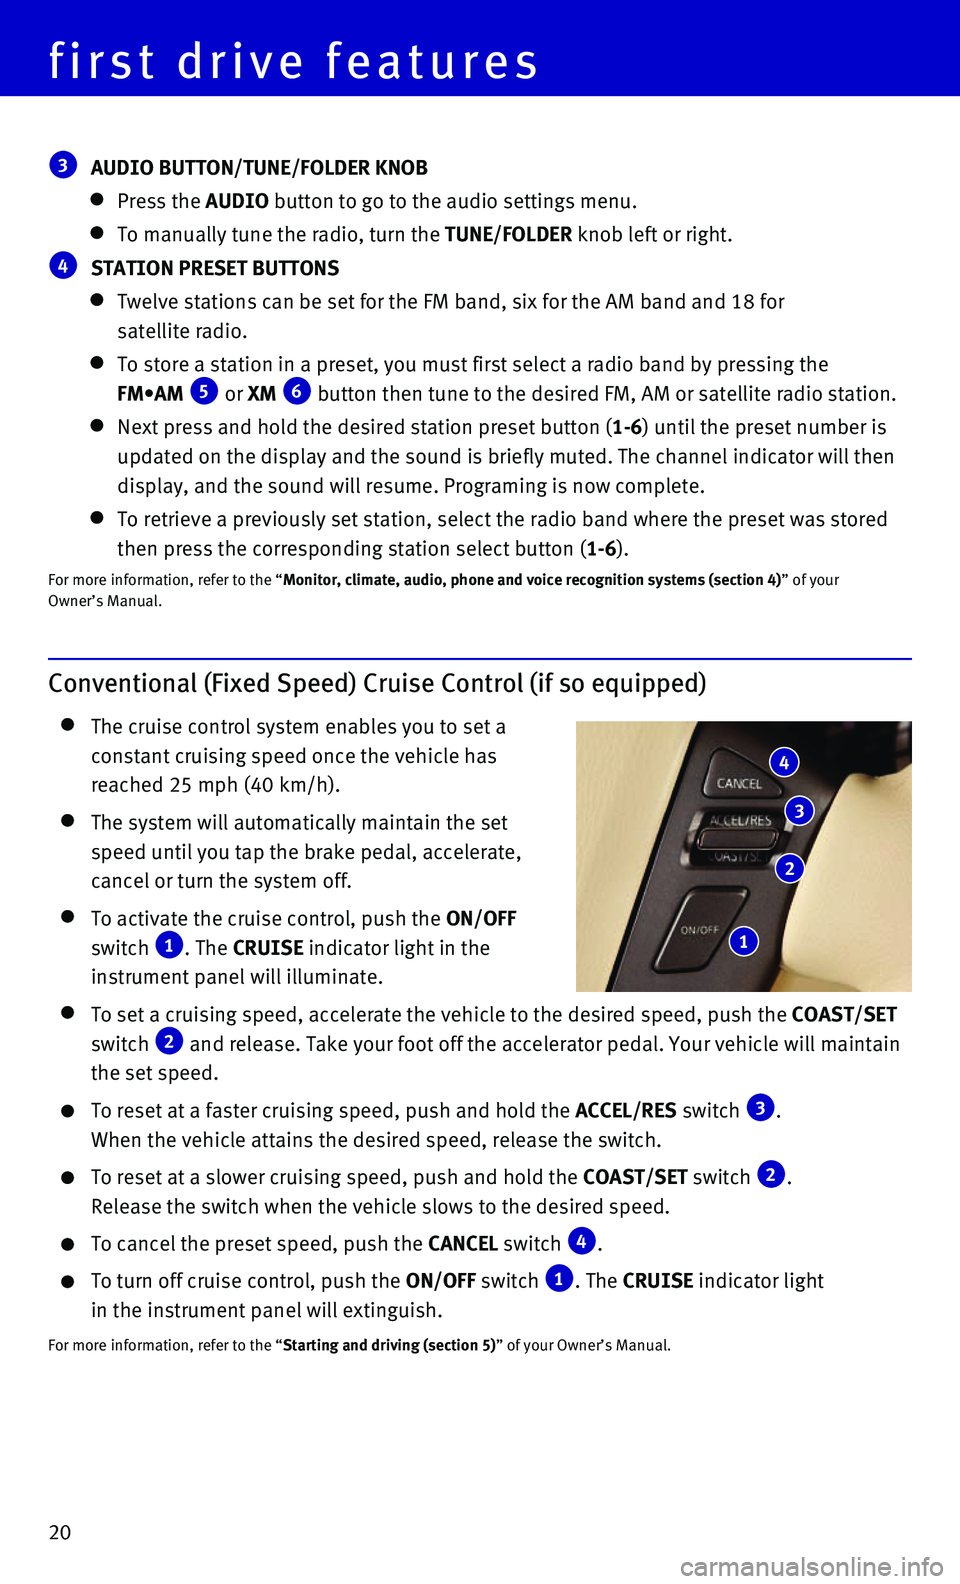
To activate the cruise control, push the ON/OFF
switch 1. The CRUISE indicator light in the
instrument panel will illuminate.
To set a cruising speed, accelerate the vehicle to the desired speed, pu\
sh the COAST/SET
switch 2 and release. Take your foot off the accelerator pedal. Your vehicle wil\
l maintain
the set speed.
To reset at a faster cruising speed, push and hold the ACCEL/RES switch 3.
When the vehicle attains the desired speed, release the switch.
To reset at a slower cruising speed, push and hold the COAST/SET switch 2.
Release the switch when the vehicle slows to the desired speed.
To cancel the preset speed, push the CANCEL switch 4.
To turn off cruise control, push the ON/OFF switch 1. The CRUISE indicator light
in the instrument panel will extinguish.
For more information, refer to the “Starting and driving (section 5)” of your Owner’s Manual.
4
3
2
1
3 AUDIO BUTTON/TUNE/FOLDER KNOB
Press the AUDIO button to go to the audio settings menu.
To manually tune the radio, turn the TUNE/FOLDER knob left or right.
4 STATION PRESET BUTTONS
Twelve stations can be set for the FM band, six for the AM band and 18 f\
or
satellite radio.
To store a station in a preset, you must first select a radio band by pr\
essing the
FM•AM 5 or XM 6 button then tune to the desired FM, AM or satellite radio station.
Next press and hold the desired station preset button (1-6) until the preset number is
updated on the display and the sound is briefly muted. The channel indic\
ator will then
display, and the sound will resume. Programing is now complete.
To retrieve a previously set station, select the radio band where the pr\
eset was stored
then press the corresponding station select button (1-6).
For more information, refer to the “Monitor, climate, audio, phone and voice recognition systems (section 4\
) ” of your
Owner’s Manual.