Page 25 of 36
 (if so equipped)
VEHICLE-TO-VEHICLE DISTANCE CONTROL MODE
To set vehicle-to-vehicle distance control mode,
press the
button 1 on the steering wheel for
l")
23
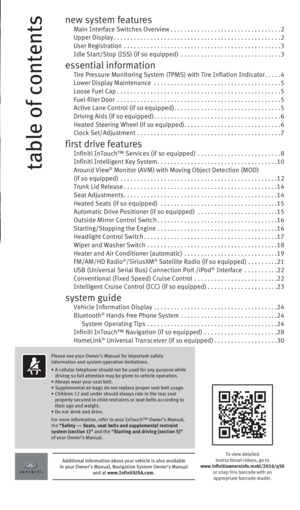
Intelligent Cruise Control (ICC) (if so equipped)
VEHICLE-TO-VEHICLE DISTANCE CONTROL MODE
To set vehicle-to-vehicle distance control mode,
press the
button 1 on the steering wheel for
less than 1.5 seconds. The gray
indicator light 2
will illuminate.
Accelerate to the desired speed.
Push down on the SET – switch 3
on the steering
wheel and release it. Intelligent Cruise Control will
be set to the desired speed.
Press the distance button 4 repeatedly to change
the set distance between long, middle and short.
When a vehicle is not detected ahead of you in the
lane, the set distance and set vehicle speed
indicator lights will illuminate
5 in set mode.
When a vehicle is detected ahead of you in the lane,
the vehicle ahead detection, set distance and set
vehicle speed indicator lights will illuminate
6 in
set mode.
To reset at a faster cruising speed, push up and
hold the RES + switch
7 on the steering wheel.
When the vehicle attains the desired speed, release
the switch.
To reset at a slower cruising speed, push down and hold the SET – switch 3
on the
steering wheel. Release the switch when the vehicle slows to the desired\
speed.
To cancel the preset speed, push the CANCEL switch 8
on the steering wheel. The set
vehicle speed indicator
5 will change to gray.
To turn off Intelligent Cruise Control, press the button 1 on the steering wheel.
The
indicator light 2 in the instrument panel will extinguish.
To set conventional (fixed speed) cruise control mode:
While Intelligent Cruise Control is off, press the button 1 on the steering wheel and
hold it down for more than 1.5 seconds. The grey
indicator light will illuminate.
Accelerate to the desired speed.
Push down on the SET – switch on the steering wheel and release it. The green
indicator light will illuminate. Cruise control should be set to the des\
ired speed.
To switch between the two cruise control modes:
When one of the two cruise modes is in use, you must turn the system off\
a nd then turn it
on again to select the other cruise control mode.
For more information, refer to the “Starting and driving (section 5)” of your Owner’s Manual.
2
5
6
1 8
4
7
3
1967179_16b_Q50_US_QRG_012916.indd 231/29/16 1:54 PM
Page 26 of 36

24
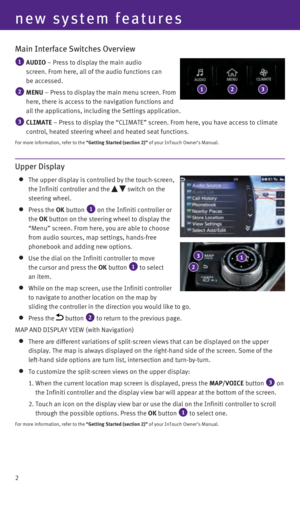
Bluetooth® Hands-free Phone System
A cellular telephone should not be used
while driving so full attention may be given
to vehicle operation.*
SYSTEM OPERATING TIPS
If the Voice Recognition system does not recognize
your voice commands:
1.
Be sure to wait for the tone/beep before speaking
a command.
2.
Reduce background noise as much as possible
by closing the windows and moonroof.
3.
Make sure there are no other conversations in
the car at the same time.
4.
Lower HVAC blower fan speed and point vents
away from the ceiling microphone.
5.
Speak naturally. Speaking too fast, too slow,
too soft, or too loud makes voice recognition more difficult.
6.
Confirm that the correct voice commands are being used. Glance at the sc\
reen to see the
currently available commands.
system guide
Vehicle Information Display
When the or button 1 on the steering
wheel is pressed, the following modes will appear
on the vehicle information display
2:
•
Fuel Economy
– Displays the current
fuel consumption.
•
Average Speed
– Displays the average vehicle
speed since the last reset.
•
Distance/Time
– Displays the elapsed time and
total distance the vehicle has been driven since
the last reset.
•
Range – Displays the estimated distance
to empty (dte) the vehicle can be driven
before refueling.
•
Navigation (if so equipped) – Displays the
navigation route information when route guidance is set in the Infiniti InTouch Navigation.
•
Audio – Displays the status of the audio information.
•
Driving Aids
(if so equipped) – Displays driving aid status.
•
Tire Pressure
(if so equipped) – Displays the current tire pressure in each tire\
.
•
Chassis Control
– Displays the status of Active Lane Control and Active Trace Contro\
l.
•
Warning – Displays when a warning is present.
Push the TRIP RESET switch 3 for approximately 1 second to reset the currently
displayed trip odometer to zero.
For more information, refer to the “Instruments and controls (section 2)” of your Owner’s Manual.
2
3
1
Microphone
Bluetooth®
Controls
*Some jurisdictions prohibit the use of cellular telephones while drivin\
g.
1967179_16b_Q50_US_QRG_012916.indd 241/29/16 1:54 PM
Page 27 of 36

25
Press the button on the steering wheel to activate Voice Recognition.
Press the
button on the steering wheel to interrupt the voice prompts at any time \
and
speak a command after the tone.
To use the system faster, you may speak the second level commands with t\
he main menu
command on the main menu.
To decrease or increase the volume of the voice prompts, push the volume\
control
switches or
on the steering wheel or turn the
(power) button/ VOL (volume) control
knob on the audio system while the system is responding.
The Voice Recognition system allows you to choose between voice input an\
d manual
control of lists. Choose the method that is easiest for you. For example\
, when a list is
shown, you can use the
switch and press the OK button on the steering wheel to
select an item from the displayed list instead of saying the item.
When using the feature to navigate lists during Voice Recognition, use the spoken
menu readout feature to help navigate the list easily. Voice input is pa\
used when menu
control is activated. To resume Voice Recognition, select a menu item by\
pushing
the
switch or simply press the button on the steering wheel.
To cancel a Voice Recognition session, say “Exit” or press and hol\
d the button on the
steering wheel for 5 seconds.
To go back to the previous command, say “Go Back”.
For more detailed information and instructions, refer to your cellular p\
hone’s Owner’s
Manual and visit
www.InfinitiUSA.com/bluetooth.
CONNECTING PROCEDURE
The vehicle must be stationary when connecting
the cellular phone.
1.
Press the MENU button below the lower display
and touch the “Settings” key.
2.
Touch the “Bluetooth” key.
3.
Touch “Connect Device” and then touch “Add New”.
4.
Initiate connecting from the cellular phone.
•
The connecting procedure varies according
to each cellular phone model. For detailed
connecting instructions and a list of compatible
cellular phones, please visit
www.InfinitiUSA.com/bluetooth.
•
When prompted for a PIN, enter the PIN that
appears on the screen into the handset.
5.
When connecting is complete, the screen will
return to the previous screen.
1967179_16b_Q50_US_QRG_012916.indd 251/29/16 1:54 PM
Page 28 of 36

26
Some cellular phones may require you to accept certain permissions in or\
der to enable
features on your Bluetooth® system. During the Bluetooth® pairing process, please check
your cellular phone’s display for pop-ups with the following request:\
•
Message Access — Granting Message Access permission will enable text \
messaging
features on your vehicle’s Bluetooth® system. A
pop-up may display on your cellular phone stating
that the Bluetooth
® system would like to access
your messages. Please select “ALLOW” 1 or
“YES” to grant this permission. If your cellular
phone presents an option to “Don’t show this
message again”, please make sure that this item
is checked.
Additionally, some popular devices will require
you to enable Notifications in order to receive text
messages through your vehicle. In your Bluetooth
®
menu, select the Information icon 2 next to the
name of your vehicle’s Bluetooth® system. Ensure
that “Show Notifications” 3 is enabled on this
screen. A vehicle ignition cycle may be required for
changes to take effect.
PHONEBOOK SETUP
Depending on your cellular phone, the system may
automatically download your cellular phone’s entire
phonebook to the vehicle’s Bluetooth
® system.
If the phonebook does not download automatically,
the vehicle phonebook may be set up for
manual entry.
To manually download entries:
1.
Press the
MENU button below the lower display.
2.
Touch the “Settings” key.
3.
Touch the “Phone/Mail”
key.
4.
Touch the “Phone Settings”
key.
5.
Touch the “Phonebook/Favorites Settings”
key.
6.
Touch the “Configure Phonebook Settings”
key.
7.
Touch the “Manual Phonebook Transfer”
key.
•
From here, you are able to transfer information from your cellular phone\
to
your vehicle.
1
2
3
system guide
1967179_16b_Q50_US_QRG_012916.indd 261/29/16 1:54 PM
Page 29 of 36

27
MAKING A CALL FROM THE PHONEBOOK
1.
Press the
button on the steering wheel. 2.
After waiting for the tone, say “Phone”.
3.
After waiting for the tone, say “Call”.
4.
After the next tone, speak the name of a phonebook entry. For example, “\
Michael Smith”.
In some cases, names stored using all UPPERCASE letters may not be recog\
nized by the
Voice Recognition system.
MAKING A CALL BY PHONE NUMBER
1.
Press the button on the steering wheel. A tone will sound.
2.
After waiting for the tone, say “Phone”.
3.
After waiting for the tone, say “Dial”.
4.
Say the number you wish to call starting with the area code in single di\
git format.
5.
When you have finished speaking the phone number, the system repeats it \
back and
announces the available commands.
6.
Say “Dial”. The system acknowledges the command and makes the call\
.
RECEIVING/ENDING A CALL
To accept the call, press the button on the
steering wheel or touch the “Answer” key on
the display.
To reject the call, touch the “Decline” key on
the display.
To hang up, press the button on the steering
wheel or touch the “Hang Up” key on the display.
For more information, refer to the “Hands-Free Phone (section 5)” and the
“Voice recognition (section 10)” of your InTouch Owner’s Manual or please
visit www.InfinitiUSA.com/bluetooth.
1967179_16b_Q50_US_QRG_012916.indd 271/29/16 1:54 PM
Page 30 of 36

Your Navigation System can calculate a route from your current location \
to a preferred
destination. The real-time map display and turn-by-turn")
28
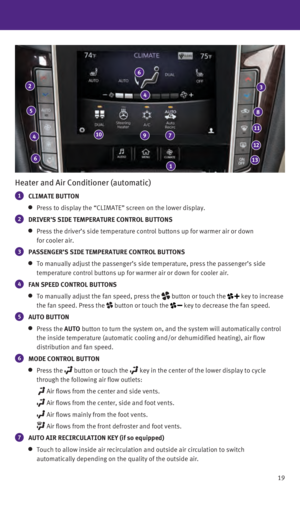
Infiniti InTouch™ Navigation (if so equipped)
Your Navigation System can calculate a route from your current location \
to a preferred
destination. The real-time map display and turn-by-turn voice guidance w\
ill lead you along
the route.
The Navigation system will continually update your vehicle’s position\
. If you have deviated
from the original route, it will recalculate the route from your current\
location.
SYSTEM OPERATION
Move through the menus and on-screen keys by
rotating the Infiniti controller 1 to highlight an
item on the screen and pressing the OK button 2 to select the highlighted item, or touch the desired
key on the touch-screen display.
Press the button 3 to return to the previous
screen. In a settings screen, this button can also
be used to apply the setting. In a character input
screen, this button can also delete the characters
that have been entered.
Press the MAP/VOICE button 4 to display the map.
Press and hold the CAMERA/ button 5 to
switch between the day screen (bright) and the
night screen (dark).
Upper Display 6 – Displays the map and can be
controlled by the Infiniti controller 1.
Lower Display 7 – Displays navigation functions
and is not controlled by the Infiniti controller 1.
Press the MENU button 8 below the lower display
to access the navigation functions.
SETTING A ROUTE
To set a route, first ensure that the correct region is
selected on the touch-screen.
1.
Press the
MENU button
8 below the
lower display.
2.
Touch the “Destination” key 9.
3.
Check the State/Province to make sure it is correct. The default is your\
current location.
4.
Enter the House Number and touch the “OK” key.
5.
Enter the Street Name and touch the “List” key.
6.
Select the preferred Street/City combination*.
7.
Touch the “Start” key.
* If the Street/City list is too long, press the button and touch the “City” key. Then enter the city name, and tou\
ch the “List”
key again.
1
4
5
3
2
6
7
9
8
system guide
1967179_16b_Q50_US_QRG_012916.indd 281/29/16 1:54 PM
Page 31 of 36

29
CANCELING A ROUTE
1.
Press the
MENU button
8 below the lower display.
2.
Touch the “Cancel Route” key 10.
ZOOMING IN AND OUT
On the map screen, turn the Infiniti controller 1
right or left to zoom in or out.
MOVING AROUND THE MAP
To scroll the map, slide the Infiniti controller 1 in the direction you want to scroll.
CHANGING THE MAP VIEW
It is possible to switch between different map views: 2D and bird’s-e\
ye view (3D).
To switch to the preferred map view:
1.
Press the
MENU button
8 below the
lower display.
2.
Touch the “Settings” key 11.
3.
Touch the “Navigation” key 12.
4.
Touch the “Map Preferences” key.
5.
Touch the “Map View” key.
6.
From the “Map View” screen, you can
choose North Up (2D), Heading Up (2D) or
Birdview (3D) map views.
VOICE GUIDANCE
To activate voice guidance:
1.
Press the
MENU button
8 below the
lower display.
2.
Touch the “Settings” key 11.
3.
Touch the “Navigation” key 12.
4.
Touch the “Guidance Preferences” key.
5.
Touch the “Voice Guidance” key to toggle voice guidance on or off.\
To adjust the guidance volume, select the “Guidance Volume” key.
To hear the current guidance during a programed route, press and hold th\
e MAP/VOICE
button 4 next to the Infiniti controller 1.
For more information, refer to your InTouch Owner’s Manual.
10
11
12
1967179_16b_Q50_US_QRG_012916.indd 291/29/16 1:54 PM
Page 32 of 36

The HomeLink® Universal Transceiver can learn and consolidate the functions of up to \
three different hand-held transmitters, operating items")
30
HomeLink® Universal Transceiver (if so equipped)
The HomeLink® Universal Transceiver can learn and consolidate the functions of up to \
three different hand-held transmitters, operating items such as garage d\
oors, property
gates, outdoor and indoor lights or alarm systems.
To program the HomeLink® Universal Transceiver:
• Position the handheld transceiver 1-3 in (26-76 mm) away from the Home\
Link surface,
keeping the HomeLink indicator light in view.
• Press and hold the desired HomeLink button and the handheld transmitter \
button
simultaneously until the HomeLink indicator light flashes slowly and the\
n rapidly.
•
Both buttons may be released when the indicator light flashes rapidly.
To verify the programing is complete, press and hold the HomeLink button\
and observe the
indicator light:
• A solid, continuous light indicates the programing is complete and the H\
omeLink button
will activate your device.
• A blinking light that turns to a solid, continuous light after 2 seconds\
indicates additional
steps are required to complete the programing.
An additional person may make the remaining steps easier. To complete th\
e
programing process:
• At the receiver of the device that you are programing to the HomeLink bu\
tton, press and
release the learn or smart button (the name may vary by manufacturer, b\
ut it is usually
located near where the hanging antenna wire is attached to the unit). Y\
ou have
approximately 30 seconds to initiate the following step.
•
Press and hold the programed HomeLink button for 2 seconds and release.
You may have to repeat the previous two steps up to three times to complete the
programing process. HomeLink should now activate your device.
For more information, refer to the “Instruments and controls (section 2)” of your Owner’s Manual, the HomeLink website
at www.homelink.com or call 1-800-355-3515.
HOMELINK
system guide
1967179_16b_Q50_US_QRG_012916.indd 301/29/16 1:54 PM