Page 399 of 642
5-15
Driving your vehicle
5
The indicator in the instrument clus-
ter displays the shift lever position
when the ignition switch is in the ONposition.
P (Park)
Always come to a complete stop
before shifting into P (Park).
To shift from P (Park), you must
depress firmly on the brake pedal
and make sure your foot is off the
accelerator pedal.
If you have done all of the above and
still cannot shift the lever out of P
(Park), see "Shift-Lock Release" onpage 5-25.
The shift lever must be in P (Park)
before turning the engine off.
To reduce the risk of serious
injury or death:
ALWAYS check the surround-
ing areas near your vehicle for
people, especially children,
before shifting a vehicle into
D (Drive) or R (Reverse).
Before leaving the driver's
seat, always make sure the
shift lever is in the P (Park)
position, then set the parking
brake, and place the ignition
switch in the LOCK/OFF posi-
tion. Unexpected and sudden
vehicle movement can occurif these precautions are not
followed.
Do not use engine braking
(shifting from a high gear to
lower gear) rapidly on slip-
pery roads. The vehicle mayslip causing an accident.
WARNING
Shifting into P (Park) while the
vehicle is in motion may
cause you to lose control of
the vehicle.
After the vehicle has stopped,
always make sure the shift
lever is in P (Park), apply the
parking brake, and turn the
engine off.
Do not use the P (Park) posi- tion in place of the parking
brake.
WARNING
Page 406 of 642
5-22
The indicator in the instrument clus-
ter displays the shift lever position
when the ignition switch is in the ONposition.
P (Park)
Always come to a complete stop
before shifting into P (Park).
To shift from P (Park), you must
depress firmly on the brake pedal
and make sure your foot is off the
accelerator pedal.
If you have done all of the above and
still cannot shift the lever out of P
(Park), see "Shift-Lock Release" inthis section.
The shift lever must be in P (Park)
before turning the engine off.
R (Reverse)
Use this position to drive the vehicle
backward.
Driving your vehicle
Always come to a complete
stop before shifting into or out
of R (Reverse); you may dam-
age the transmission if you shift
into R (Reverse) while the vehi-
cle is in motion.
CAUTION
Shifting into P (Park) while the
vehicle is in motion may
cause you to lose control of
the vehicle.
After the vehicle has stopped,
always make sure the shift
lever is in P (Park), apply the
parking brake, and turn the
engine off.
Do not use the P (Park) posi- tion in place of the parking
brake.
WARNING
Page 427 of 642
5-43
Driving your vehicle
AWD operation
5
If AWD warning light ( ) stays on the instrument cluster, your vehicle may have a malfunction with the
AWD system. When the AWD warning light ( ) illuminates have your vehicle checked by an authorized
HYUNDAI dealer as soon as possible.
WARNING
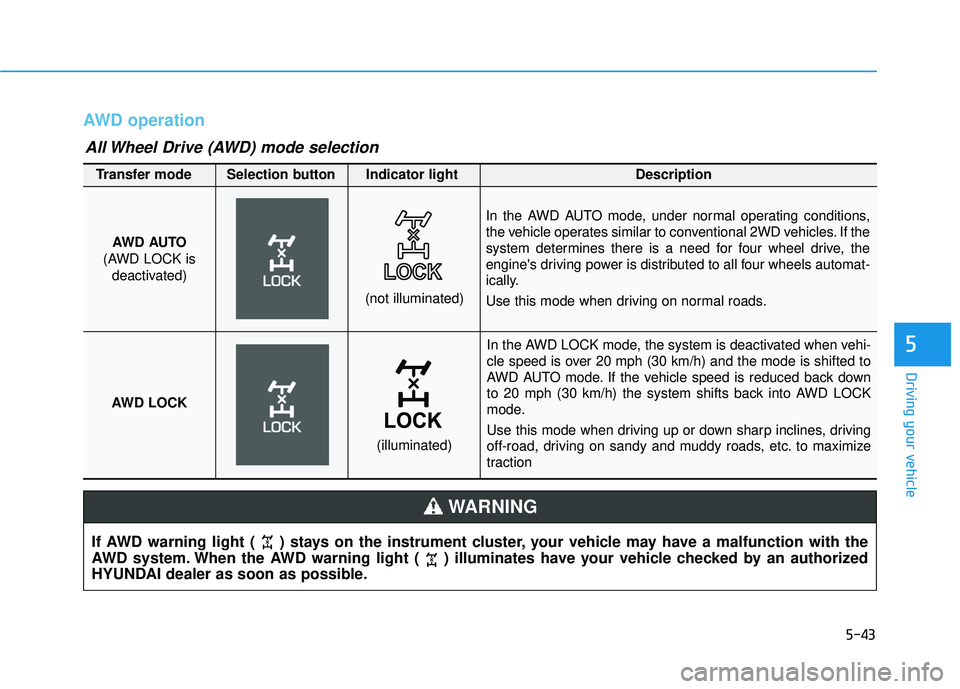
In the AWD LOCK mode, the system is deactivated when vehi-
cle speed is over 20 mph (30 km/h) and the mode is shifted to
AWD AUTO mode. If the vehicle speed is reduced back down
to 20 mph (30 km/h) the system shifts back into AWD LOCK
mode.
Use this mode when driving up or down sharp inclines, driving
off-road, driving on sandy and muddy roads, etc. to maximize
traction
AWD AUTO
(AWD LOCK is deactivated)
(not illuminated)
Transfer mode Selection button Indicator light Description
In the AWD AUTO mode, under normal operating conditions,
the vehicle operates similar to conventional 2WD vehicles. If the
system determines there is a need for four wheel drive, the
engine's driving power is distributed to all four wheels automat-
ically.
Use this mode when driving on normal roads.
AWD LOCK
(illuminated)
All Wheel Drive (AWD) mode selection
Page 433 of 642
5-49
Driving your vehicle
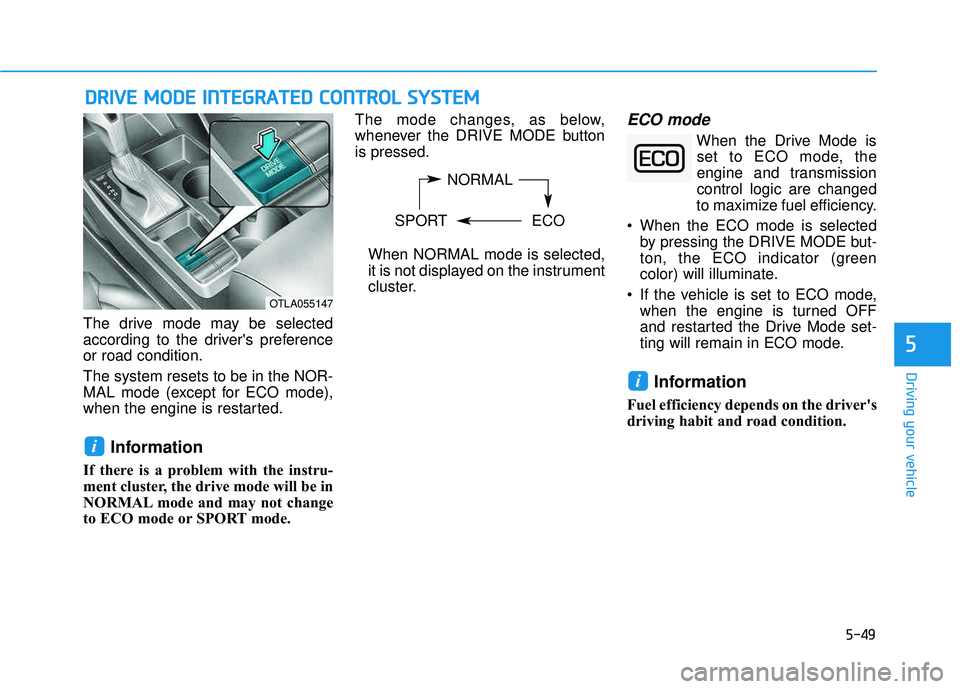
The drive mode may be selected
according to the driver's preferenceor road condition. The system resets to be in the NOR-
MAL mode (except for ECO mode),
when the engine is restarted.
Information
If there is a problem with the instru-
ment cluster, the drive mode will be in
NORMAL mode and may not change
to ECO mode or SPORT mode. The mode changes, as below,
whenever the DRIVE MODE buttonis pressed.
When NORMAL mode is selected,
it is not displayed on the instrument
cluster.
ECO mode
When the Drive Mode isset to ECO mode, the
engine and transmissioncontrol logic are changed
to maximize fuel efficiency.
When the ECO mode is selected by pressing the DRIVE MODE but-
ton, the ECO indicator (green
color) will illuminate.
If the vehicle is set to ECO mode, when the engine is turned OFF
and restarted the Drive Mode set-
ting will remain in ECO mode.
Information
Fuel efficiency depends on the driver's
driving habit and road condition.
i
i
DDRRIIVV EE MM OODDEE IINN TTEEGG RRAA TTEEDD CC OO NNTTRR OO LL SS YY SSTT EEMM
5
NORMAL
SPORT ECO
OTLA055147
Page 456 of 642
5-72
Driving your vehicle
LDWS Operation
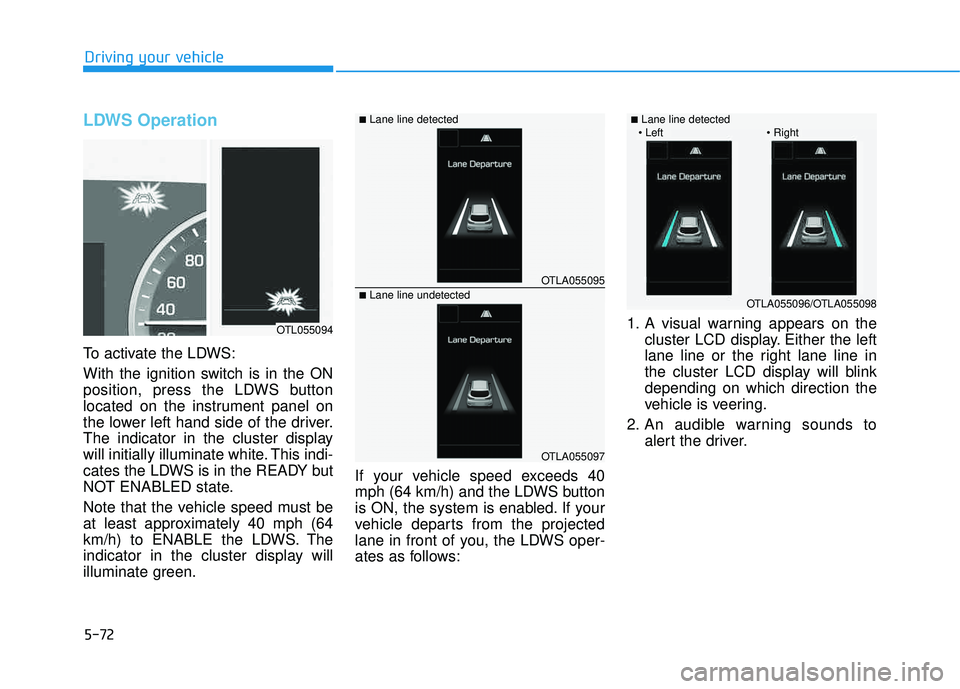
To activate the LDWS:
With the ignition switch is in the ON
position, press the LDWS button
located on the instrument panel on
the lower left hand side of the driver.
The indicator in the cluster display
will initially illuminate white. This indi-
cates the LDWS is in the READY but
NOT ENABLED state.
Note that the vehicle speed must be
at least approximately 40 mph (64
km/h) to ENABLE the LDWS. The
indicator in the cluster display will
illuminate green.If your vehicle speed exceeds 40
mph (64 km/h) and the LDWS button
is ON, the system is enabled. If your
vehicle departs from the projected
lane in front of you, the LDWS oper-
ates as follows:1. A visual warning appears on the
cluster LCD display. Either the left
lane line or the right lane line in
the cluster LCD display will blinkdepending on which direction the
vehicle is veering.
2. An audible warning sounds to alert the driver.
OTLA055095
OTLA055097
■Lane line detected
■Lane line undetected
OTL055094
OTLA055096/OTLA055098
■Lane line detected
Page 459 of 642
5-75
Driving your vehicle
5
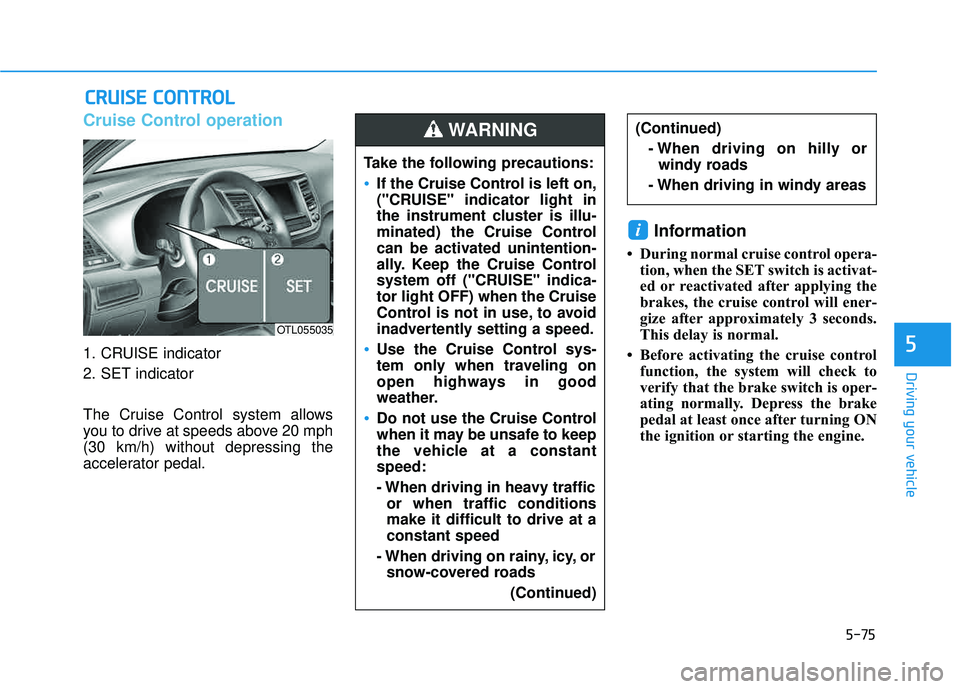
Cruise Control operation
1. CRUISE indicator
2. SET indicator
The Cruise Control system allows
you to drive at speeds above 20 mph(30 km/h) without depressing the
accelerator pedal.
Information
During normal cruise control opera-tion, when the SET switch is activat-
ed or reactivated after applying the
brakes, the cruise control will ener-
gize after approximately 3 seconds.
This delay is normal.
Before activating the cruise control function, the system will check to
verify that the brake switch is oper-
ating normally. Depress the brake
pedal at least once after turning ON
the ignition or starting the engine.
i
CCRR UU IISS EE CC OO NNTTRR OO LL
Take the following precautions:
If the Cruise Control is left on,
("CRUISE" indicator light in
the instrument cluster is illu-
minated) the Cruise Control
can be activated unintention-
ally. Keep the Cruise Control
system off ("CRUISE" indica-tor light OFF) when the Cruise
Control is not in use, to avoid
inadvertently setting a speed.
Use the Cruise Control sys-
tem only when traveling on
open highways in good
weather.
Do not use the Cruise Control
when it may be unsafe to keep
the vehicle at a constantspeed:
- When driving in heavy traffic
or when traffic conditions make it difficult to drive at aconstant speed
- When driving on rainy, icy, or snow-covered roads
(Continued)
(Continued)- When driving on hilly orwindy roads
- When driving in windy areasWARNING
OTL055035
Page 462 of 642
5-78
Driving your vehicle
Cruise Control will be canceledwhen:
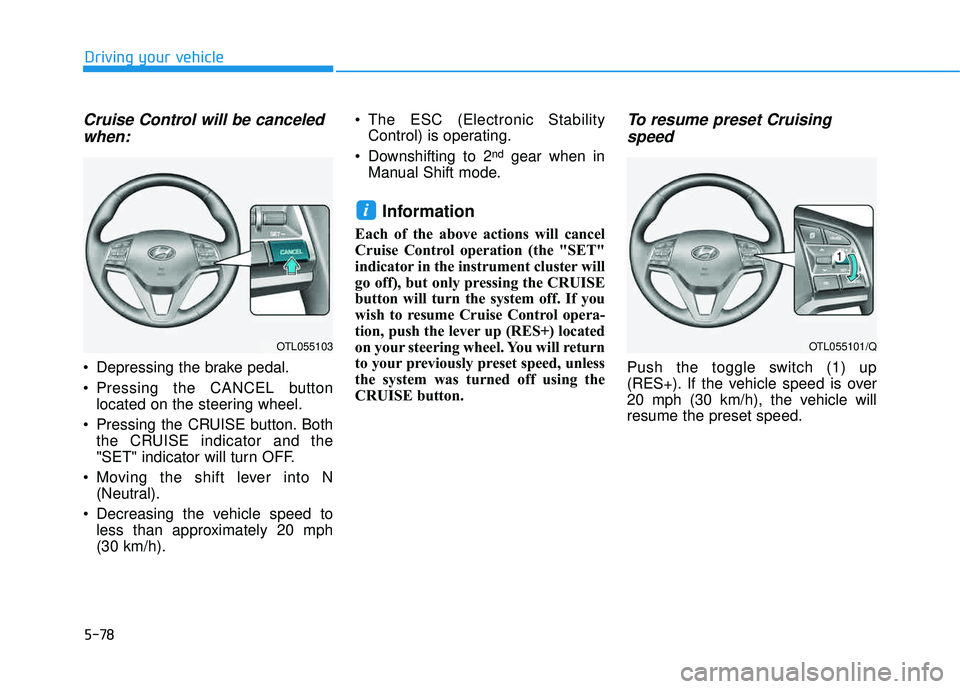
Depressing the brake pedal.
Pressing the CANCEL button located on the steering wheel.
Pressing the CRUISE button. Both the CRUISE indicator and the
"SET" indicator will turn OFF.
Moving the shift lever into N (Neutral).
Decreasing the vehicle speed to less than approximately 20 mph(30 km/h). The ESC (Electronic Stability
Control) is operating.
Downshifting to 2
ndgear when in
Manual Shift mode.
Information
Each of the above actions will cancel
Cruise Control operation (the "SET"
indicator in the instrument cluster will
go off), but only pressing the CRUISE
button will turn the system off. If you
wish to resume Cruise Control opera-
tion, push the lever up (RES+) located
on your steering wheel. You will return
to your previously preset speed, unless
the system was turned off using the
CRUISE button.
To resume preset Cruising
speed
Push the toggle switch (1) up
(RES+). If the vehicle speed is over
20 mph (30 km/h), the vehicle willresume the preset speed.
i
OTL055103OTL055101/Q
Page 478 of 642
5-94
Driving your vehicle
Turn signals
When you tow a trailer, your vehicle
has to have a different turn signal
flasher and extra wiring. The green
arrows on your instrument panel will
flash whenever you signal a turn or
lane change. Properly connected,
the trailer lights will also flash to alert
other drivers you're about to turn,
change lanes, or stop.
When towing a trailer, the green
arrows on your instrument panel will
flash for turns even if the bulbs on the
trailer are burned out. Thus, you may
think drivers behind you are seeing
your signals when, in fact, they are
not. It’s important to check occasion-
ally to be sure the trailer bulbs are still
working. You must also check the
lights every time you disconnect and
then reconnect the wires.
Driving on hills
Reduce speed and shift to a lower
gear before you start down a long or
steep downgrade. If you don't shift
down, you might have to use your
brakes so much that they would get
overheated and may not operate effi-
ciently.
On a long uphill grade, shift down
and reduce your speed to around 45mph (70 km/h) to reduce the possi-
bility of engine and transmission
overheating.
If your trailer weighs more than the
maximum trailer weight without trailer
brakes, you should drive in D (Drive)
when towing a trailer. Operating your
vehicle in D (Drive) when towing a
trailer will minimize heat build-up and
extend the life of your transmission.
Do not connect a trailer lighting
system directly to your vehi-
cle’s lighting system. Use an
approved trailer wiring harness.
Failure to do so could result in
damage to the vehicle electrical
system and/or personal injury.
Consult an authorized HYUNDAI
dealer for assistance.WARNING