2016 Hyundai Sonata Hybrid steering
[x] Cancel search: steeringPage 194 of 708
3-99
Convenient features of your vehicle
3
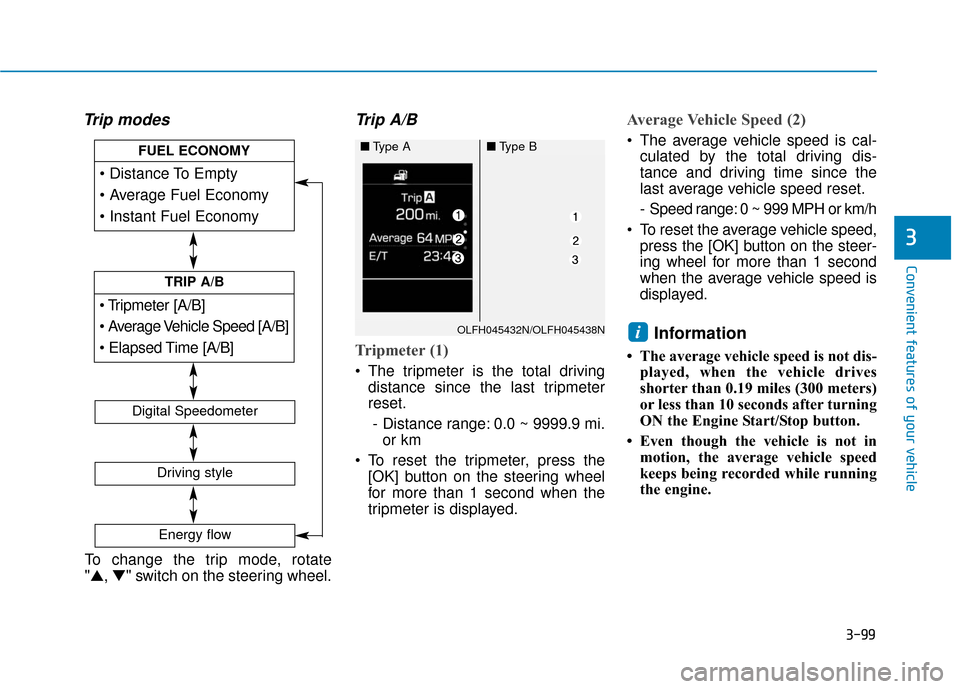
Trip modesTrip A/B
Tripmeter (1)
The tripmeter is the total driving
distance since the last tripmeter
reset.
- Distance range: 0.0 ~ 9999.9 mi. or km
To reset the tripmeter, press the [OK] button on the steering wheel
for more than 1 second when the
tripmeter is displayed.
Average Vehicle Speed (2)
The average vehicle speed is cal-culated by the total driving dis-
tance and driving time since the
last average vehicle speed reset.
- Speed range: 0 ~ 999 MPH or km/h
To reset the average vehicle speed, press the [OK] button on the steer-
ing wheel for more than 1 second
when the average vehicle speed is
displayed.
Information
• The average vehicle speed is not dis- played, when the vehicle drives
shorter than 0.19 miles (300 meters)
or less than 10 seconds after turning
ON the Engine Start/Stop button.
• Even though the vehicle is not in motion, the average vehicle speed
keeps being recorded while running
the engine.
i
[A/B]
TRIP A/B
FUEL ECONOMY
Digital Speedometer
Driving style
Energy flow
OLFH045432N/OLFH045438N
■Type A■Type B
To change the trip mode, rotate
"▲, ▼" switch on the steering wheel.
Page 195 of 708
3-100
Convenient features of your vehicle
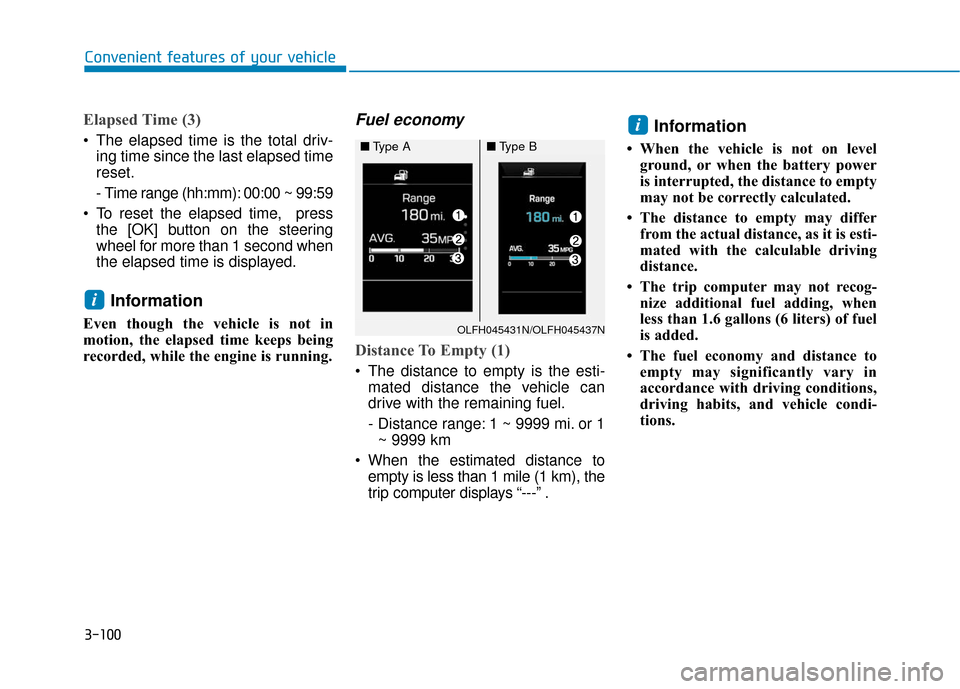
Elapsed Time (3)
The elapsed time is the total driv-ing time since the last elapsed time
reset.
- Time range (hh:mm): 00:00 ~ 99:59
To reset the elapsed time, press the [OK] button on the steering
wheel for more than 1 second when
the elapsed time is displayed.
Information
Even though the vehicle is not in
motion, the elapsed time keeps being
recorded, while the engine is running.
Fuel economy
Distance To Empty (1)
The distance to empty is the esti-mated distance the vehicle can
drive with the remaining fuel.
- Distance range: 1 ~ 9999 mi. or 1~ 9999 km
When the estimated distance to empty is less than 1 mile (1 km), the
trip computer displays “---” .
Information
• When the vehicle is not on levelground, or when the battery power
is interrupted, the distance to empty
may not be correctly calculated.
• The distance to empty may differ from the actual distance, as it is esti-
mated with the calculable driving
distance.
• The trip computer may not recog- nize additional fuel adding, when
less than 1.6 gallons (6 liters) of fuel
is added.
• The fuel economy and distance to empty may significantly vary in
accordance with driving conditions,
driving habits, and vehicle condi-
tions.
i
i
OLFH045431N/OLFH045437N
■ Type A■Type B
Page 196 of 708
3-101
Convenient features of your vehicle
3
Average Fuel Economy (2)
The average fuel economy is calcu-lated by the total driving distance
and fuel consumption since the last
average fuel economy reset.
- Fuel economy range: 0.0 ~ 99.9MPG or L/100km or km/L
The average fuel economy can be reset both manually and automati-
cally.
Manual reset
To manually reset the average fuel
economy, press the OK button on the
steering wheel for more than 1 sec-
ond, when the average fuel economy
is displayed.
For more information about the
OK button, refer to "LCD Display
Control" in this chapter.
Automatic reset
To automatically reset the average fuel
economy after refueling, select the
"Auto Reset" mode in User Settings
menu on the LCD display (Refer to
"LCD Display“ in this chapter).
In "Auto Reset" mode, the average fuel
economy will be reset to zero (---),
when driving speed exceeds 1 km/h,
after adding 1.6 gallons (6 liters) of fuel
or more.
Information
The average fuel economy may be
inaccurate when the vehicle drives
shorter than 0.19 miles (300 meters)
after turning ON the Engine Start/Stop
button.
Instant Fuel Economy (3)
This mode displays the instant fueleconomy during the last few sec-
onds when vehicle speed exceeds
6.2 MPH (10 km/h).
- Fuel economy range:0 ~ 50 MPG or 0 ~ 30 L/100km
i
Page 208 of 708
3-113
Convenient features of your vehicle
3
Battery saver function
The purpose of this feature is to pre-
vent the battery from being dis-
charged. The system automatically
turns off the parking lamp when the
driver turns the engine off and opens
the driver-side door.
With this feature, the parking lamps
will turn off automatically if the driver
parks on the side of road at night.
If necessary, to keep the lamps on
when the engine is turned off, perform
the following:
1) Open the driver-side door.
2) Turn the parking lamps OFF andON again using the light switch on
the steering column.
Headlamp delay function (if equipped)
If engine Start/Stop button is in the
ACC or OFF position with the head-
lamps ON, the headlamps (and/or
parking lamps) remain on for about 5
minutes. However, if the driver’s door
is opened and closed, the headlamps
are turned off after 15 seconds.
However, with the engine off if the dri-
ver’s door is opened and closed, the
headlamps (and/or parking lamps)
are turned off after 15 seconds.
The headlamps (and/or parking
lamps) can be turned off by pressing
the lock button on the smart key
twice or turning the light switch to the
OFF or AUTO position. However, if
you turn the light switch to the AUTO
position when it is dark outside, the
headlamps will not be turned off.
You can activate or deactivate the
Headlamp Delay function from the
User Settings Mode (Light) on the
LCD display.
For more information, refer to the
"LCD Display" section in this
chapter. If the driver gets out of the vehicle
through other doors (except dri-
ver’s door), the battery saver func-
tion does not operate and the
headlamp delay function does not
turn off automatically. Therefore, It
causes the battery to be dis-
charged. In this case, make sure
to turn off the lamp before getting
out of the vehicle.
NOTICE
Page 245 of 708
3-150
Convenient features of your vehicle
Clock
With Audio system
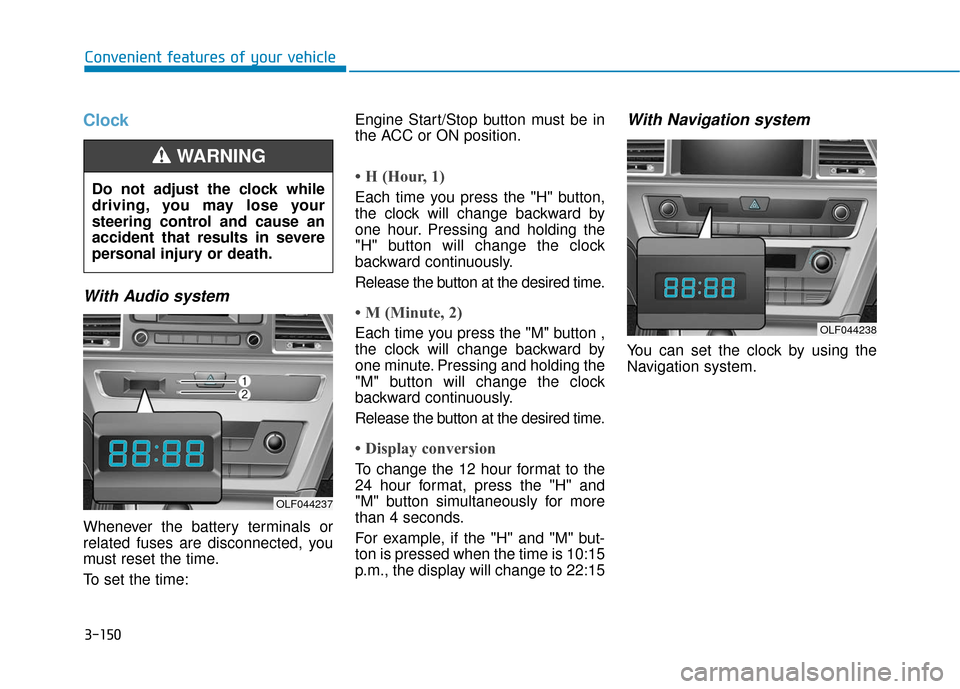
Whenever the battery terminals or
related fuses are disconnected, you
must reset the time.
To set the time:Engine Start/Stop button must be in
the ACC or ON position.
• H (Hour, 1)
Each time you press the "H" button,
the clock will change backward by
one hour. Pressing and holding the
"H" button will change the clock
backward continuously.
Release the button at the desired time.
• M (Minute, 2)
Each time you press the "M" button ,
the clock will change backward by
one minute. Pressing and holding the
"M" button will change the clock
backward continuously.
Release the button at the desired time.
• Display conversion
To change the 12 hour format to the
24 hour format, press the "H" and
"M" button simultaneously for more
than 4 seconds.
For example, if the "H" and "M" but-
ton is pressed when the time is 10:15
p.m., the display will change to 22:15
With Navigation system
You can set the clock by using the
Navigation system.
Do not adjust the clock while
driving, you may lose your
steering control and cause an
accident that results in severe
personal injury or death.
WARNING
OLF044237
OLF044238
Page 249 of 708
Multimedia System
Multimedia System.................................................4-2
AUX, USB and iPod®Port ...............................................4-2
Antenna ........................................................................\
.......4-2
Steering Wheel Audio Control........................................4-3
Audio / Video / Navigation System (AVN) ..................4-4
Bluetooth®Wireless Technology Hands-Free ...........4-4
How Vehicle Audio Works ...............................................4-5
Features of Your Vehicle.................................................4-7
System Controllers and Functions
-3.8 Inch Mono TFT ................................4-18, 4-111
Audio Head Unit .................................................4-18, 4-111
Setup .....................................................................4-2\
0, 4-113
Radio : FM, AM, SiriusXM ...............................4-23, 4-116
SiriusXM, XM
TMRADIO ......................................4-26, 4-117
Basic Method of Use : Audio CD /
MP3 CD / USB / iPod
®/ My Music .............4-28, 4-119
Bluetooth®Wireless Technology Audio .......4-34, 4-125
Bluetooth®Wireless Technology ...................4-36, 4-127
Voice Recognition ..............................................4-47, 4-138
Ending Voice Recognition ................................4-48, 4-139
System Controllers and Functions
- 5 Inch Color TFT LCD ..........................4-55, 4-145
Audio Head Unit .................................................4-55, 4-145
Steering-Wheel Mounted Controls ...............4-57, 4-147
Radio Mode .........................................................4-59, 4-149
SiriusXM, XM
TMRadio Mode ...........................4-63, 4-151
Media Mode ........................................................4-65, 4-153
Audio CD Mode ..................................................4-66, 4-154
MP3 CD Mode.....................................................4-68, 4-156
USB Mode............................................................4-71, 4-159
iPod
®Mode .........................................................4-74, 4-162
AUX Mode ...........................................................4-76, 4-164
MY Music Mode.................................................4-77, 4-165
Bluetooth®Wireless Technology
Audio Mode .........................................................4-80, 4-168
Voice Recognition ..............................................4-95, 4-183
Setup...................................................................4-101\
, 4-190
Rear View Camera ...........................................4-106, 4-194
Blue Link
®..........................................................4-106, 4-194
Declaration of conformity ..........................................4-198
4
Page 251 of 708
4-3
Multimedia System
Do not clean the inside of therear window glass with a cleaner
or scraper to remove foreign
deposits as this may cause dam-
age to the antenna elements.
Avoid adding metallic coatings such as Ni, Cd, and so on. These
can degrade the receiving AM
and FM broadcast signals.
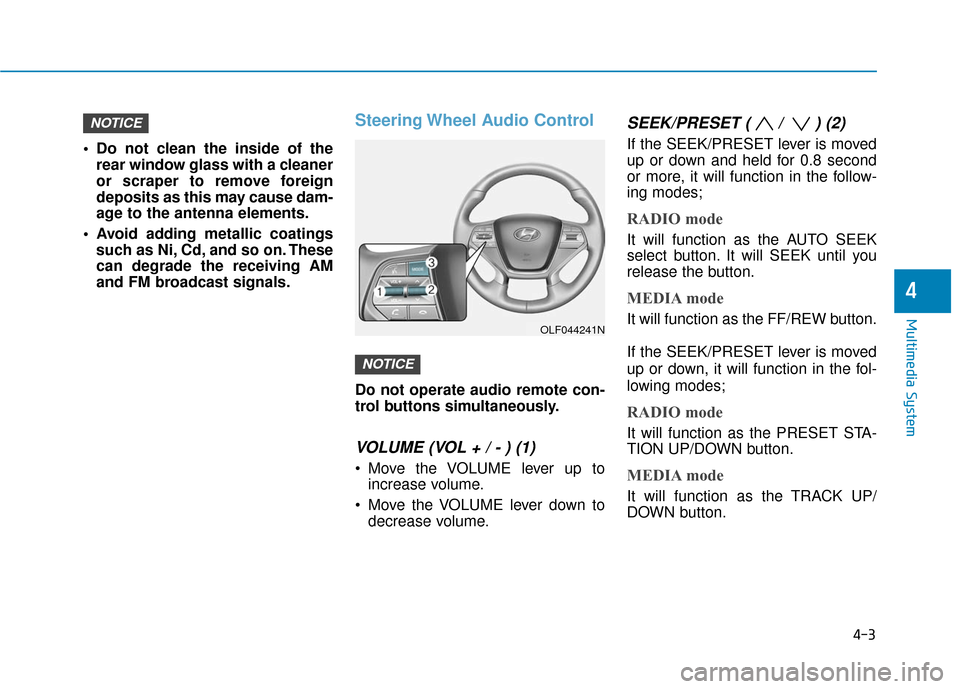
Steering Wheel Audio Control
Do not operate audio remote con-
trol buttons simultaneously.
VOLUME (VOL + / - ) (1)
Move the VOLUME lever up toincrease volume.
Move the VOLUME lever down to decrease volume.
SEEK/PRESET ( / ) (2)
If the SEEK/PRESET lever is moved
up or down and held for 0.8 second
or more, it will function in the follow-
ing modes;
RADIO mode
It will function as the AUTO SEEK
select button. It will SEEK until you
release the button.
MEDIA mode
It will function as the FF/REW button.
If the SEEK/PRESET lever is moved
up or down, it will function in the fol-
lowing modes;
RADIO mode
It will function as the PRESET STA-
TION UP/DOWN button.
MEDIA mode
It will function as the TRACK UP/
DOWN button.
NOTICE
NOTICE
4
OLF044241N
Page 283 of 708
4-35
Multimedia System
4
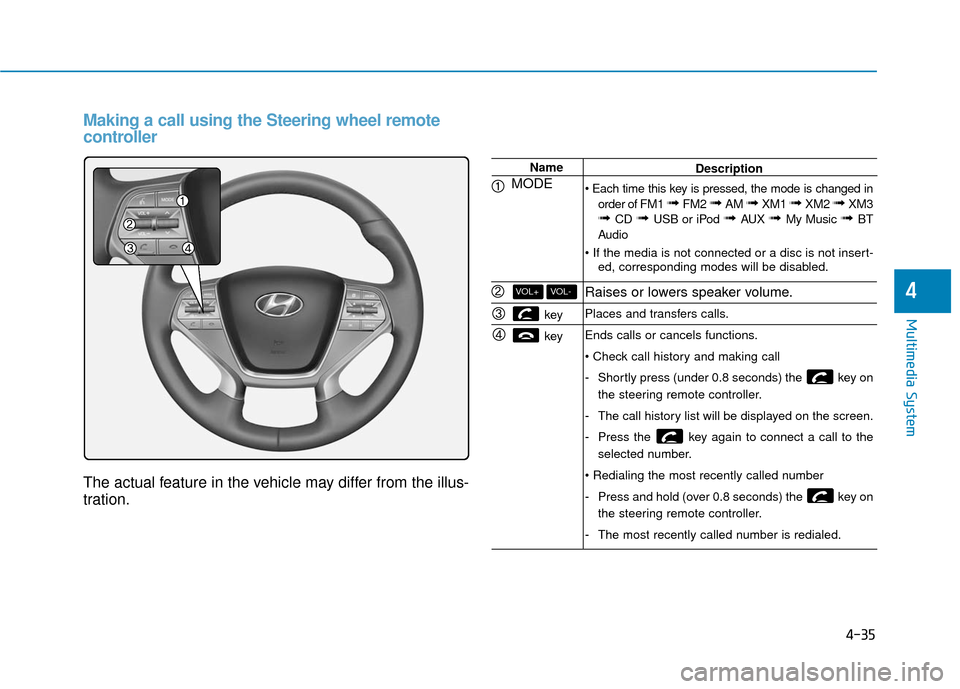
Making a call using the Steering wheel remote
controller
The actual feature in the vehicle may differ from the illus-
tration.
Name
MODE
key
key
VOL-VOL+
Description
order of FM1
➟ FM2 ➟ AM ➟ XM1 ➟ XM2 ➟ XM3➟ CD ➟ USB or iPod ➟ AUX ➟ My Music ➟ BT
Audio
ed, corresponding modes will be disabled.
Raises or lowers speaker volume.
Places and transfers calls.
Ends calls or cancels functions.
-Shortly press (under 0.8 seconds) the key on
the steering remote controller.
- The call history list will be displayed on the screen.
- Press the key again to connect a call to the
selected number.
- Press and hold (over 0.8 seconds) the key on
the steering remote controller.
- The most recently called number is redialed.