2016 Hyundai Santa Fe battery
[x] Cancel search: batteryPage 19 of 699
27
Your vehicle at a glance
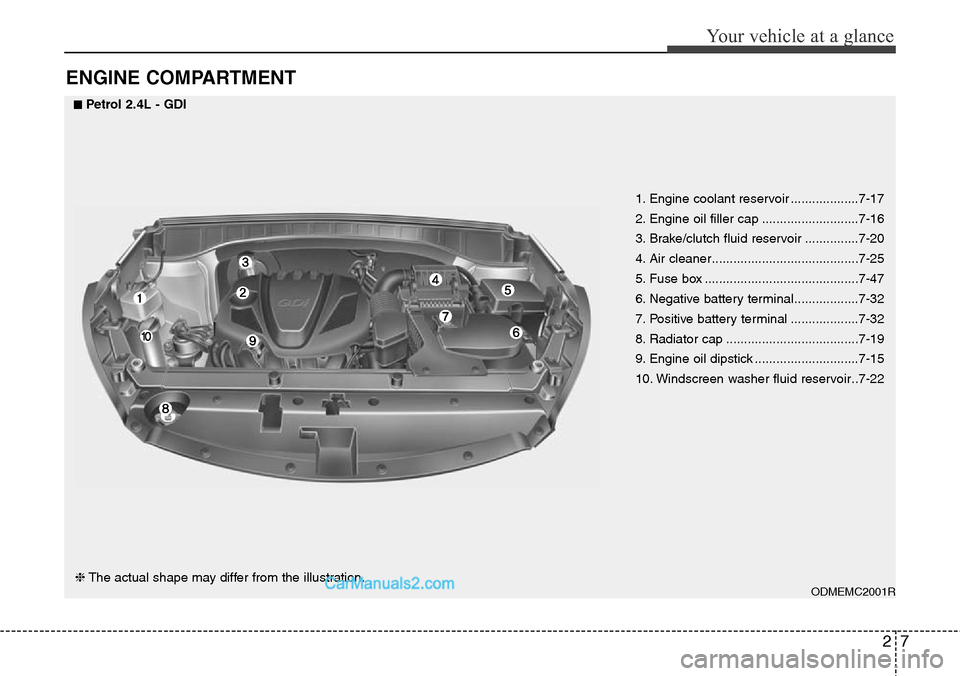
ENGINE COMPARTMENT
1. Engine coolant reservoir ...................7-17
2. Engine oil filler cap ...........................7-16
3. Brake/clutch fluid reservoir ...............7-20
4. Air cleaner.........................................7-25
5. Fuse box ...........................................7-47
6. Negative battery terminal..................7-32
7. Positive battery terminal ...................7-32
8. Radiator cap .....................................7-19
9. Engine oil dipstick .............................7-15
10. Windscreen washer fluid reservoir..7-22
ODMEMC2001R
■Petrol 2.4L - GDI
❈The actual shape may differ from the illustration.
Page 20 of 699
Your vehicle at a glance
8 2
ODMNMC2023R
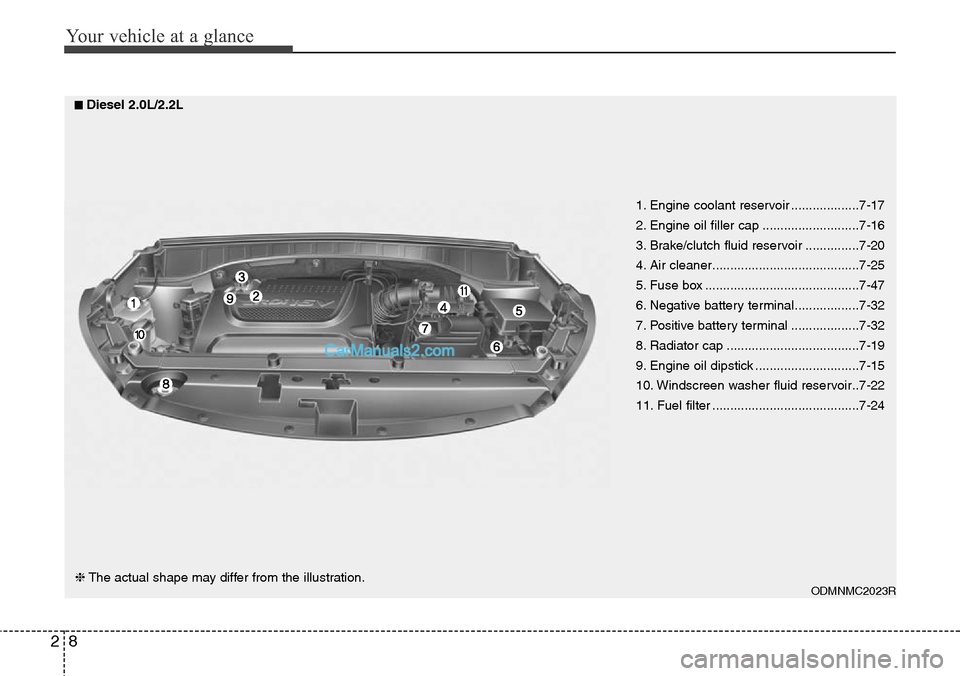
1. Engine coolant reservoir ...................7-17
2. Engine oil filler cap ...........................7-16
3. Brake/clutch fluid reservoir ...............7-20
4. Air cleaner.........................................7-25
5. Fuse box ...........................................7-47
6. Negative battery terminal..................7-32
7. Positive battery terminal ...................7-32
8. Radiator cap .....................................7-19
9. Engine oil dipstick .............................7-15
10. Windscreen washer fluid reservoir..7-22
11. Fuel filter .........................................7-24
■Diesel 2.0L/2.2L
❈The actual shape may differ from the illustration.
Page 28 of 699
Safety features of your vehicle
8 3
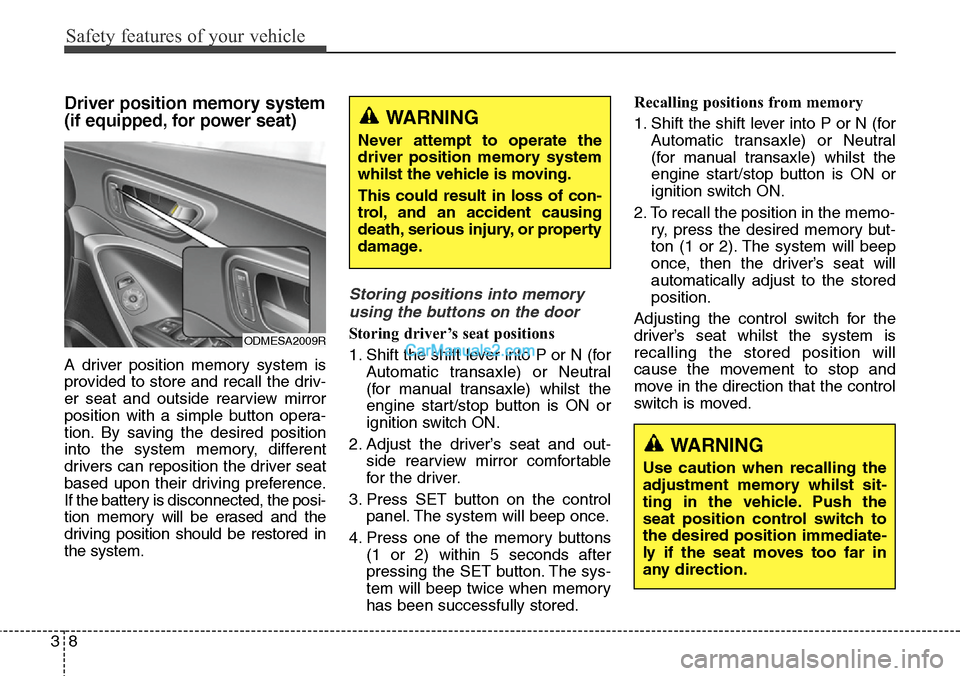
Driver position memory system
(if equipped, for power seat)
A driver position memory system is
provided to store and recall the driv-
er seat and outside rearview mirror
position with a simple button opera-
tion. By saving the desired position
into the system memory, different
drivers can reposition the driver seat
based upon their driving preference.
If the battery is disconnected, the posi-
tion memory will be erased and the
driving position should be restored in
the system.
Storing positions into memory
using the buttons on the door
Storing driver’s seat positions
1. Shift the shift lever into P or N (for
Automatic transaxle) or Neutral
(for manual transaxle) whilst the
engine start/stop button is ON or
ignition switch ON.
2. Adjust the driver’s seat and out-
side rearview mirror comfortable
for the driver.
3. Press SET button on the control
panel. The system will beep once.
4. Press one of the memory buttons
(1 or 2) within 5 seconds after
pressing the SET button. The sys-
tem will beep twice when memory
has been successfully stored.Recalling positions from memory
1. Shift the shift lever into P or N (for
Automatic transaxle) or Neutral
(for manual transaxle) whilst the
engine start/stop button is ON or
ignition switch ON.
2. To recall the position in the memo-
ry, press the desired memory but-
ton (1 or 2). The system will beep
once, then the driver’s seat will
automatically adjust to the stored
position.
Adjusting the control switch for the
driver’s seat whilst the system is
recalling the stored position will
cause the movement to stop and
move in the direction that the control
switch is moved.
WARNING
Never attempt to operate the
driver position memory system
whilst the vehicle is moving.
This could result in loss of con-
trol, and an accident causing
death, serious injury, or property
damage.
ODMESA2009R
WARNING
Use caution when recalling the
adjustment memory whilst sit-
ting in the vehicle. Push the
seat position control switch to
the desired position immediate-
ly if the seat moves too far in
any direction.
Page 77 of 699
357
Safety features of your vehicle
WARNING
• If an air bag deploys, there
may be a loud noise followed
by a fine dust released in the
vehicle. These conditions are
normal and are not hazardous
- the air bags are packed in
this fine powder. The dust
generated during air bag
deployment may cause skin
or eye irritation as well as
aggravate asthma for some
persons. Always wash all
exposed skin areas thorough-
ly with lukewarm water and a
mild soap after an accident in
which the air bags were
deployed.
(Continued)
(Continued)
• When installing a container of
liquid air freshener inside the
vehicle, do not place it near
the instrument cluster nor on
the instrument panel surface.
It may become dangerous pro-
jectiles and cause injury if the
passenger's air bag inflates.(Continued)
• The SRS can function only
when the ignition key is in the
"ON" position. If the SRS air
bag warning light does not
illuminate, or continuously
remains on after illuminating
for about 6 seconds when the
ignition key is turned to the
ON position, or after the
engine is started, comes on
whilst driving, the SRS is not
working properly.
If this occurs, we recommend
that the system be inspected
by a HYUNDAI authorised
repairer.
• Before you replace a fuse or
disconnect a battery terminal,
turn the ignition switch to the
LOCK position and remove
the ignition key. Never remove
or replace the air bag related
fuse(s) when the ignition
switch is in the ON position.
Failure to heed this warning
will cause the SRS air bag
warning light to illuminate.
Page 99 of 699
Features of your vehicle
Keys . . . . . . . . . . . . . . . . . . . . . . . . . . . . . . . . . . . . . . 4-5
• Record your key number . . . . . . . . . . . . . . . . . . . . . . . 4-5
• Key operations . . . . . . . . . . . . . . . . . . . . . . . . . . . . . . . . 4-5
• Immobiliser system . . . . . . . . . . . . . . . . . . . . . . . . . . . . 4-6
Remote keyless entry . . . . . . . . . . . . . . . . . . . . . . . . 4-8
• System operation . . . . . . . . . . . . . . . . . . . . . . . . . . . . . . 4-8
• Transmitter precautions . . . . . . . . . . . . . . . . . . . . . . . 4-10
• Battery replacement . . . . . . . . . . . . . . . . . . . . . . . . . . 4-11
Smart key . . . . . . . . . . . . . . . . . . . . . . . . . . . . . . . . 4-13
• Smart key function . . . . . . . . . . . . . . . . . . . . . . . . . . . 4-13
• Smart key precautions . . . . . . . . . . . . . . . . . . . . . . . . 4-14
• Door lock/unlock in an emergency situation . . . . . . 4-15
Theft-alarm system . . . . . . . . . . . . . . . . . . . . . . . . 4-17
• Armed stage . . . . . . . . . . . . . . . . . . . . . . . . . . . . . . . . . 4-17
• Theft-alarm stage . . . . . . . . . . . . . . . . . . . . . . . . . . . . 4-19
• Disarmed stage. . . . . . . . . . . . . . . . . . . . . . . . . . . . . . . 4-19
Door locks . . . . . . . . . . . . . . . . . . . . . . . . . . . . . . . . 4-20
• From outside . . . . . . . . . . . . . . . . . . . . . . . . . . . . . . . . 4-20
• From inside . . . . . . . . . . . . . . . . . . . . . . . . . . . . . . . . . 4-21
• Deadlocks . . . . . . . . . . . . . . . . . . . . . . . . . . . . . . . . . . . 4-23
• Door lock/unlock features. . . . . . . . . . . . . . . . . . . . . . 4-23
• Child-protector rear door lock . . . . . . . . . . . . . . . . . 4-24
Tailgate . . . . . . . . . . . . . . . . . . . . . . . . . . . . . . . . . . 4-25
• Non-power tailgate . . . . . . . . . . . . . . . . . . . . . . . . . . . 4-25
• Power tailgate . . . . . . . . . . . . . . . . . . . . . . . . . . . . . . . 4-27• Smart tailgate. . . . . . . . . . . . . . . . . . . . . . . . . . . . . . . . 4-32
• Emergency tailgate safety release . . . . . . . . . . . . . . . 4-36
Windows . . . . . . . . . . . . . . . . . . . . . . . . . . . . . . . . . 4-37
• Power windows . . . . . . . . . . . . . . . . . . . . . . . . . . . . . . 4-38
Bonnet . . . . . . . . . . . . . . . . . . . . . . . . . . . . . . . . . . . 4-42
• Opening the bonnet . . . . . . . . . . . . . . . . . . . . . . . . . . . 4-42
• Closing the bonnet . . . . . . . . . . . . . . . . . . . . . . . . . . . . 4-43
Fuel filler lid . . . . . . . . . . . . . . . . . . . . . . . . . . . . . . 4-44
• Opening the fuel filler lid . . . . . . . . . . . . . . . . . . . . . . 4-44
• Closing the fuel filler lid . . . . . . . . . . . . . . . . . . . . . . . 4-44
• Emergency fuel filler lid release. . . . . . . . . . . . . . . . . 4-46
Panorama sunroof . . . . . . . . . . . . . . . . . . . . . . . . . 4-47
• Sunroof open warning. . . . . . . . . . . . . . . . . . . . . . . . . 4-47
• Sunshade . . . . . . . . . . . . . . . . . . . . . . . . . . . . . . . . . . . 4-48
• Sliding the sunroof . . . . . . . . . . . . . . . . . . . . . . . . . . . 4-49
• Tilting the sunroof . . . . . . . . . . . . . . . . . . . . . . . . . . . . 4-49
• Closing the sunroof . . . . . . . . . . . . . . . . . . . . . . . . . . . 4-50
• Resetting the sunroof . . . . . . . . . . . . . . . . . . . . . . . . . 4-51
Steering wheel . . . . . . . . . . . . . . . . . . . . . . . . . . . . . 4-52
• Electronic power steering . . . . . . . . . . . . . . . . . . . . . . 4-52
• Power steering . . . . . . . . . . . . . . . . . . . . . . . . . . . . . . . 4-53
• Tilt steering . . . . . . . . . . . . . . . . . . . . . . . . . . . . . . . . . 4-53
• Heated steering wheel . . . . . . . . . . . . . . . . . . . . . . . . . 4-54
• Horn . . . . . . . . . . . . . . . . . . . . . . . . . . . . . . . . . . . . . . . 4-55
• Flex steering wheel . . . . . . . . . . . . . . . . . . . . . . . . . . . 4-55
4
Page 100 of 699
Mirrors . . . . . . . . . . . . . . . . . . . . . . . . . . . . . . . . . . 4-58
• Inside rearview mirror . . . . . . . . . . . . . . . . . . . . . . . . 4-58
• Outside rearview mirror . . . . . . . . . . . . . . . . . . . . . . . 4-62
Instrument cluster . . . . . . . . . . . . . . . . . . . . . . . . . 4-66
• Instrument Cluster Control . . . . . . . . . . . . . . . . . . . . 4-68
• LCD Display Control . . . . . . . . . . . . . . . . . . . . . . . . . 4-69
• Gauges . . . . . . . . . . . . . . . . . . . . . . . . . . . . . . . . . . . . . 4-69
• Transaxle Shift Indicator . . . . . . . . . . . . . . . . . . . . . . 4-74
LCD display . . . . . . . . . . . . . . . . . . . . . . . . . . . . . . 4-76
• LCD Modes . . . . . . . . . . . . . . . . . . . . . . . . . . . . . . . . . 4-76
• Service Mode . . . . . . . . . . . . . . . . . . . . . . . . . . . . . . . . 4-77
• User Settings Mode . . . . . . . . . . . . . . . . . . . . . . . . . . . 4-78
• A/V Mode . . . . . . . . . . . . . . . . . . . . . . . . . . . . . . . . . . . 4-80
• Turn By Turn Mode. . . . . . . . . . . . . . . . . . . . . . . . . . . 4-81
• Warning Messages . . . . . . . . . . . . . . . . . . . . . . . . . . . . 4-81
Trip computer . . . . . . . . . . . . . . . . . . . . . . . . . . . . . 4-88
• Overview. . . . . . . . . . . . . . . . . . . . . . . . . . . . . . . . . . . . 4-88
• Trip A/B . . . . . . . . . . . . . . . . . . . . . . . . . . . . . . . . . . . . 4-89
• Fuel Economy . . . . . . . . . . . . . . . . . . . . . . . . . . . . . . . 4-90
Warning and indicator lights . . . . . . . . . . . . . . . . 4-93
• Warning lights . . . . . . . . . . . . . . . . . . . . . . . . . . . . . . . 4-93
• Indicator Lights . . . . . . . . . . . . . . . . . . . . . . . . . . . . . 4-103
Rear parking assist system . . . . . . . . . . . . . . . . . 4-109
• Operation . . . . . . . . . . . . . . . . . . . . . . . . . . . . . . . . . . 4-109
• Non-operational conditions . . . . . . . . . . . . . . . . . . . 4-110• Self-diagnosis . . . . . . . . . . . . . . . . . . . . . . . . . . . . . . . 4-112
Parking assist system . . . . . . . . . . . . . . . . . . . . . . 4-113
• Operation . . . . . . . . . . . . . . . . . . . . . . . . . . . . . . . . . . 4-114
• Non-operational conditions . . . . . . . . . . . . . . . . . . . 4-116
• Self-diagnosis . . . . . . . . . . . . . . . . . . . . . . . . . . . . . . . 4-118
Smart parking assist system(SPAS) . . . . . . . . . . 4-119
• Operation . . . . . . . . . . . . . . . . . . . . . . . . . . . . . . . . . . 4-120
• Non-operational conditions . . . . . . . . . . . . . . . . . . . 4-120
• How the system works . . . . . . . . . . . . . . . . . . . . . . . 4-123
• Additional instructions . . . . . . . . . . . . . . . . . . . . . . . 4-130
• System malfunction . . . . . . . . . . . . . . . . . . . . . . . . . . 4-130
Rearview camera . . . . . . . . . . . . . . . . . . . . . . . . . 4-131
Hazard warning flasher . . . . . . . . . . . . . . . . . . . . 4-132
Lighting . . . . . . . . . . . . . . . . . . . . . . . . . . . . . . . . . 4-133
• Battery saver function. . . . . . . . . . . . . . . . . . . . . . . . 4-133
• Headlamp escort function. . . . . . . . . . . . . . . . . . . . . 4-133
• Smart cornering light . . . . . . . . . . . . . . . . . . . . . . . . 4-133
• Lighting control . . . . . . . . . . . . . . . . . . . . . . . . . . . . . 4-134
• Traffic direction change . . . . . . . . . . . . . . . . . . . . . . 4-136
• High - beam operation . . . . . . . . . . . . . . . . . . . . . . . 4-137
• Turn signals and lane change signals . . . . . . . . . . . 4-138
• Front fog light . . . . . . . . . . . . . . . . . . . . . . . . . . . . . . 4-139
• Rear fog light . . . . . . . . . . . . . . . . . . . . . . . . . . . . . . . 4-140
• Daytime running light . . . . . . . . . . . . . . . . . . . . . . . . 4-140
• Headlight levelling device . . . . . . . . . . . . . . . . . . . . . 4-141
4
Page 108 of 699
Features of your vehicle
10 4
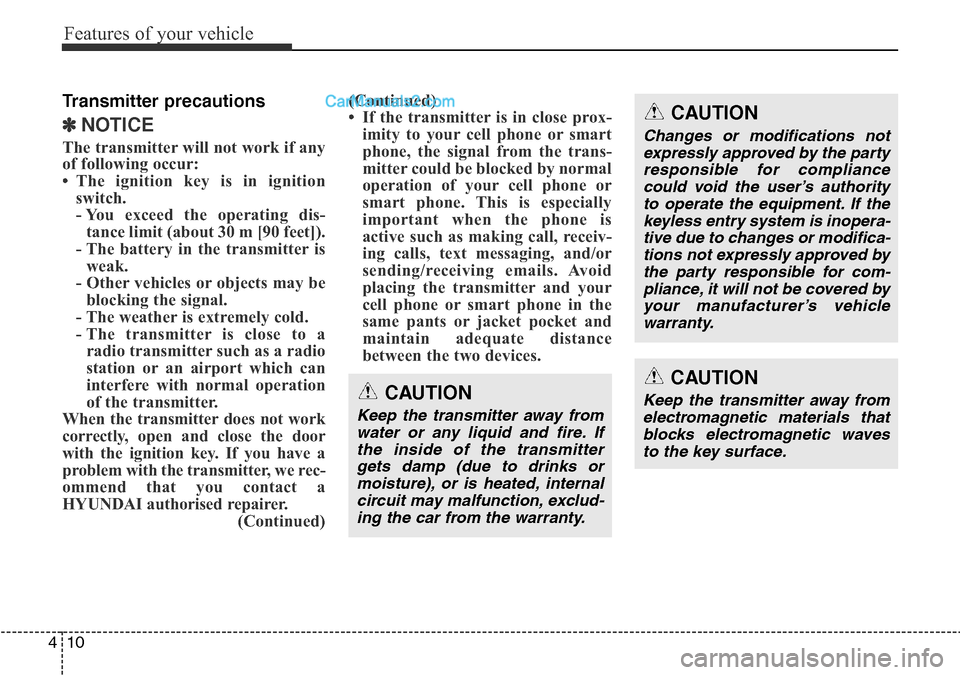
Transmitter precautions
✽NOTICE
The transmitter will not work if any
of following occur:
• The ignition key is in ignition
switch.
- You exceed the operating dis-
tance limit (about 30 m [90 feet]).
- The battery in the transmitter is
weak.
- Other vehicles or objects may be
blocking the signal.
- The weather is extremely cold.
- The transmitter is close to a
radio transmitter such as a radio
station or an airport which can
interfere with normal operation
of the transmitter.
When the transmitter does not work
correctly, open and close the door
with the ignition key. If you have a
problem with the transmitter, we rec-
ommend that you contact a
HYUNDAI authorised repairer.
(Continued)(Continued)
• If the transmitter is in close prox-
imity to your cell phone or smart
phone, the signal from the trans-
mitter could be blocked by normal
operation of your cell phone or
smart phone. This is especially
important when the phone is
active such as making call, receiv-
ing calls, text messaging, and/or
sending/receiving emails. Avoid
placing the transmitter and your
cell phone or smart phone in the
same pants or jacket pocket and
maintain adequate distance
between the two devices.
CAUTION
Keep the transmitter away from
water or any liquid and fire. If
the inside of the transmitter
gets damp (due to drinks or
moisture), or is heated, internal
circuit may malfunction, exclud-
ing the car from the warranty.
CAUTION
Changes or modifications not
expressly approved by the party
responsible for compliance
could void the user’s authority
to operate the equipment. If the
keyless entry system is inopera-
tive due to changes or modifica-
tions not expressly approved by
the party responsible for com-
pliance, it will not be covered by
your manufacturer’s vehicle
warranty.
CAUTION
Keep the transmitter away from
electromagnetic materials that
blocks electromagnetic waves
to the key surface.
Page 109 of 699
411
Features of your vehicle
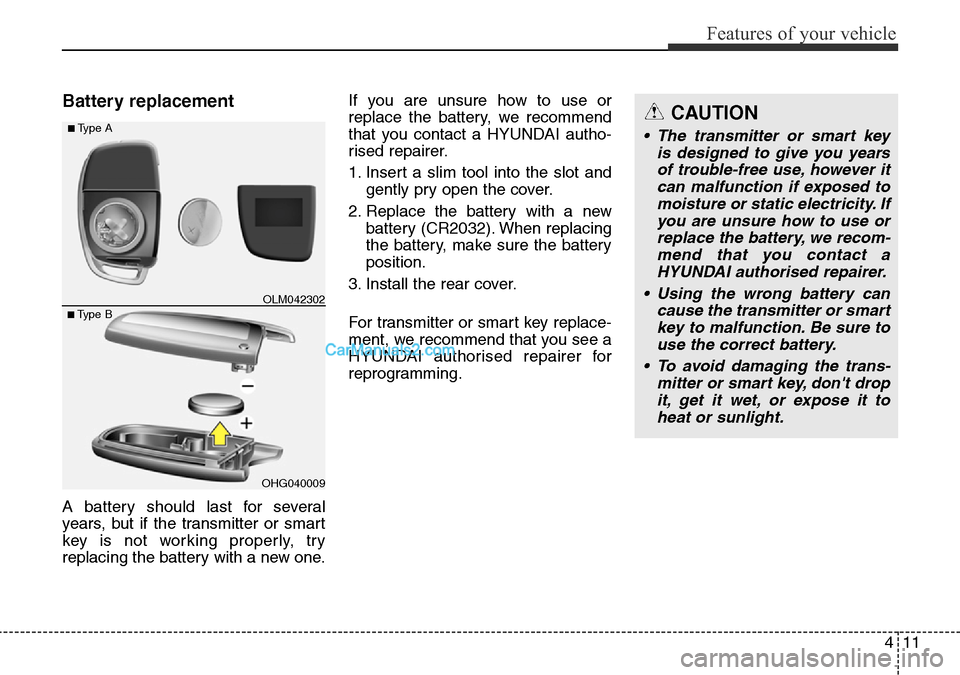
Battery replacement
A battery should last for several
years, but if the transmitter or smart
key is not working properly, try
replacing the battery with a new one.If you are unsure how to use or
replace the battery, we recommend
that you contact a HYUNDAI autho-
rised repairer.
1. Insert a slim tool into the slot and
gently pry open the cover.
2. Replace the battery with a new
battery (CR2032). When replacing
the battery, make sure the battery
position.
3. Install the rear cover.
For transmitter or smart key replace-
ment, we recommend that you see a
HYUNDAI authorised repairer for
reprogramming.
OHG040009
■Type BOLM042302
■Type ACAUTION
• The transmitter or smart key
is designed to give you years
of trouble-free use, however it
can malfunction if exposed to
moisture or static electricity. If
you are unsure how to use or
replace the battery, we recom-
mend that you contact a
HYUNDAI authorised repairer.
• Using the wrong battery can
cause the transmitter or smart
key to malfunction. Be sure to
use the correct battery.
• To avoid damaging the trans-
mitter or smart key, don't drop
it, get it wet, or expose it to
heat or sunlight.