2016 HYUNDAI IX35 steering
[x] Cancel search: steeringPage 67 of 550
Safety features of your vehicle48
3SRS components and functionsThe SRS consists of the following com-
ponents:
1. Driver's front air bag module*
2. Front impact sensors*
3. Passenger's front air bag module*
4. Retractor pre-tensioner assemblies*
5. Side impact sensors*
6. Curtain air bag modules*
7. Side air bag modules*
8. SRS control module (SRSCM)
9. Air bag warning light
10. Anchor pre-tensioner assembly*
(driver side)
11. Passenger’s front air bag ON/OFF switch*
12. Passenger’s front air bag ON/OFF indicator*
*: if equipped The SRSCM continually monitors all ele-
ments whilst the ignition switch is ON to
determine if a frontal, near-frontal impact
or side impact is severe enough to
require air bag deployment or pre-ten-
sioner seat belt deployment.
The SRS air bag warning light on the
instrument panel will illuminate for about
6 seconds after the ignition switch is
turned to the ON position, after which the
air bag warning light should go out.
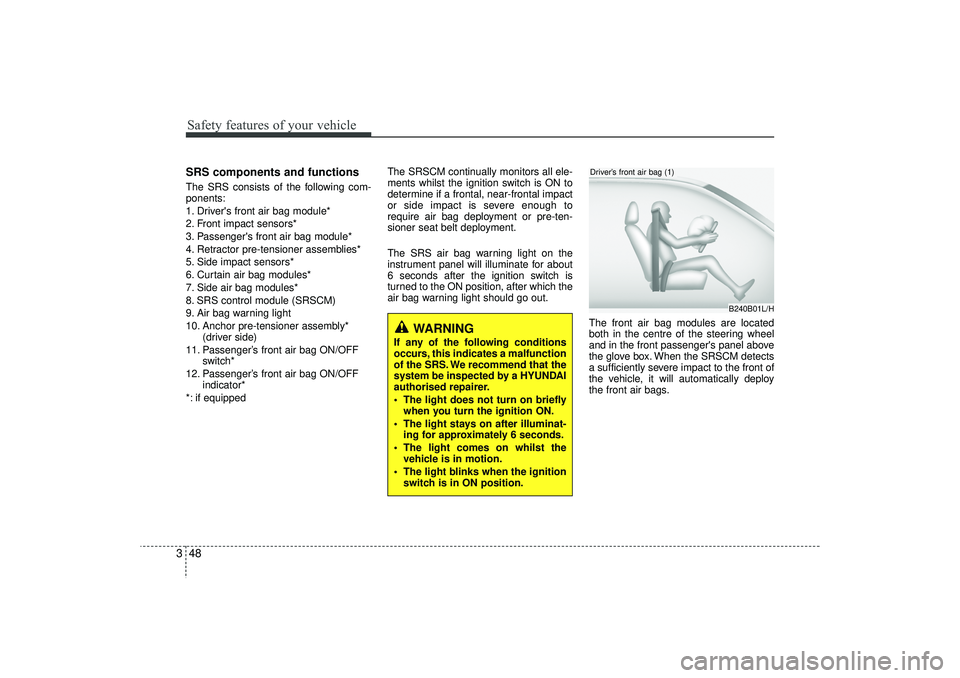
The front air bag modules are located
both in the centre of the steering wheel
and in the front passenger's panel above
the glove box. When the SRSCM detects
a sufficiently severe impact to the front of
the vehicle, it will automatically deploy
the front air bags.
WARNING
If any of the following conditions
occurs, this indicates a malfunction
of the SRS. We recommend that the
system be inspected by a HYUNDAI
authorised repairer.
The light does not turn on brieflywhen you turn the ignition ON.
The light stays on after illuminat- ing for approximately 6 seconds.
The light comes on whilst the vehicle is in motion.
The light blinks when the ignition switch is in ON position.
B240B01L/H
Driver’s front air bag (1)
EL(FL) UK 3.QXP 12/16/2014 8:56 PM Page 48
Page 70 of 550
351
Safety features of your vehicle
The indications of the system's presence
are the letters "AIR BAG" embossed on
the air bag pad cover on the steering
wheel and the passenger's side front
panel pad above the glove box.
The SRS consists of air bags installed
under the pad covers in the centre of the
steering wheel and the passenger's side
in the front panel above the glove box.
The purpose of the SRS is to provide the
vehicle's driver and/or the front passen-
ger with additional protection than that
offered by the seat belt system alone in
case of a frontal impact of sufficient
severity.
WARNING
Always use seat belts and child
restraints – every trip, every time,
everyone! Air bags inflate with
considerable force and in the blink
of an eye. Seat belts help keep
occupants in proper position to
obtain maximum benefit from the
air bag. Even with air bags, improp-
erly and unbelted occupants can be
severely injured when the air bag
inflates. Always follow the precau-
tions about seat belts, air bags and
occupant safety contained in this
manual.
To reduce the chance of serious or
fatal injuries and receive the maxi-
mum safety benefit from your
restraint system:
Never place a child in any child orbooster seat in the front seat. NB
See section - Passenger's front
air bag ON/OFF switch (if
equipped).
ABC – Always Buckle Children in the back seat. It is the safest
place for children of any age to
ride.
(Continued)
(Continued)
Front and side air bags can injureoccupants improperly positioned
in the front seats.
Move your seat as far back as practical from the front air bags,
whilst still maintaining control of
the vehicle.
You and your passengers should never sit or lean unnecessarily
close to the air bags. Improperly
positioned drivers and passen-
gers can be severely injured by
inflating air bags.
Never lean against the door or centre console – always sit in an
upright position.
No objects should be placed over or near the air bag modules on
the steering wheel, instrument
panel, and the front passenger's
panel above the glove box,
because any such object could
cause harm if the vehicle is in a
crash severe enough to cause
the air bags to deploy.
(Continued)
EL(FL) UK 3.QXP 12/16/2014 8:56 PM Page 51
Page 75 of 550
Safety features of your vehicle56
3 The side air bags are designed to
deploy only during certain side-impact
collisions, depending on the crash
severity, angle, speed and point of
impact.
The side air bags do not only deploy on the side of the impact but also on the
opposite side.
(Continued)
Use of seat covers could reduceor prevent the effectiveness of
the system.
Do not install any accessories on the side or near the side air bag.
Do not place any objects over the air bag or between the air bag
and yourself.
Do not place any objects (an umbrella, bag, etc.) between the
front door and the front seat.
Such objects may become dan-
gerous projectiles and cause
injury if the supplemental side air
bag inflates.
To prevent unexpected deploy- ment of the side air bag that may
result in personal injury, avoid
impact to the side impact sensor
when the ignition key is on.
If seat or seat cover is damaged, we recommend that the system
be serviced by a HYUNDAI autho-
rised repairer. Inform that your
vehicle is equipped with side air
bags.
WARNING
The side air bag is supplementalto the driver's and the passen-
ger's seat belt systems and is not
a substitute for them. Therefore
your seat belts must be worn at
all times whilst the vehicle is in
motion. The air bags deploy only
in certain side impact conditions
severe enough to cause signifi-
cant injury to the vehicle occu-
pants.
For best protection from the side air bag system and to avoid being
injured by the deploying side air
bag, both front seat occupants
should sit in an upright position
with the seat belt properly fas-
tened. The driver's hands should
be placed on the steering wheel
at the 9:00 and 3:00 positions.
The passenger's arms and hands
should be placed on their laps.
Do not use any accessory seat covers.
(Continued)
WARNING
Do not allow the passengers to lean
their heads or bodies onto doors,
put their arms on the doors, stretch
their arms out of the window, or
place objects between the doors
and passengers when they are
seated on seats equipped with side
and/or curtain air bags.
EL(FL) UK 3.QXP 12/16/2014 8:56 PM Page 56
Page 83 of 550
Safety features of your vehicle64
3SRS CareThe SRS is virtually maintenance-free
and so there are no parts you can safely
service by yourself. If the SRS air bag
warning light does not illuminate, or con-
tinuously remains on, we recommend
that the system be inspected by a
HYUNDAI authorised repairer.
WARNING
Modification to SRS components
or wiring, including the addition
of any kind of badges to the pad
covers or modifications to the
body structure, can adversely
affect SRS performance and lead
to possible injury.
For cleaning the air bag pad cov- ers, use only a soft, dry cloth or
one which has been moistened
with plain water. Solvents or
cleaners could adversely affect
the air bag covers and proper
deployment of the system.
No objects should be placed over or near the air bag modules on
the steering wheel, instrument
panel, and the front passenger's
panel above the glove box,
because any such object could
cause harm if the vehicle is in a
crash severe enough to cause
the air bags to inflate.
If the air bags inflate, we recom- mend that the system be
replaced by a HYUNDAI autho-
rised repairer.
(Continued)
(Continued)
Do not tamper with or disconnectSRS wiring, or other components
of the SRS system. Doing so
could result in injury, due to acci-
dental inflation of the air bags or
by rendering the SRS inopera-
tive.
If components of the air bag sys- tem must be discarded, or if the
vehicle must be scrapped, certain
safety precautions must be
observed. We recommend that
you contact a HYUNDAI autho-
rised repairer for these precau-
tions and necessary information.
Failure to follow these precau-
tions and procedures could
increase the risk of personal
injury.
If your car was flooded and has soaked carpeting or water on
flooring, you shouldn't try to start
the engine; we recommend that
you contact a HYUNDAI autho-
rised repairer.
EL(FL) UK 3.QXP 12/16/2014 8:57 PM Page 64
Page 86 of 550

Features of your vehicleKeys . . . . . . . . . . . . . . . . . . . . . . . . . . . . . . . . . . . . \
. . 4-4• Record your key number . . . . . . . . . . . . . . . . . . . . . . . 4-4
• Key operations . . . . . . . . . . . . . . . . . . . . . . . . . . . . . . . . 4-4
• Immobiliser system . . . . . . . . . . . . . . . . . . . . . . . . . . . . 4-5Remote keyless entry . . . . . . . . . . . . . . . . . . . . . . . 4-7• Remote keyless entry system operations . . . . . . . . . . . 4-7
• Transmitter precautions . . . . . . . . . . . . . . . . . . . . . . . . 4-8
• Battery replacement . . . . . . . . . . . . . . . . . . . . . . . . . . . 4-9Smart key . . . . . . . . . . . . . . . . . . . . . . . . . . . . . . . . 4-10• Smart key functions . . . . . . . . . . . . . . . . . . . . . . . . . . 4-10
• Smart key precautions . . . . . . . . . . . . . . . . . . . . . . . . 4-12
• Door lock/unlock in an emergency situation . . . . . . 4-12Theft-alarm system . . . . . . . . . . . . . . . . . . . . . . . . 4-13• Theft-alarm stage . . . . . . . . . . . . . . . . . . . . . . . . . . . . 4-14
• Disarmed stage. . . . . . . . . . . . . . . . . . . . . . . . . . . . . . . 4-14Door locks . . . . . . . . . . . . . . . . . . . . . . . . . . . . . . . 4-15• Operating door locks from outside the vehicle . . . . 4-15
• Operating door locks from inside the vehicle . . . . . . 4-16
• Deadlocks . . . . . . . . . . . . . . . . . . . . . . . . . . . . . . . . . . 4-17\
• Speed sensing door lock system . . . . . . . . . . . . . . . . 4-18
• Child-protector rear door lock. . . . . . . . . . . . . . . . . . 4-18Tailgate . . . . . . . . . . . . . . . . . . . . . . . . . . . . . . . . . . 4-19\
• Opening the tailgate . . . . . . . . . . . . . . . . . . . . . . . . . . 4-19
• Closing the tailgate . . . . . . . . . . . . . . . . . . . . . . . . . . . 4-19
Windows . . . . . . . . . . . . . . . . . . . . . . . . . . . . . . . . . 4-21• Power windows . . . . . . . . . . . . . . . . . . . . . . . . . . . . . . 4-22Bonnet . . . . . . . . . . . . . . . . . . . . . . . . . . . . . . . . . . . 4-\
25• Opening the bonnet . . . . . . . . . . . . . . . . . . . . . . . . . . 4-25
• Closing the bonnet . . . . . . . . . . . . . . . . . . . . . . . . . . . . 4-26Fuel filler lid . . . . . . . . . . . . . . . . . . . . . . . . . . . . . 4-27• Opening the fuel filler lid . . . . . . . . . . . . . . . . . . . . . . 4-27
• Closing the fuel filler lid . . . . . . . . . . . . . . . . . . . . . . . 4-27Panorama sunroof . . . . . . . . . . . . . . . . . . . . . . . . . 4-30• Sunroof open warning . . . . . . . . . . . . . . . . . . . . . . . . 4-30
• Tilting the sunroof . . . . . . . . . . . . . . . . . . . . . . . . . . . 4-32
• Resetting the sunroof . . . . . . . . . . . . . . . . . . . . . . . . . 4-33Steering wheel . . . . . . . . . . . . . . . . . . . . . . . . . . . . . 4-34• Electric power steering . . . . . . . . . . . . . . . . . . . . . . . 4-34
• Heated steering wheel . . . . . . . . . . . . . . . . . . . . . . . . 4-35
• Horn . . . . . . . . . . . . . . . . . . . . . . . . . . . . . . . . . . . . \
. . . 4-36
• Flex steering wheel . . . . . . . . . . . . . . . . . . . . . . . . . . . 4-37Mirrors . . . . . . . . . . . . . . . . . . . . . . . . . . . . . . . . . . 4-39\
• Inside rearview mirror . . . . . . . . . . . . . . . . . . . . . . . . 4-39
• Outside rearview mirror . . . . . . . . . . . . . . . . . . . . . . 4-43Instrument cluster . . . . . . . . . . . . . . . . . . . . . . . . . 4-46• Instrument panel illumination . . . . . . . . . . . . . . . . . 4-47
• LCD Display Control . . . . . . . . . . . . . . . . . . . . . . . . . 4-47
• Gauges . . . . . . . . . . . . . . . . . . . . . . . . . . . . . . . . . . . . \
. 4-48
• Transaxle Shift Indicator . . . . . . . . . . . . . . . . . . . . . . 4-52
4
EL(FL) UK 4A.QXP 2/9/2015 9:02 PM Page 1
Page 119 of 550

Features of your vehicle34
4Electric power steering
(if equipped)Power steering uses the motor to assist
you in steering the vehicle. If the engine
is off or if the power steering system
becomes inoperative, the vehicle may
still be steered, but it will require
increased steering effort.
The motor driven power steering is con-
trolled by the power steering control unit
which senses the steering wheel torque
and vehicle speed to command the
motor.
The steering wheel becomes heavier as
the vehicle’s speed increases and
becomes lighter as the vehicle’s speed
decreases for better control of the steer-
ing wheel.
Should you notice any change in the
effort required to steering during normal
vehicle operation, we recommend that
the system be checked by a HYUNDAI
authorised repairer.
✽ ✽
NOTICEThe following symptoms may occur dur-
ing normal vehicle operation:
• The EPS warning light does not illumi-
nate.
• The steering effort is high immediately after turning the ignition switch on.
This happens as the system performs
the EPS system diagnostics. When the
diagnostics is completed, the steering
wheel will return to its normal condi-
tion.
• A click noise may be heard from the EPS relay after the ignition switch is
turned to the ON or LOCK position.
• Motor noise may be heard when the vehicle is at a stop or at a low driving
speed.
• The steering effort increases if the steering wheel is rotated continuously
when the vehicle is not in motion.
However, after a few minutes, it will
return to its normal conditions. (Continued)(Continued)
• If the Electric Power Steering System
does not operate normally, the warn-
ing light will illuminate on the instru-
ment cluster. The steering wheel may
become difficult to control or operate
abnormally. We recommend that the
system be checked by a HYUNDAI
authorised repairer.
• When you operate the steering wheel in low temperature, abnormal noise
could occur. If temperature rises, the
noise will disappear. This is a normal
condition.
STEERING WHEEL
EL(FL) UK 4A.QXP 2/9/2015 9:04 PM Page 34
Page 120 of 550
435
Features of your vehicle
Tilt steering A tilt steering wheel allows you to adjust
the steering wheel before you drive. You
can also raise it to give your legs more
room when you exit and enter the vehicle
(if equipped).
The steering wheel should be positioned
so that it is comfortable for you to drive,
whilst permitting you to see the instru-
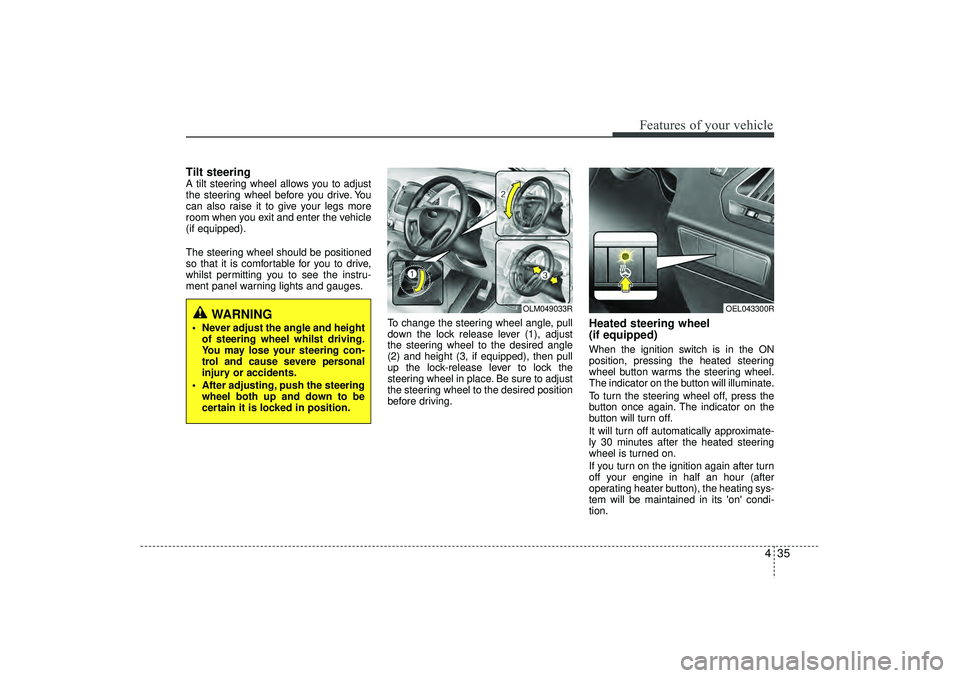
ment panel warning lights and gauges.To change the steering wheel angle, pull
down the lock release lever (1), adjust
the steering wheel to the desired angle
(2) and height (3, if equipped), then pull
up the lock-release lever to lock the
steering wheel in place. Be sure to adjust
the steering wheel to the desired position
before driving.
Heated steering wheel
(if equipped)When the ignition switch is in the ON
position, pressing the heated steering
wheel button warms the steering wheel.
The indicator on the button will illuminate.
To turn the steering wheel off, press the
button once again. The indicator on the
button will turn off.
It will turn off automatically approximate-
ly 30 minutes after the heated steering
wheel is turned on.
If you turn on the ignition again after turn
off your engine in half an hour (after
operating heater button), the heating sys-
tem will be maintained in its 'on' condi-
tion.
WARNING
Never adjust the angle and heightof steering wheel whilst driving.
You may lose your steering con-
trol and cause severe personal
injury or accidents.
After adjusting, push the steering wheel both up and down to be
certain it is locked in position.
OLM049033R
OEL043300R
EL(FL) UK 4A.QXP 2/9/2015 9:04 PM Page 35
Page 121 of 550
Features of your vehicle36
4
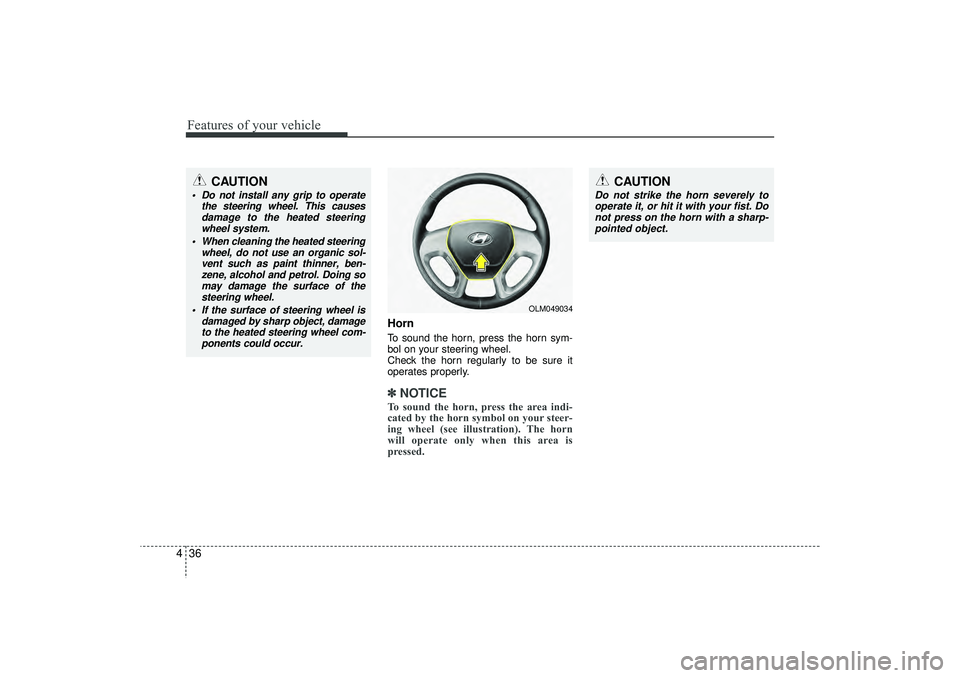
HornTo sound the horn, press the horn sym-
bol on your steering wheel.
Check the horn regularly to be sure it
operates properly.✽ ✽
NOTICETo sound the horn, press the area indi-
cated by the horn symbol on your steer-
ing wheel (see illustration). The horn
will operate only when this area is
pressed.
OLM049034
CAUTION
Do not strike the horn severely to
operate it, or hit it with your fist. Donot press on the horn with a sharp- pointed object.
CAUTION
Do not install any grip to operate the steering wheel. This causesdamage to the heated steeringwheel system.
When cleaning the heated steering wheel, do not use an organic sol-vent such as paint thinner, ben- zene, alcohol and petrol. Doing somay damage the surface of thesteering wheel.
If the surface of steering wheel is damaged by sharp object, damageto the heated steering wheel com-ponents could occur.
EL(FL) UK 4A.QXP 2/9/2015 9:04 PM Page 36