2016 HYUNDAI IX35 ignition
[x] Cancel search: ignitionPage 459 of 550
637
What to do in an emergency
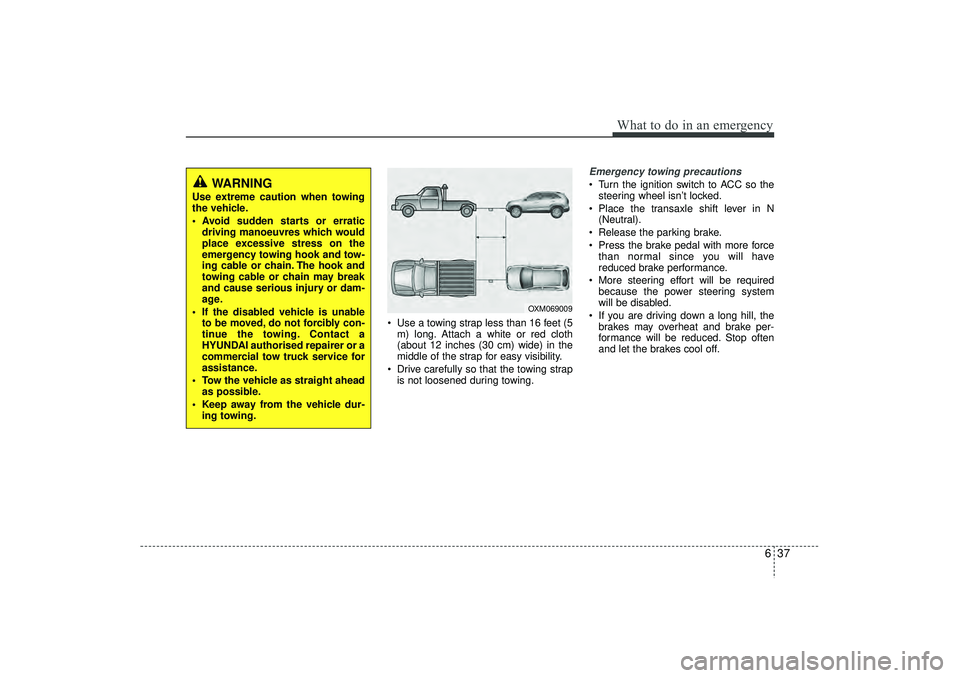
Use a towing strap less than 16 feet (5m) long. Attach a white or red cloth
(about 12 inches (30 cm) wide) in the
middle of the strap for easy visibility.
Drive carefully so that the towing strap is not loosened during towing.
Emergency towing precautions Turn the ignition switch to ACC so thesteering wheel isn’t locked.
Place the transaxle shift lever in N (Neutral).
Release the parking brake.
Press the brake pedal with more force than normal since you will have
reduced brake performance.
More steering effort will be required because the power steering system
will be disabled.
If you are driving down a long hill, the brakes may overheat and brake per-
formance will be reduced. Stop often
and let the brakes cool off.
WARNING
Use extreme caution when towing
the vehicle.
Avoid sudden starts or erratic driving manoeuvres which would
place excessive stress on the
emergency towing hook and tow-
ing cable or chain. The hook and
towing cable or chain may break
and cause serious injury or dam-
age.
If the disabled vehicle is unable to be moved, do not forcibly con-
tinue the towing. Contact a
HYUNDAI authorised repairer or a
commercial tow truck service for
assistance.
Tow the vehicle as straight ahead as possible.
Keep away from the vehicle dur- ing towing.
OXM069009
EL(FL) UK 6.QXP 12/16/2014 8:13 PM Page 37
Page 460 of 550
CAUTION - Automatictransaxle
If the car is being towed with all
four wheels on the ground, it canbe towed only from the front. Besure that the transaxle is in neu-tral. Be sure the steering is unlocked by placing the ignitionswitch in the ACC position. Adriver must be in the towed vehi- cle to operate the steering andbrakes.
To avoid serious damage to the automatic transaxle, limit thevehicle speed to 10 mph (15 km/h) and drive less than 1 mile (1.5km) when towing.
Before towing, check the auto- matic transaxle fluid leak underyour vehicle. If the automatic transaxle fluid is leaking, aflatbed equipment or towing dollymust be used.
638What to do in an emergency
EL(FL) UK 6.QXP 12/16/2014 8:13 PM Page 38
Page 472 of 550
Maintenance12
7EXPLANATION OF SCHEDULED MAINTENANCE ITEMSEngine oil and filterThe engine oil and filter should be
changed at the intervals specified in the
maintenance schedule. If the car is being
driven in severe conditions, more fre-
quent oil and filter changes are required.Drive beltsInspect all drive belts for evidence of
cuts, cracks, excessive wear or oil satu-
ration and replace if necessary. Drive
belts should be checked periodically for
proper tension and adjusted as neces-
sary.
Fuel filter (cartridge)A clogged filter can limit the speed at
which the vehicle may be driven, damage
the emission system and cause multiple
issues such as hard starting. If an exces-
sive amount of foreign matter accumu-
lates in the fuel tank, the filter may
require replacement more frequently.
After installing a new filter, run the engine
for several minutes, and check for leaks
at the connections. We recommend that
the fuel filter be replaced by a HYUNDAI
authorised repairer.
Fuel lines, fuel hoses and con-
nectionsCheck the fuel lines, fuel hoses and con-
nections for leakage and damage. We
recommend that the fuel lines, fuel hoses
and connections be replaced by a
HYUNDAI authorised repairer.
WARNING -
Diesel only
Never work on injection system
with engine running or within 30
seconds after shutting off engine.
High pressure pump, rail, injectors
and high pressure pipes are sub-
ject to high pressure even after the
engine stopped. The fuel jet pro-
duced by fuel leaks may cause seri-
ous injury, if it touch the body.
People using pacemakers should
not move than 30cm closer to the
ECU or wiring harness within the
engine room whilst engine is run-
ning, since the high currents in the
Common Rail system produce con-
siderable magnetic fields.
CAUTION
When you are inspecting the belt,
place the ignition switch in theLOCK/OFF or ACC position.
EL(FL) UK 7.QXP 3/4/2015 9:04 PM Page 12
Page 481 of 550

721
Maintenance
FUEL FILTER (FOR DIESEL)Draining water from fuel filterThe fuel filter for diesel engine plays an
important role of separating water from
fuel and accumulating the water in its
bottom.
If water accumulates in the fuel filter, the
warning light comes on when the ignition
switch is in the ON position.If this warning light illuminates,
we recommend that the sys-
tem by checked by a HYUNDAI
authorised repairer.
Extracting air from the fuel filterIf you drive until you have no fuel left or if
you replace the fuel filter, be sure to
extract air from the fuel system as it
makes it difficult to start the engine.
1. Pump up and down(1) approximately50 times until the pump is hard.
2. Extract air from the fuel filter by remov- ing the bolt(2) with a cross-tip screw
driver and reinstall the bolt(2).
3. Pump up and down(1) approximately 15 times.
4. Extract air from the fuel filter by remov- ing the bolt(2) with a cross-tip screw
driver and reinstall the bolt(2).
5. Pump up and down(1) approximately 5 times.
✽ ✽NOTICE• Use cloths when you extract air so that
the fuel is not sprayed around.
• Clean the fuel around the fuel filter or the injection pump before starting the
engine to prevent fire.
• Finally, check each part if the fuel is leaking.
CAUTION
If the water accumulated in the fuel
filter is not drained at proper times,damages to the major parts such as the fuel system can be caused bywater permeation in the fuel filter.
OEL070304
■ Type A
EL(FL) UK 7.QXP 3/4/2015 9:05 PM Page 21
Page 491 of 550
731
Maintenance
❈The actual battery label in the vehicle
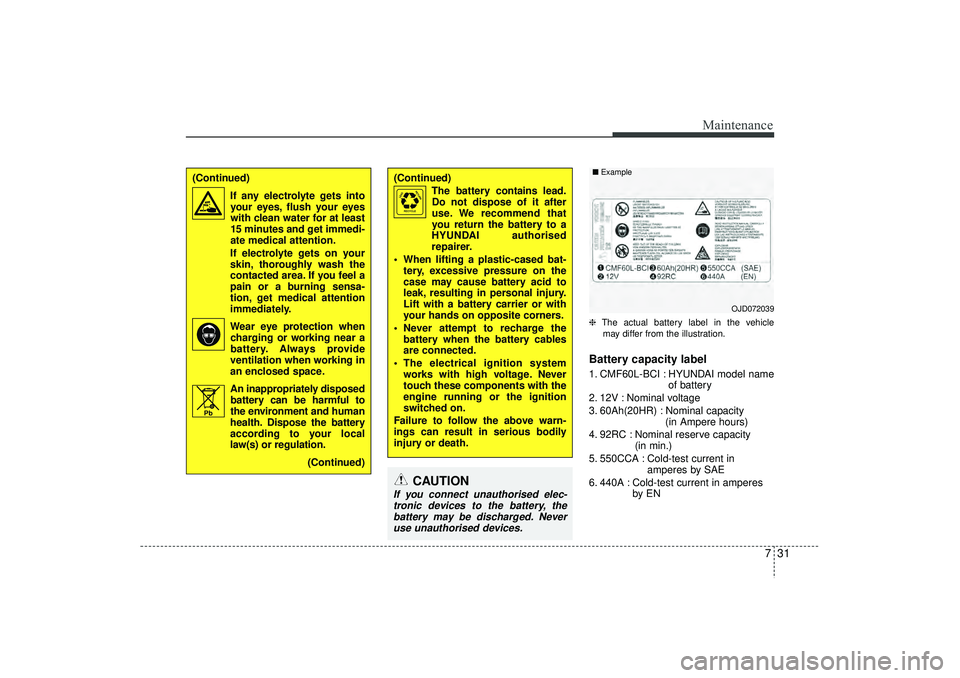
may differ from the illustration.Battery capacity label 1. CMF60L-BCI : HYUNDAI model name of battery
2. 12V : Nominal voltage
3. 60Ah(20HR) : Nominal capacity (in Ampere hours)
4. 92RC : Nominal reserve capacity (in min.)
5. 550CCA : Cold-test current in amperes by SAE
6. 440A : Cold-test current in amperes by EN
(Continued)
The battery contains lead.
Do not dispose of it after
use. We recommend that
you return the battery to a
HYUNDAI authorised
repairer.
When lifting a plastic-cased bat- tery, excessive pressure on the
case may cause battery acid to
leak, resulting in personal injury.
Lift with a battery carrier or with
your hands on opposite corners.
Never attempt to recharge the battery when the battery cables
are connected.
The electrical ignition system works with high voltage. Never
touch these components with the
engine running or the ignition
switched on.
Failure to follow the above warn-
ings can result in serious bodily
injury or death.
(Continued)
If any electrolyte gets intoyour eyes, flush your eyes
with clean water for at least
15 minutes and get immedi-
ate medical attention.
If electrolyte gets on your
skin, thoroughly wash the
contacted area. If you feel a
pain or a burning sensa-
tion, get medical attention
immediately.
Wear eye protection when charging or working near a
battery. Always provide
ventilation when working in
an enclosed space.
An inappropriately disposed battery can be harmful to
the environment and human
health. Dispose the battery
according to your local
law(s) or regulation.
(Continued)
Pb
CAUTION
If you connect unauthorised elec-tronic devices to the battery, thebattery may be discharged. Never use unauthorised devices.
OJD072039
■
Example
EL(FL) UK 7.QXP 3/4/2015 9:05 PM Page 31
Page 505 of 550
745
Maintenance
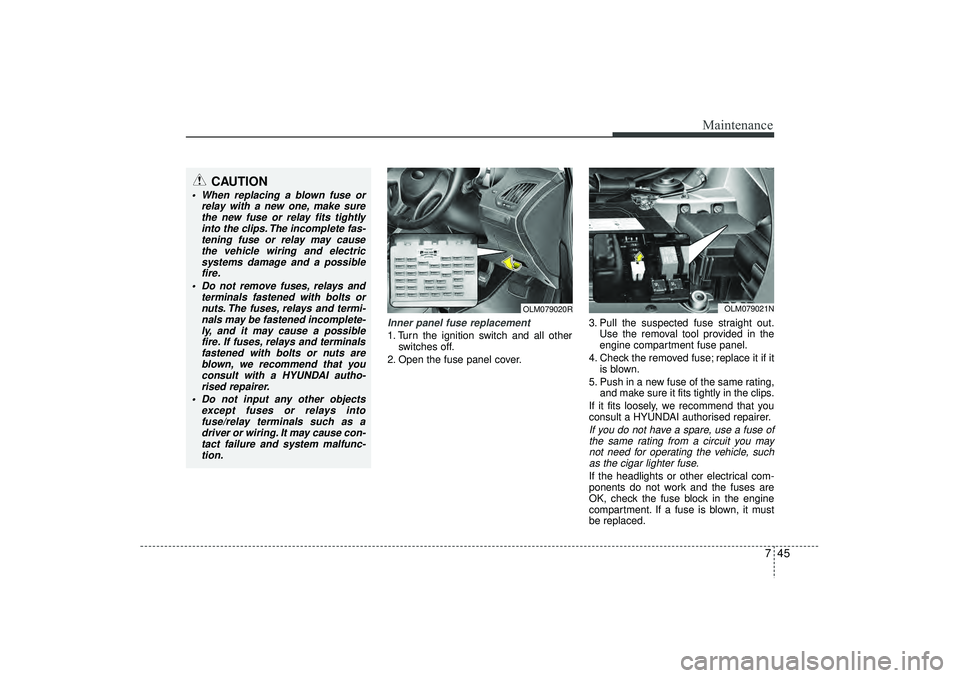
Inner panel fuse replacement1. Turn the ignition switch and all otherswitches off.
2. Open the fuse panel cover. 3. Pull the suspected fuse straight out.
Use the removal tool provided in the
engine compartment fuse panel.
4. Check the removed fuse; replace it if it is blown.
5. Push in a new fuse of the same rating, and make sure it fits tightly in the clips.
If it fits loosely, we recommend that you
consult a HYUNDAI authorised repairer.
If you do not have a spare, use a fuse of the same rating from a circuit you maynot need for operating the vehicle, suchas the cigar lighter fuse.If the headlights or other electrical com-
ponents do not work and the fuses are
OK, check the fuse block in the engine
compartment. If a fuse is blown, it must
be replaced.
OLM079020R
OLM079021N
CAUTION
When replacing a blown fuse or relay with a new one, make surethe new fuse or relay fits tightlyinto the clips. The incomplete fas-tening fuse or relay may cause the vehicle wiring and electricsystems damage and a possiblefire.
Do not remove fuses, relays and terminals fastened with bolts ornuts. The fuses, relays and termi-nals may be fastened incomplete-ly, and it may cause a possiblefire. If fuses, relays and terminals fastened with bolts or nuts areblown, we recommend that youconsult with a HYUNDAI autho- rised repairer.
Do not input any other objects except fuses or relays intofuse/relay terminals such as adriver or wiring. It may cause con- tact failure and system malfunc-tion.
EL(FL) UK 7.QXP 3/4/2015 9:05 PM Page 45
Page 506 of 550
Maintenance46
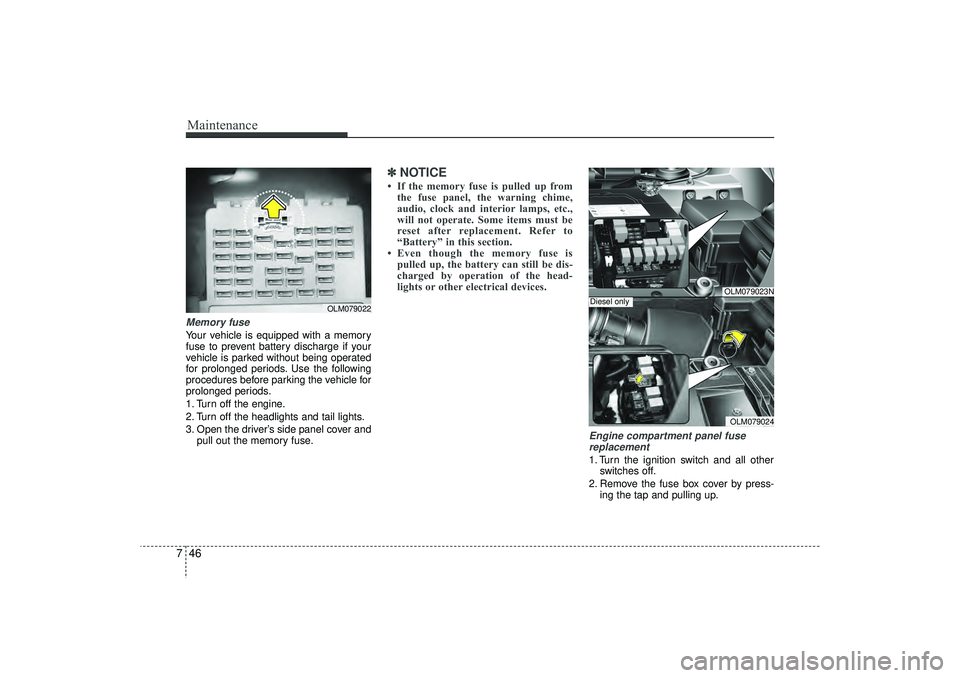
7Memory fuse Your vehicle is equipped with a memory
fuse to prevent battery discharge if your
vehicle is parked without being operated
for prolonged periods. Use the following
procedures before parking the vehicle for
prolonged periods.
1. Turn off the engine.
2. Turn off the headlights and tail lights.
3. Open the driver’s side panel cover and
pull out the memory fuse.
✽ ✽NOTICE• If the memory fuse is pulled up from
the fuse panel, the warning chime,
audio, clock and interior lamps, etc.,
will not operate. Some items must be
reset after replacement. Refer to
“Battery” in this section.
• Even though the memory fuse is pulled up, the battery can still be dis-
charged by operation of the head-
lights or other electrical devices.
Engine compartment panel fuse
replacement1. Turn the ignition switch and all other switches off.
2. Remove the fuse box cover by press- ing the tap and pulling up.
OLM079022
OLM079023NOLM079024
Diesel only
EL(FL) UK 7.QXP 3/4/2015 9:06 PM Page 46
Page 510 of 550
Maintenance50
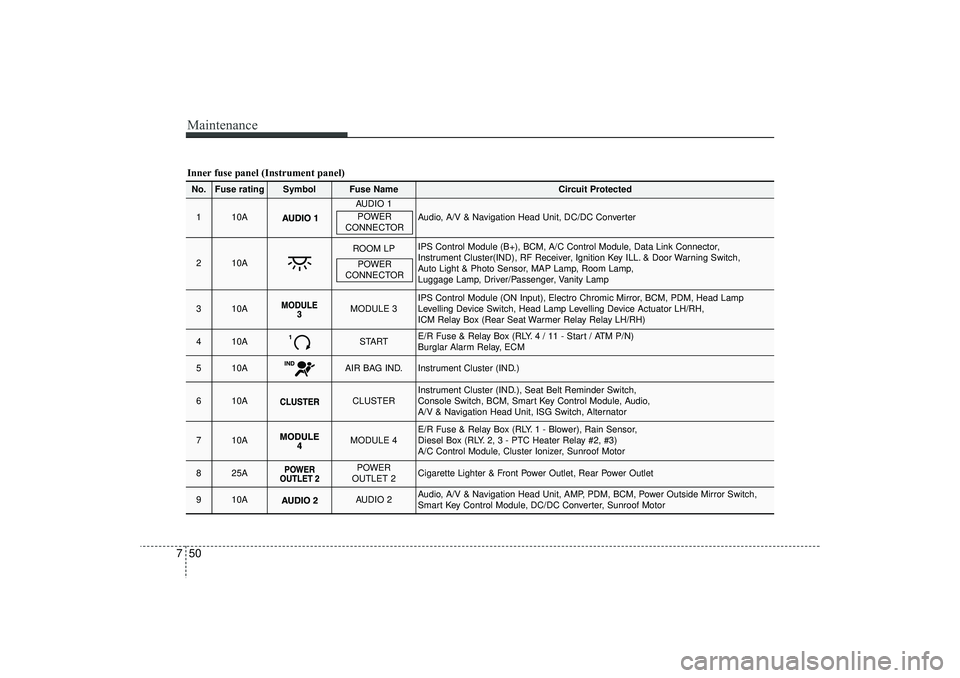
7Inner fuse panel (Instrument panel)No.
Fuse rating
Symbol
Fuse Name
Circuit Protected
1
10A
AUDIO 1
Audio, A/V & Navigation Head Unit, DC/DC Converter
2
10A
ROOM LP
IPS Control Module (B+), BCM, A/C Control Module, Data Link Connector,
Instrument Cluster(IND), RF Receiver, Ignition Key ILL. & Door Warning Switch,
Auto Light & Photo Sensor, MAP Lamp, Room Lamp,
Luggage Lamp, Driver/Passenger, Vanity Lamp
3
10A
MODULE 3
IPS Control Module (ON Input), Electro Chromic Mirror, BCM, PDM, Head Lamp
Levelling Device Switch, Head Lamp Levelling Device Actuator LH/RH,
ICM Relay Box (Rear Seat Warmer Relay Relay LH/RH)
4
10A
START
E/R Fuse & Relay Box (RLY. 4 / 11 - Start / ATM P/N)
Burglar Alarm Relay, ECM
5
10A
AIR BAG IND.
Instrument Cluster (IND.)
6
10A
CLUSTER
Instrument Cluster (IND.), Seat Belt Reminder Switch,
Console Switch, BCM, Smart Key Control Module, Audio,
A/V & Navigation Head Unit, ISG Switch, Alternator
7
10A
MODULE 4
E/R Fuse & Relay Box (RLY. 1 - Blower), Rain Sensor,
Diesel Box (RLY. 2, 3 - PTC Heater Relay #2, #3)
A/C Control Module, Cluster Ionizer, Sunroof Motor
8
25A
POWER
OUTLET 2
Cigarette Lighter & Front Power Outlet, Rear Power Outlet
9
10A
AUDIO 2
Audio, A/V & Navigation Head Unit, AMP, PDM, BCM, Power Outside Mirror Switch,
Smart Key Control Module, DC/DC Converter, Sunroof Motor
POWER
CONNECTORPOWER
CONNECTOR
EL(FL) UK 7.QXP 3/4/2015 9:07 PM Page 50