Page 305 of 332
Maintenance
54 7
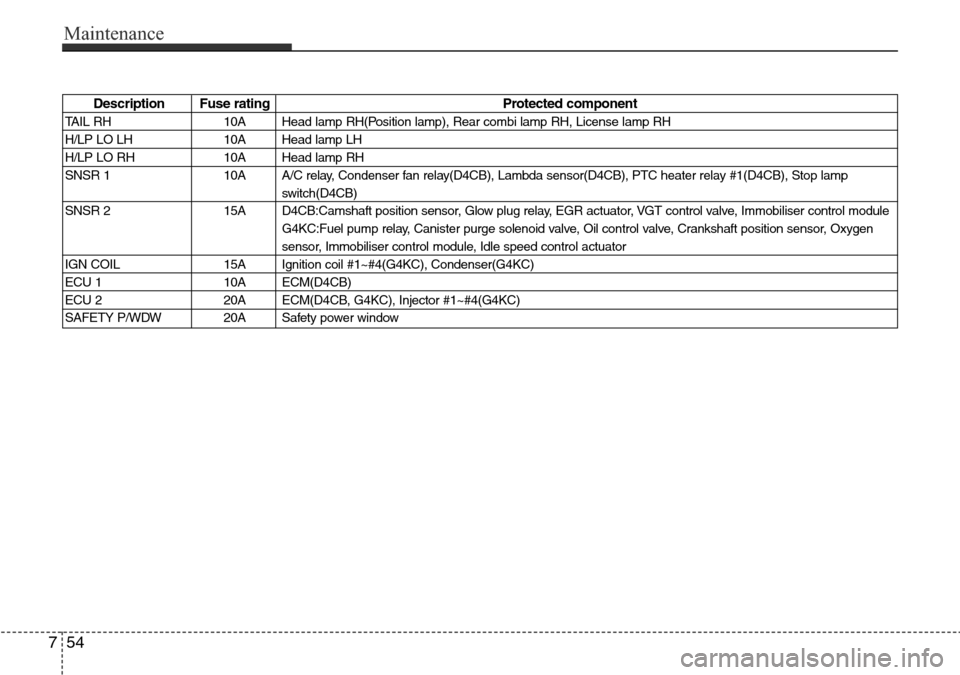
Description Fuse rating Protected component
TAIL RH 10A Head lamp RH(Position lamp), Rear combi lamp RH, License lamp RH
H/LP LO LH 10A Head lamp LH
H/LP LO RH 10A Head lamp RH
SNSR 1 10A A/C relay, Condenser fan relay(D4CB), Lambda sensor(D4CB), PTC heater relay #1(D4CB), Stop lamp
switch(D4CB)
SNSR 2 15A D4CB:Camshaft position sensor, Glow plug relay, EGR actuator, VGT control valve, Immobiliser control module
G4KC:Fuel pump relay, Canister purge solenoid valve, Oil control valve, Crankshaft position sensor, Oxygen
sensor, Immobiliser control module, Idle speed control actuator
IGN COIL 15A Ignition coil #1~#4(G4KC), Condenser(G4KC)
ECU 1 10A ECM(D4CB)
ECU 2 20A ECM(D4CB, G4KC), Injector #1~#4(G4KC)
SAFETY P/WDW 20A Safety power window
Page 306 of 332
755
Maintenance
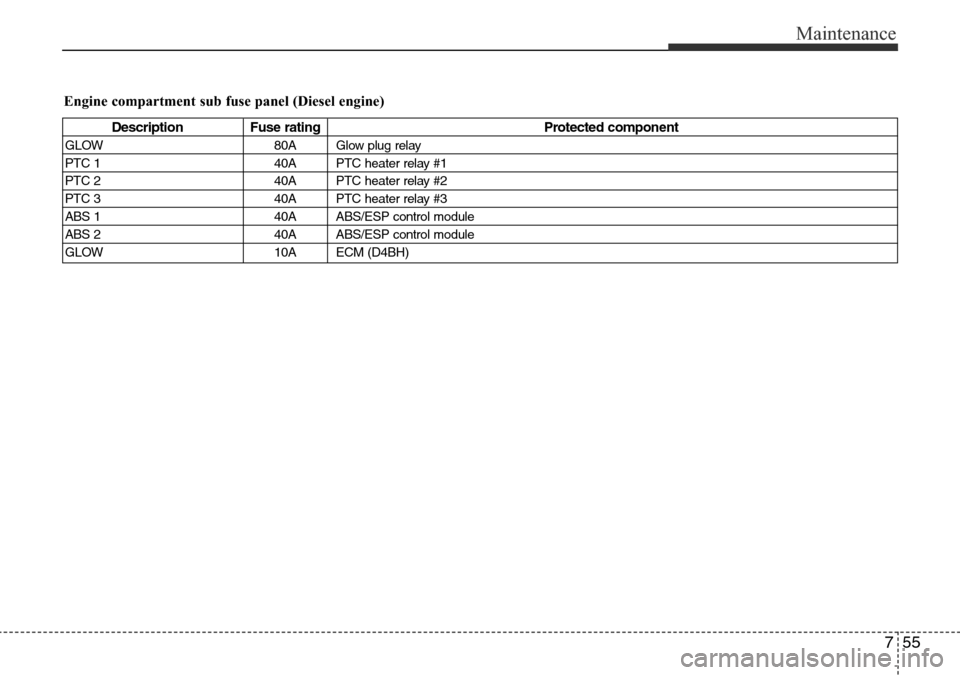
Engine compartment sub fuse panel (Diesel engine)
Description Fuse rating Protected component
GLOW 80A Glow plug relay
PTC 1 40A PTC heater relay #1
PTC 2 40A PTC heater relay #2
PTC 3 40A PTC heater relay #3
ABS 1 40A ABS/ESP control module
ABS 2 40A ABS/ESP control module
GLOW 10A ECM (D4BH)
Page 307 of 332

Maintenance
56 7
LIGHT BULBS
G220000AEN-EA
Use only the bulbs of the specified
wattage.
All bulbs are available from your
HYUNDAI dealers Parts Department.
✽NOTICE
After washing or driving through heavy
rain, condensation may form in the head
and tail lamp lenses. This condition is
caused by the temperature difference
between the lamp inside and outside.
This is similar to the condensation on
your windows inside your vehicle during
the rain and doesn’t indicate a problem
with your vehicle. If the water leaks into
the lamp bulb circuitry, have the vehicle
checked by an authorised HYUNDAI
dealer.
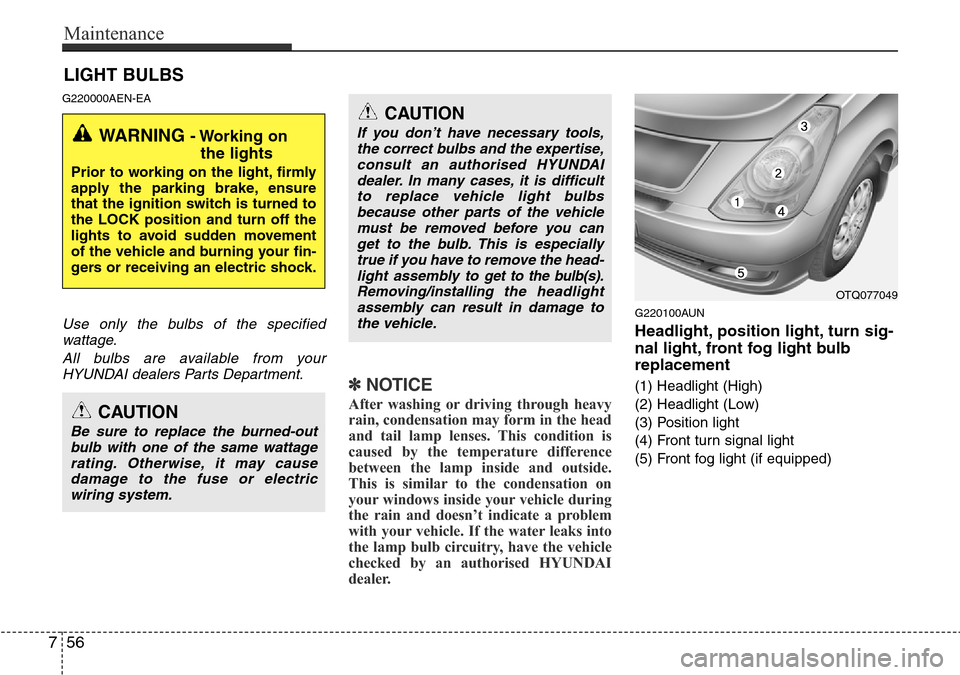
G220100AUN
Headlight, position light, turn sig-
nal light, front fog light bulb
replacement
(1) Headlight (High)
(2) Headlight (Low)
(3) Position light
(4) Front turn signal light
(5) Front fog light (if equipped)
WARNING - Working on
the lights
Prior to working on the light, firmly
apply the parking brake, ensure
that the ignition switch is turned to
the LOCK position and turn off the
lights to avoid sudden movement
of the vehicle and burning your fin-
gers or receiving an electric shock.
CAUTION
Be sure to replace the burned-out
bulb with one of the same wattage
rating. Otherwise, it may cause
damage to the fuse or electric
wiring system.
CAUTION
If you don’t have necessary tools,
the correct bulbs and the expertise,
consult an authorised HYUNDAI
dealer. In many cases, it is difficult
to replace vehicle light bulbs
because other parts of the vehicle
must be removed before you can
get to the bulb. This is especially
true if you have to remove the head-
light assembly to
get to the bulb(s).
Removing/installingthe headlight
assembly can result in damage to
the vehicle.OTQ077049
Page 308 of 332

757
Maintenance
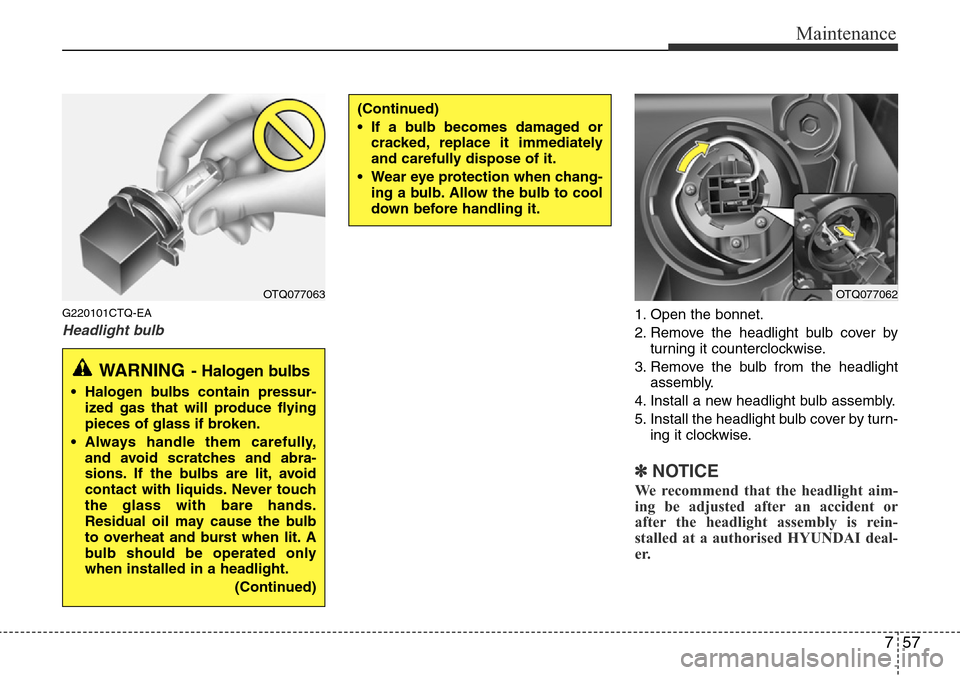
G220101CTQ-EA
Headlight bulb1. Open the bonnet.
2. Remove the headlight bulb cover by
turning it counterclockwise.
3. Remove the bulb from the headlight
assembly.
4. Install a new headlight bulb assembly.
5. Install the headlight bulb cover by turn-
ing it clockwise.
✽NOTICE
We recommend that the headlight aim-
ing be adjusted after an accident or
after the headlight assembly is rein-
stalled at a authorised HYUNDAI deal-
er.
(Continued)
• If a bulb becomes damaged or
cracked, replace it immediately
and carefully dispose of it.
• Wear eye protection when chang-
ing a bulb. Allow the bulb to cool
down before handling it.
OTQ077063OTQ077062
WARNING- Halogen bulbs
• Halogen bulbs contain pressur-
ized gas that will produce flying
pieces of glass if broken.
• Always handle them carefully,
and avoid scratches and abra-
sions. If the bulbs are lit, avoid
contact with liquids. Never touch
the glass with bare hands.
Residual oil may cause the bulb
to overheat and burst when lit. A
bulb should be operated only
when installed in a headlight.
(Continued)
Page 309 of 332

Maintenance
58 7
G220102ATQ-EA
Turn signal light/position light, fog
light bulb (if equipped)
Turn signal light
1. If necessary, remove the headlight
assembly by loosening the headlight
installation bolts. When you remove
the headlight assembly, you may need
to remove the bumper according to the
vehicle.
2. Replace the malfunctioned light bulb.
3. Install the headlight assembly.
Fog light bulb (if equipped)
1. Remove the fog light under cover by
loosening the screw.
2. Replace the malfunctioned light bulb.
3. Install the fog light under cover.Position light
1. Open the bonnet.
2. Remove the socket by turning it coun-
terclockwise.
3. Remove the bulb by pulling it straight
out.
4. Insert a new bulb in the socket.
5. Install the position light socket.
G220200AUN
Side repeater light bulb replace-
ment (if equipped)
1. Remove the light assembly from the
vehicle by prying the lens and pulling
the assembly out.
2. Disconnect the bulb electrical connec-
tor.
3. Separate the socket and the lens parts
by turning the socket counterclockwise
until the tabs on the socket align with
the slots on the lens part.
4. Remove the bulb by pulling it straight
out.
5. Insert a new bulb in the socket.
6. Reassemble the socket and the lens
part.
7. Connect the bulb electrical connector.
8. Reinstall the light assembly to the
body of the vehicle.
OTQ077056OTQ077050
Page 310 of 332
759
Maintenance
G220300ATQ
Rear combination light bulb
replacement
- Without rear fog light
(1) Tail light
(2) Back-up light
(3) Rear turn signal light
(4) Stop light
- With rear fog light
(1) Tail and stop light
(2) Back-up light
(3) Rear turn signal light
(4) Rear fog light
1. Open the tailgate.
2. Loosen the light assembly retaining
screws with a philips head screwdriver.
3. Remove the rear combination light
assembly from the body of the vehicle.
OTQ077052
OTQ077053
OTQ077051
OTQ077051G
Type B
Type A
Page 311 of 332
Maintenance
60 7
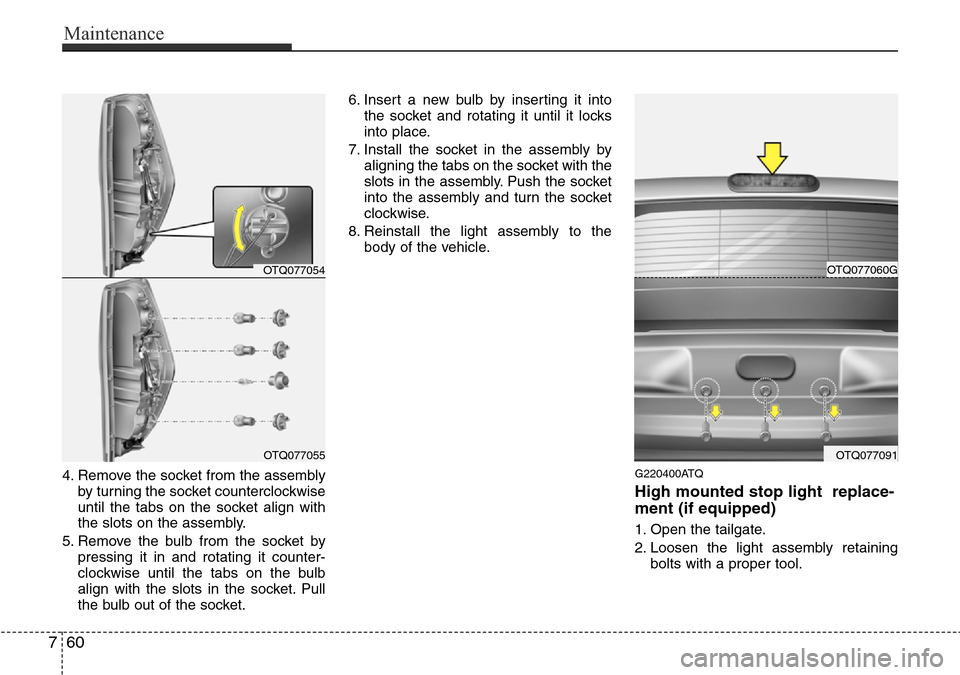
4. Remove the socket from the assembly
by turning the socket counterclockwise
until the tabs on the socket align with
the slots on the assembly.
5. Remove the bulb from the socket by
pressing it in and rotating it counter-
clockwise until the tabs on the bulb
align with the slots in the socket. Pull
the bulb out of the socket.6. Insert a new bulb by inserting it into
the socket and rotating it until it locks
into place.
7. Install the socket in the assembly by
aligning the tabs on the socket with the
slots in the assembly. Push the socket
into the assembly and turn the socket
clockwise.
8. Reinstall the light assembly to the
body of the vehicle.G220400ATQ
High mounted stop light replace-
ment (if equipped)
1. Open the tailgate.
2. Loosen the light assembly retaining
bolts with a proper tool.
OTQ077054
OTQ077055
OTQ077060G
OTQ077091
Page 312 of 332
761
Maintenance
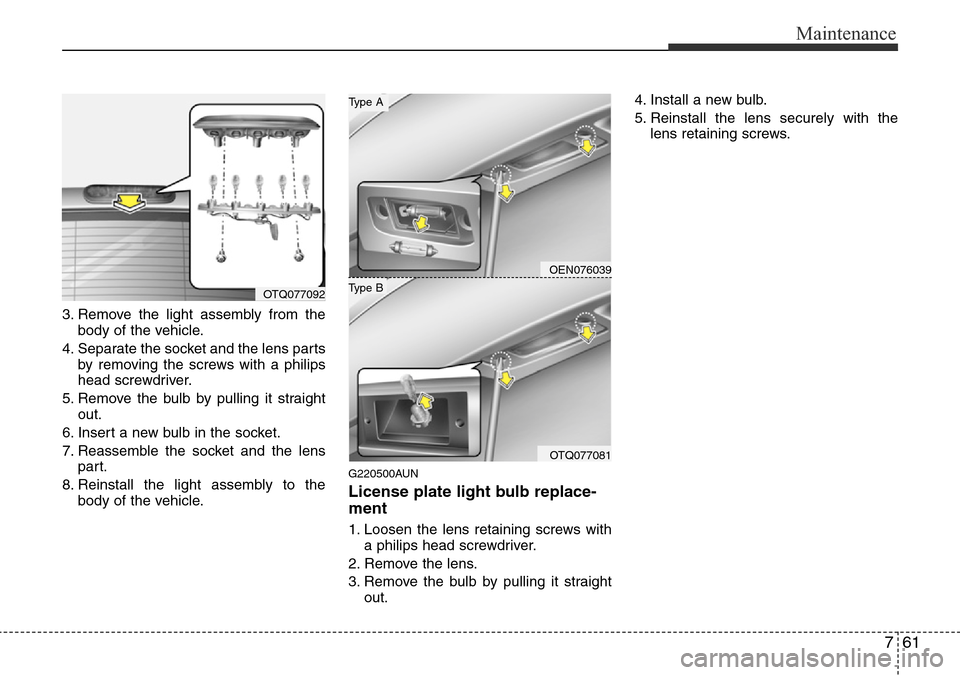
3. Remove the light assembly from the
body of the vehicle.
4. Separate the socket and the lens parts
by removing the screws with a philips
head screwdriver.
5. Remove the bulb by pulling it straight
out.
6. Insert a new bulb in the socket.
7. Reassemble the socket and the lens
part.
8. Reinstall the light assembly to the
body of the vehicle.
G220500AUN
License plate light bulb replace-
ment
1. Loosen the lens retaining screws with
a philips head screwdriver.
2. Remove the lens.
3. Remove the bulb by pulling it straight
out.4. Install a new bulb.
5. Reinstall the lens securely with the
lens retaining screws.
OTQ077092
OEN076039
OTQ077081
Type B
Type A