2016 Hyundai Grand Santa Fe check engine
[x] Cancel search: check enginePage 539 of 717
Driving your vehicle
90 5
Turn signals when towing a trailer
When you tow a trailer, your vehicle
has to have a different turn signal
flasher and extra wiring. The green
arrows on your instrument panel will
flash whenever you signal a turn or
lane change. Properly connected,
the trailer lights will also flash to alert
other drivers you’re about to turn,
change lanes, or stop.
When towing a trailer, the green
arrows on your instrument panel will
flash for turns even if the bulbs on
the trailer are burned out. Thus, you
may think drivers behind you are
seeing your signals when, in fact,
they are not. It is important to check
occasionally to be sure the trailer
bulbs are still working. You must also
check the lights every time you dis-
connect and then reconnect the
wires.
Do not connect a trailer lighting sys-
tem directly to your vehicle’s lighting
system. Use only an approved trailer
wiring harness.
An authorized HYUNDAI dealer can
assist you in installing the wiring har-
ness.
Driving on grades
Reduce speed and shift to a lower
gear before you start down a long or
steep downgrade. If you don’t shift
down, you might have to use your
brakes so much that they would get
hot and no longer operate efficiently.
On a long uphill grade, shift down
and reduce your speed to around 70
km/h (45 mph) to reduce the possi-
bility of engine and transaxle over-
heating.
If your trailer weighs more than the
maximum trailer weight without trail-
er brakes and you have an automat-
ic transaxle, you should drive in D
(Drive) when towing a trailer.
Operating your vehicle in D (Drive)
when towing a trailer will minimize
heat build up and extend the life of
your transaxle.WARNING
Failure to use an approved trail-
er wiring harness could result
in damage to the vehicle electri-
cal system and/or personal
injury.
Page 541 of 717
Driving your vehicle
92 5
When you are ready to leave after
parking on a hill
1.With automatic transaxle in P
(Park), apply your brakes and hold
the brake pedal down while you:
• Start your engine;
• Shift into gear; and
• Release the parking brake.
2.Slowly remove your foot from the
brake pedal.
3.Drive slowly until the trailer is clear
of the chocks.
4.Stop and have someone pick up
and store the chocks.
Maintenance when trailer tow-
ing
Your vehicle will need service more
often when you regularly pull a trail-
er. Important items to pay particular
attention to include engine oil, auto-
matic transaxle fluid, axle lubricant
and cooling system fluid. Brake con-
dition is another important item to
frequently check. Each item is cov-
ered in this manual, and the Index
will help you find them quickly. If
you’re trailering, it is a good idea to
review these sections before you
start your trip.
Do not forget to also maintain your
trailer and hitch. Follow the mainte-
nance schedule that accompanied
your trailer and check it periodically.
Preferably, conduct the check at the
start of each day’s driving. Most
importantly, all hitch nuts and bolts
should be tight.
CAUTION
• Due to higher load during
trailer usage, overheating
might occur in hot days or
during uphill driving. If the
coolant gauge indicates over-
heating, switch off the air con-
ditioner and stop the vehicle
in a safe area to cool down the
engine.
• When towing check transaxle
fluid more frequently.
WARNING- Parking
brake
It can be dangerous to get out
of your vehicle if the parking
brake is not firmly set.
If you have left the engine run-
ning, the vehicle can move sud-
denly. You or others could be
seriously or fatally injured.
Page 546 of 717
What to do in an emergency
Road warning . . . . . . . . . . . . . . . . . . . . . . . . . . . . . . 6-2
• Hazard warning flasher . . . . . . . . . . . . . . . . . . . . . . . . 6-2
In case of an emergency while driving . . . . . . . . . . 6-3
• If the engine stalls at a crossroad or crossing. . . . . . . 6-3
• If you have a flat tire while driving . . . . . . . . . . . . . . . 6-3
• If engine stalls while driving . . . . . . . . . . . . . . . . . . . . 6-3
If the engine does not start . . . . . . . . . . . . . . . . . . . 6-4
• If engine doesn’t turn over or turns over slowly . . . . 6-4
• If engine turns over normally but does not start . . . . 6-4
Emergency starting . . . . . . . . . . . . . . . . . . . . . . . . . 6-5
• Jump starting . . . . . . . . . . . . . . . . . . . . . . . . . . . . . . . . . 6-5
• Push-starting . . . . . . . . . . . . . . . . . . . . . . . . . . . . . . . . . 6-6
If the engine overheats . . . . . . . . . . . . . . . . . . . . . . . 6-7
Tire pressure monitoring system (TPMS) - Type A . . 6-8
• Low tire pressure (position) telltale . . . . . . . . . . . . . . . 6-9
• TPMS (Tire pressure monitoring system)
malfunction indicator . . . . . . . . . . . . . . . . . . . . . . . . 6-11
• Changing a tire with TPMS . . . . . . . . . . . . . . . . . . . . 6-11
Tire pressure monitoring system (TPMS) - Type B . 6-13
• Check tire pressure . . . . . . . . . . . . . . . . . . . . . . . . . . . 6-13
• Tire pressure monitoring system . . . . . . . . . . . . . . . . 6-14
• TPMS (Tire pressure monitoring system)
malfunction indicator . . . . . . . . . . . . . . . . . . . . . . . . 6-16
• Changing a tire with TPMS . . . . . . . . . . . . . . . . . . . . 6-17
If you have a flat tire (with spare tire) . . . . . . . . . 6-20
• Jack and tools . . . . . . . . . . . . . . . . . . . . . . . . . . . . . . . 6-20
• Removing and storing the spare tire . . . . . . . . . . . . . 6-21
• Changing tires . . . . . . . . . . . . . . . . . . . . . . . . . . . . . . . 6-23
• Wheel nut tightening torque. . . . . . . . . . . . . . . . . . . . 6-26
• Jack label . . . . . . . . . . . . . . . . . . . . . . . . . . . . . . . . . . . 6-29
• EC Declaration of Conformity for Jack . . . . . . . . . . 6-30
Towing . . . . . . . . . . . . . . . . . . . . . . . . . . . . . . . . . . . 6-31
• Towing service . . . . . . . . . . . . . . . . . . . . . . . . . . . . . . . 6-31
• Removable towing hook . . . . . . . . . . . . . . . . . . . . . . . 6-32
• Emergency towing . . . . . . . . . . . . . . . . . . . . . . . . . . . . 6-33
Emergency commodity . . . . . . . . . . . . . . . . . . . . . 6-36
• Fire extinguisher . . . . . . . . . . . . . . . . . . . . . . . . . . . . . 6-36
• First aid kit. . . . . . . . . . . . . . . . . . . . . . . . . . . . . . . . . . 6-36
• Triangle reflector . . . . . . . . . . . . . . . . . . . . . . . . . . . . . 6-36
• Tire pressure gauge . . . . . . . . . . . . . . . . . . . . . . . . . . . 6-36
6
Page 549 of 717
What to do in an emergency
4 6
IF THE ENGINE DOES NOT START
If engine doesn't turn over or
turns over slowly
1.If your vehicle has an automatic
transaxle, be sure the shift lever is
in N (Neutral) or P (Park) and the
emergency brake is set.
2.Check the battery connections to
be sure they are clean and tight.
3.Turn on the interior light. If the light
dims or goes out when you operate
the starter, the battery is dis-
charged.
4.Check the starter connections to
be sure they are securely tight-
ened.
5.Do not push or pull the vehicle to
start it. See instructions for "Jump
starting".
If engine turns over normally
but does not start
1.Check fuel level.
2.With the ignition switch in the
LOCK/OFF position, check all con-
nectors at ignition, coil and spark
plugs. Reconnect any that may be
disconnected or loose.
3.Check the fuel line in the engine
compartment.
4.If the engine still does not start, we
recommend that you call an
authorized HYUNDAI dealer.
WARNING
If the engine will not start, do
not push or pull the vehicle to
start it. This could result in a
collision or cause other dam-
age. In addition, push or pull
starting may cause the catalytic
converter to be overloaded and
create a fire hazard.
Page 551 of 717
What to do in an emergency
6 6
Jump starting procedure
1.Make sure the booster battery is
12-volt and that its negative termi-
nal is grounded.
2.If the booster battery is in another
vehicle, do not allow the vehicles to
touch.
3.Turn off all unnecessary electrical
loads.
4.Connect the jumper cables in the
exact sequence shown in the illus-
tration. First connect one end of a
jumper cable to the positive termi-
nal of the discharged battery (1),
then connect the other end to the
positive terminal on the booster
battery (2). Proceed to connect
one end of the other jumper cable
to the negative terminal of the
booster battery (3), then the other
end to a solid, stationary, metallic
point (for example, the engine lift-
ing bracket) away from the battery
(4). Do not connect it to or near any
part that moves when the engine is
cranked.Do not allow the jumper cables to
contact anything except the correct
battery terminals or the correct
ground. Do not lean over the bat-
tery when making connections.
5.Start the engine of the vehicle with
the booster battery and let it run at
2,000 rpm, then start the engine of
the vehicle with the discharged
battery.
If the cause of your battery discharg-
ing is not apparent, we recommend
that the system be checked by an
authorized HYUNDAI dealer.
Push-starting
Vehicles equipped with automatic
transaxle cannot be push-started.
Follow the directions in this section
for jump-starting.
WARNING
Never tow a vehicle to start it
because the sudden surge for-
ward when the engine starts
could cause a collision with the
tow vehicle.
CAUTION - Battery cables
Do not connect the jumper
cable from the negative terminal
of the booster battery to the
negative terminal of the dis-
charged battery. This can cause
the discharged battery to over-
heat and crack, releasing bat-
tery acid.
Page 552 of 717
67
What to do in an emergency
IF THE ENGINE OVERHEATS
If your temperature gauge indicates
overheating, you will experience a
loss of power, or hear loud pinging or
knocking, the engine is probably too
hot. If this happens, you should:
1.Pull off the road and stop as soon
as it is safe to do so.
2.Place the shift lever in P (Park) and
set the parking brake. If the air con-
ditioning is on, turn it off.
3.If engine coolant is running out
under the vehicle or steam is com-
ing out from the hood, stop the
engine. Do not open the hood until
the coolant has stopped running
or the steaming has stopped. If
there is no visible loss of engine
coolant and no steam, leave the
engine running and check to be
sure the engine cooling fan is oper-
ating. If the fan is not running, turn
the engine off.4.Check to see if the water pump
drive belt is missing. If it is not
missing, check to see that it is
tight. If the drive belt seems to be
satisfactory, check for coolant leak-
ing from the radiator, hoses or
under the vehicle. (If the air condi-
tioning had been in use, it is nor-
mal for cold water to be draining
from it when you stop).
5.If the water pump drive belt is bro-
ken or engine coolant is leaking
out, stop the engine immediately
and we recommend that you call
an authorized HYUNDAI dealer.6.If you cannot find the cause of the
overheating, wait until the engine
temperature has returned to nor-
mal. Then, if coolant has been lost,
carefully add coolant to the reser-
voir to bring the fluid level in the
reservoir up to the halfway mark.
7.Proceed with caution, keeping
alert for further signs of overheat-
ing. If overheating happens again,
we recommend that you call an
authorized HYUNDAI dealer.
CAUTION
Serious loss of coolant indi-
cates there is a leak in the cool-
ing system and we recommend
that the system be checked by
an authorized HYUNDAI dealer.
WARNING
While the engine is running,
keep hair, hands and clothing
away from moving parts such
as the fan and drive belts to pre-
vent injury.
WARNING
Do not remove the radiator cap
when the engine is hot. This can
allow coolant to blow out of the
opening and cause serious
burns.
Page 554 of 717
69
What to do in an emergency
Always check the TPMS malfunction
telltale after replacing one or more
tires or wheels on your vehicle to
ensure that the replacement or alter-
nate tires and wheels allow the
TPMS to continue to function proper-
ly.
✽NOTICE
If any of the below happens, we rec-
ommend that the system be checked
by an authorized HYUNDAI dealer.
1.The low tire pressure telltale/
TPMS malfunction indicator do
not illuminate for 3 seconds when
the ignition switch is turned to the
ON position or engine is running.
2. The TPMS malfunction indicator
remains illuminated after blinking
for approximately 1 minute.
3. The Low tire pressure position
telltale remains illuminated.
Low tire pressure telltale
Low tire pressure position tell-
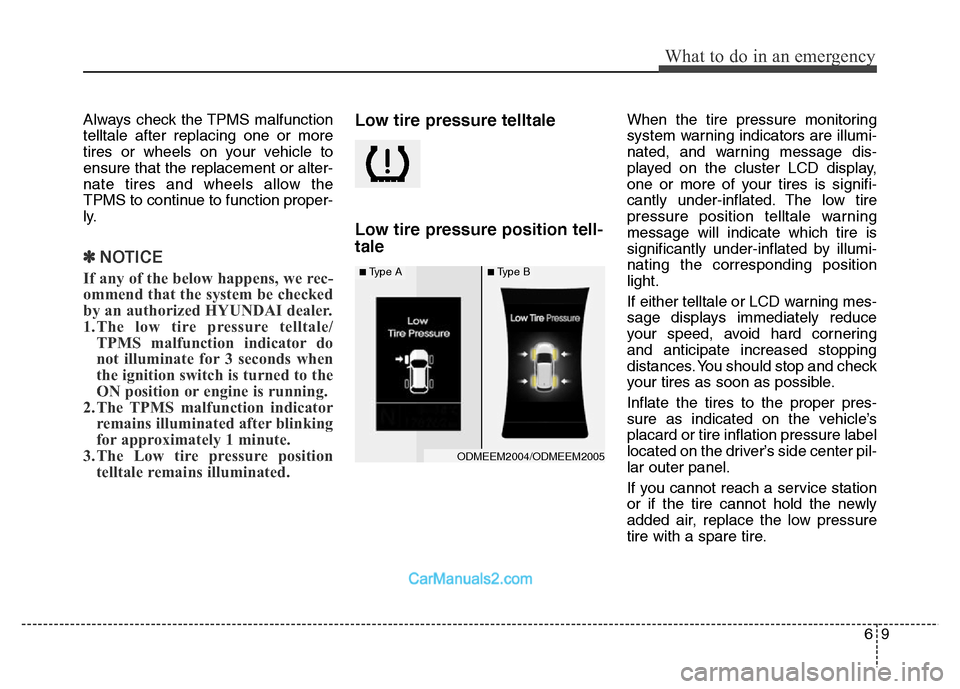
taleWhen the tire pressure monitoring
system warning indicators are illumi-
nated, and warning message dis-
played on the cluster LCD display,
one or more of your tires is signifi-
cantly under-inflated. The low tire
pressure position telltale warning
message will indicate which tire is
significantly under-inflated by illumi-
nating the corresponding position
light.
If either telltale or LCD warning mes-
sage displays immediately reduce
your speed, avoid hard cornering
and anticipate increased stopping
distances. You should stop and check
your tires as soon as possible.
Inflate the tires to the proper pres-
sure as indicated on the vehicle’s
placard or tire inflation pressure label
located on the driver’s side center pil-
lar outer panel.
If you cannot reach a service station
or if the tire cannot hold the newly
added air, replace the low pressure
tire with a spare tire.
ODMEEM2004/ODMEEM2005
■Type A■Type B
Page 560 of 717
615
What to do in an emergency
✽NOTICE
If any of the below happens, we rec-
ommend that the system be checked
by an authorized HYUNDAI dealer.
1.The low tire pressure telltale/
TPMS malfunction indicator does
not illuminate for 3 seconds when
Engine Start/Stop button is turned
to the ON or engine is running.
2. The TPMS malfunction indicator
remains illuminated after blinking
for approximately 1 minute.
3. The Low tire pressure position
telltale remains illuminated.
Low tire pressure
telltale
Low tire pressure position tell-
tale and tire pressure telltale
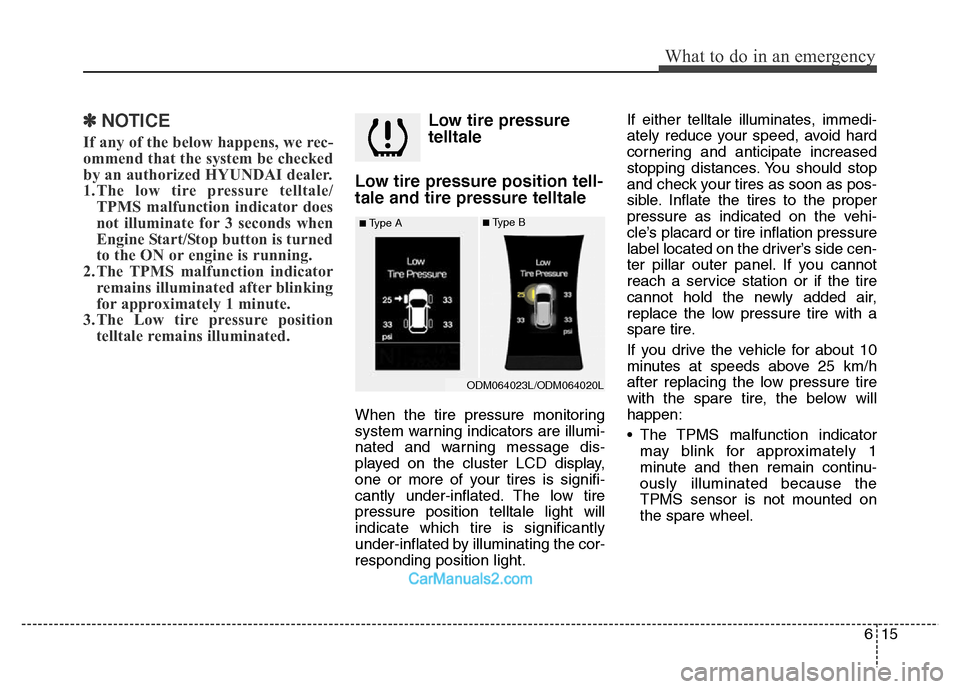
When the tire pressure monitoring
system warning indicators are illumi-
nated and warning message dis-
played on the cluster LCD display,
one or more of your tires is signifi-
cantly under-inflated. The low tire
pressure position telltale light will
indicate which tire is significantly
under-inflated by illuminating the cor-
responding position light.If either telltale illuminates, immedi-
ately reduce your speed, avoid hard
cornering and anticipate increased
stopping distances. You should stop
and check your tires as soon as pos-
sible. Inflate the tires to the proper
pressure as indicated on the vehi-
cle’s placard or tire inflation pressure
label located on the driver’s side cen-
ter pillar outer panel. If you cannot
reach a service station or if the tire
cannot hold the newly added air,
replace the low pressure tire with a
spare tire.
If you drive the vehicle for about 10
minutes at speeds above 25 km/h
after replacing the low pressure tire
with the spare tire, the below will
happen:
• The TPMS malfunction indicator
may blink for approximately 1
minute and then remain continu-
ously illuminated because the
TPMS sensor is not mounted on
the spare wheel.
ODM064023L/ODM064020L
■Type A■Type B